
SelectAI
Using Annotations to Improve Responses from SelectAI
In my previous posts on using SelectAI, I illustrated how adding metadata to your tables and columns can improve the SQL generated by the LLMs. Some of the results from those where a bit questionable. Going forward (from 23.9 onwards, although it might get backported), it appears that we need to add additional metadata to obtain better responses from the LLMs, by way of Annotations. Check out my previous posts on SelectAI at post-1, post-2, post-3, post-4, post-5.
Let’s have a look at how to add Annotations to support SelectAI with generating better responses.
NB: Support for additional LLMs is constantly being updated. Check out the current list here.
The following is an example from my previous post on adding table and column comments.
CREATE TABLE TABLE1(
c1  NUMBER(2) not null primary key,
c2  VARCHAR2(50) not null,
c3  VARCHAR2(50) not null);

COMMENT ON TABLE table1 IS 'Department table. Contains details of each Department including Department Number, Department Name and Location for the Department';

COMMENT ON COLUMN table1.c1 IS 'Department Number. Primary Key. Unique. Used to join to other tables';
COMMENT ON COLUMN table1.c1 IS 'Department Name. Name of department. Description of function';
COMMENT ON COLUMN table1.c3 IS 'Department Location. City where the department is located';

-- create the EMP table as  TABLE2
CREATE TABLE TABLE2(
c1  NUMBER(4) not null primary key,
c2  VARCHAR2(50) not null,
c3  VARCHAR2(50) not null,
c4  NUMBER(4),
c5  DATE,
c6  NUMBER(10,2),
c7  NUMBER(10,2),
c8  NUMBER(2) not null);

COMMENT ON TABLE table2 IS 'Employee table. Contains details of each Employee. Employees';

COMMENT ON COLUMN table2.c1 IS 'Employee Number. Primary Key. Unique. How each employee is idendifed';
COMMENT ON COLUMN table2.c1 IS 'Employee Name. Name of each Employee';
COMMENT ON COLUMN table2.c3 IS 'Employee Job Title. Job Role. Current Position';
COMMENT ON COLUMN table2.c4 IS 'Manager for Employee. Manager Responsible. Who the Employee reports to';
COMMENT ON COLUMN table2.c5 IS 'Hire Date. Date the employee started in role. Commencement Date';
COMMENT ON COLUMN table2.c6 IS 'Salary. How much the employee is paid each month. Dollars';
COMMENT ON COLUMN table2.c7 IS 'Commission. How much the employee can earn each month in commission. This is extra on top of salary';
COMMENT ON COLUMN table2.c8 IS 'Department Number. Foreign Key. Join to Department Table';
Annotations is a way of adding additional metadata for a database object. The Annotation is in the form of a <key, value>, which are both freeform text. The database object can have multiple Annotations.
ANNOTATIONS ([ADD|DROP] annotation_name [ annotation_value ] [ , annotation_name [ annotation_value ]... )For example, using Table 1 from about, which represents DEPT, we could add the following:
CREATE TABLE TABLE1(
...
c3  VARCHAR2(50) not null)
annotations (display 'departments');
We can also add annotations are column level.
CREATE TABLE TABLE1(
c1  NUMBER(2) not null primary key ANNOTATION(key 'Department Number'),
c2  VARCHAR2(50) not null ANNOTATION(display 'Department Name. Name of department. Description of function'),
c3  VARCHAR2(50) not null) ANNOTATION(display 'Department Location. City where the department is located');
At some point, only the Annotations will be passed to the LLMs, so in the meantime, you’ll need to consider the addition of Comments and Annotations.
Annotations have their own data dictionary views called USER_ANNOTATIONS, USER_ANNOTATIONS_USAGE.
Some care is needed to ensure consistency of Annotation definitions used across all database objects.
Select AI – OpenAI changes
A few weeks ago I wrote a few blog posts about using SelectAI. These illustrated integrating and using Cohere and OpenAI with SQL commands in your Oracle Cloud Database. See these links below.
- SelectAI – the beginning of a journey
- SelectAI – Doing something useful
- SelectAI – Can metadata help
- SelectAI – the APEX version
With the constantly changing world of APIs, has impacted the steps I outlined in those posts, particularly if you are using the OpenAI APIs. Two things have changed since writing those posts a few weeks ago. The first is with creating the OpenAI API keys. When creating a new key you need to define a project. For now, just select ‘Default Project’. This is a minor change, but it has caused some confusion for those following my steps in this blog post. I’ve updated that post to reflect the current setup in defining a new key in OpenAI. This is a minor change, oh and remember to put a few dollars into your OpenAI account for your key to work. I put an initial $10 into my account and a few minutes later API key for me from my Oracle (OCI) Database.
The second change is related to how the OpenAI API is called from Oracle (OCI) Databases. The API is now expecting a model name. From talking to the Oracle PMs, they will be implementing a fix in their Cloud Databases where the default model will be ‘gpt-3.5-turbo’, but in the meantime, you have to explicitly define the model when creating your OpenAI profile.
BEGIN
   --DBMS_CLOUD_AI.drop_profile(profile_name => 'COHERE_AI');

   DBMS_CLOUD_AI.create_profile(
      profile_name => 'COHERE_AI',
      attributes => '{"provider": "cohere",
                      "credential_name": "COHERE_CRED",
                      "object_list": [{"owner": "SH", "name": "customers"},
                                      {"owner": "SH", "name": "sales"},
                                      {"owner": "SH", "name": "products"},
                                      {"owner": "SH", "name": "countries"},
                                      {"owner": "SH", "name": "channels"},
                                      {"owner": "SH", "name": "promotions"},
                                      {"owner": "SH", "name": "times"}],
                      "model":"gpt-3.5-turbo"
       }');
END;
Other model names you could use include gpt-4 or gpt-4o.
SelectAI – the APEX version
I’ve written a few blog posts about the new Select AI feature on the Oracle Database. In this post, I’ll explore how to use this within APEX, because you have to do things in a different way.
The previous posts on Select AI are:
- SelectAI – the beginning of a journey
- SelectAI – Doing something useful
- SelectAI – Can metadata help
- SelectAI – the APEX version
We have seen in my previous posts how the PL/SQL package called DBMS_CLOUD_AI was used to create a profile. This profile provided details of what provided to use (Cohere or OpenAI in my examples), and what metadata (schemas, tables, etc) to send to the LLM. When you look at the DBMS_CLOUD_AI PL/SQL package it only contains seven functions (at time of writing this post). Most of these functions are for managing the profile, such as creating, deleting, enabling, disabling and setting the profile attributes. But there is one other important function called GENERATE. This function can be used to send your request to the LLM.
Why is the DBMS_CLOUD_AI.GENERATE function needed? We have seen in my previous posts using Select AI using common SQL tools such as SQL Developer, SQLcl and SQL Developer extension for VSCode. When using these tools we need to enable the SQL session to use Select AI by setting the profile. When using APEX or creating your own PL/SQL functions, etc. You’ll still need to set the profile, using
EXEC DBMS_CLOUD_AI.set_profile('OPEN_AI');We can now use the DBMS_CLOUD_AI.GENERATE function to run our equivalent Select AI queries. We can use this to run most of the options for Select AI including showsql, narrate and chat. It’s important to note here that runsql is not supported. This was the default action when using Select AI. Instead, you obtain the necessary SQL using showsql, and you can then execute the returned SQL yourself in your PL/SQL code.
Here are a few examples from my previous posts:
SELECT DBMS_CLOUD_AI.GENERATE(prompt       => 'what customer is the largest by sales',
                              profile_name => 'OPEN_AI',
                              action       => 'showsql')
FROM dual;

SELECT DBMS_CLOUD_AI.GENERATE(prompt       => 'how many customers in San Francisco are married',
                              profile_name => 'OPEN_AI',
                              action       => 'narrate')
FROM dual;

SELECT DBMS_CLOUD_AI.GENERATE(prompt       => 'who is the president of ireland',
                              profile_name => 'OPEN_AI',
                              action       => 'chat')
FROM dual;
If using Oracle 23c or higher you no longer need to include the FROM DUAL;
SelectAI – Can metadata help
Continuing with the exploration of Select AI, in this post I’ll look at how metadata can help. In my previous posts on Select AI, I’ve walked through examples of exploring the data in the SH schema and how you can use some of the conversational features. These really give a lot of potential for developing some useful features in your apps.
Many of you might have encountered schemas here either the table names and/or column names didn’t make sense. Maybe their names looked like some weird code or something, and you had to look up a document, often referred to as a data dictionary, to decode the actual meaning. In some instances, these schemas cannot be touched and in others, minor changes are allowed. In these later cases, we can look at adding some metadata to the tables to give meaning to these esoteric names.
For the following example, I’ve taken the simple EMP-DEPT tables and renamed the table and column names to something very generic. You’ll see I’ve added comments to explain the Tables and for each of the Columns. These comments should correspond to the original EMP-DEPT tables.
CREATE TABLE TABLE1(
c1  NUMBER(2) not null primary key,
c2  VARCHAR2(50) not null,
c3  VARCHAR2(50) not null);

COMMENT ON TABLE table1 IS 'Department table. Contains details of each Department including Department Number, Department Name and Location for the Department';

COMMENT ON COLUMN table1.c1 IS 'Department Number. Primary Key. Unique. Used to join to other tables';
COMMENT ON COLUMN table1.c1 IS 'Department Name. Name of department. Description of function';
COMMENT ON COLUMN table1.c3 IS 'Department Location. City where the department is located';

-- create the EMP table as  TABLE2
CREATE TABLE TABLE2(
c1  NUMBER(4) not null primary key,
c2  VARCHAR2(50) not null,
c3  VARCHAR2(50) not null,
c4  NUMBER(4),
c5  DATE,
c6  NUMBER(10,2),
c7  NUMBER(10,2),
c8  NUMBER(2) not null);

COMMENT ON TABLE table2 IS 'Employee table. Contains details of each Employee. Employees';

COMMENT ON COLUMN table2.c1 IS 'Employee Number. Primary Key. Unique. How each employee is idendifed';
COMMENT ON COLUMN table2.c1 IS 'Employee Name. Name of each Employee';
COMMENT ON COLUMN table2.c3 IS 'Employee Job Title. Job Role. Current Position';
COMMENT ON COLUMN table2.c4 IS 'Manager for Employee. Manager Responsible. Who the Employee reports to';
COMMENT ON COLUMN table2.c5 IS 'Hire Date. Date the employee started in role. Commencement Date';
COMMENT ON COLUMN table2.c6 IS 'Salary. How much the employee is paid each month. Dollars';
COMMENT ON COLUMN table2.c7 IS 'Commission. How much the employee can earn each month in commission. This is extra on top of salary';
COMMENT ON COLUMN table2.c8 IS 'Department Number. Foreign Key. Join to Department Table';

insert into table1 values (10,'Accounting','New York');
insert into table1 values (20,'Research','Dallas');
insert into table1 values (30,'Sales','Chicago');
insert into table1 values (40,'Operations','Boston');

alter session set nls_date_format = 'YY/MM/DD';

insert into table2 values (7369,'SMITH','CLERK',7902,'93/6/13',800,0.00,20);
insert into table2 values (7499,'ALLEN','SALESMAN',7698,'98/8/15',1600,300,30);
insert into table2 values (7521,'WARD','SALESMAN',7698,'96/3/26',1250,500,30);
insert into table2 values (7566,'JONES','MANAGER',7839,'95/10/31',2975,null,20);
insert into table2 values (7698,'BLAKE','MANAGER',7839,'92/6/11',2850,null,30);
insert into table2 values (7782,'CLARK','MANAGER',7839,'93/5/14',2450,null,10);
insert into table2 values (7788,'SCOTT','ANALYST',7566,'96/3/5',3000,null,20);
insert into table2 values (7839,'KING','PRESIDENT',null,'90/6/9',5000,0,10);
insert into table2 values (7844,'TURNER','SALESMAN',7698,'95/6/4',1500,0,30);
insert into table2 values (7876,'ADAMS','CLERK',7788,'99/6/4',1100,null,20);
insert into table2 values (7900,'JAMES','CLERK',7698,'00/6/23',950,null,30);
insert into table2 values (7934,'MILLER','CLERK',7782,'00/1/21',1300,null,10);
insert into table2 values (7902,'FORD','ANALYST',7566,'97/12/5',3000,null,20);
insert into table2 values (7654,'MARTIN','SALESMAN',7698,'98/12/5',1250,1400,30);
Can Select AI be used to query this data? The simple answer is ‘ish’. Yes, Select AI can query this data but some care is needed on how you phrase the questions, and some care is needed to refine the metadata descriptions given in the table and column Comments.
To ensure these metadata Comments are exposed to the LLMs, we need to include the following line in our Profile
"comments":"true",Using the same Profile setup I used for OpenAI, we need to include the tables and the (above) comments:true command. See below in bold
BEGIN
  DBMS_CLOUD_AI.drop_profile(profile_name => 'OPEN_AI');
  DBMS_CLOUD_AI.create_profile(
      profile_name => 'OPEN_AI',
      attributes => '{"provider": "openai",
                      "credential_name": "OPENAI_CRED",
                      "comments":"true",
                      "object_list": [{"owner": "BRENDAN", "name": "TABLE1"},
                                     {"owner": "BRENDAN", "name": "TABLE2"}],
            "model":"gpt-3.5-turbo"
       }');
END;
After we set the profile for our session, we can now write some statements to explore the data.
Warning: if you don’t include “comments”:”true”, you’ll get no results being returned.
Here are a few of what I wrote.
select ai what departments do we have;
select AI showsql what departments do we have;

select ai count departments;
select AI showsql count department;

select ai how many employees;
select ai how many employees work in department 30;
select ai count unique job titles;
select ai list cities where departments are located;
select ai how many employees work in New York;
select ai how many people work in each city;
select ai where are the departments located;
select ai what is the average salary for each department;
Check out the other posts about Select AI.
SelectAI – Doing something useful
In a previous post, I introduced Select AI and gave examples of how to do some simple things. These included asking it using some natural language questions, to query some data in the Database. That post used both Cohere and OpenAI to process the requests. There were mixed results and some gave a different, somewhat disappointing, outcome. But with using OpenAI the overall outcome was a bit more positive. To build upon the previous post, this post will explore some of the additional features of Select AI, which can give more options for incorporating Select AI into your applications/solutions.
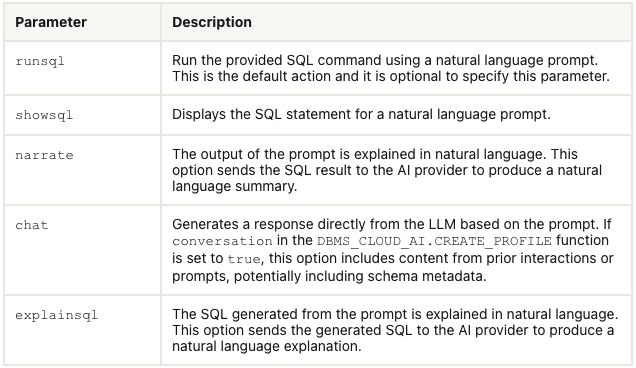
Select AI has five parameters, as shown in the table below. In the previous post, the examples focused on using the first parameter. Although those examples didn’t include the parameter name ‘runsql‘. It is the default parameter and can be excluded from the Select AI statement. Although there were mixed results from using this default parameter ‘runsql’, it is the other parameters that make things a little bit more interesting and gives you opportunities to include these in your applications. In particular, the ‘narrate‘ and ‘explainsql‘ parameters and to a lesser extent the ‘chat‘ parameter. Although for the ‘chat’ parameter there are perhaps slightly easier and more efficient ways of doing this.
Let’s start by looking at the ‘chat‘ parameter. This allows you to ‘chat’ LLM just like you would with ChatGPT and other similar. A useful parameter to set in the CREATE_PROFILE is to set the conversation to TRUE, as that can give more useful results as the conversation develops.
BEGIN
  DBMS_CLOUD_AI.drop_profile(profile_name => 'OPEN_AI');
  DBMS_CLOUD_AI.create_profile(
      profile_name => 'OPEN_AI',
      attributes => '{"provider": "openai",
                      "credential_name": "OPENAI_CRED",
                      "object_list": [{"owner": "SH", "name": "customers"},
                                      {"owner": "SH", "name": "sales"},
                                      {"owner": "SH", "name": "products"},
                                      {"owner": "SH", "name": "countries"},
                                      {"owner": "SH", "name": "channels"},
                                      {"owner": "SH", "name": "promotions"},
                                      {"owner": "SH", "name": "times"}],
        "conversation": "true",        "model":"gpt-3.5-turbo"       }');
END;
There are a few statements I’ve used.
select AI chat who is the president of ireland;
select AI chat what role does NAMA have in ireland;
select AI chat what are the annual revenues of Oracle;
select AI chat who is the largest cloud computing provider;
select AI chat can you rank the cloud providers by income over the last 5 years;
select AI chat what are the benefits of using Oracle Cloud;
As you’d expect the results can be ‘kind of correct’, with varying levels of information given. I’ve tried these using Cohere and OpenAI, and their responses illustrate the need for careful testing and evaluation of the various LLMs to see which one suits your needs.
In my previous post, I gave some examples of using Select AI to query data in the Database based on a natural language request. Select AI takes that request and sends it, along with details of the objects listed in the create_profile, to the LLM. The LLM then sends back the SQL statement, which is then executed in the Database and the results are displayed. But what if you want to see the SQL generated by the LLM. To see the SQL you can use the ‘showsql‘ parameter. Here are a couple of examples:
SQL> select AI showsql how many customers in San Francisco are married;

RESPONSE
_____________________________________________________________________________SELECT COUNT(*) AS total_married_customers
FROM SH.CUSTOMERS c
WHERE c.CUST_CITY = 'San Francisco'
AND c.CUST_MARITAL_STATUS = 'Married'

SQL> select AI what customer is the largest by sales;

   CUST_ID CUST_FIRST_NAME    CUST_LAST_NAME       TOTAL_SALES
__________ __________________ _________________ ______________
     11407 Dora               Rice                   103412.66


SQL> select AI showsql what customer is the largest by sales;

RESPONSE
_____________________________________________________________________________SELECT C.CUST_ID, C.CUST_FIRST_NAME, C.CUST_LAST_NAME, SUM(S.AMOUNT_SOLD) AS TOTAL_SALES
FROM SH.CUSTOMERS C
JOIN SH.SALES S ON C.CUST_ID = S.CUST_ID
GROUP BY C.CUST_ID, C.CUST_FIRST_NAME, C.CUST_LAST_NAME
ORDER BY TOTAL_SALES DESC
FETCH FIRST 1 ROW ONLY
The examples above that illustrate the ‘showsql‘ is kind of interesting. Careful consideration of how and where to use this is needed.
Where things get a little bit more interesting with the ‘narrate‘ parameter, which attempts to narrate or explain the output from the query. There are many use cases where this can be used to supplement existing dashboards, etc. The following are examples of using ‘narrate‘ for the same two queries used above.
SQL> select AI narrate how many customers in San Francisco are married;

RESPONSE
________________________________________________________________
The total number of married customers in San Francisco is 18.


SQL> select AI narrate what customer is the largest by sales;

RESPONSE
_____________________________________________________________________________To find the customer with the largest sales, you can use the following SQL query:

```sql
SELECT c.CUST_FIRST_NAME || ' ' || c.CUST_LAST_NAME AS CUSTOMER_NAME, SUM(s.AMOUNT_SOLD) AS TOTAL_SALES
FROM "SH"."CUSTOMERS" c
JOIN "SH"."SALES" s ON c.CUST_ID = s.CUST_ID
GROUP BY c.CUST_FIRST_NAME, c.CUST_LAST_NAME
ORDER BY TOTAL_SALES DESC
FETCH FIRST 1 ROW ONLY;
```

This query joins the "CUSTOMERS" and "SALES" tables on the customer ID and calculates the total sales for each customer. It then sorts the results in descending order of total sales and fetches only the first row, which represents the customer with the largest sales.

The result will be in the following format:

| CUSTOMER_NAME | TOTAL_SALES |
|---------------|-------------|
| Tess Drumm    | 161882.79   |

In this example, the customer with the largest sales is "Tess Drumm" with a total sales amount of 161,882.79.
Looking at the outputs from using the ‘narrate‘ parameter, we can see the level of detail given and see the potential of including this kind of information in our applications, dashboards, etc. But to use this output some additional filtering and subsetting will need to be performed.
The final parameter is called ‘explainsql‘. While it may not be as useful as the ‘narrate‘ parameter, it does have some potential uses. The ‘explainsql‘ attempts to explain in natural language what a SQL query is attempting to do, based on a natural language statement. Again using the same two examples, we get the following.
SQL> select AI explainsql what customer is the largest by sales;

RESPONSE
_____________________________________________________________________________SELECT C.CUST_ID, C.CUST_FIRST_NAME, C.CUST_LAST_NAME, SUM(S.AMOUNT_SOLD) AS TOTAL_SALES
FROM SH.CUSTOMERS C
JOIN SH.SALES S ON C.CUST_ID = S.CUST_ID
GROUP BY C.CUST_ID, C.CUST_FIRST_NAME, C.CUST_LAST_NAME
ORDER BY TOTAL_SALES DESC
FETCH FIRST 1 ROW ONLY;

Explanation:
- The query selects the customer ID, first name, last name, and the sum of the amount sold from the CUSTOMERS and SALES tables.
- The CUSTOMERS and SALES tables are joined on the CUST_ID column.
- The results are grouped by customer ID, first name, and last name.
- The results are then ordered in descending order by the total sales.
- The FETCH FIRST 1 ROW ONLY clause is used to retrieve only the top row with the highest total sales.

SQL> select AI explainsql how many customers in San Francisco are married;

RESPONSE
_____________________________________________________________________________
SELECT COUNT(*) AS total_married_customers
FROM SH.CUSTOMERS c
WHERE c.CUST_CITY = 'San Francisco'
AND c.CUST_MARITAL_STATUS = 'Married';

This query selects the count of customers who are married and live in San Francisco. The table alias "c" is used for the CUSTOMERS table. The condition "c.CUST_CITY = 'San Francisco'" filters the customers who live in San Francisco, and the condition "c.CUST_MARITAL_STATUS = 'Married'" filters the customers who are married. The result is the total number of married customers in San Francisco.
Check out the other posts about Select AI.
SelectAI – the beginning of a journey
Oracle released Select AI a few months ago, and with any new product it is always a good idea to give it a little time to fix any “bugs” or “features”. To a certain extent, the release of this capability is a long time behind the marketplace. Similar products have been available in different ways, in different products, in different languages, etc for some time now. I’m not going to get into the benefits of this feature/product, as lots have been written about this and most of those are just rehashing the documentation and the marketing materials created for the release. But over all this time, Oracle seems to have been focused on deploying generative AI and LLM related features into their vast collection of applications. Yes, they have done some really cool work with those applications. But during that period the everyday developer, outside of those Apps development teams, has been left waiting for too long to get proper access to this functionality. In most cases, they have gone elsewhere. One thing Oracle does need to address is the public messaging around certain behavioural aspects of Select AI. There has been some contradictory information between what it says in the documentation and what the various Product Managers are saying. This is a problem, as it just confuses customers who will then use something else.
I’m building a particular application that utilizes various OCI products, including some of their AI products, to create a hands-free way of interacting with data and is suitable for those who have various physical and visual impairments. Should I consider including Select AI? Let’s see if it is up to the task.
Let’s get on with setting up and using Select AI. This post focuses on getting it set-up and running with some basic commands, plus a few warnings too as it isn’t all that it’s made out to be! Check out my other posts that explore different aspects (most other posts only show one or two statements), and some of the issues you need to watch out for, as it may not entirely live up to expectations.
The first thing you need to be aware of, this functionality is only available on an ADW/ATP on Oracle Cloud. At some point, we might have it on-premises, but that might be a while coming as I’m sure the developers are still working on improving how it works (and yes it does need some work).
Step 1 – Connect as ADMIN of ADW/ATP
As the ADMIN user for the database, you need to set-up a few things for other users of the Database before they can use Select AI.
Firstly we add the schema which will be using Select AI to the Access Control List. This will allow them to reach things outside of the Database. The following illustrates adding the BRENDAN schema to the list and allowing HTTP calls to the Cohere API interface.
BEGIN
    DBMS_NETWORK_ACL_ADMIN.APPEND_HOST_ACE(
         host => 'api.cohere.ai',
         ace => xs$ace_type(privilege_list => xs$name_list('http'),
         principal_name => 'BRENDAN',
         principal_type => xs_acl.ptype_db)
    );
END;
Next, we need to grant some privileges to some PL/SQL packages.
grant execute on DBMS_CLOUD_AI to BRENDAN;
grant execute on DBMS_CLOUD to BRENDAN;
That’s the admin steps
Step 2 – Connect to your Schema/User – Cohere Example (see OpenAI later in this post)
In my BRENDAN schema, I need to create a Credential.
BEGIN
   -- DBMS_CLOUD.DROP_CREDENTIAL (credential_name => 'COHERE_CRED');

   DBMS_CLOUD.CREATE_CREDENTIAL(
       credential_name => 'COHERE_CRED',
       username => 'COHERE',
       password => '...' );
END;
The … in the above example, indicates where you can place your Cohere API key. It’s very easy to get this and this explains the steps.
Next, you need to create a CLOUD_AI profile.
BEGIN
   --DBMS_CLOUD_AI.drop_profile(profile_name => 'COHERE_AI');

   DBMS_CLOUD_AI.create_profile(
      profile_name => 'COHERE_AI',
      attributes => '{"provider": "cohere",
                      "credential_name": "COHERE_CRED",
                      "object_list": [{"owner": "SH", "name": "customers"},
                                      {"owner": "SH", "name": "sales"},
                                      {"owner": "SH", "name": "products"},
                                      {"owner": "SH", "name": "countries"},
                                      {"owner": "SH", "name": "channels"},
                                      {"owner": "SH", "name": "promotions"},
                                      {"owner": "SH", "name": "times"}]
       }');
END;
When creating the CLOUD_AI profile for your schema, you can list the objects/tables you want to expose to the Cohere or OpenAI models. In theory (so the documentation says) it shares various metadata about these objects/tables, which the models in turn interpret, and use this to formulate their response. I said in theory, as that is what the documentation says, but the PMs on a recent webcast said it did use things like primary keys, foreign keys, etc. There are many other challenges here, and I’ll come back to those at a later time.
At this point, you are all set up to use Select AI.
Step 3 – See if you can get Select AI to work!
Before you can use Select AI, you need to enable it for your session. To do this run,
EXEC DBMS_CLOUD_AI.set_profile('COHERE_AI');If you start a new session/connection or your session/connection gets reset, you will need to run the above command again.
No onto the fun or less fun part. The Fun part is using it and getting results displayed back to you. When this happens (i.e. when it works) it can look like magic is happening. For example here are some commands that worked for me.
select ai how many customers exist;
select AI which customer is the biggest;
select AI what customer is the largest by revenue;
select AI what customer is the largest by sales;
The real challenge with using Select AI is crafting a statement that works i.e. a query is run in the Database and the results are displayed back to you. This can be a real challenge. There are many blog posts out there with lots of examples of using Select AI, along with all the ‘canned’ examples in the documentation and in demos from PMs. I’ve tried all that I could find, and most/all of them didn’t work for me. Something isn’t working correctly behind the scenes. For example here are some examples of statements that didn’t work for me.
select AI how many customers in San Francisco are married;
select AI what is our best selling product by country;
select AI what is our biggest selling product by country;
select AI how many items with the product sub category of Cameras were sold in 1998;
select AI what customer is the biggest;
select AI which customer is the largest by revenue;
Yet some of these statements (above) have been given in docs/posts/demos as working. For a little surprise, have a look at the comment at the bottom of this post.
Don’t let this put you off from trying it. What I’ve shown here is just one part of what Select AI can do. Check out my next post on Select AI where I’ll show examples of the other features, which work and can be used to build some interesting solutions for your users.
Set-up for OpenAI
The steps I’ve given above are for using Cohere. A few others can be used including the popular OpenAI. The setup is very similar to what I’ve shown above and the main difference is the Hostname, OpenAI API key and username. See here for how to get an OpenAI API key.
As ADMIN run.
BEGIN
    DBMS_NETWORK_ACL_ADMIN.APPEND_HOST_ACE(
         host => 'api.openai.com',
         ace  => xs$ace_type(privilege_list => xs$name_list('http'),
                             principal_name => 'BRENDAN',
                             principal_type => xs_acl.ptype_db)
   );
END;
Then in your Schema/user.
BEGIN
   DBMS_CLOUD.DROP_CREDENTIAL (credential_name  => 'OPENAI_CRED');

  DBMS_CLOUD.CREATE_CREDENTIAL(
    credential_name => 'OPENAI_CRED',
    username => '.....',
    password => '...' );
END;
BEGIN
DBMS_CLOUD_AI.drop_profile(profile_name => 'OPEN_AI');
DBMS_CLOUD_AI.create_profile(
profile_name => 'OPEN_AI',
attributes => '{"provider": "openai",
"credential_name": "OPENAI_CRED",
"object_list": [{"owner": "SH", "name": "customers"},
{"owner": "SH", "name": "sales"},
{"owner": "SH", "name": "products"},
{"owner": "SH", "name": "countries"},
{"owner": "SH", "name": "channels"},
{"owner": "SH", "name": "promotions"},
{"owner": "SH", "name": "times"}],
"model":"gpt-3.5-turbo"
}');
END;And then run the following before trying any use Select AI.
EXEC DBMS_CLOUD_AI.set_profile('OPEN_AI');If you look earlier in this post, I listed some questions that couldn’t be answered using Cohere. When I switched to using OpenAPI, all of these worked for me. The question then is, which LLM should you use? based on this simple experiment use Open API and avoid Cohere. But things might be different for you and at a later time when Cohere has time to improve.
Check out the other posts about Select AI.
Cohere and OpenAI API Keys
To access and use the Generative AI features in the Oracle Database you’ll need access to the API of a LLM. In this post, I’ll step through what you need to do to get API keys from Cohere and OpenAI. These are the two main LLMs for use with the database and others will be accessible over time.
Cohere API
First, go to the Cohere API Dashboard. You can sign-up using your Google or GitHub accounts to sign in. Or create an account by clicking on Sign-up? (Bottom right-hand corner of page). Fill in your email address and a suitable password. Then confirm your sign-up using the email they just sent to you.

When you sign-up to Cohere, you are initially creating a Trial (Free) account. For now, this will be enough for playing with Select AI. There are some restrictions (shown below) but these might change over time so make sure to check this out.
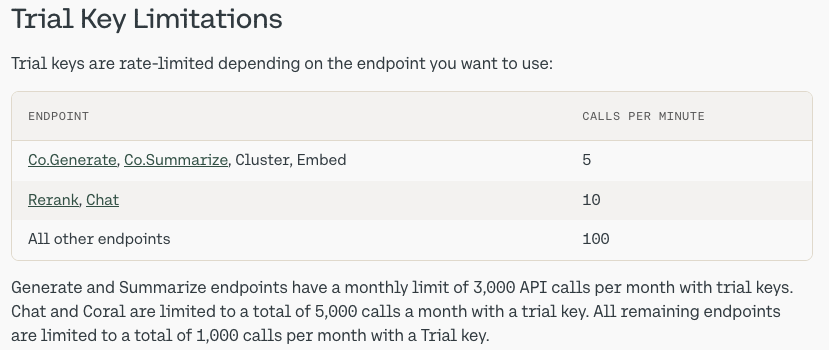
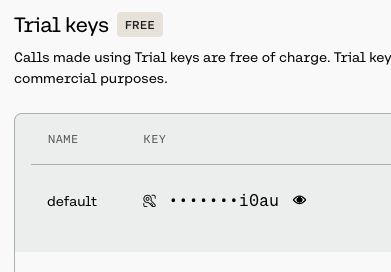
From your Cohere Dashboard, you can access your API key, and use this to set-up your access to the LLM from your remote (app, database, etc) environment. This is a Trial API Key, that is rate-limited, so is kind of ok for testing and evaluation. If you need more, you’ll need to upgrade your account.
Open API
For Open API, you’ll need to create an account – Sign-up here.
Initially, you’ll be set-up with a Trial Account but you may need to upgrade this by depositing some money into your account. The minimum is $10 (plus taxes) and this should be enough to allow you to have a good play with using the API, and only top-up as needed after that, particularly if you go into production use. When you get logged into OpenAI, go to your Dashboard and click on the ‘Create new secret key’ button.

When you’ve obtained the API keys check out my other posts on how to allow access to these from the database and start using the Oracle Select AI features (and other products and code libraries) .
You only need an API key from one of these, but I’ve shown both. This allows you to decide which one you’d like to use.
Check out the other posts about Select AI.

You must be logged in to post a comment.