
LLM
Using Oracle Vector Search to find Similar Wines – Part 3
In this post we will move onto exploring similarity search for the wine of interest. This is an Irish produced wine called Lusca Wine. In the previous posts we did all the hard work of setting up our original data set and adding the AI model to the database. Check out Part-1 and Part-2 for these details. This post will focus on creating a stored function to generate the vector, creating a trigger on our data set table to automatically update the vector data when a new record is added or a update, and then exploring similar wines using vector search.
1-Create a Function to Generate the Vector
To simplify the generation of a Vector we can create a function to perform the necessary steps. This means we have a simple function call to use going forward.
create or replace function wine_desc_vector(p_desc varchar2) return VECTORIS v_vector VECTOR;BEGIN SELECT vector_embedding(all_minilm_l12_v2 using p_desc as data) INTO v_vector; RETURN v_vector;END wine_desc_vector;/
We can test this using the following:
set serveroutput on;DECLARE v_return VECTOR;BEGIN v_return := wine_desc_vector('A lovely fruity red from the south of france.'); dbms_output.put_line(to_char(v_return));END;/set serveroutput off;
This will print out the vector data. I haven’t included it here as the output is very long.
2-Cerate a Table Trigger to Automatically the Vector
We can now use this function to add or update the vector data whenever a record is inserted into the table or a record is updated.
CREATE OR REPLACE TRIGGER trig_winereviews_vecBEFORE INSERT OR UPDATE ON winereviews_vecREFERENCING NEW as NEWFOR EACH ROWBEGIN IF INSERTING THEN :NEW.wine_vec := wine_desc_vector(:NEW.description); ELSIF UPDATING THEN :NEW.wine_vec := wine_desc_vector(:NEW.description); END IF;END;/
3-Insert our Lusca Wine Data
For our test/sample Wine I’m using the Lusca Cabernet Merlot. I’m going to use the description on their website and create a record in the table.
insert into winereviews_vec (id, country, title, winery, description)values(999999, 'Ireland', 'Lusca Cabernet Merlot', 'Lusca Vineyard', 'With a smattering of Cabernet Franc, Shiraz, and Dunkelfelder. Deep ruby red in colour. On the nose there are harmonious aromas of blackcurrants, green herbs, green peppers, mint, black pepper and vanilla. Ripe, dark fruit flavours of blackcurrants, plums, damsons and redcurrants');select country, title, winery, description, wine_vec from winereviews_vec where id = 999999;
When the above is run, we will see the Vector data being displayed.
4-Use Vector Search to Explore Similar Wines
We can now perform Similarity Search.
SELECT vector_distance(wine_vec, (SELECT wine_vec FROM winereviews_vec WHERE id = 999999)) AS distance, title, variety, winery, countryFROM winereviews_vecWHERE id <> 999999ORDER BY 1FETCH APPROXIMATE FIRST 5 ROWS ONLY;
This will display the 5 closest or most similar wines.
We can expand our search for Wines from France and Italy.
SELECT vector_distance(wine_vec, (SELECT wine_vec FROM winereviews_vec WHERE id = 999999)) AS distance, title, variety, winery, countryFROM winereviews_vecWHERE id <> 999999AND country in ('France', 'Italy')ORDER BY 1FETCH APPROXIMATE FIRST 5 ROWS ONLY;
Although the results gives us the most similar other wines based on the description data. But out accurate are the results. This is where some empirical testing is needed. Yes we would have to buy these wines and to do a full tasting. I’ll leave that enjoyable experience to yourself to explore.
Using Oracle Vector Search to find Similar Wines – Part 2
Vector Search can be powerful way to perform Similarity Search in bodies of text. In Part 1 of this series, we walked through the steps for getting everything setup to perform Vector Search. We are using a Wine dataset with the aim of using a locally grown and produced Irish wine to find similar wines. In the Part 1 we loaded the dataset, imported the ONNX Model and were able to run some basis queries or similarity searches using some general text and to produce Vectors. In this post we will move onto generating Vector embeddings, look are some different scenarios around what data and text to include/exclude and how these can be easily added to tables containing our data.
Step 2-1: Adding a column to store the Vector data
We will need to add a new column to our Wine Reviews table to store Vector Embeddings. There is a VECTOR data type for storing this kind of data.
alter table winereviews add (wine_vec vector);
Step 2-2: Creating Vectors and Updating our Data
To generate the Vector Embeddings we can use the ONNX model we imported into the database. See my previous post for more on this. A simple SQL UPDATE command can create the Vector and add this data to our WINEREVIEWS table.
UPDATE winereviews set wine_vec = vector_embedding(all_minilm_l12_v2 using description as data);
This took about 40 minutes to complete on my laptop running the Database in a Docker container. This might seem like a long time but most of that time is taken up the OS extending files, as there weren’t created to process this kind of workload. In a real world database this wouldn’t be an issue and would be completed significantly quicker.
If you don’t want to wait around for this command to run, you can IMPORT the already updated dataset including the Vector data using the following file and commands. The first thing you need to do is to create another table called WINEREVIEWS_VEC.
drop table if exists winereviews_vec;CREATE TABLE WINEREVIEWS_VEC ( "ID" NUMBER(38,0), "COUNTRY" VARCHAR2(300), "DESCRIPTION" VARCHAR2(3000), "DESIGNATION" VARCHAR2(2000), "POINTS" NUMBER(38,0), "PRICE" VARCHAR2(50), "PROVINCE" VARCHAR2(100), "REGION_1" VARCHAR2(200), "REGION_2" VARCHAR2(100), "TASTER_NAME" VARCHAR2(200), "TASTER_TWITTER_HANDLE" VARCHAR2(200), "TITLE" VARCHAR2(2000), "VARIETY" VARCHAR2(300), "WINERY" VARCHAR2(300), "WINE_VEC" VECTOR);
Download this file to your computer. It contains the original Wine Reviews data in addition to the Vector data. This data file can be imported using SQL Command Line ‘load’ function. Using SQL Command Line (SQLcl) log into the schema you are using, and run the following at the SQL prompt.
-- The following LOAD command takes approx. 15seconds to load the datasetload winereviews_vec WINEREVIEWS_DATA_TABLE_vec.csv
We can examine the newly imported data by
-- Let's examine the dataselect count(*) from winereviews_vec;select * from winereviews_vec where rownum=1;
Step 2-3: Let’s explore our Vector Data – Vector Search
We can now explore the Wine Vectors with some specific wine descriptions. For example, we are looking for wines that have a description that are similar to ‘light, crisp, summer wine with little fruit and good citrus’. We need to define a session variable to hold this description and then query the data.
variable search_text varchar2(100);exec :search_text := 'light, crisp, summer wine with little fruit and good citrus';SELECT vector_distance(wine_vec, (vector_embedding(all_minilm_l12_v2 using :search_text as data))) as distance, title, variety, winery, countryFROM winereviews_vecorder by 1fetch approximate first 5 rows only;

We can fine tune the search to only return wines from France or Italy, by adding to the WHERE clause. For example,
SELECT vector_distance(wine_vec, (vector_embedding(all_minilm_l12_v2 using :search_text as data))) as distance, title, variety, winery, countryFROM winereviews_vecWHERE country = 'Italy'ORDER BY 1 ascfetch approximate first 5 rows only;

We can see from the outcomes from the above two queries the wines from Italy have a weaker match than some of the Wines from France, Portugal and US. We look at the wine descriptions from these wines to see how the description of the wine compares to our original text stored in the session variable. (I’m not including this query here for conciseness, but it is straightforward to write). In the results we don’t necessarily see an exact match with our search text. What we do get is wine descriptions that are similar to our search text. This illustrates how Vector Search can be used for similarity matches.

Step 2-4: What is the Database Query Optimizer doing
There are a few ways to look at how the Database executes the above queries. One of the simplest is to use AUTOTRACE. In SQLcl we can turn it on using,
set autotrace on
Using the last query used in the previous section above when we run it we get the following details. Only particial details is given here. When you examine the trace details you will notice a large number of block reads and a full table scan. The aim is to reduce the number of block reads and we can achieve this in a number of ways from using a larger block size, increasing memory, buffers etc. One additional method is to use indexes and the next section will show how this can be done for Vector data.
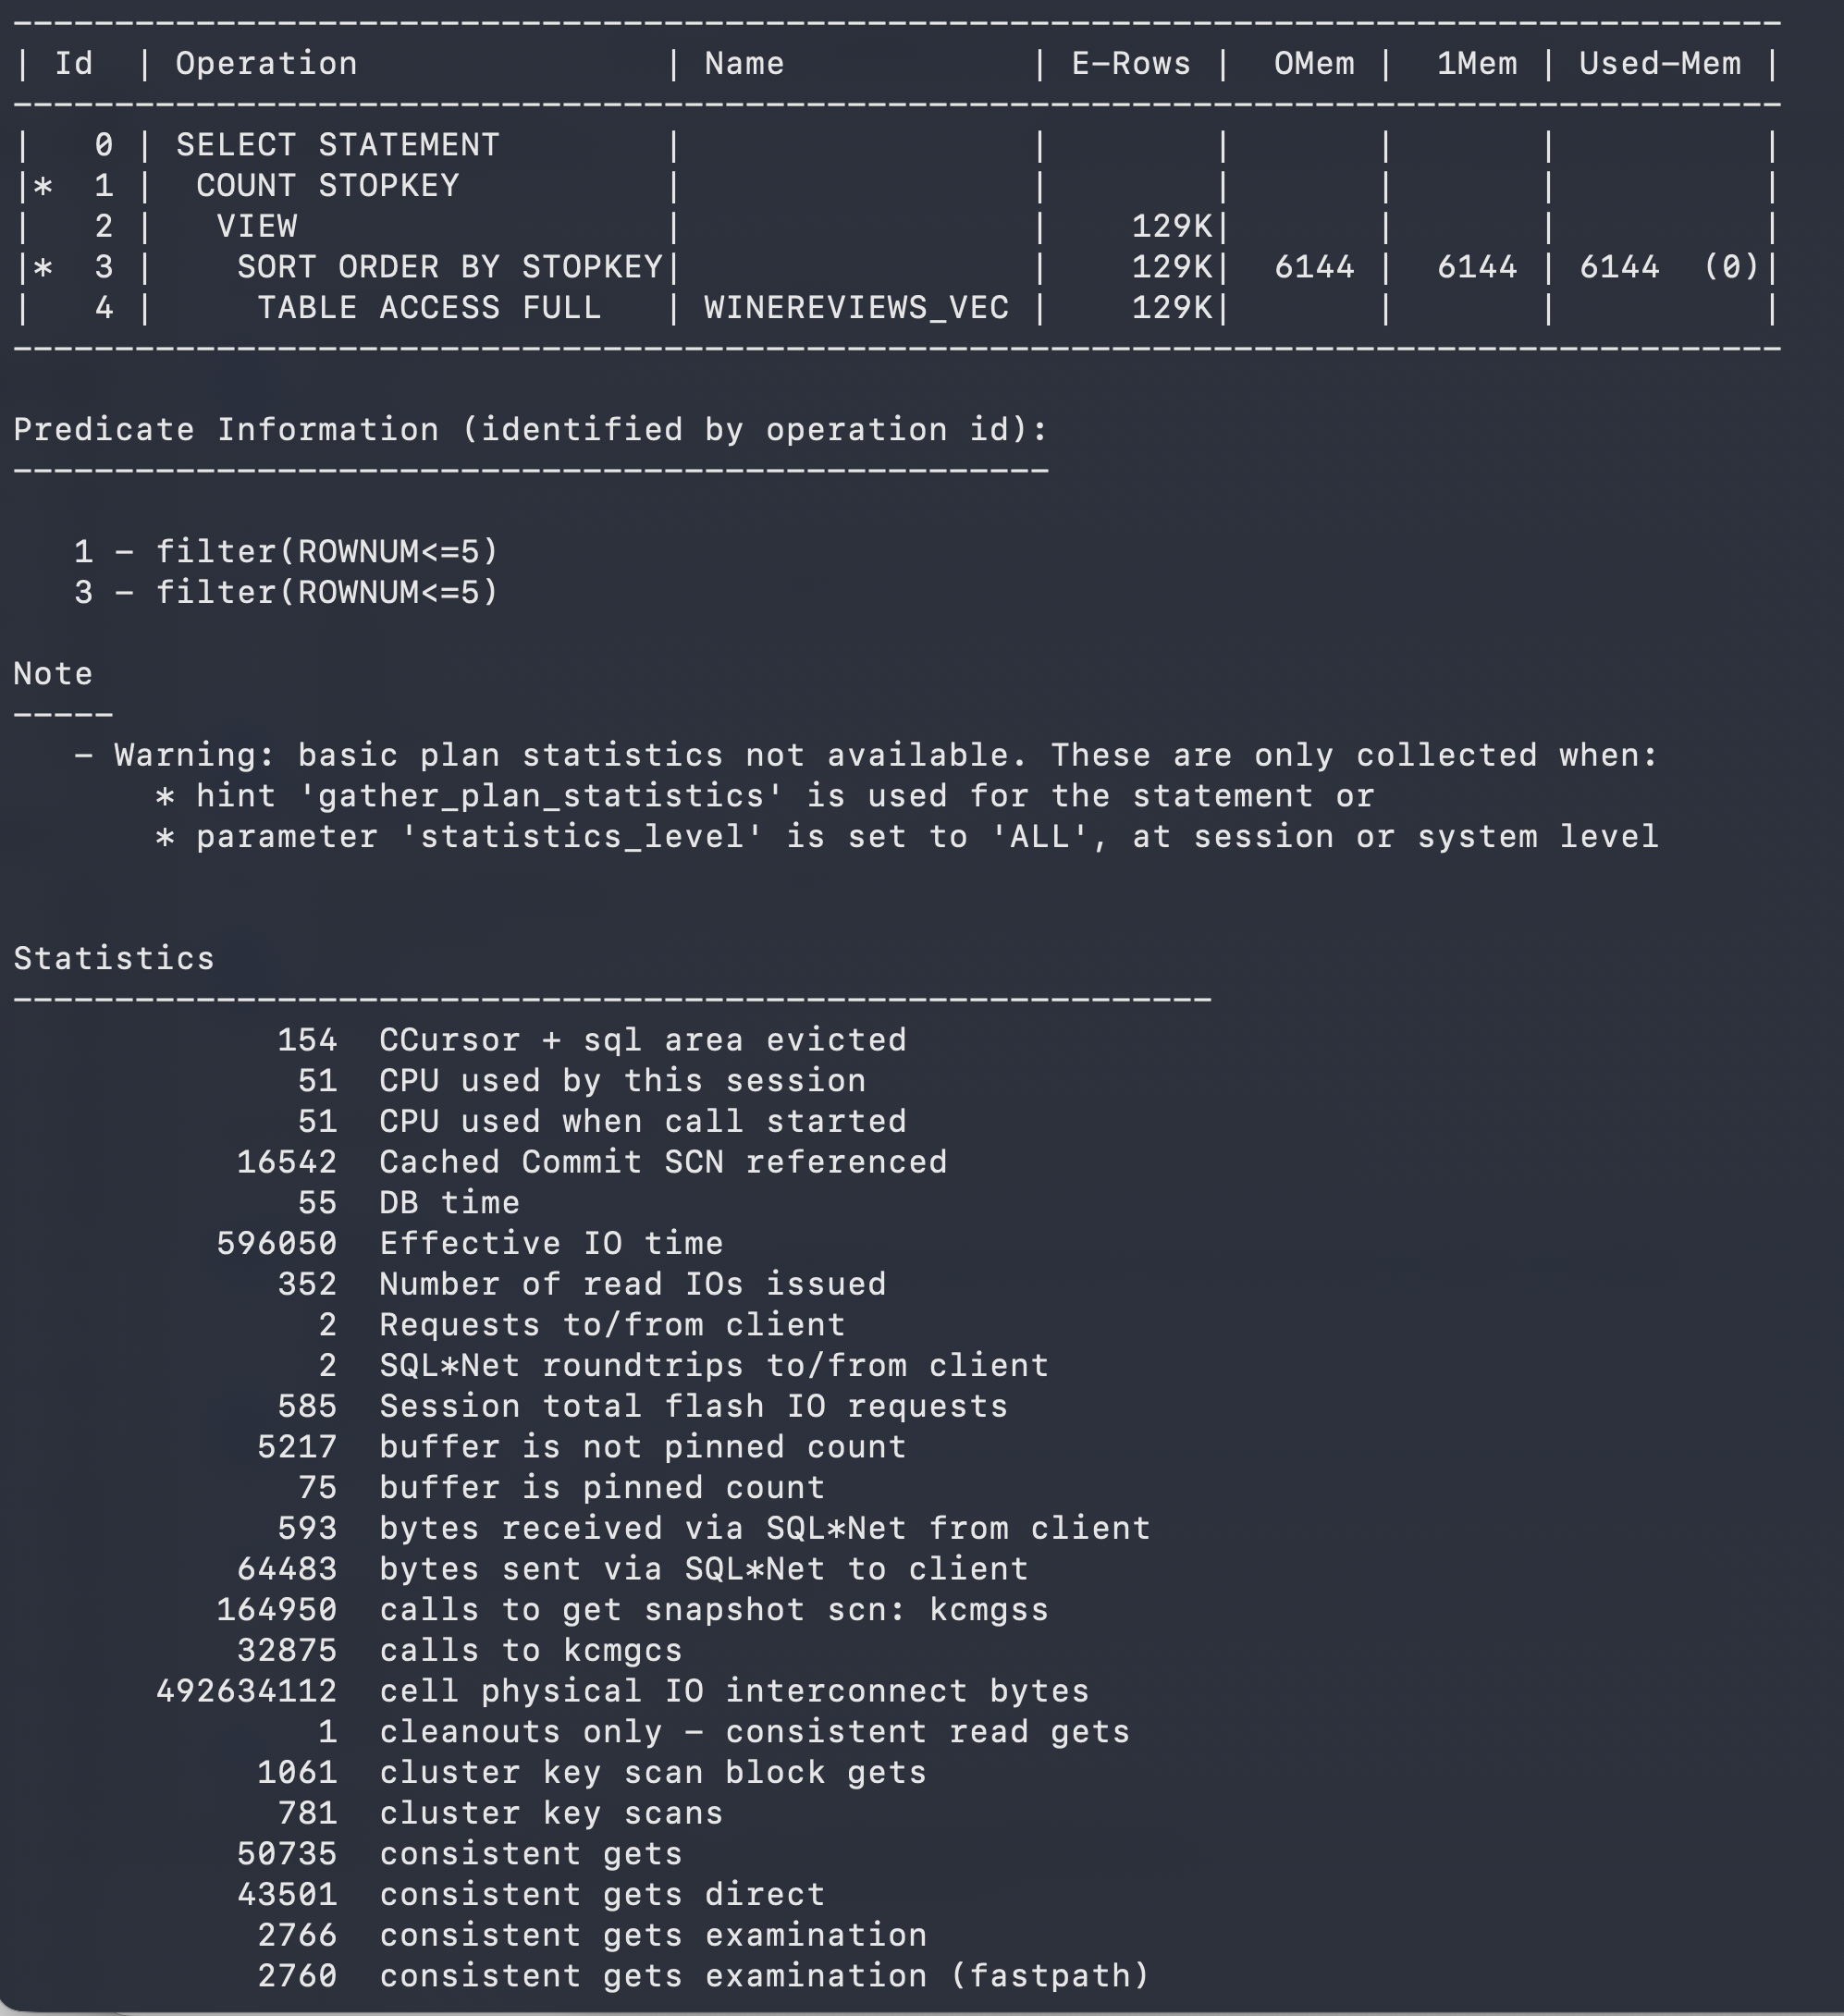
Don’t forget to turn off AUTOTRACE when you are finished using it.
set autotrace off
Step 2-5: Creating Vector Indexes
Before we can create vector indexes we might need to allocate some memory resources to it. We can examine this using the command
show parameter vector_memory_size
On the docker container I’m using this returned Zero for the size, which means if I tried to create a vector index it would fail. To allocate memory to Vectors we need to do the following on the docker container.
- connect to the Docker container shell. docker exec -it sh
- cd /opt/oracle/product/26ai/dbhomeFree/bin
- sqlplus / as sysdba
- alter system set vector_memory_size = 500M scope=spfile;
- show parameter vector_memory_size – to verify the exhange
- restart the database
When we reconnect to our schema we can run the show parameter command now to show the change.
SQL> show parameter vector_memory_sizeNAME TYPE VALUE ------------------ ----------- ----- vector_memory_size big integer 512M
Now we can create the index.
create vector index winereviews_vec_idx on winereviews_vec(wine_vec) organization inmemory neighbor graphdistance cosinewith target accuracy 95;
When we re-run the query now we get the following plan. Her we can see the index being used and reduction in the number of buffers used. Roughly a 1,600x reduction.
------------------------------------------------------------------------------------------------------------------------------------------- | Id | Operation | Name | Starts | E-Rows | A-Rows | A-Time | Buffers | OMem | 1Mem | Used-Mem | ------------------------------------------------------------------------------------------------------------------------------------------- | 0 | SELECT STATEMENT | | 1 | | 5 |00:00:00.01 | 27 | | | | |* 1 | COUNT STOPKEY | | 1 | | 5 |00:00:00.01 | 27 | | | | | 2 | VIEW | | 1 | 5 | 5 |00:00:00.01 | 27 | | | | |* 3 | SORT ORDER BY STOPKEY | | 1 | 5 | 5 |00:00:00.01 | 27 | 2048 | 2048 | 2048 (0)| | 4 | TABLE ACCESS BY INDEX ROWID| WINEREVIEWS_VEC | 1 | 5 | 5 |00:00:00.01 | 27 | | | | | 5 | VECTOR INDEX HNSW SCAN | WINEREVIEWS_VEC_IDX | 1 | 5 | 5 |00:00:00.01 | 22 | | | | ------------------------------------------------------------------------------------------------------------------------------------------- Predicate Information (identified by operation id): --------------------------------------------------- 1 - filter(ROWNUM<=5) 3 - filter(ROWNUM<=5) Statistics----------------------------------------------------------- 7 CPU used by this session 6 CPU used when call started 6 DB time 2 Requests to/from client 17 enqueue releases 17 enqueue requests 17 non-idle wait count 513 opened cursors cumulative 1 opened cursors current 1674 recursive calls 5 recursive cpu usage 2097 session logical reads 3 user calls
If you run this query again you will see a reduction in the numbers again and this indicates that it is reading the data what was cached from the previous run.
We are now at the point that we can use Vector Search to compare wines to our Luscas Wine, from Ireland, and to find similar wines in the dataset. I’ll explore this, the steps needed and what we discovered in the next post.
Using Oracle Vector Search to find Similar Wines – Part 1
Vector search lets you find items that are semantically similar rather than just matching keywords, by representing text as high-dimensional numeric vectors. We’ve seen lots of examples of using Vector Search to perform various different types of Similarity Searches. In this post and the following posts, I’ll walk through a little example of using Vector Search to find similar wines.
This is Part-1 and it is all about the Set-up and what we need.
There are a few parts to this process and these include:
- Finding a suitable dataset. Yes that is always a challenge, but in this example I’m going to use the Wines 130K dataset from Kaggle. Just like most datasets, it isn’t perfect but is enough to illustrate a real world application of Vector Search.
- We also need a Wine that we will use for testing. In this case I’m going to select a locally grown and produced wine here in Ireland. I’m going to use the Lusca Cabernet Merlot wine. The vines are grown in Lusk, in North County Dublin. They produce a small amount of bottles and these can be typically bought at local Craft/Farmers markets and a few online retailers also stock it.
- We need a suitable ML model we can use for creating Vectors. There are lots out there, but because we are going to illustrate this using the Vector Search feature an Oracle Database, we can use one of the pre-approved or recommended models. See table below. By using one of these we can embed the AI model in the database. That means we don’t need to access and Gen AI models locally, or in out data centre, or via an API to the Gen AI providers. Yes you can do that, but some of those options there are some security and data protection concerns. By using the model in the Database, we don’t have any data movement and everything is secure. For other AI models, check out what is available on Hugging Face.
- The last thing we need is an Oracle Database. For this I’m using Oracle 23.26.2 running in a Docker container. I’m also using Oracle SQL Command Line (SQLcl) for my interface to the Database. It’s a simple command line tool, and yes it keeps things simple. There are a few steps that need to be performed as Administrator of the Database and at the command line in the Docker container.
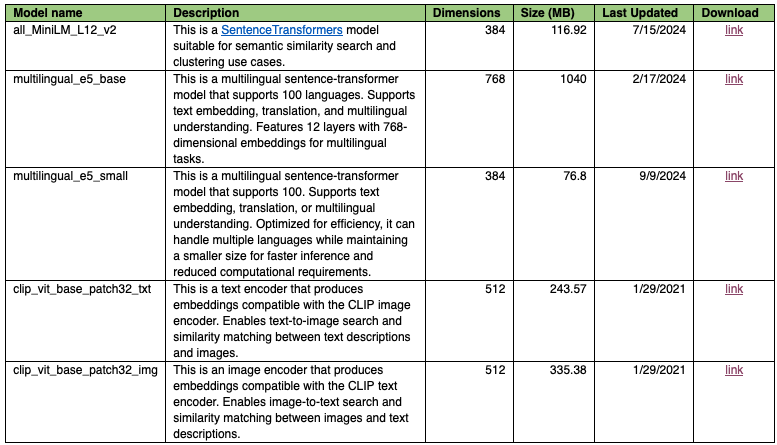
Let’s get started. I’m assuming you have Oracle Database using somewhere. In my case it is Docker Container and you have downloaded the dataset and the all_MiniLM_L12_v2 model.
Step-1: Load the Data
I’ve created a new schema for this example called vec_user. All the data and work will be performed in this schema.
SQLcl has a very useful Import feature that allows us to import data is a variety of formats. The most common of these is CSV format and the dataset downloaded from Kaggle is in CSV format.
Before we can import the CSV data, we need to create a table for the data. This isn’t strictly needed but it can be useful step to do manually as you can ensure the data types you want to use for each column in the CSV data.
drop table if exists winereviews;CREATE TABLE WINEREVIEWS ("ID" NUMBER(38,0), "COUNTRY" VARCHAR2(300), "DESCRIPTION" VARCHAR2(3000), "DESIGNATION" VARCHAR2(2000), "POINTS" NUMBER(38,0), "PRICE" VARCHAR2(50), "PROVINCE" VARCHAR2(100), "REGION_1" VARCHAR2(200), "REGION_2" VARCHAR2(100), "TASTER_NAME" VARCHAR2(200), "TASTER_TWITTER_HANDLE" VARCHAR2(200), "TITLE" VARCHAR2(2000), "VARIETY" VARCHAR2(300), "WINERY" VARCHAR2(300));
With the table created in our vec_user schema, we can now use the SQLcl IMPORT feature.
-- Load Wine dataset using SQLcl Load featureload winereviews winemag-data-130k-v2.csv
The CSV file needs to be on the Command Line Search Path. If it isn’t then you’ll need to add the path in front for the file name. The data will be loaded into the table in a few seconds.
We can verify the number of records imported and have a look at one of the records.
SQL> select count(*) as num_records from winereviews; NUM_RECORDS ______________ 129971 1 row selected. SQL> -- display one recordSQL> select * from winereviews where rownum = 1; ID COUNTRY DESCRIPTION DESIGNATION POINTS PRICE PROVINCE REGION_1 REGION_2 TASTER_NAME TASTER_TWITTER_HANDLE TITLE VARIETY WINERY _____ __________ _______________________________________________________________________________________________________________________________________________________________________________ _______________ _________ ________ ____________________ ___________ ___________ ________________ ________________________ ____________________________________ ______________ __________ 0 Italy Aromas include tropical fruit, broom, brimstone and dried herb. The palate isn't overly expressive, offering unripened apple, citrus and dried sage alongside brisk acidity. Vulkà Bianco 87 Sicily & Sardinia Etna Kerin O’Keefe @kerinokeefe Nicosia 2013 Vulkà Bianco (Etna) White Blend Nicosia 1 row selected.
Step-2: Download the AI Model and Move it to the Database Container
Download the AI model you are going to use to generate the Vectors. Hugging Face has a collection of these. Oracle provides a subset of these that are compatible with the Machine Learning engine in the Database. That doesn’t mean some of the other AI models won’t work. The table given above lists these supported AI models. I’m going to use the first one, ‘ALL_MINILM_L12_V2’ as it’s general purpose model. Download the AI model ZIP file and unzip it. The ONNX configuration file will be extracted.
To make this AI model accessible to the the Database, we need to move it to the Database Server. As I’m using a Docker Container, I can use the following command to move it to the /tmp directory on the container.
docker cp ./all_MiniLM_L12_v2.onnx <container_name> :/tmp
You’ll need to connect to the SYS database user to grant our VEC_USER read access to the DB_IMPORT directory object with points to the /tmp OS director.
SQL> connect sys/oracle as sysdbaSQL> select * from all_directories;OWNER DIRECTORY_NAME DIRECTORY_PATH ORIGIN_CON_ID ________ ___________________________ _________________________________________________________________ ________________ SYS SDO_DIR_ADMIN /opt/oracle/product/26ai/dbhomeFree/md/admin 1 SYS XMLDIR /opt/oracle/product/26ai/dbhomeFree/rdbms/xml 1 SYS XSDDIR /opt/oracle/product/26ai/dbhomeFree/rdbms/xml/schema 1 SYS ORACLE_BASE /opt/oracle 1 SYS ORACLE_HOME /opt/oracle/product/26ai/dbhomeFree 1 SYS OPATCH_INST_DIR /opt/oracle/product/26ai/dbhomeFree/OPatch 1 SYS DATA_PUMP_DIR /opt/oracle/admin/FREE/dpdump/53103647BA9E10B0E0636402000A338A 1 SYS DBMS_OPTIM_LOGDIR /opt/oracle/product/26ai/dbhomeFree/cfgtoollogs 1 SYS DBMS_OPTIM_ADMINDIR /opt/oracle/product/26ai/dbhomeFree/rdbms/admin 1 SYS OPATCH_SCRIPT_DIR /opt/oracle/product/26ai/dbhomeFree/QOpatch 1 SYS OPATCH_LOG_DIR /opt/oracle/product/26ai/dbhomeFree/rdbms/log 1 SYS JAVA$JOX$CUJS$DIRECTORY$ /opt/oracle/product/26ai/dbhomeFree/javavm/admin/ 1 SYS DB_IMPORT /tmp 3 13 rows selected. SQL> grant read on DB_IMPORT to vec_user;SQL> -- reconnect to the vec_userSQL> conn vec_user/Password1SQL> select * from all_directories;OWNER DIRECTORY_NAME DIRECTORY_PATH ORIGIN_CON_ID ________ _________________ _________________ ________________ SYS DB_IMPORT /tmp 3 1 row selected.
The Database already has a DIRECTORY defined in the Database to point to the ‘/tmp’ directory on the operating system. If I wanted to use a different directory, I’d have to connect to SYS, create a new directory and grant my user read access to this dictionary object.
-- connect to SYScreate directory MY_DIR as '/my_dir';grant read on directory MY_DIR to vec_user;-- connect to VEC_USER-- you should be able to read from the MY_DIR directory
Step-3: Import the AI Model
At this stage we have the ONNX AI model downloaded and unzipped, and we have it copied to the Database server. We should be good to Import the ONNX model to the database.
Using our VEC_USER, we can run the following to import the model. We should have all the necessary privileges (mining mode, read on directory, etc)
begin--- dbms_vector.drop_onnx_model (--- model_name => 'ALL_MINILM_L12_V2',--- force => true); dbms_vector.load_onnx_model ( directory => 'DB_IMPORT', file_name => 'all_MiniLM_L12_v2.onnx', model_name => 'ALL_MINILM_L12_V2');end;/
The above code allows for reproducibility of this import. If the model exists in the database, then drop it and then import it. If you need to rerun the above after importing the model, just uncomment the drop_onnx_model command.
We can check what machine learning models we have access to by running:
-- List available modelselect model_name, algorithm, mining_functionfrom user_mining_models;MODEL_NAME ALGORITHM MINING_FUNCTION ____________________ ____________ __________________ ALL_MINILM_L12_V2 ONNX EMBEDDING 1 row selected.
Step-4: Run some Similarity Searches to see it the AI Model works
Before we move on with processing our Wine dataset with the AI model with generating vectors and performing similarity search, let’s have a look at how we can call or use the imported AI model. The AI model sits in the database and can be executed or run using the in-database machine learning engine. This allows us to keep the data within the database and nothing is sent externally to an LLM or other type of AI engine. Let’s try some basic phrases to see what the AI model creates.
select vector_embedding(all_minilm_l12_v2 using 'A simple test to create a vector using the ONNX model' as data) AS my_vector;MY_VECTOR---------------------------------------------------------------------------------------------------------[-1.1862169E-002,-6.19494878E-002,-5.25733493E-002,3.32576432E-003,-2.87775719E-003,-2.79027559E-002,-5.32365367E-002,3.25470306E-002,-8.14431012E-002,3.27502415E-002,5.79739586E-002,-1.00366184E-002,1.51149062E-002,2.53521837E-002,-5.58732748E-002,-6.06239261E-003,-1.15927346E-002,7.10275471E-002,7.80366957E-002,3.07483934E-002,-5.52542396E-002,-5.33219278E-002,-4.31507863E-002,-3.5467267E-002,1.39131406E-002,7.7143237E-003,9.57045406E-002,1.35890581E-002,2.19696667E-002,-6.06945306E-002,4.66698483E-002,-3.37560987E-003,2.96193287E-002,5.36179841E-002,-2.75602993E-002,-1.70154907E-002,-2.81273387E-002,-1.42529653E-002,-2.23667752E-002,-1.17503572E-002,5.50950877E-002,4.63315211E-002,8.00665375E-003,-2.82223243E-002,-1.89246144E-002,1.13920778E-001,-2.17806976E-002,-6.69694021E-002,6.43107593E-002,2.43396256E-002,-1.84283648E-002,-5.22144362E-002,1.11321002E-001,-3.84567901E-002,1.48841748E-002,4.28449102E-002,2.02198476E-002,6.35366216E-002,-2.03748588E-002,-9.1745086E-002,-8.33614692E-002,-2.99174688E-003,-2.25598831E-002,-5.42856799E-003,4.0825054E-002,4.43562046E-002,-4.10938412E-002,6.19381368E-002,3.28762978E-002,2.11752895E-002,-5.37039116E-002,1.83419809E-002,1.16077727E-002,2.11831694E-003,-3.11171841E-002,-2.77244276E-003,1.74682252E-002,1.13666626E-002,5.24466932E-002,-1.75879449E-002,-2.90773176E-002,5.41730374E-002,5.01469802E-003,-7.33102672E-003,4.24308293E-002,7.88432807E-002,5.29912785E-002,-1.8913582E-002,1.15211476E-002,-3.07812896E-002,2.33124965E-003,4.3144837E-002,-7.58033525E-003,8.82296637E-002,1.10972993E-001,3.85747999E-002,1.52123887E-002,-5.74417002E-002,1.47257121E-002,6.02892786E-002,4.0903978E-002,-2.08789371E-002,-6.04964346E-002,4.23973799E-002,-1.74141806E-002,-4.4276759E-002,4.97439178E-003,-4.89390902E-002,-2.68593691E-002,-1.52082881E-002,-2.85744667E-003,6.27590865E-002,-6.41179234E-002,4.83581051E-002,1.5746966E-002,-1.4682156E-002,6.62061851E-003,3.40981483E-002,-9.90032963E-003,4.55836803E-002,-1.47245992E-002,-5.88329025E-002,-1.0270042E-001,-8.16448033E-002,-4.14121784E-002,-6.95772767E-002,4.12401259E-002,-1.61944497E-002,-9.75468084E-002,1.38579784E-002,1.82065554E-002,-6.35358021E-002,1.58151966E-002,7.94038549E-002,3.20437029E-002,6.94024786E-002,7.46046379E-002,4.92931195E-002,-7.57167637E-002,-2.05017347E-002,-5.73285967E-002,7.74050951E-002,5.69546558E-002,-6.23143315E-002,3.39660607E-002,-4.40245308E-003,-1.35002598E-001,-7.20189959E-002,2.87418142E-002,-1.20503353E-002,2.79477853E-002,-9.56245437E-002,-2.564409E-002,-6.19855663E-003,-3.21824998E-002,1.13457099E-001,-2.09106058E-002,-3.15456204E-002,-6.97289631E-002,6.69988468E-002,-2.67115571E-002,2.73290519E-002,1.22783668E-002,2.11374066E-003,1.38278455E-002,2.11777049E-003,-8.01261291E-002,8.91891345E-002,7.21878186E-002,-5.92943802E-002,4.89146076E-002,3.57595533E-002,-1.38857201E-001,1.44773936E-002,5.73108084E-002,-7.75126275E-003,2.44468488E-002,2.46164459E-003,9.98818874E-003,-3.0055875E-003,-9.52457916E-003,-7.23954439E-002,1.76559724E-002,1.79478135E-002,-9.02936384E-002,-5.99887483E-002,-3.25217471E-002,-1.58283859E-002,-9.94548053E-002,-3.76612768E-002,8.24269354E-002,7.44124316E-003,1.66539177E-002,4.12631407E-002,-2.89798323E-002,-1.37990773E-001,3.47260088E-002,-7.23604709E-002,2.70092972E-002,8.97826441E-003,-7.28023574E-002,-3.08126006E-002,5.07898182E-002,5.59227653E-002,-2.85209883E-002,2.41481867E-002,-3.15275975E-002,2.04243325E-003,2.82701571E-002,8.80170688E-002,-8.94553289E-002,-2.65875738E-002,3.5613589E-002,-5.49732335E-002,-6.30540997E-002,-1.85488667E-002,-1.16195783E-001,-2.97640134E-002,2.53809579E-002,-3.2125283E-002,-1.30758146E-002,-6.06578253E-002,9.31177568E-003,9.08785189E-033,-1.25198409E-001,-2.00347472E-002,9.08883568E-003,4.97741885E-002,5.51343746E-002,-7.35867098E-002,1.44137442E-001,6.84367195E-002,-1.2948221E-001,4.10339199E-002,1.78874657E-002,-2.63292734E-002,-7.93097839E-002,7.32451677E-002,2.88251378E-002,-8.10253341E-003,-7.11302757E-002,4.18880805E-002,4.53449823E-002,-6.01221062E-003,6.79178983E-002,-5.35881892E-003,-5.63834794E-002,4.40003574E-002,2.11469959E-002,4.8730094E-002,1.53696025E-003,3.78657617E-002,-6.92071095E-002,-1.17045911E-002,-1.05027348E-001,5.24917506E-002,-1.25820618E-002,9.27475989E-002,4.75268848E-002,5.95951229E-002,1.38896152E-001,-3.34764384E-002,-2.01537088E-002,5.81902498E-003,7.59647712E-002,3.10984701E-002,-7.96632618E-002,-1.16957002E-003,-3.50703001E-002,-2.83128452E-002,3.17137204E-002,1.92918144E-002,7.28997216E-003,2.61563938E-002,-6.830169E-004,-2.75356174E-002,2.88278628E-002,-2.410769E-003,-2.82850419E-003,-8.91539548E-003,4.09550266E-004,-5.20184785E-002,3.48629914E-002,-9.83022037E-004,-4.82109301E-002,-2.87288055E-002,3.62203047E-002,9.2427142E-002,2.53859498E-002,-7.6168038E-002,4.09572721E-002,2.00462174E-002,3.91589068E-002,-7.17473477E-002,3.18682045E-002,2.80438233E-002,8.44237283E-002,-2.13520881E-003,-1.13178026E-002,-1.36510096E-002,2.30457578E-002,-3.59750614E-002,-2.97435429E-002,3.11401524E-002,-6.6576466E-002,-1.00944526E-001,5.22288866E-002,6.99869469E-002,5.41537106E-002,3.89597155E-002,1.14934787E-001,8.27853009E-002,-6.11951686E-002,6.26713559E-002,5.42582478E-003,1.17276028E-001,-3.35108154E-002,7.20500539E-004,-6.92384914E-002,2.23888651E-032,-8.25942382E-002,1.0263361E-002,4.60346043E-002,2.90820021E-002,3.49532031E-002,-5.21782693E-003,1.33043546E-002,-1.56213745E-001,-3.79306041E-002,-1.71216168E-002,-2.44396739E-002,2.15015635E-002,-3.68581414E-002,4.4896391E-005,4.91990009E-003,6.02074899E-003,-2.57451404E-002,1.79552678E-002,-2.89816465E-002,-9.44156721E-002,4.04688381E-002,5.10384142E-002,-2.82051954E-002,9.17229578E-002,2.05879752E-002,1.91760119E-002,-1.45426579E-002,3.70379053E-002,-1.38869872E-002,3.54876891E-002,3.84136215E-002,3.25987786E-002,9.86970961E-003,2.94941887E-002,-9.09914002E-002,7.22922683E-002,-9.27466433E-003,1.34579856E-002,-3.04076672E-002,6.80207014E-002,-1.35811288E-002,8.4245922E-003,5.90760447E-002,-5.11229271E-003,3.90975364E-002,2.50931103E-002,-2.91317422E-002,-8.91669989E-002,-5.16400263E-002,-2.60937382E-002,3.58074605E-002,3.03873625E-002,7.83548225E-003,7.71026313E-002,6.23333715E-002,9.71396361E-003,-7.08995908E-002,1.22748474E-002,4.20468524E-002,2.13721655E-002,-6.48246184E-002,-1.57039538E-002,-9.04715285E-002,-3.41060348E-002]
The vector contains 384 dimensions.
Let’s have a look at another example.
select vector_embedding(all_minilm_l12_v2 using 'What is a good quality wine' as data) AS my_vector;MY_VECTOR---------------------------------------------------------------------------------------------------------[8.48758966E-003,-8.6496979E-002,-2.83764433E-002,-2.10696012E-002,-8.53050649E-002,-1.40911127E-002,-6.18022904E-002,1.69754717E-002,-1.2954114E-002,-6.90694749E-002,-3.53608765E-002,-2.13439725E-002,-8.13569427E-002,-1.57823078E-002,-2.76144315E-002,3.59890647E-002,9.48644057E-002,5.47600761E-002,3.18817794E-002,3.72690633E-002,-5.204181E-002,-5.40845245E-002,4.28323895E-002,6.13691173E-002,1.27978669E-002,4.7162503E-002,1.46299815E-002,-6.53423294E-002,-3.95153426E-002,5.93141234E-003,-5.01540564E-002,-5.14247902E-002,4.01225425E-002,-4.10377346E-002,-9.46420953E-002,-6.99803531E-002,-3.19304764E-002,-1.17475994E-001,6.24287277E-002,-5.8764508E-003,6.15919828E-002,2.38833278E-002,3.07811219E-002,5.97841777E-002,-7.12923259E-002,-9.45204869E-002,6.4850254E-003,8.36489648E-002,4.84998412E-002,1.07569546E-001,-2.75600981E-002,8.6291872E-002,-4.40733321E-002,-4.95140068E-002,6.01537004E-002,3.07337046E-002,-2.51231454E-002,3.81110869E-002,-7.99637437E-002,3.69612239E-002,-2.88316864E-003,-8.649664E-003,3.24146152E-002,-4.19037882E-003,-1.77016796E-003,3.3910118E-002,-3.95271741E-002,9.23643187E-002,-1.47576213E-001,2.29765121E-002,-5.87550811E-002,-3.02798003E-002,1.85213704E-002,-9.45490692E-003,-5.74432872E-002,-6.74801767E-002,5.22300042E-002,-6.02966174E-002,-9.77811515E-002,1.71270877E-001,5.46088479E-002,-7.74407014E-002,-1.7115524E-002,-6.18977053E-003,9.67943855E-003,-3.82515304E-002,-3.43274884E-002,-5.3462307E-003,-2.57053934E-002,3.8461946E-002,4.52922611E-003,2.56689675E-002,-6.83755474E-003,3.23626362E-002,4.57450151E-002,1.62628904E-001,3.15850265E-002,3.74837965E-002,1.45565858E-002,2.91972514E-002,-3.35903913E-002,7.65944421E-002,7.86963031E-002,-6.14850484E-002,6.81868345E-002,3.69149223E-002,1.64239109E-002,8.27361643E-002,-1.08057745E-002,8.46561268E-002,-7.56146479E-003,-1.76091399E-002,-3.67957875E-002,-9.44054592E-003,-3.34670162E-003,8.53082538E-002,5.10462336E-002,3.06608751E-002,-6.38281256E-002,-6.82414044E-003,1.30195748E-002,6.00180821E-003,1.14564523E-001,-3.65287834E-003,-1.59793515E-002,-1.84295438E-002,2.22749095E-002,4.40397859E-002,-5.9329503E-004,4.17956263E-002,-2.21824367E-002,-1.75340977E-002,4.82484289E-002,2.34650262E-002,-5.26955724E-002,-2.57514659E-002,-2.05297023E-002,-2.17089459E-004,-6.76679239E-002,-2.2591617E-002,-2.69411188E-002,3.98312521E-004,1.20914824E-001,9.40298475E-003,-2.64402013E-002,-3.41484919E-002,-4.44080308E-002,-1.56795774E-002,-6.17562085E-002,-4.11389805E-002,-3.31432815E-003,1.0424844E-002,5.59891351E-002,-5.74715957E-002,6.47083893E-002,5.04113324E-002,3.12482826E-002,-4.80899215E-002,-1.97987147E-002,3.99696231E-002,-3.41557562E-002,-3.5732843E-002,6.90332204E-002,4.48493008E-003,-1.37494877E-001,2.34414525E-002,-2.29555909E-002,1.88858993E-002,1.79906562E-002,1.01220138E-001,1.2918289E-001,6.68326393E-002,-3.34317982E-002,-4.04514605E-003,1.90632418E-003,5.17417826E-002,-1.01933286E-001,7.3630102E-002,-2.04305276E-002,1.10038137E-002,2.08075661E-002,7.53787085E-002,-8.32989961E-002,1.54158296E-002,-1.94807146E-002,5.8314044E-002,-1.37357572E-002,2.32190676E-002,8.57607722E-002,-9.80165671E-004,9.28820577E-003,-6.93036057E-003,-5.53022996E-002,8.65026042E-002,1.02880057E-002,-3.40889171E-002,5.97957894E-003,-4.56773154E-002,-5.15860878E-003,8.13246816E-002,-3.78845744E-002,-1.05865337E-002,7.26584792E-002,-4.63496782E-002,4.93186451E-002,5.03463782E-002,6.83160052E-002,-9.38946009E-003,-1.13420062E-001,4.88068983E-002,-7.79750943E-003,2.02954076E-002,-8.23409483E-002,-8.23013559E-002,-5.31551428E-002,-5.37308864E-003,3.18441242E-002,-5.12061827E-002,-6.79519922E-002,7.09872693E-003,6.45572469E-002,-2.81210393E-002,4.86408733E-002,4.74716928E-033,9.62270573E-002,5.59062883E-002,8.48388672E-002,5.9035521E-002,-1.44827394E-002,-3.57090309E-002,-9.54525992E-002,-1.30636785E-002,2.18042005E-002,4.4574175E-002,1.08921984E-002,6.3118306E-003,-9.96271614E-003,-3.34643945E-002,5.40529564E-002,-4.80750985E-002,5.24901673E-002,8.59874953E-003,-1.92004927E-002,-5.47123253E-002,7.70864496E-003,1.08891085E-001,-4.08197641E-002,1.29449191E-002,-2.16392428E-002,-1.19118195E-003,-4.54484634E-002,-6.9629699E-002,2.56183483E-002,-3.89085859E-002,4.77184393E-002,-2.72601563E-002,-4.19324711E-002,3.15431729E-002,-3.43257301E-002,6.97843134E-002,3.4660209E-002,-3.60485502E-002,-2.67435778E-002,6.15297183E-002,-8.34145583E-003,4.61625531E-002,4.38644784E-003,-3.40693668E-002,-5.74661754E-002,2.0197548E-002,1.72714908E-002,-3.5297893E-002,2.9808145E-002,7.18882531E-002,-4.65194695E-002,-7.09975883E-002,2.10589427E-003,6.8706125E-002,1.89182116E-003,-1.32000968E-002,-5.56618944E-002,7.22503057E-003,-8.22117329E-002,-4.39907163E-002,-3.44051681E-002,7.23620923E-003,3.23290266E-002,1.84718259E-002,2.26995163E-002,-5.46125658E-002,4.14239103E-003,6.37765825E-002,-2.6696356E-002,-4.74399291E-002,2.87484415E-002,-1.2054625E-002,-6.55562803E-003,3.33951227E-002,-2.00122036E-003,-7.6644063E-002,-4.85422183E-003,-5.85341677E-002,-7.73658394E-004,1.54947257E-002,6.48625717E-002,4.69440967E-002,-1.03136338E-001,-1.40075209E-002,1.24892229E-002,-4.50104102E-002,7.64881E-002,-6.69086128E-002,-5.63001484E-002,3.16645242E-002,8.0466263E-002,1.12166874E-001,-4.84984703E-002,-1.29239513E-002,-6.03075363E-002,1.15767981E-032,2.56223325E-002,3.19225863E-002,-2.27732752E-002,1.00588268E-002,-1.36545569E-001,-3.18606608E-002,-7.25163892E-002,5.13358647E-003,-1.02892384E-001,1.1200984E-002,2.78379079E-002,3.41770276E-002,-6.22369908E-002,-1.47911618E-002,-2.32076943E-002,-1.71934068E-002,-1.86444726E-002,1.52370462E-003,5.72243445E-002,1.09391231E-002,1.83431469E-002,4.68679033E-002,5.2194126E-002,-6.33046916E-003,-1.4392744E-001,-6.23738579E-003,5.20701781E-002,-6.51828796E-002,-1.6265668E-002,-1.56783797E-002,-1.29948063E-002,6.13683276E-002,6.56574145E-002,-4.02861573E-002,-2.43402226E-003,4.88248132E-002,-7.06177503E-002,6.24311231E-002,2.37270202E-002,-3.28262016E-004,-3.08714854E-003,-6.34882227E-003,-3.39139104E-002,-2.94253174E-002,-3.03511508E-002,-2.12311675E-003,3.24944928E-002,3.19266468E-002,-1.04616182E-002,-2.29319744E-002,3.62934768E-002,5.24914898E-002,4.01269132E-003,-6.44117296E-002,-3.06539331E-002,-4.41541784E-002,-3.68923917E-002,2.35527195E-002,1.64446328E-002,1.29414424E-002,6.4051643E-002,-2.60969345E-002,1.20648749E-001,3.07792965E-002]
There is a very important part missing from these two examples. We are not performing a Similarity Search, to see how two vectors (and the text it is representing) are similar to each other in 384 dimensional space. I’ll have a look at how to do this and the additional steps needed in the next post.
In my next blog post on this topic, I’ll explore using the AI Model to add Vector data to each Wine in our dataset, to the data and vectors with some Similarity searches, adding vector indexes and how these impact on the queries, how we can automatically update or add new vectors are data is added or update, and we can finish with a comparison with our Lusca wine to find similar wines for our collection.
Oracle Semantic Search using Vectors on Iceberg Tables
In my previous blog posts I’ve explored how to use Iceberg Tables and how to integrate these in with your Data Lake. Additionally, I showed how to setup your Oracle Data Lake (Database) to access the data stored in Iceberg Tables stored in OCI Object Storage. To access this Iceberg Table data from the Oracle Database we created an External Table. This allows us to query the Iceberg Table data as if it was internal to the database. With all new releases there is continuous improvement in the features and to make them easier to use. One such new feature (as of 23.26.1) is the ability to read vector data types from an External Table. This new feature is called or referred to as ‘Vectors on Ice’.
With Oracle Database External Tables now supporting vector embedding stored in Iceberg Tables, means you can generate vector embeddings with your preferred embedding model (external to Oracle using your faviourite tool/library), store them in Iceberg Tables in cloud object storage (OCI Object Storage, AWS S3, etc.), and run semantic search from Oracle AI Database, accessing vector data stored within the database and externally with the minimum of data movement and with similar SQL queries.
Summary: Vectors on Ice lets you ask semantic questions of your data lake using the same SQL and vector search tooling you already use in Oracle Database, without copying or moving the data.
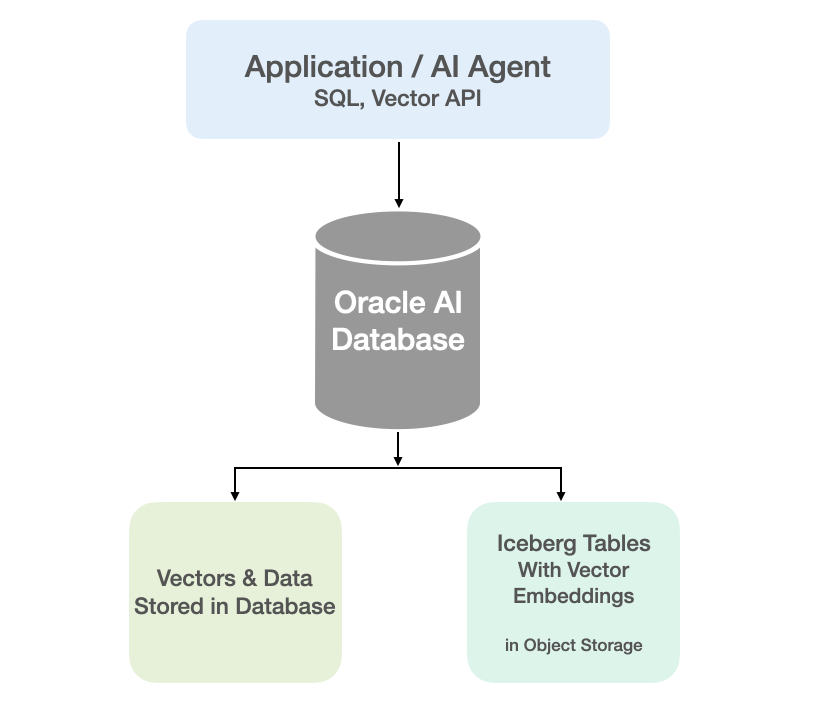
Oracle vector indexes can be created to speed up semantic search over the vectors in the Iceberg Tables. You don’t need to copy Iceberg data into an Oracle Database to use them or to update the Vector Index. The vector indexes are stored standalone in the database and (depending on the type of Vector Index used) can automatic sync as data is added to the files on Object Storage. The syncing of the Vector Index is not immediately updated but is updated based on a background process, so you can look on this index being eventually consistent. In might happen fairly quickly or during large write periods in might take seconds to a few minutes to get fully up-to-date.
Let’s have a look at an example of this. The following example builds upon my example in my previous posts which walked through the setup sets needed for gaining access to Object Storage, etc
CREATE TABLE IF NOT EXISTS external_vector_file ( id VARCHAR(10) PRIMARY KEY, text_desc VARCHAR2(1000), vec_embedding VECTOR(1024, float32) ) ORGANIZATION EXTERNAL ( TYPE ORACLE_BIGDATA DEFAULT DIRECTORY DATA_PUMP_DIR ACCESS PARAMETERS ( com.oracle.bigdata.credential.name=OCI_CRED com.oracle.bigdata.fileformat=parquet com.oracle.bigdata.access_protocol=iceberg ) LOCATION ('<path-to-iceberg-table>/metadata/v1.metadata.json') ) REJECT LIMIT UNLIMITED;
and to create a Vector Index on this external file
CREATE VECTOR INDEX external_vector_file_idx_ivf ON external_vector_file (vec_embedding)ORGANIZATION NEIGHBOR PARTITIONS;
We can now run our SQL queries on this external vector data. This query assumes we have the same vector embedding model loaded into the database.
SELECT id, text_desc, vector_distance(vec_embedding, vector_embedding(my_onnx_model using :INPUT_TERM as data) DISTFROM external_vector_fileORDER BY DISTFETCH FIRST 10 ROWS ONLY;
Why is this important? This allows organisations that already store vectors or embeddings in Iceberg Tables, as part of an existing ML pipeline, and who want to query them, performing semantic search, alongside the data in their Oracle Database, can now do so with the minimum of setup. This brings the benefits of Semantic Search to a wider audience within the organisation.
Using NotebookLM to help with understanding Oracle Analytics Cloud or any other product
Over the past few months, we’ve seen a plethora of new LLM related products/agents being released. One such one is NotebookLM from Google. The offical description say “NotebookLM is an AI-powered research and note-taking tool from Google Labs that allows users to ground a large language model (like Gemini) in their own documents, such as PDFs, Google Docs, website URLs, or audio, acting as a personal, intelligent research assistant. It facilitates summarizing, analyzing, and querying information within these specific sources to create study guides, outlines, and, notably, “Audio Overviews” (podcast-style summaries)”
Let’s have a look at using NotebookLM to help with answering questions and how it can help with understanding Oracle Analytics Cloud (OAC).

Yes, you’ll need a Google account, and Yes you need to be OK with uploading your documents to NotebookLM. Make sure you are not breaking any laws (IP, GDPR, etc). It’s really easy to create your first notebook. Simply click on ‘Create new notebook’.
When the notebook opens, you can add your documents and webpages to the notebook. These can be documents in PDF, audio, text, etc to the notebook repository. Currently, there seems to be a limit of 50 documents and webpages that can be added.
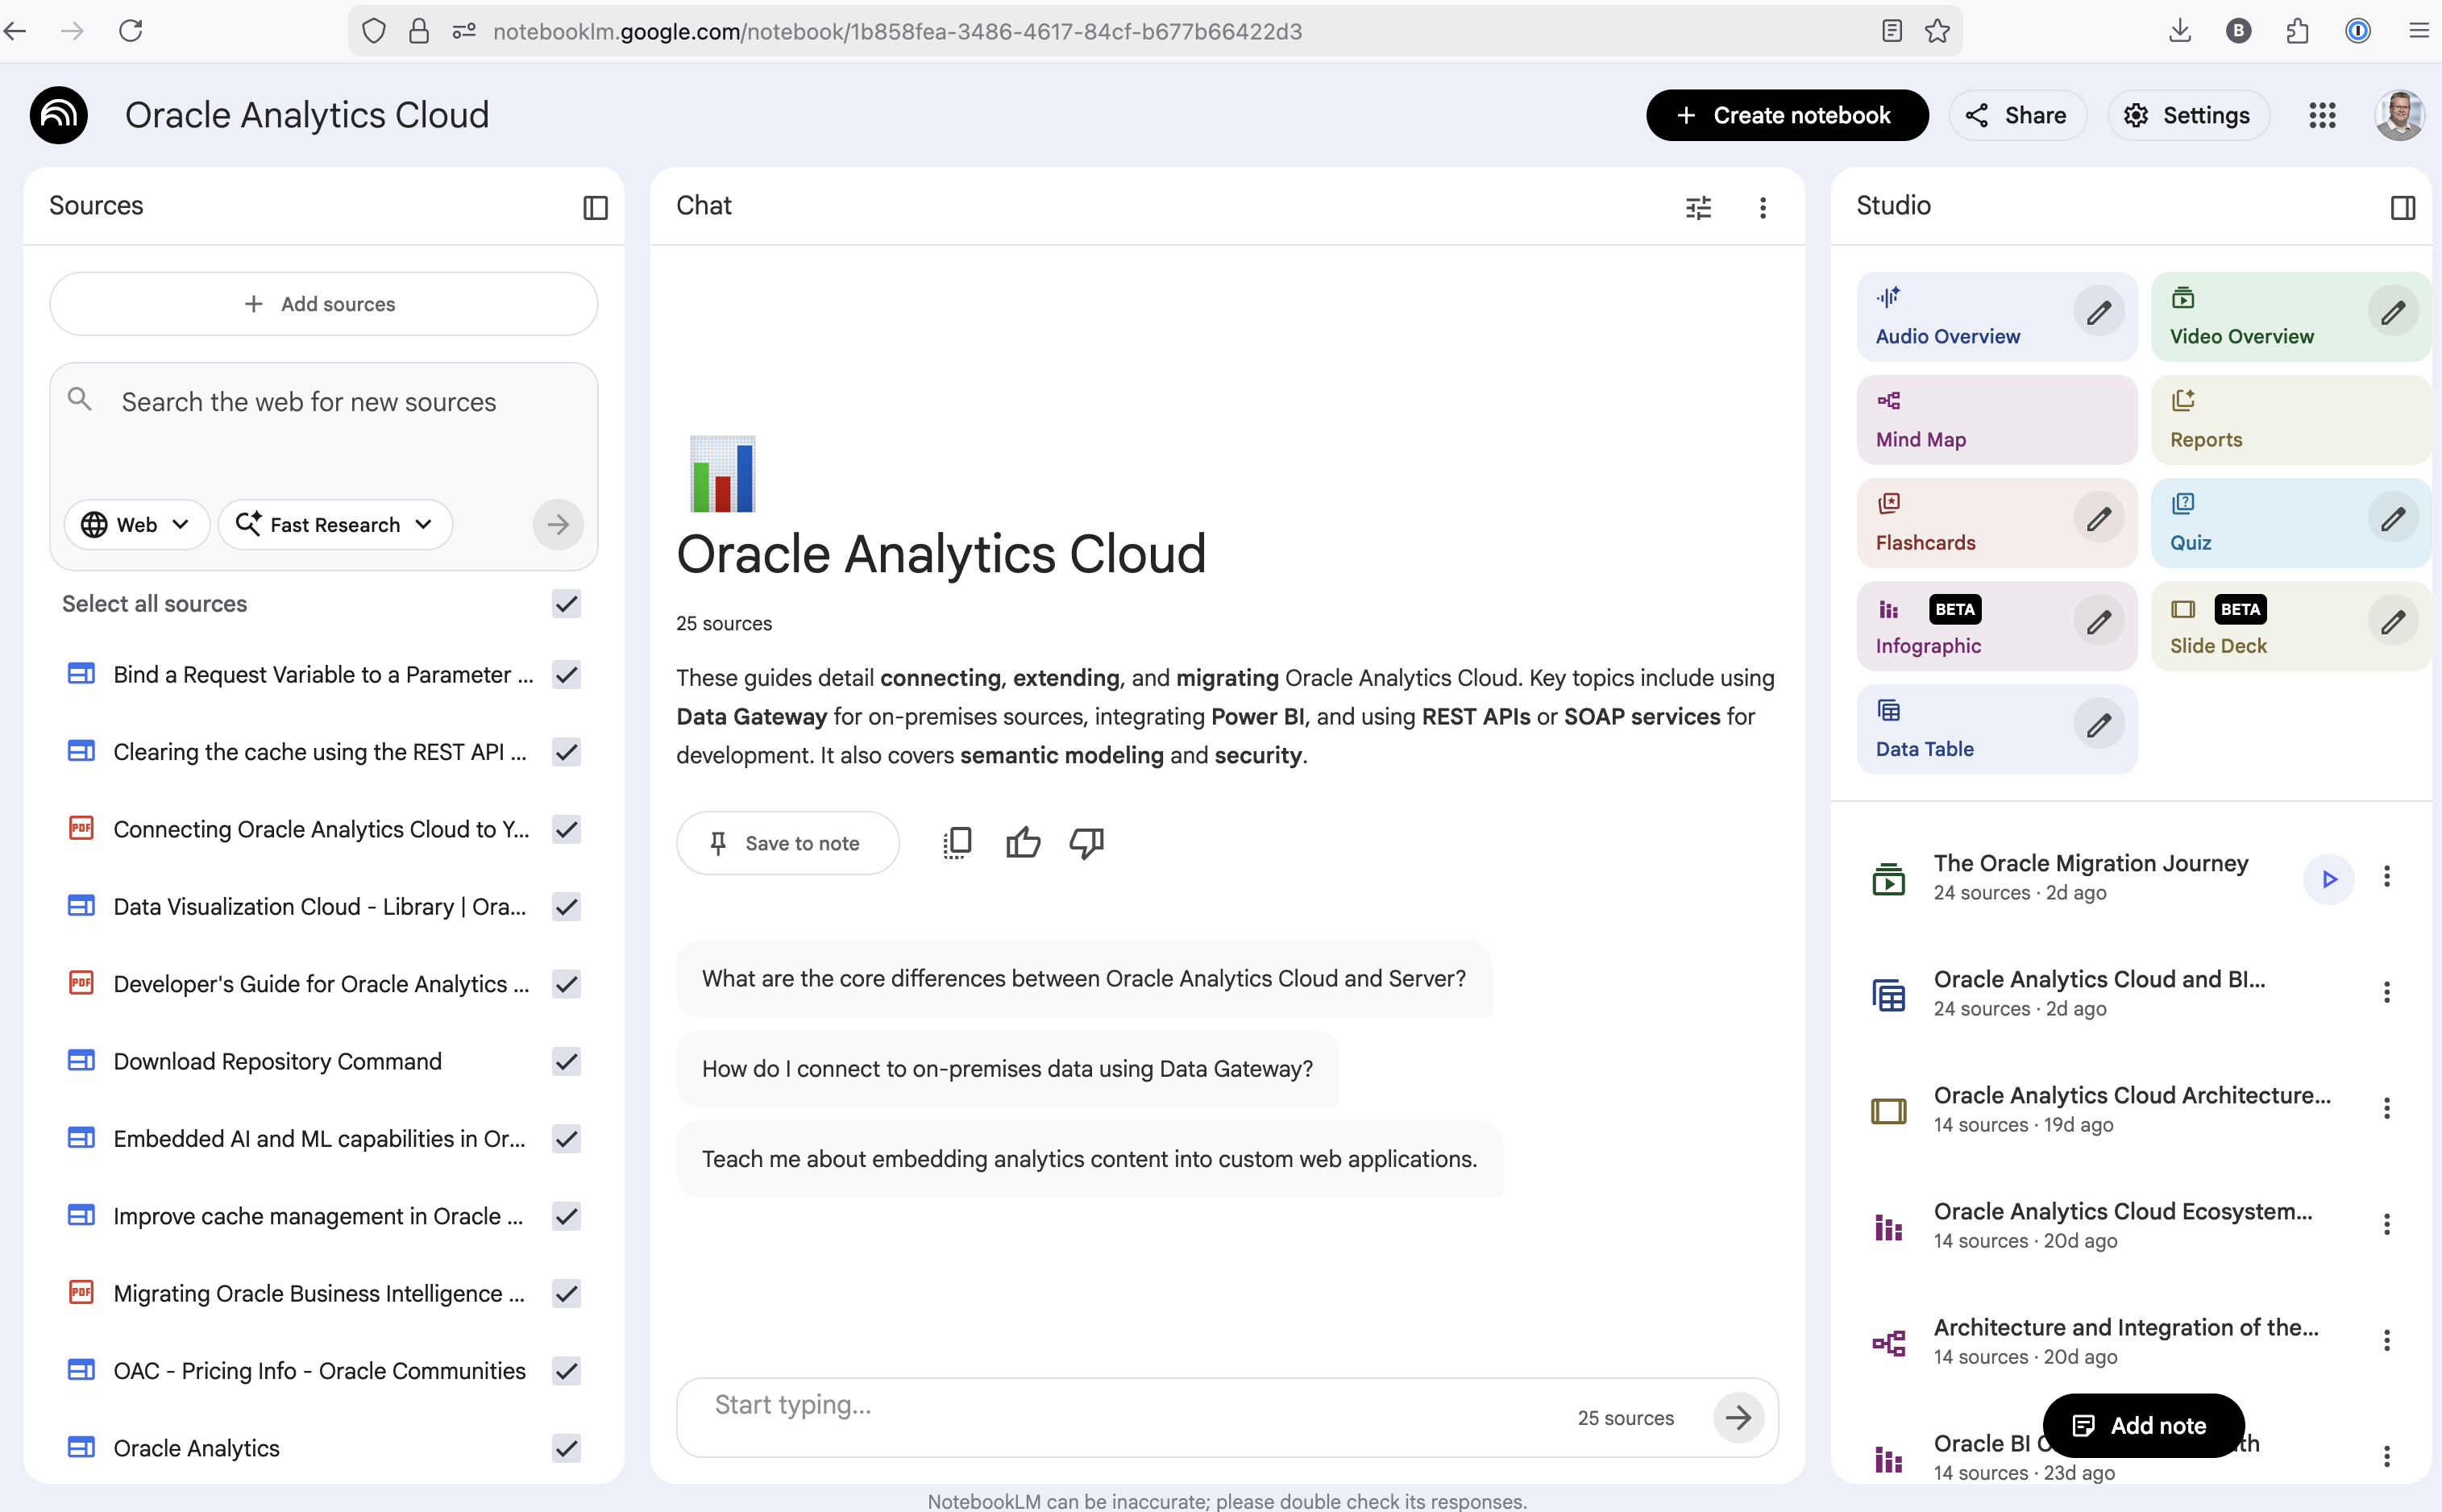
The main part of the NotebookLM provides a chatbot where you can ask questions, and the NotebookLM will search through the documents and webpages to formulate an answer. In addition to this, there are features that allow you to generate Audio Overview, Video Overview, Mind Map, Reports, Flashcards, Quiz, Infographic, Slide Deck and a Data Table.
Before we look at some of these and what they have created for Oracle Analytics Cloud, there is a small warning. Some of these can take a long time to complete, that is, if they complete. I’ve had to run some of these features multiple times to get them to create. I’ve run all of the features, and the output from these can be seen on the right-hand side of the above image.
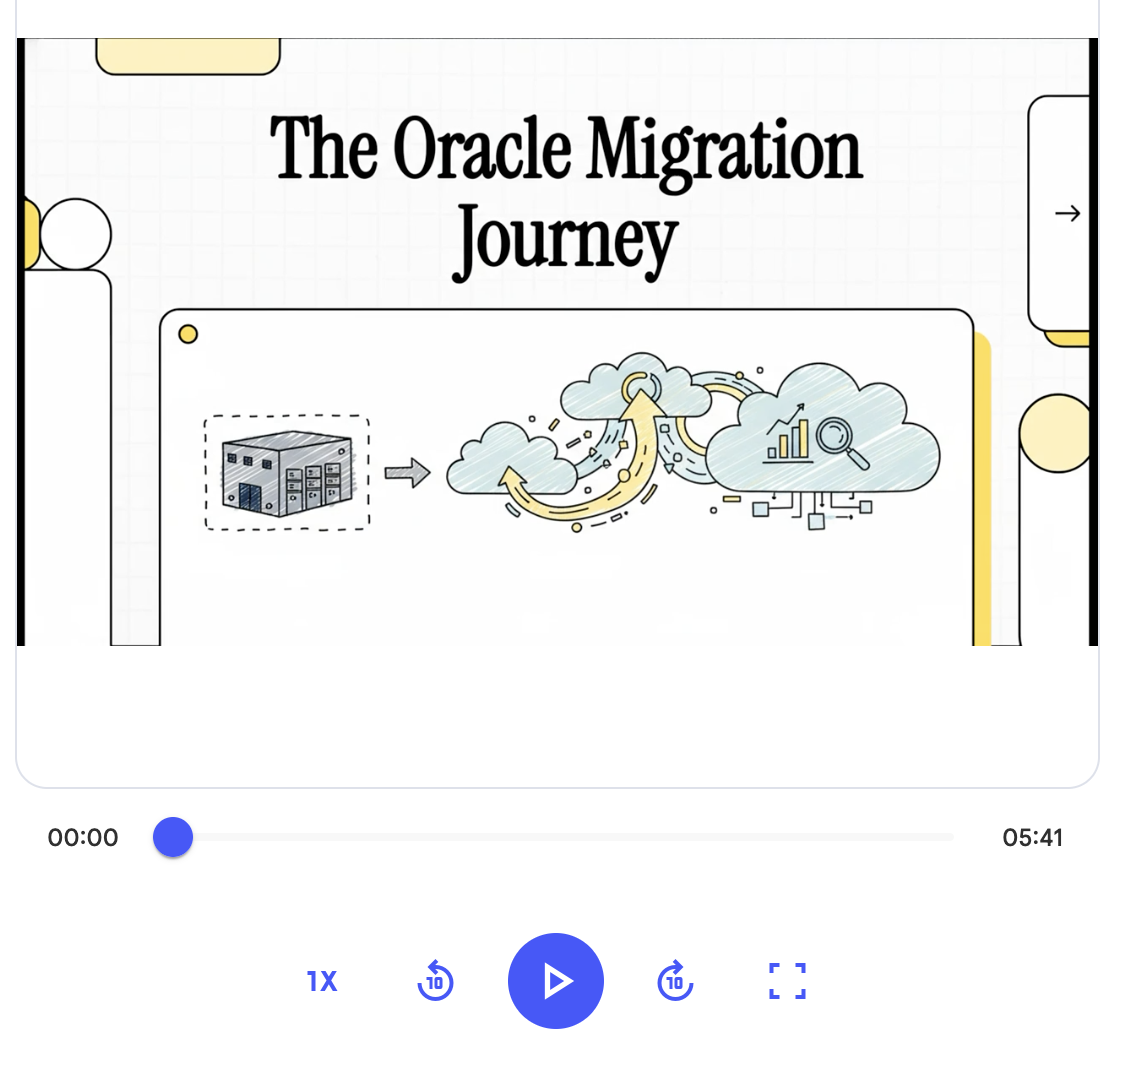
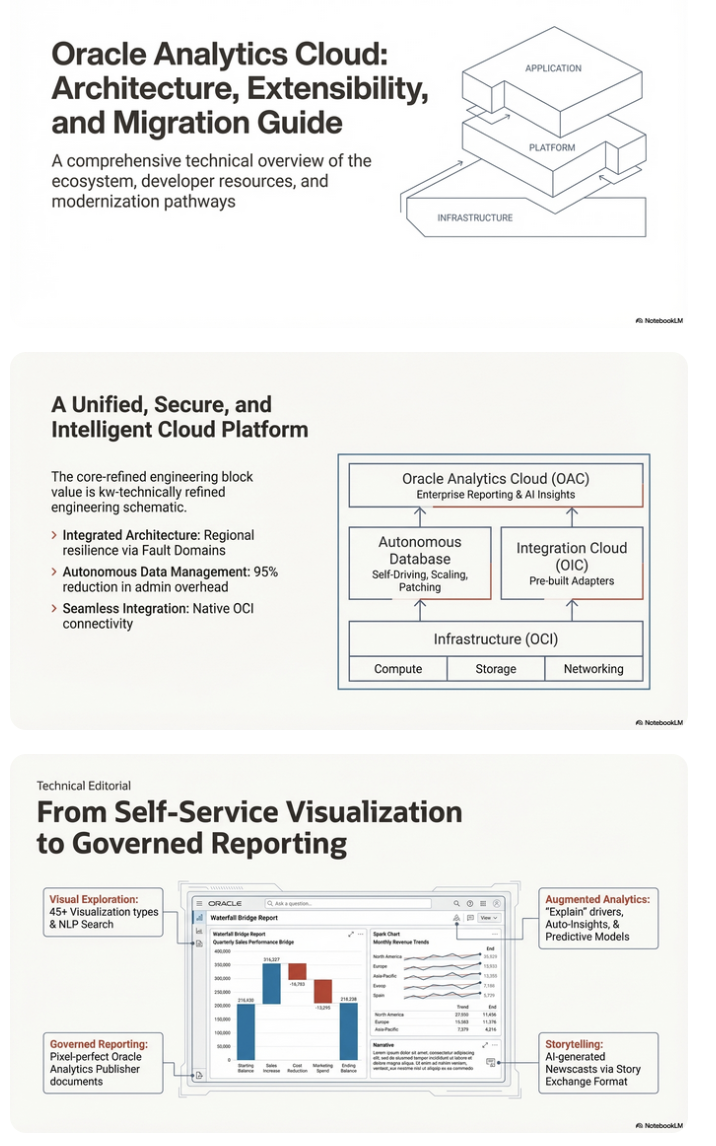
It created a 15-slide presentation on Oracle Analytics Cloud and its various features, and a five minute video on migrating OAC.
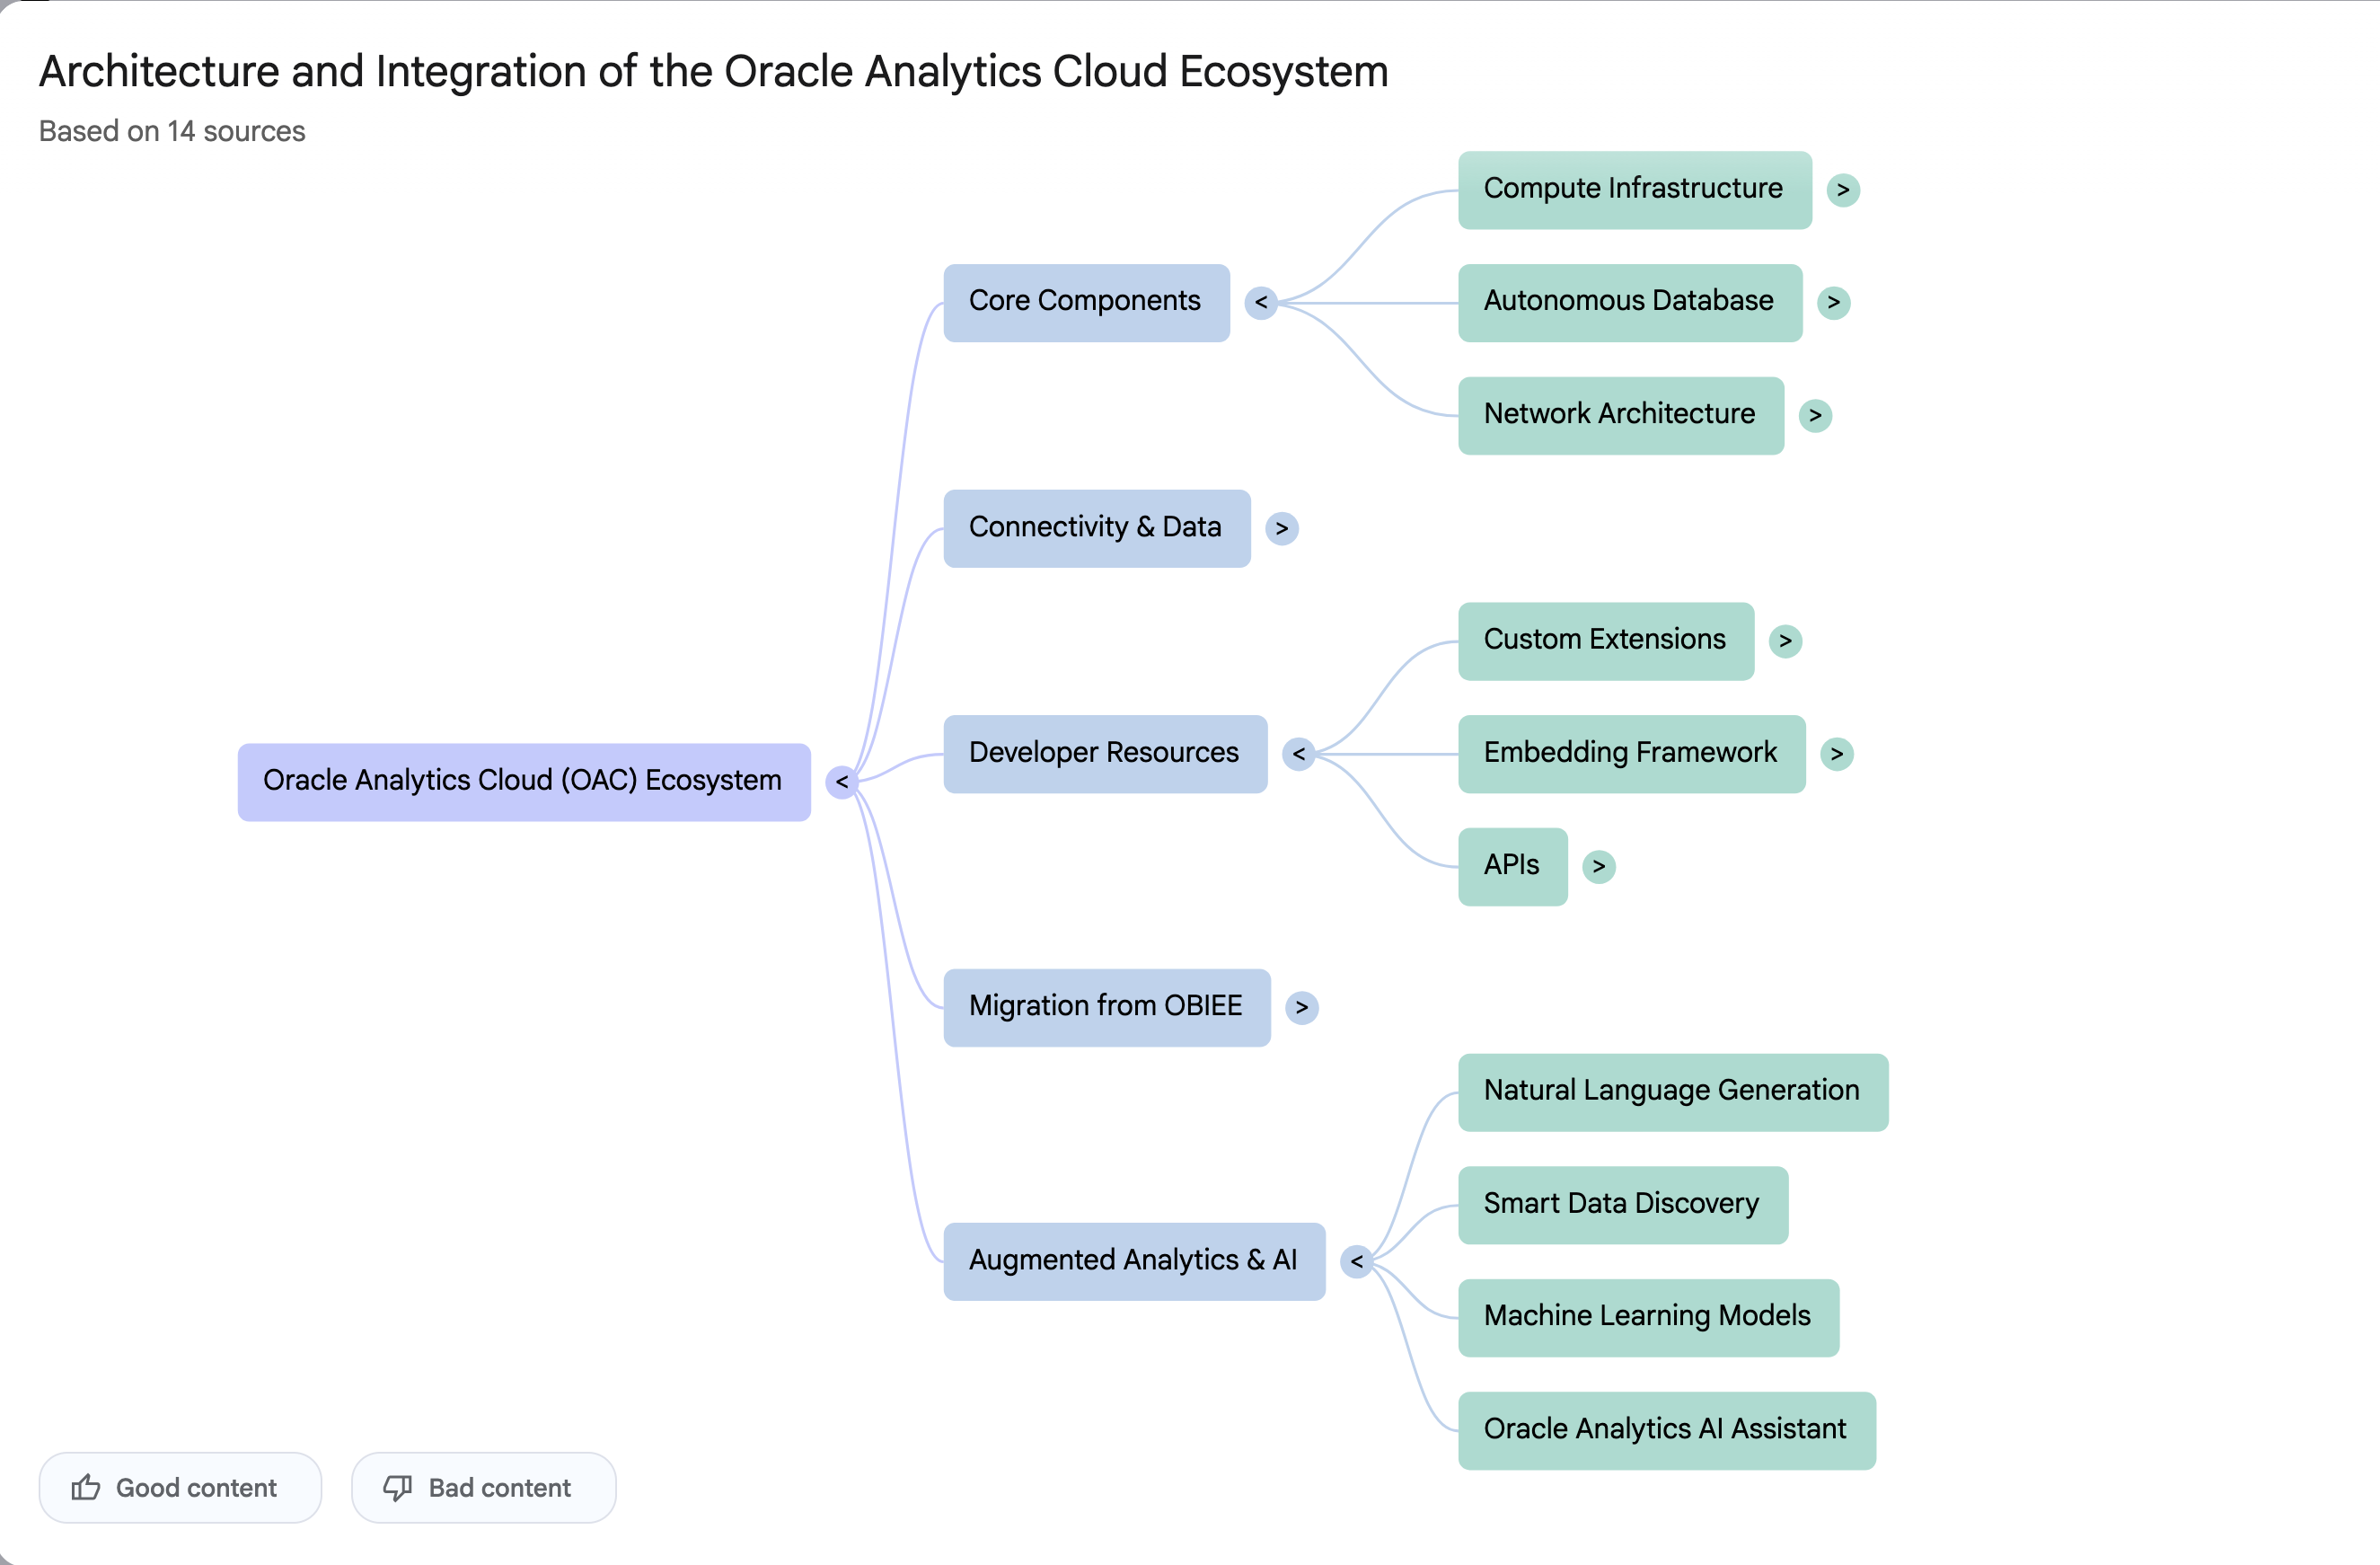
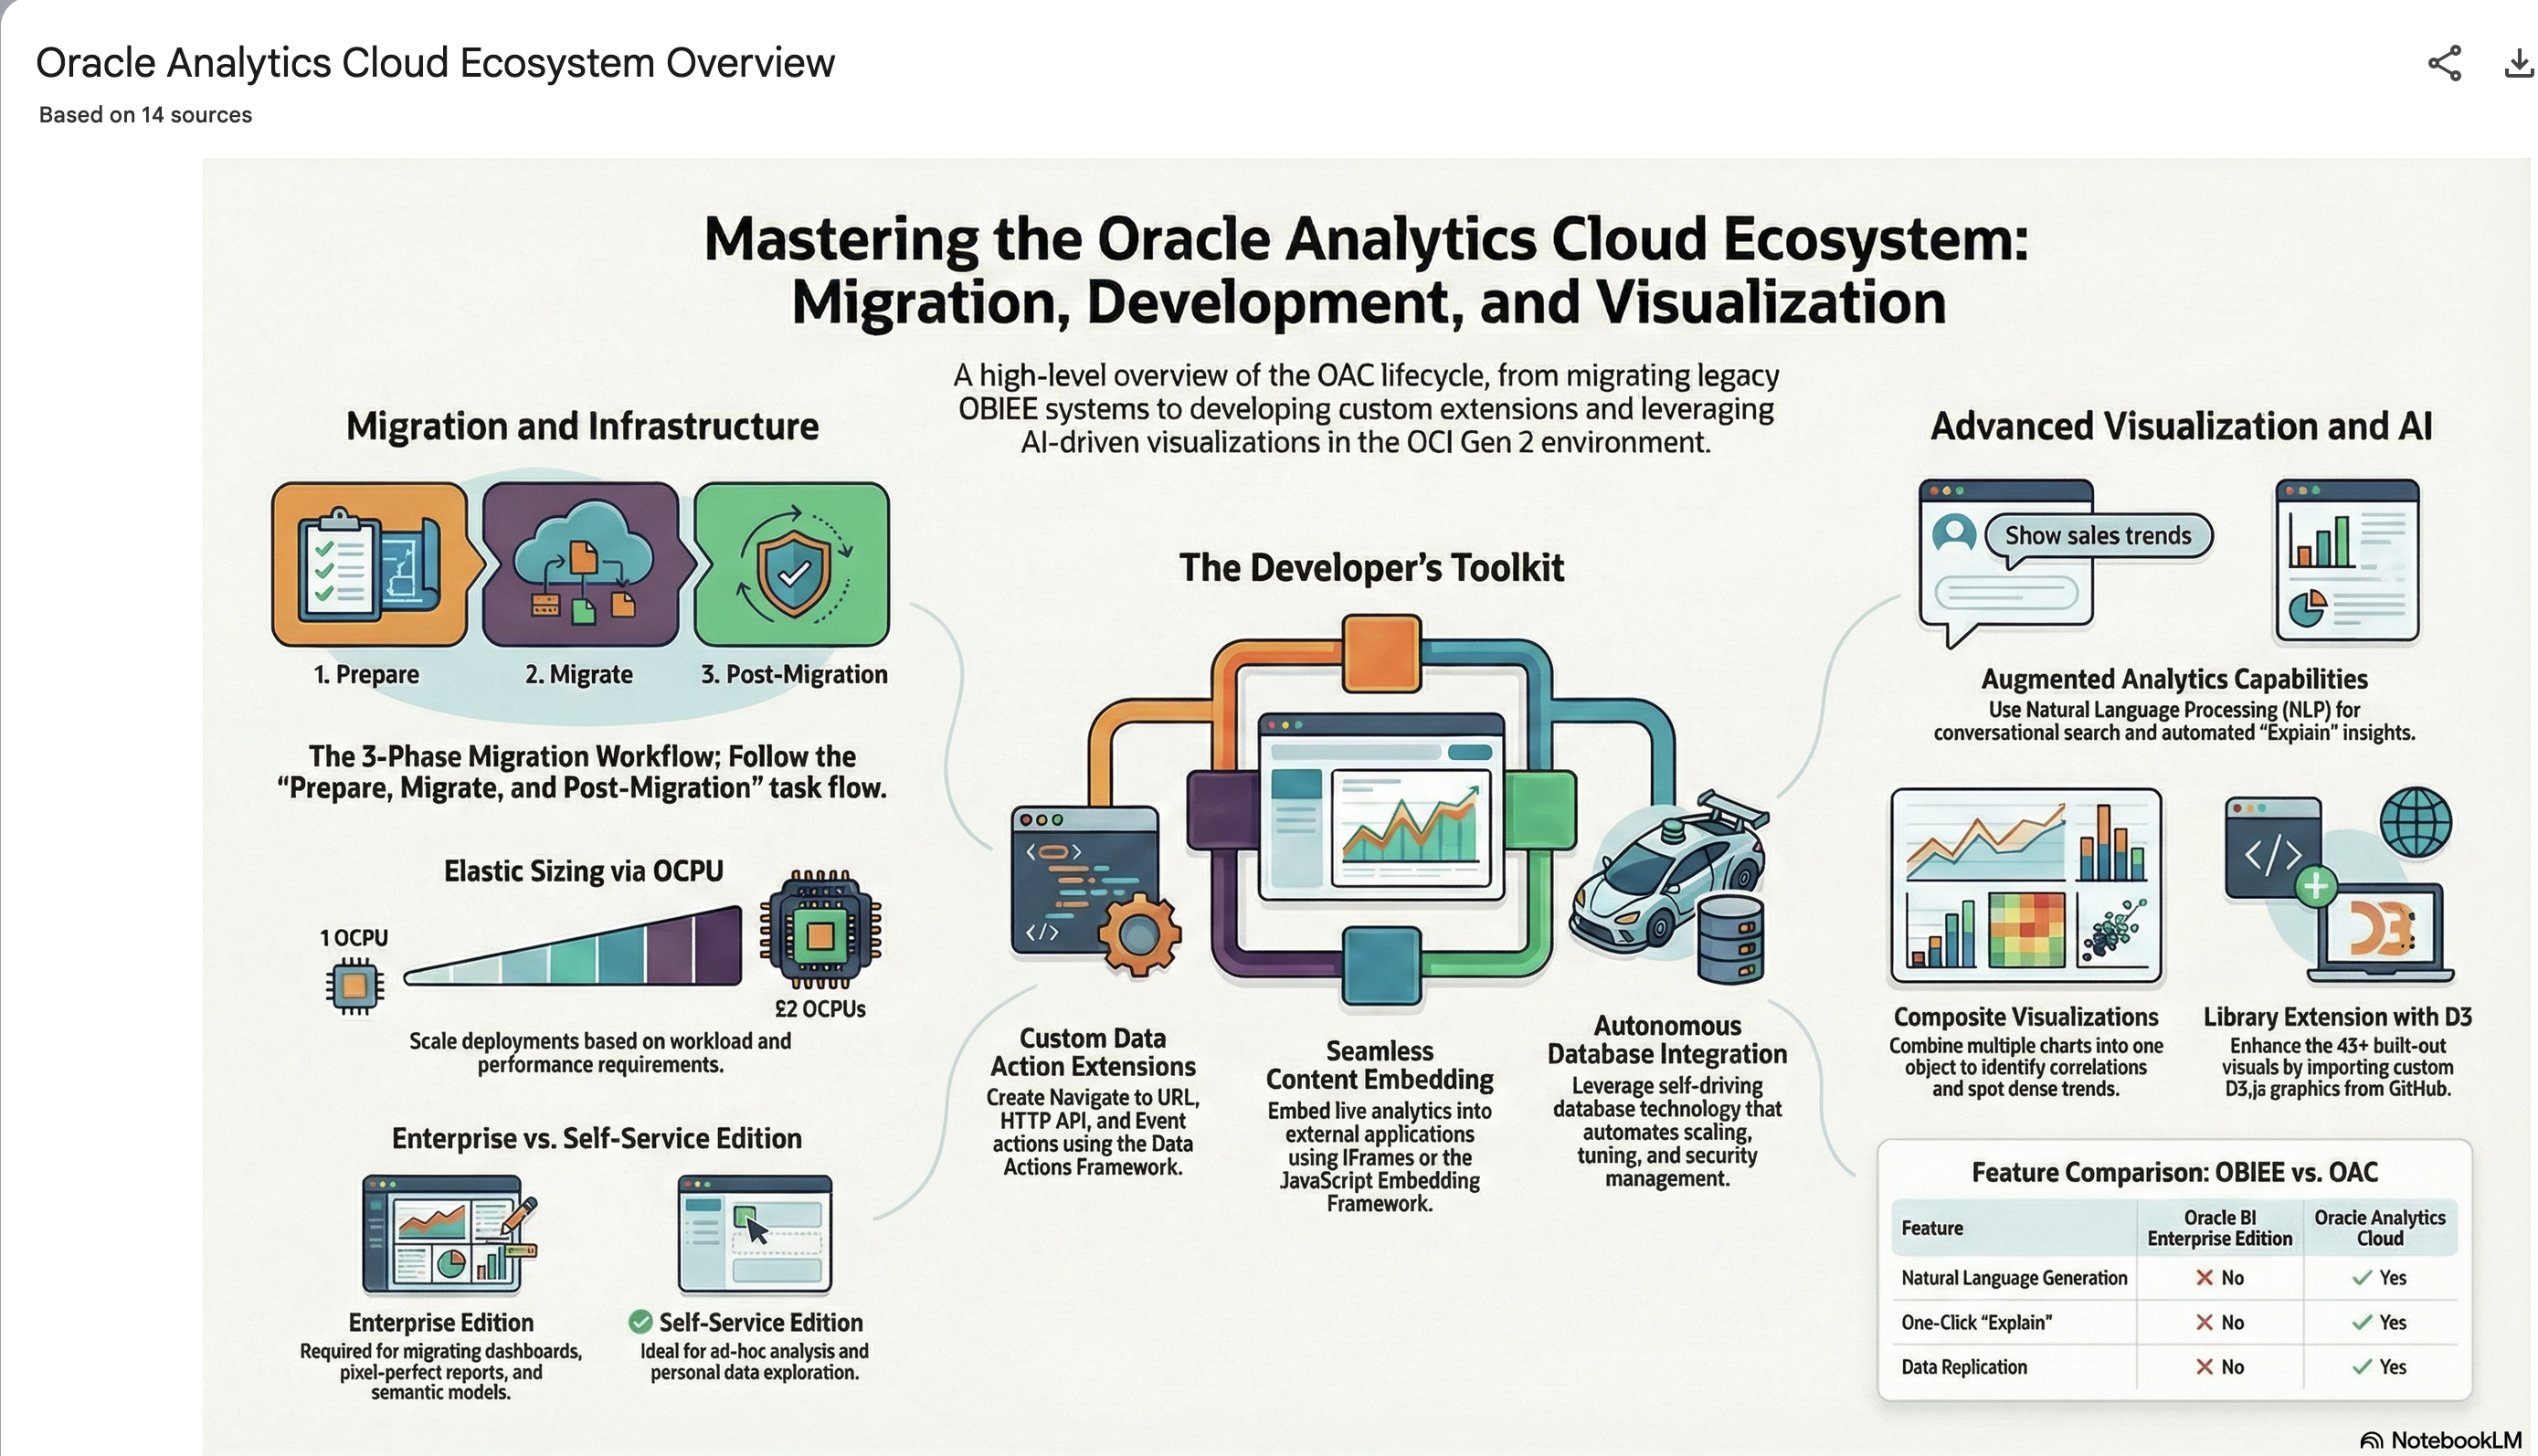
It also created a Mind-map, and an Infographic.
Calling Custom OCI Gen AI Agent using Python
In a previous post, I demonstrated how to create a custom Generative AI Agent on OCI. This GenAI Agent was built using some of Shakespeare’s works. Using the OCI GenAI Agent interface is an easy way to test the Agent and to see how it behaves. Beyond that, it doesn’t have any use as you’ll need to call it using some other language or tool. The most common of these is using Python.
The code below calls my GenAI Agent, which I’ve called BOCAS (Brendan’s Oracle Chat Agent for Shakespeare).
import oci
from oci import generative_ai_agent_runtime
import json
from colorama import Fore, Back, Style


CONFIG_PROFILE = "DEFAULT"
config = oci.config.from_file('~/.oci/config', CONFIG_PROFILE)

#AI Agent service endpoint
SERVICE_EP = <add your Service Endpoint>
AGENT_EP_ID = <add your GenAI Agent Endpoint>

welcome_msg = "This is Brendan's Oracle Chatbot Agent for Shakespeare. Ask questions about the works of Shakespeare."

def gen_Agent_Client():
    #Initiate AI Agent runtime client
    genai_agent_runtime_client = generative_ai_agent_runtime.GenerativeAiAgentRuntimeClient(config, service_endpoint=SERVICE_EP, retry_strategy=oci.retry.NoneRetryStrategy())

    create_session_details = generative_ai_agent_runtime.models.CreateSessionDetails()
    create_session_details.display_name = "Welcome to BOCAS"
    create_session_details.idle_timeout_in_seconds = 20
    create_session_details.description = welcome_msg

    return create_session_details, genai_agent_runtime_client

def Quest_Answer(user_question, create_session_details, genai_agent_runtime_client):
    #Create a Chat Session for AI Agent
    try:
        create_session_response = genai_agent_runtime_client.create_session(create_session_details, AGENT_EP_ID)
    except:
        create_session_details, genai_agent_runtime_client = gen_Agent_Client()
        create_session_response = genai_agent_runtime_client.create_session(create_session_details, AGENT_EP_ID)

    #Define Chat details and input message/question
    session_details = generative_ai_agent_runtime.models.ChatDetails()
    session_details.session_id = create_session_response.data.id
    session_details.should_stream = False
    session_details.user_message = user_question

    #Get AI Agent Respose
    session_response = genai_agent_runtime_client.chat(agent_endpoint_id=AGENT_EP_ID, chat_details=session_details)
    return session_response

print(Style.BRIGHT + Fore.RED + welcome_msg + Style.RESET_ALL)

ses_details, genai_client = gen_Agent_Client()

while True:
    question = input("Enter text (or Enter to quit): ")
    if not question:
        break
    chat_response = Quest_Answer(question, ses_details, genai_client)
    print(Style.DIM +'********** Question for BOCAS **********')
    print(Style.BRIGHT + Fore.RED + question + Style.RESET_ALL)
    print(Style.DIM + '********** Answer from BOCAS **********' + Style.RESET_ALL)
    print(Fore.MAGENTA + chat_response.data.message.content.text + Style.RESET_ALL)

print("*** The End - Exiting BOCAS ***")
When the above code is run, it will loop, asking for questions, until no question is added and the ‘Enter’ key is pressed. Here is the output of the BOCAS running for some of the questions I asked in my previous post, along with a few others. These questions are based on the Irish Leaving Certificate English Examination.
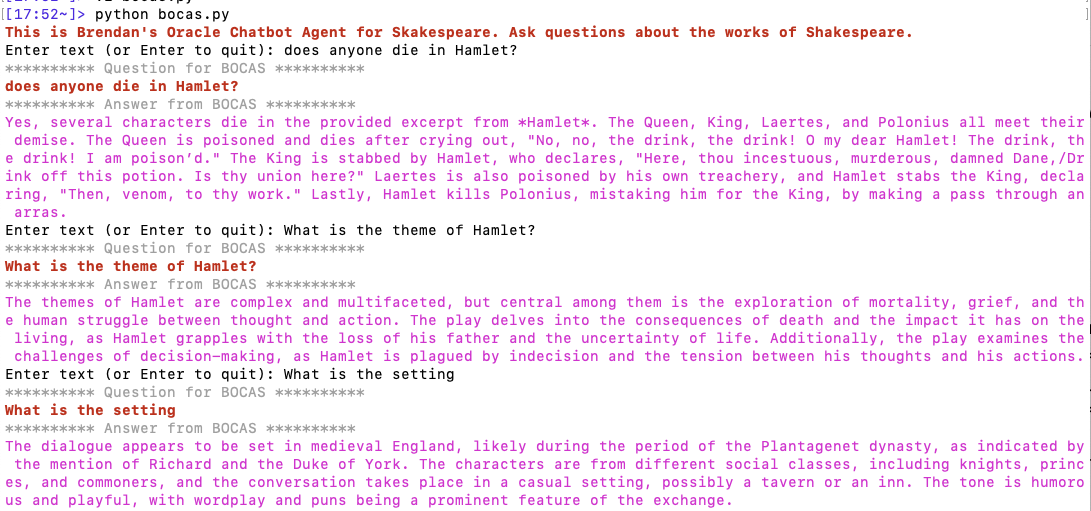
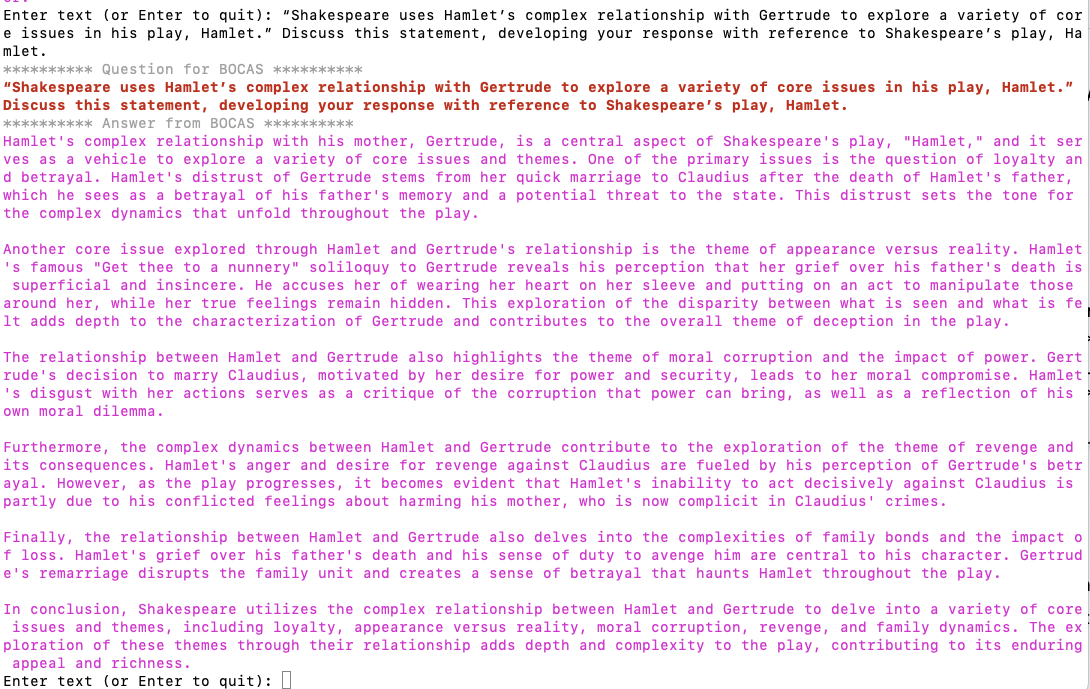
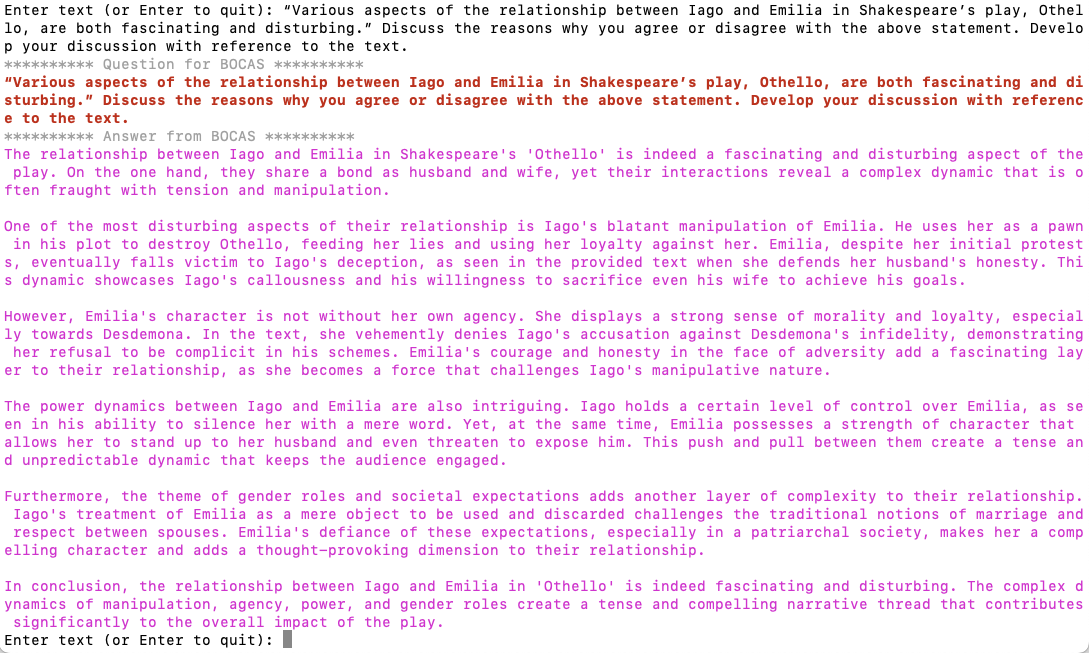
Using a Gen AI Agent to answer Leaving Certificate English papers
In a previous post, I walked through the steps needed to create a Gen AI Agent on a data set of documents containing the works of Shakespeare. In this post, I’ll look at how this Gen AI Agent can be used to answer questions from the Irish Leaving Certificate Higher Level English examination papers from the past few years.
For this evaluation, I will start with some basic questions before moving on to questions from the Higher Level English examination from 2022, 2023 and 2024. I’ve pasted the output generated below from chatting with the AI Agent.
The main texts we will examine will be Othello, McBeth and Hamlett. Let’s start with some basic questions about Hamlet.
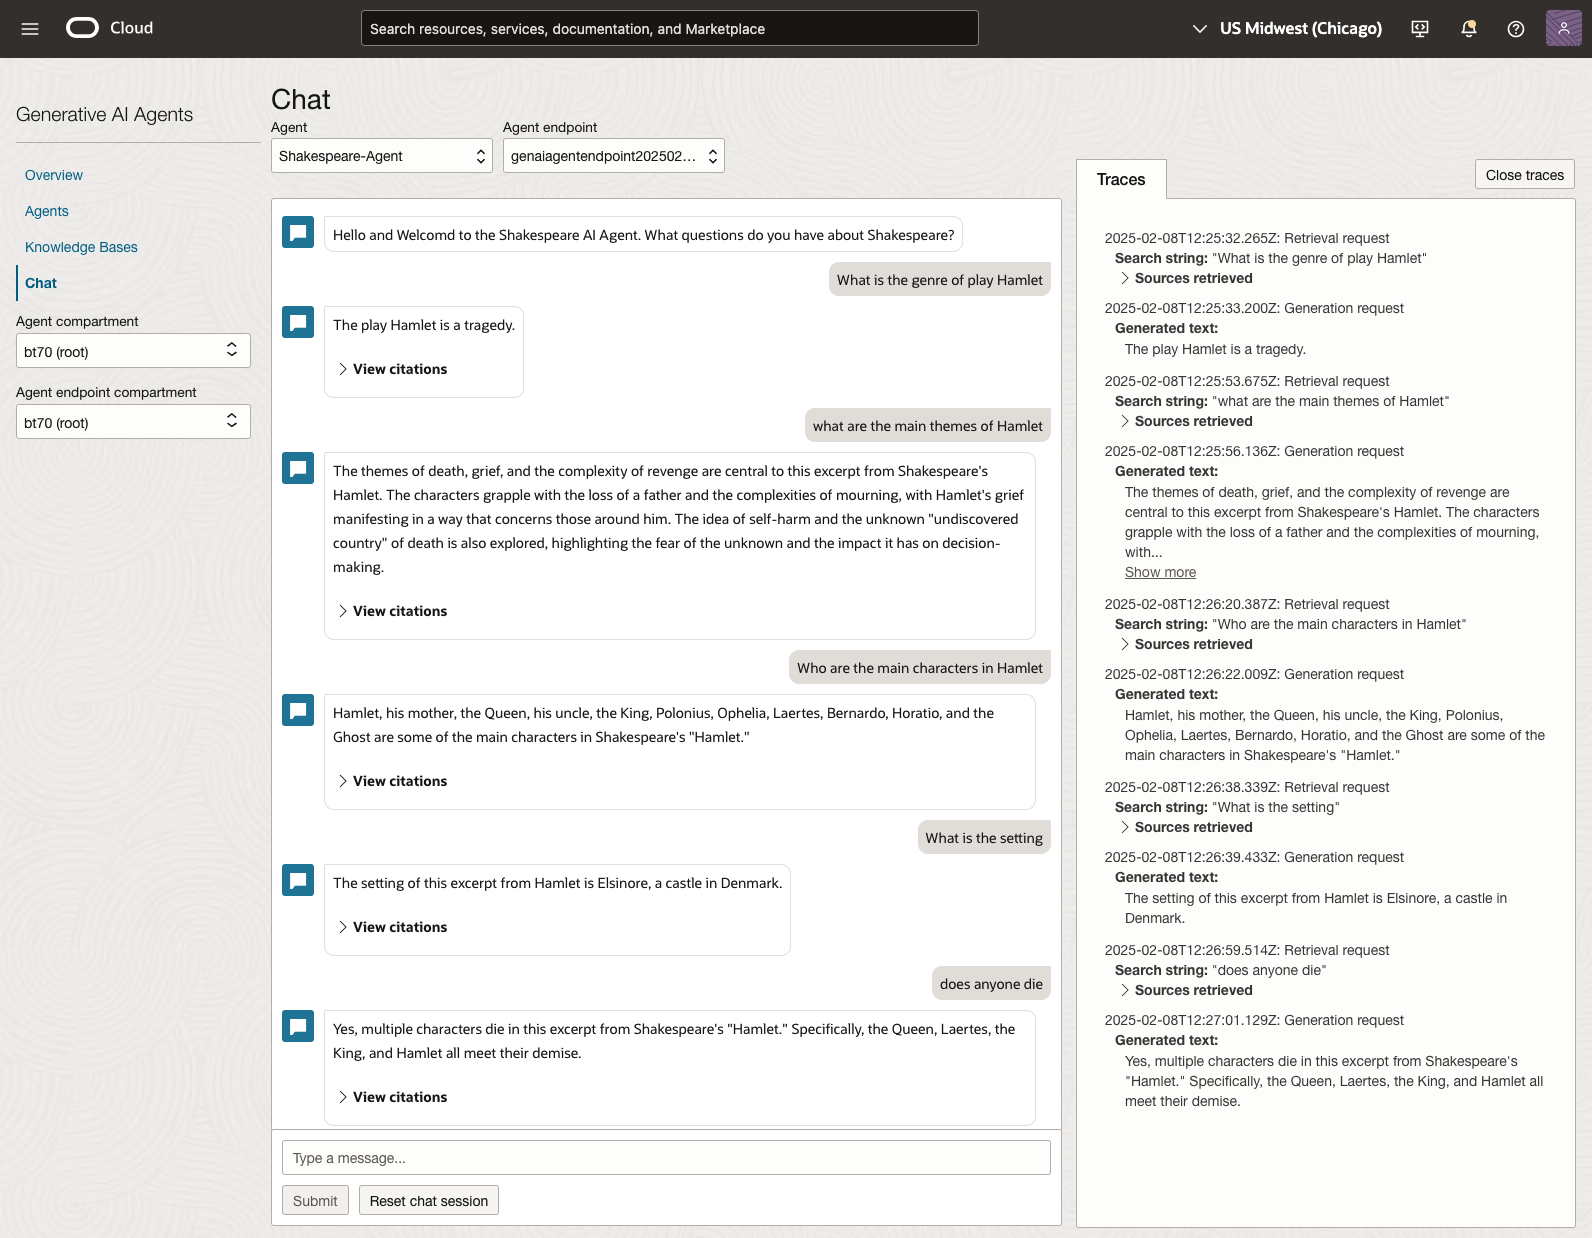
We can look at the sources used by the AI Agent to generate their answer, by clicking on View citations or Sources retrieved on the right-hand side panel.
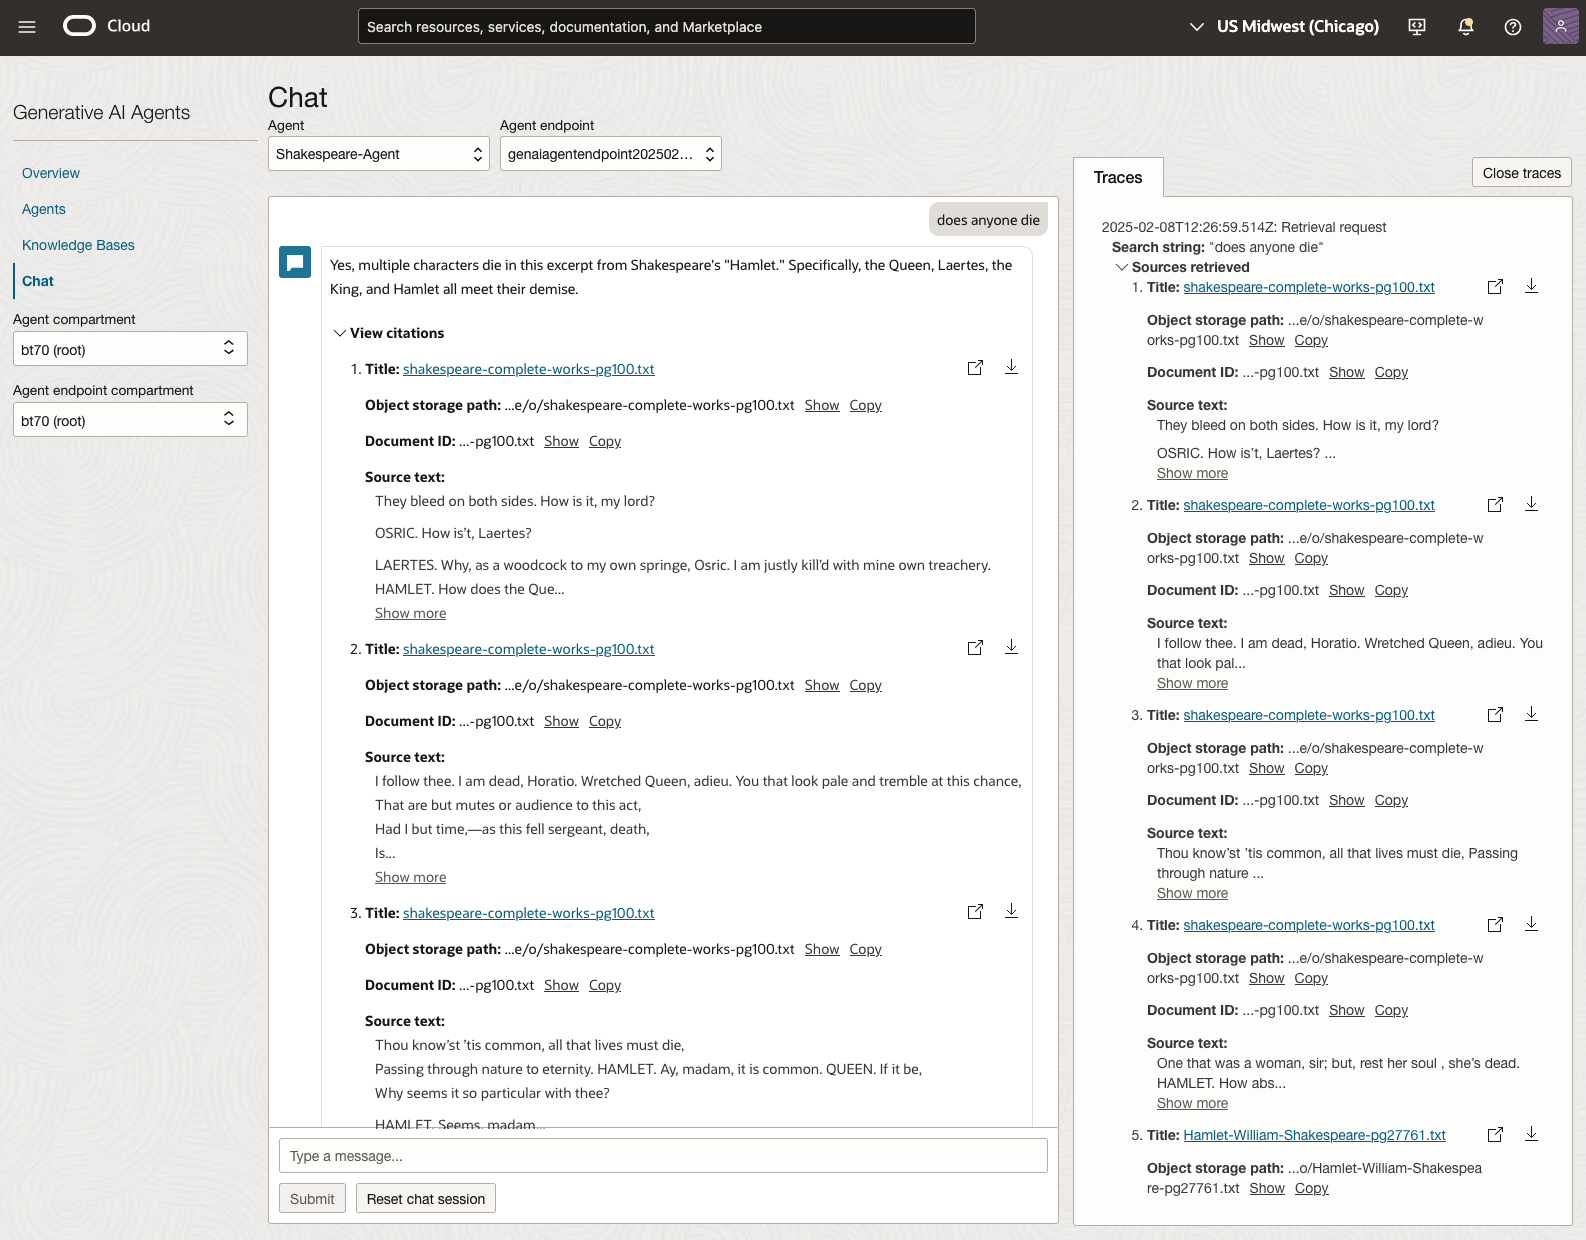
Let’s have a look at the 2022 English examination question on Othello. Students typically have the option of answering one out of two questions.
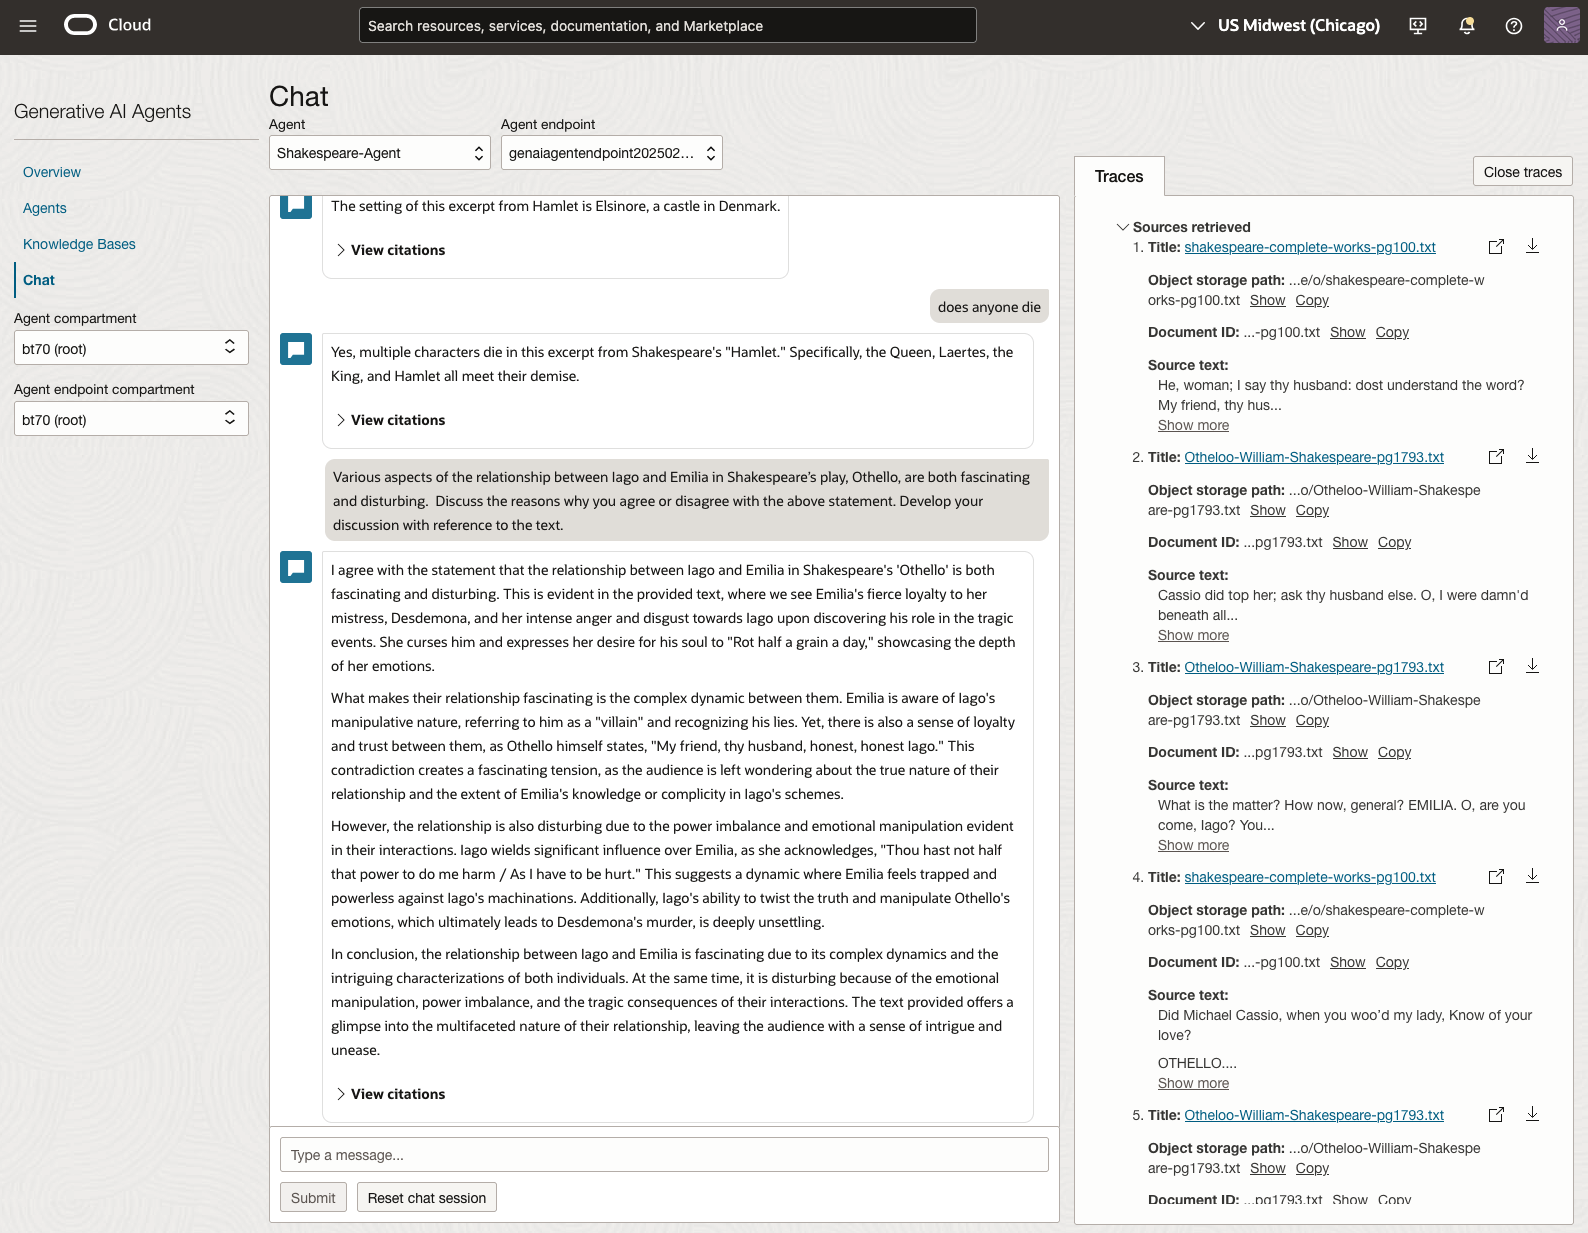
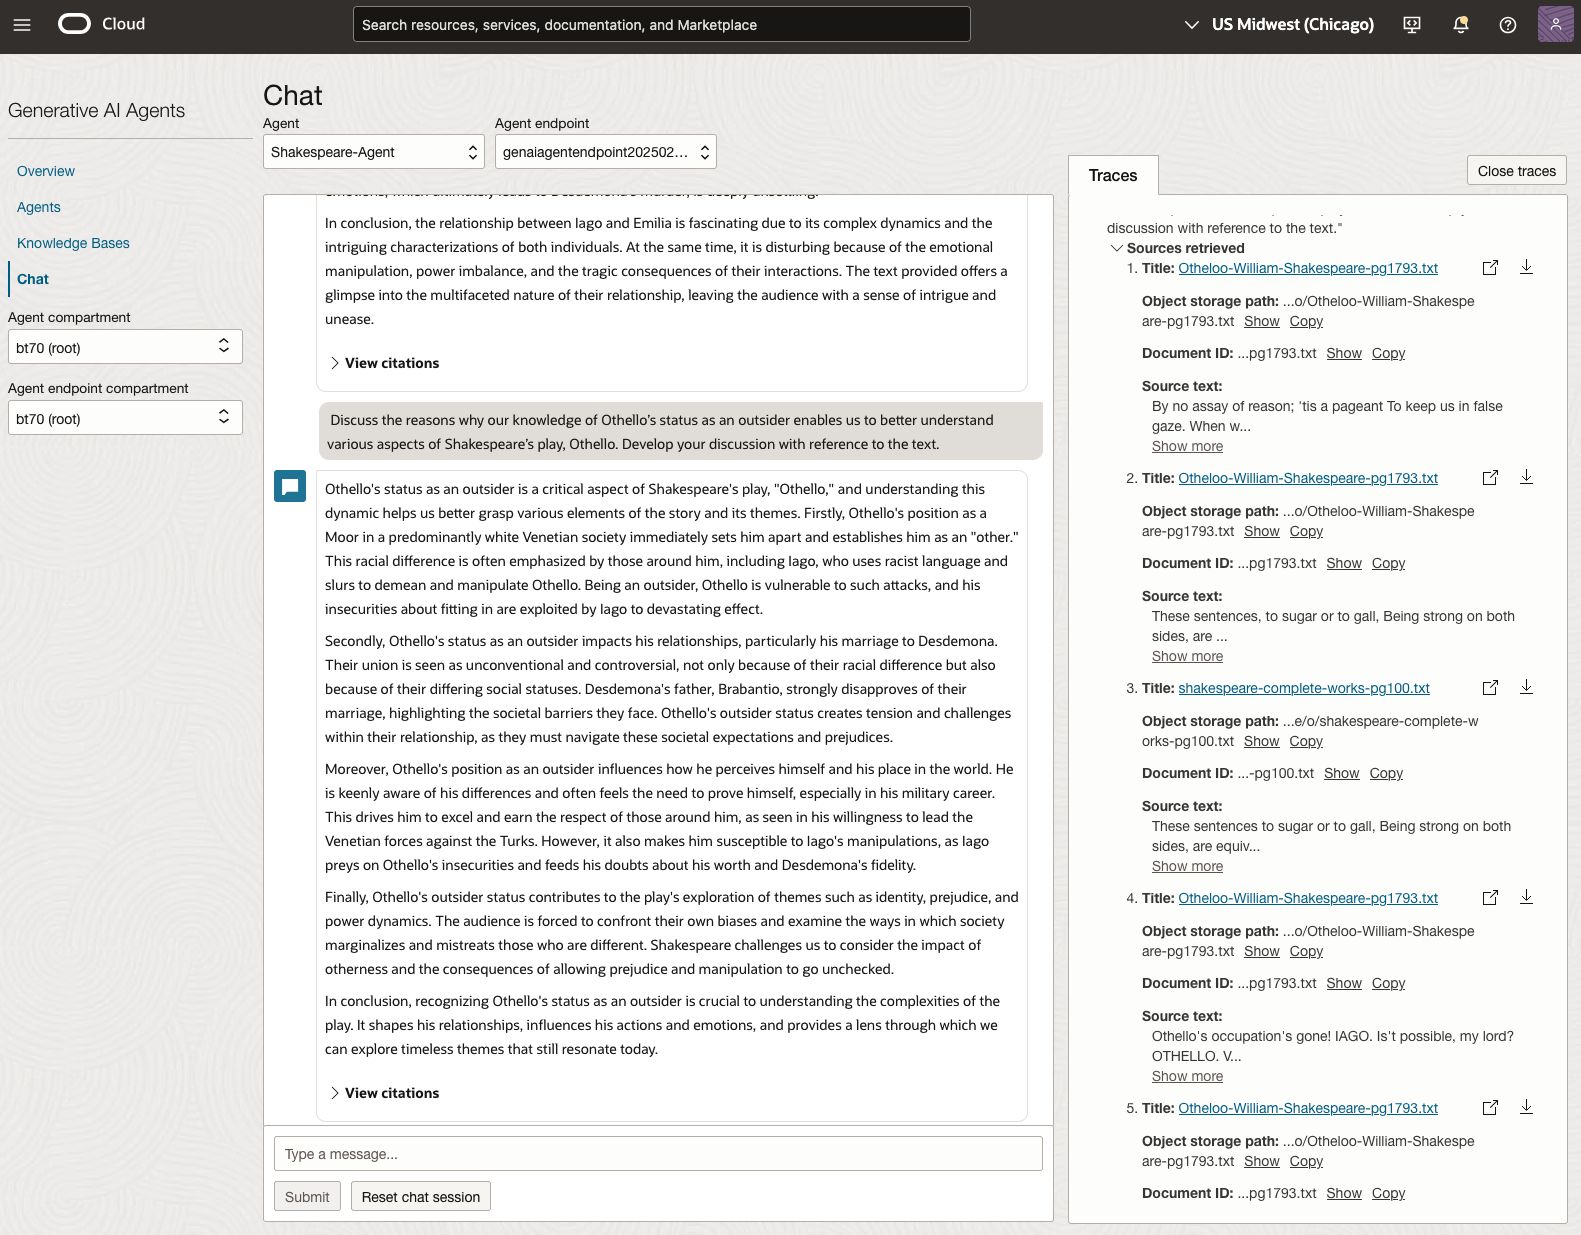
In 2023, the Shakespeare text was McBeth.
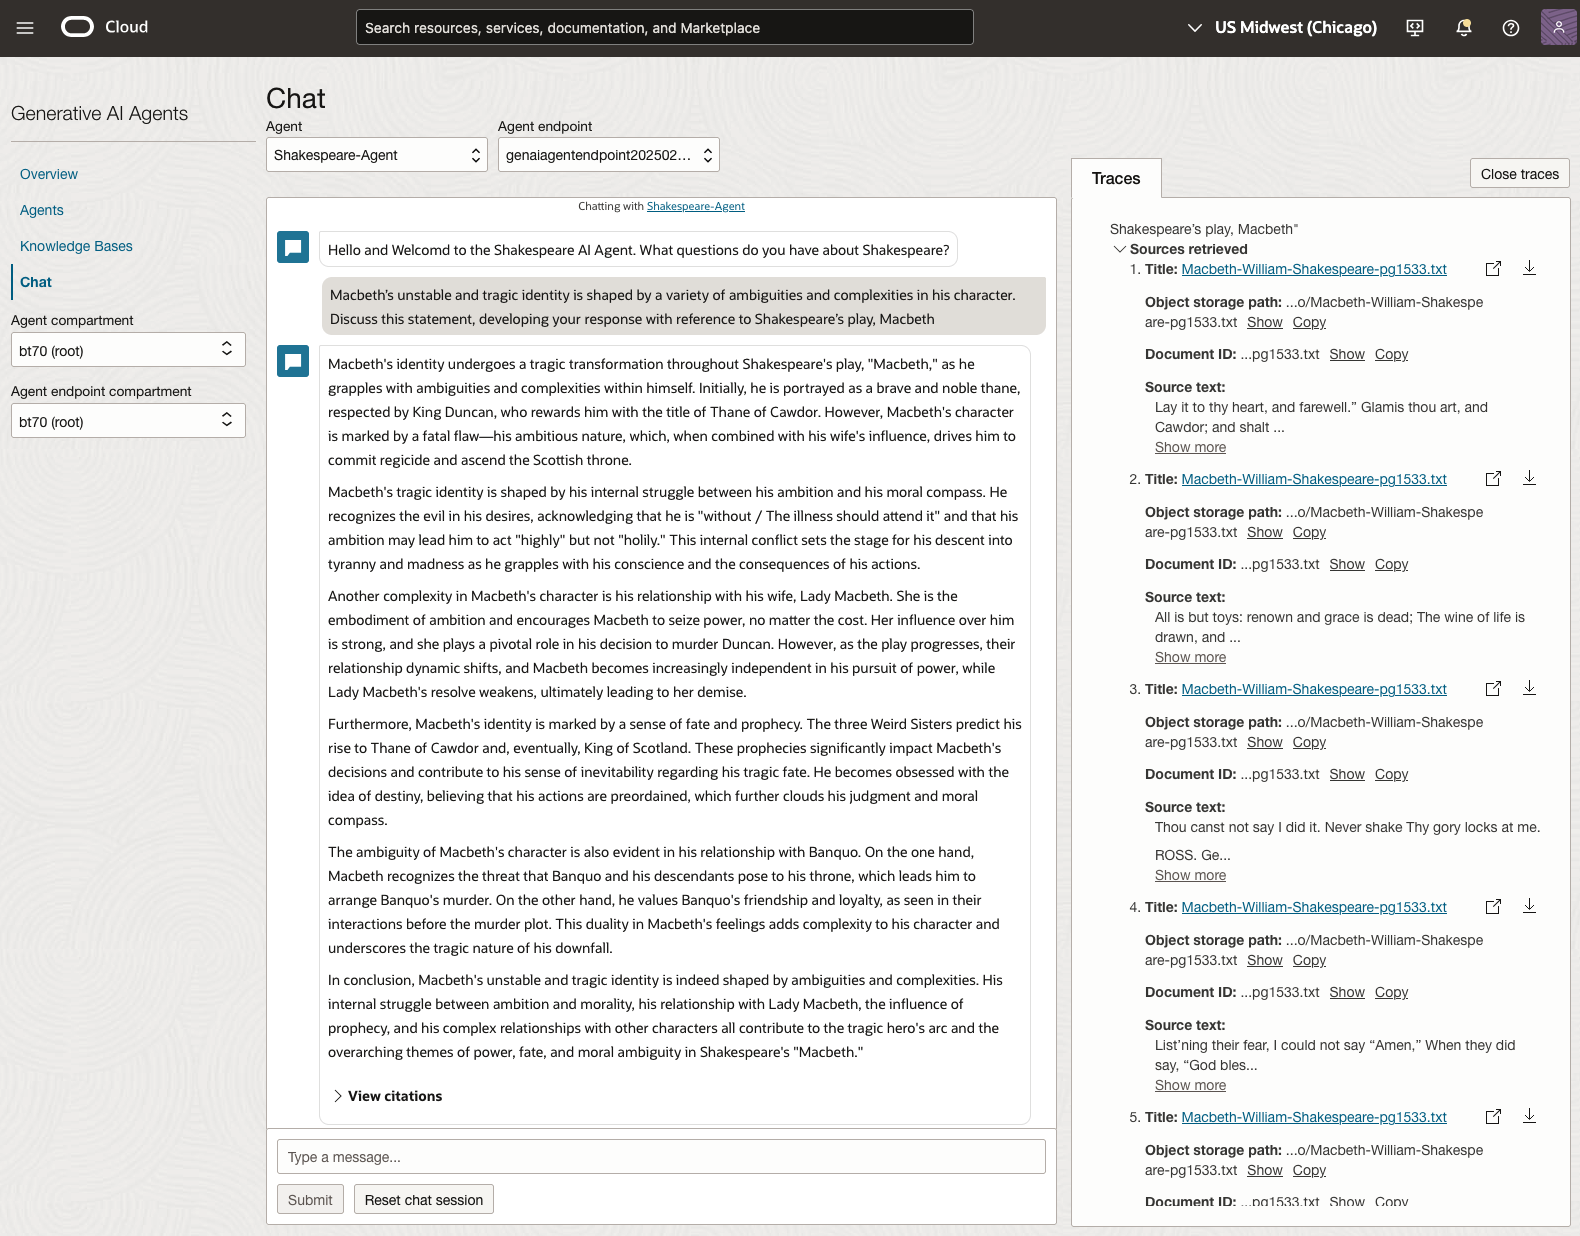
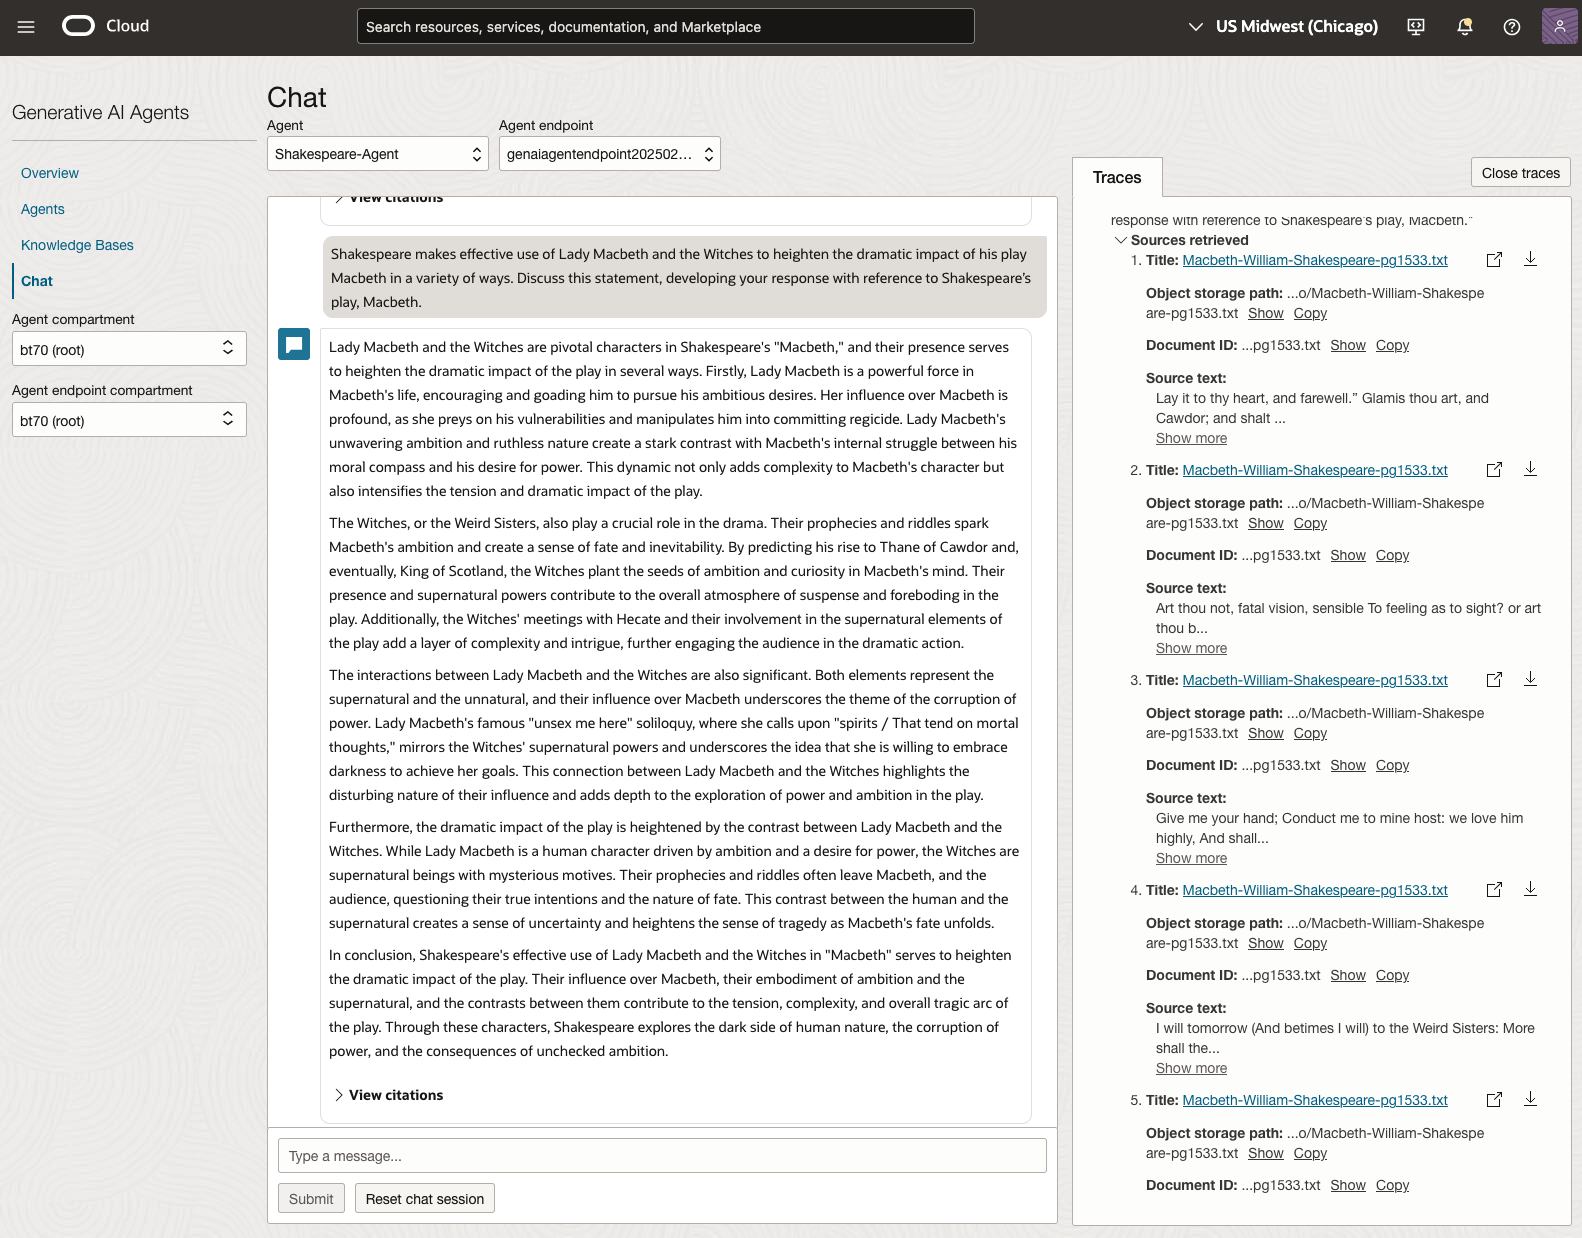
In 2024, the Shakespeare text was Hamlet.
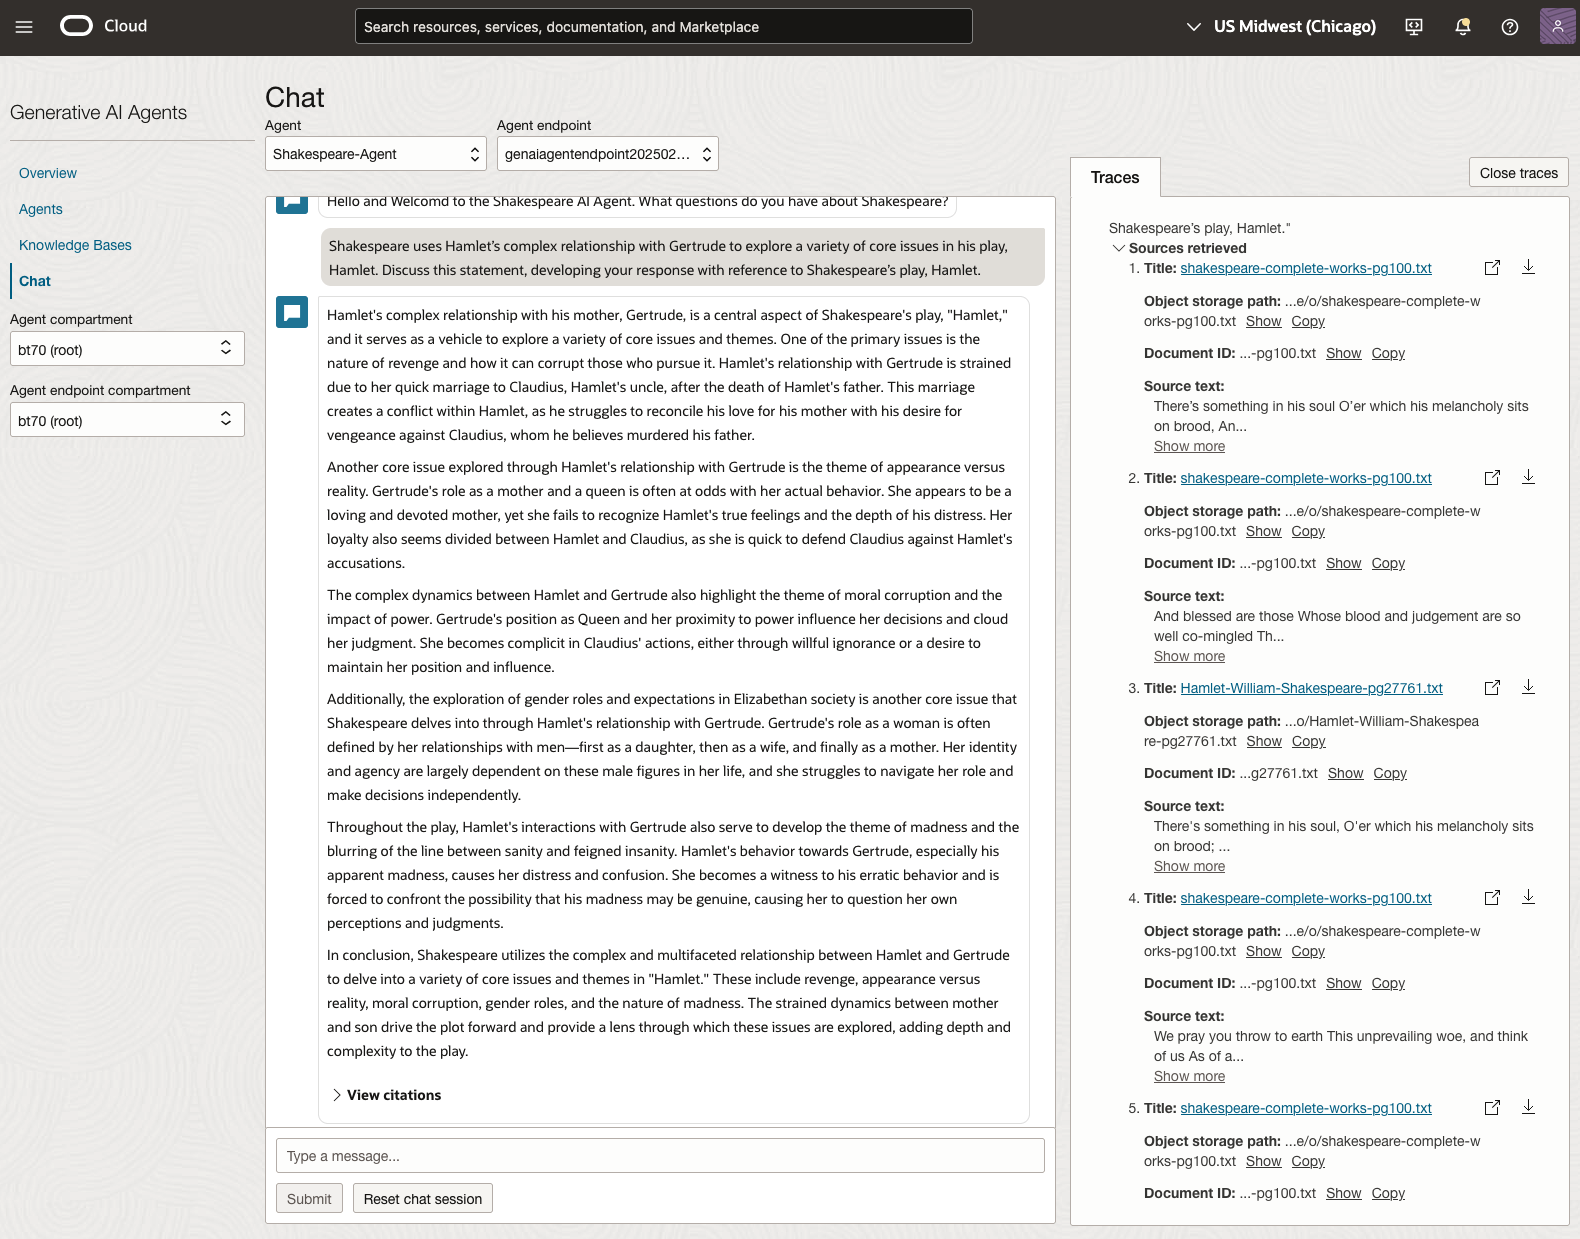
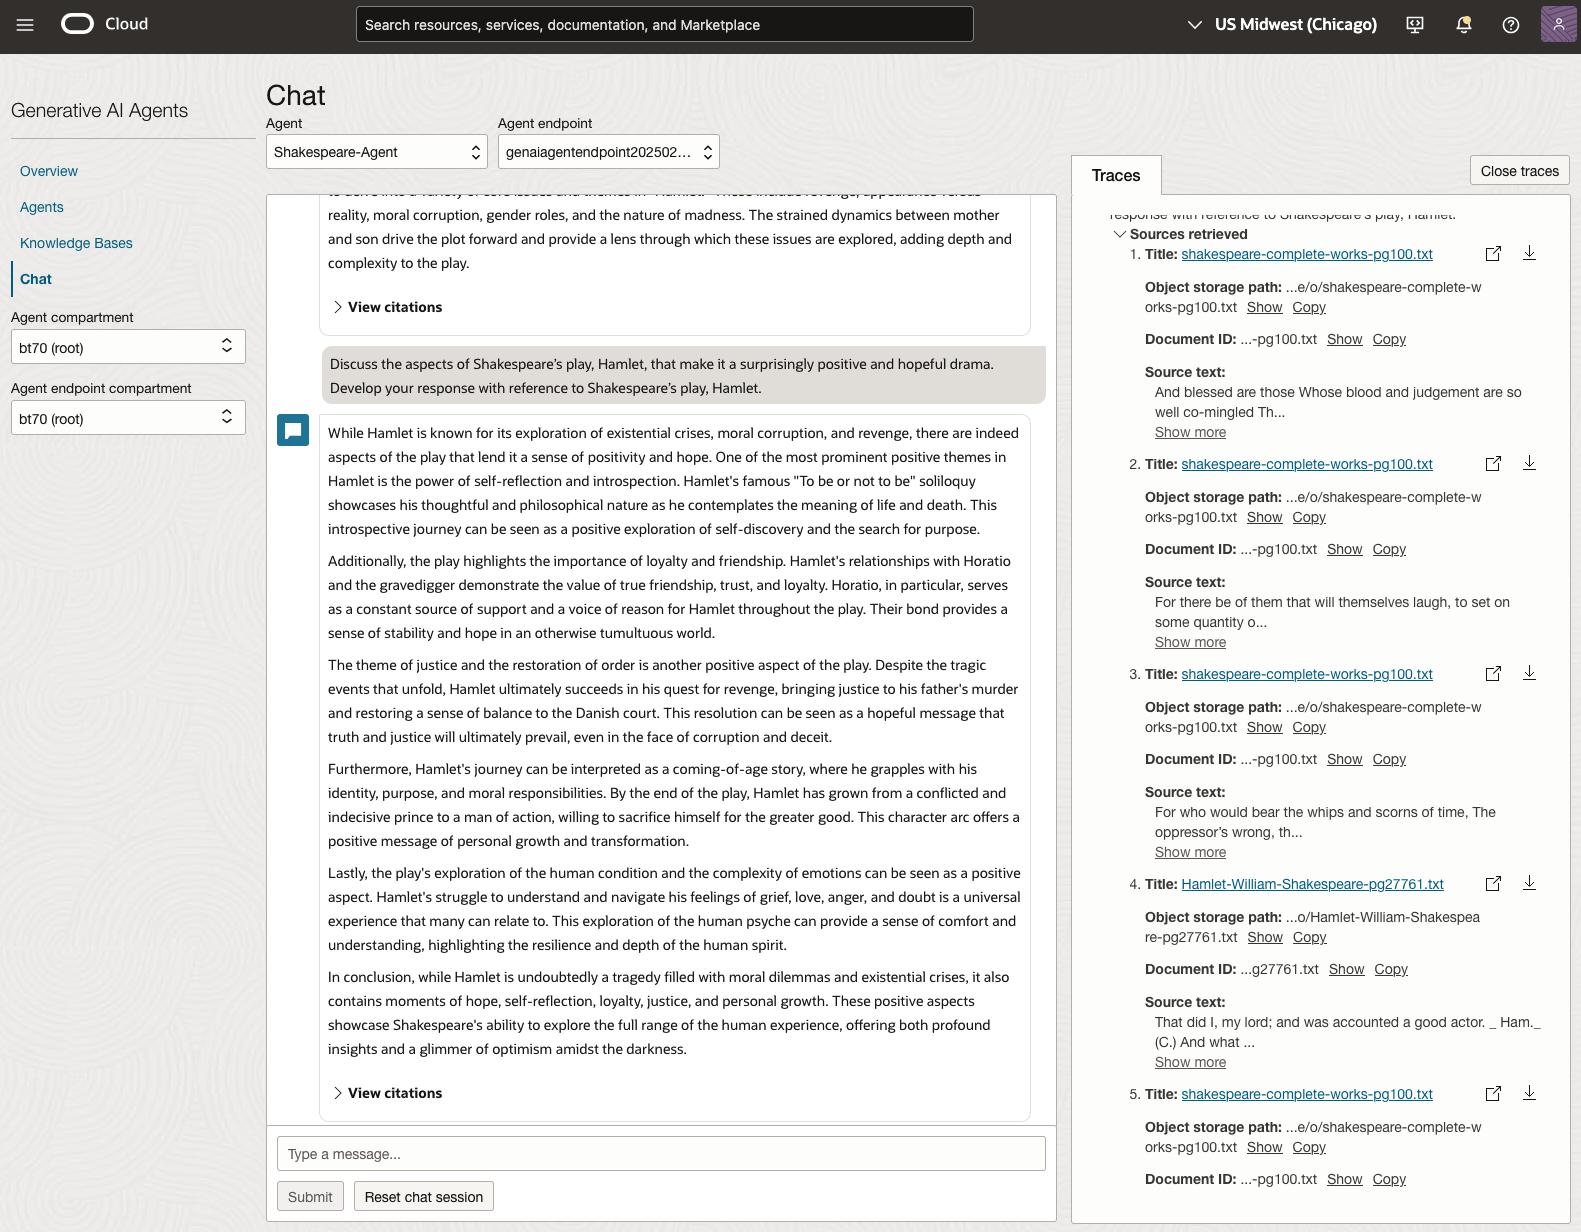
We can see from the above questions, that the AI Agent was able to generate possible answers. As a learning and study resource, it can be difficult to determine the correctness of these answers. Currently, there does seem to be evidence that students typically believe what the AI is generating. But the real question is, should they? Why the AI Agent can give a believable answer for students to memorise, but how good are the answers really? How many marks would they get for these answers? What kind of details are missing from these answers?
To help me answer these questions I enlisted the help of some previous Students who took these English examinations, along with two English teachers who teach higher-level English classes. The students all achieved a H1 grade for English. This is the highest grade possible, where a H1 means they achieved between 90-100%. The feedback from the students and teachers was largely positive. One teacher remarked the answers, to some of the questions, were surprisingly good. When asked about what grade or what percentage range these answers would achieve, again the students and teachers were largely in agreement, with a range between 60-75%. The students tended to give slightly higher marks than the teachers. They were then asked about what was missing from these answers, as in what was needed to get more marks. Again the responses from both the students and teachers were similar, with details of higher-level reasoning, understanding of interpersonal themes, irony, imagery, symbolism, etc were missing.
How to Create an Oracle Gen AI Agent
In this post, I’ll walk you through the steps needed to create a Gen AI Agent on Oracle Cloud. We have seen lots of solutions offered by my different providers for Gen AI Agents. This post focuses on just what is available on Oracle Cloud. You can create a Gen AI Agent manually. However, testing and fine-tuning based on various chunking strategies can take some time. With the automated options available on Oracle Cloud, you don’t have to worry about chunking. It handles all the steps automatically for you. This means you need to be careful when using it. Allocate some time for testing to ensure it meets your requirements. The steps below point out some checkboxes. You need to check them to ensure you generate a more complete knowledge base and outcome.
For my example scenario, I’m going to build a Gen AI Agent for some of the works by Shakespeare. I got the text of several plays from the Gutenberg Project website. The process for creating the Gen AI Agent is:

Step-1 Load Files to a Bucket on OCI
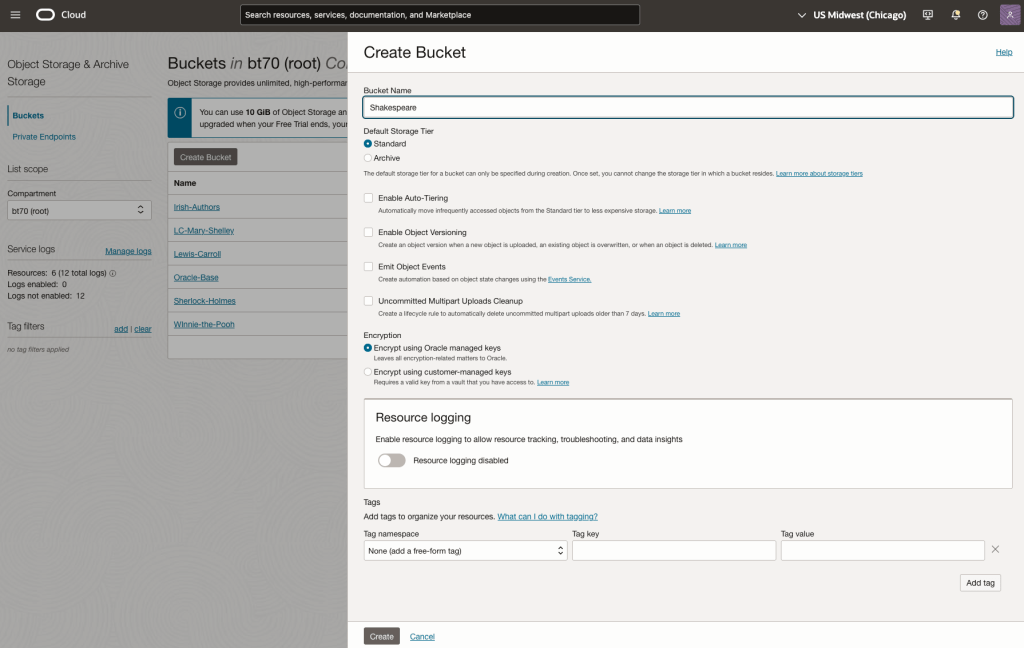
Create a bucket called Shakespeare.
Load the files from your computer into the Bucket. These files were obtained from the Gutenberg Project site.
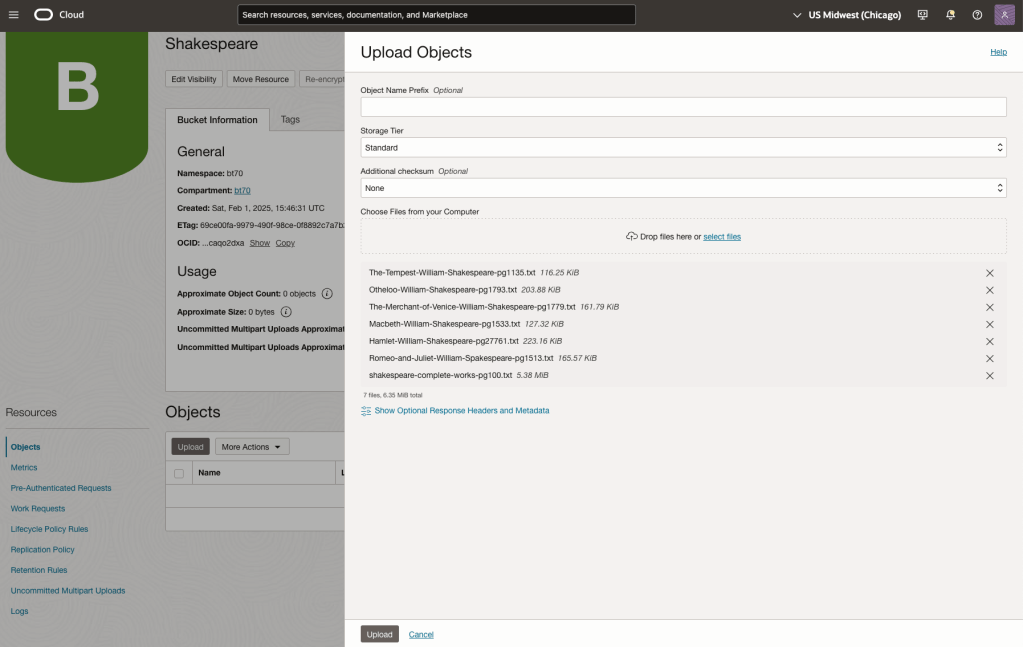
Step-2 Define a Data Source (documents you want to use) & Create a Knowledge Base
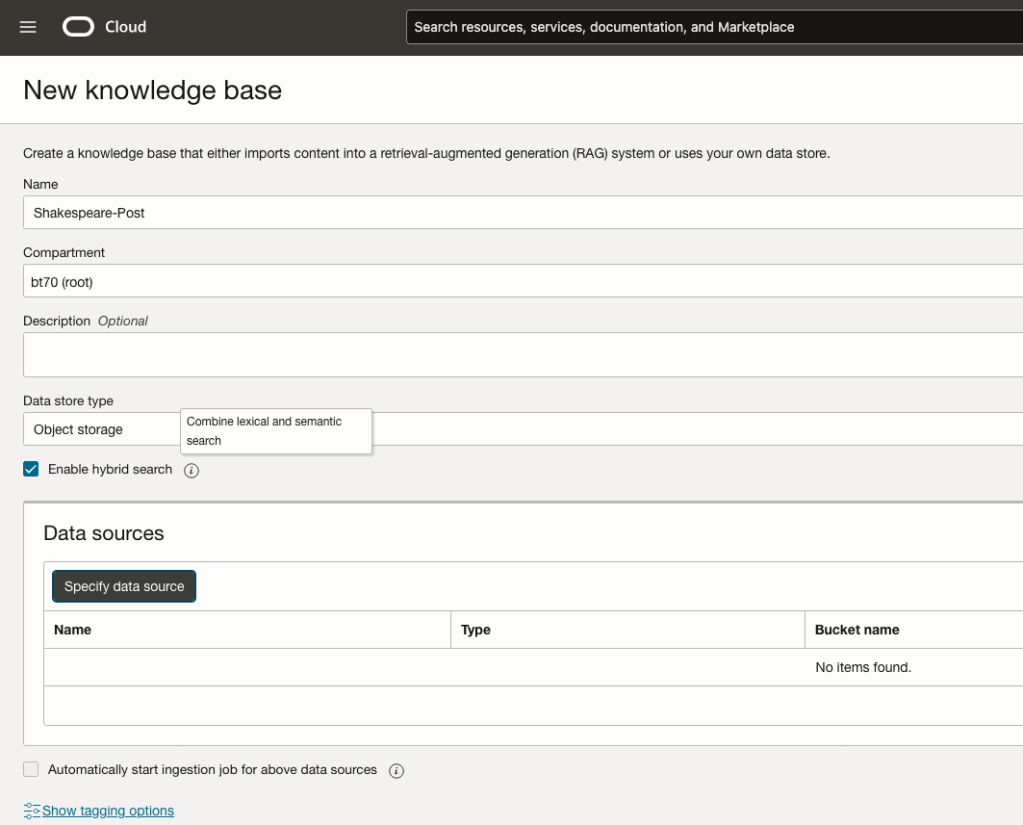
Click on Create Knowledge Base and give it a name ‘Shakespeare’.
Check the ‘Enable Hybrid Search’. checkbox. This will enable both lexical and semantic search. [this is Important]
Click on ‘Specify Data Source’
Select the Bucket from the drop-down list (Shakespeare bucket).
Check the ‘Enable multi-modal parsing’ checkbox.
Select the files to use or check the ‘Select all in bucket’
Click Create.

The Knowledge Base will be created. The files in the bucket will be parsed, and structured for search by the AI Agent. This step can take a few minutes as it needs to process all the files. This depends on the number of files to process, their format and the size of the contents in each file.
Step-3 Create Agent
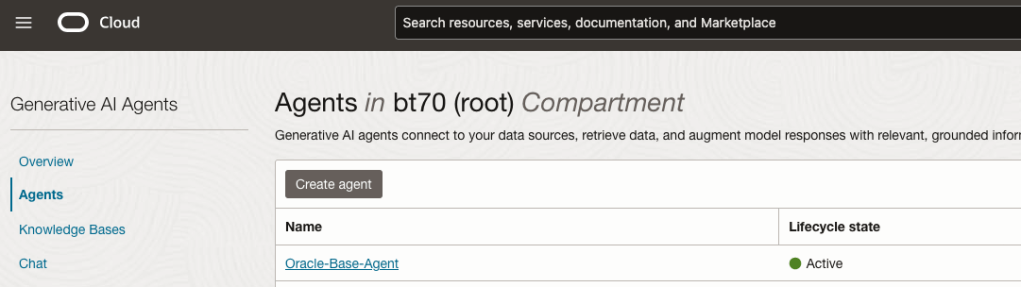
Go back to the main Gen AI menu and select Agent and then Create Agent.
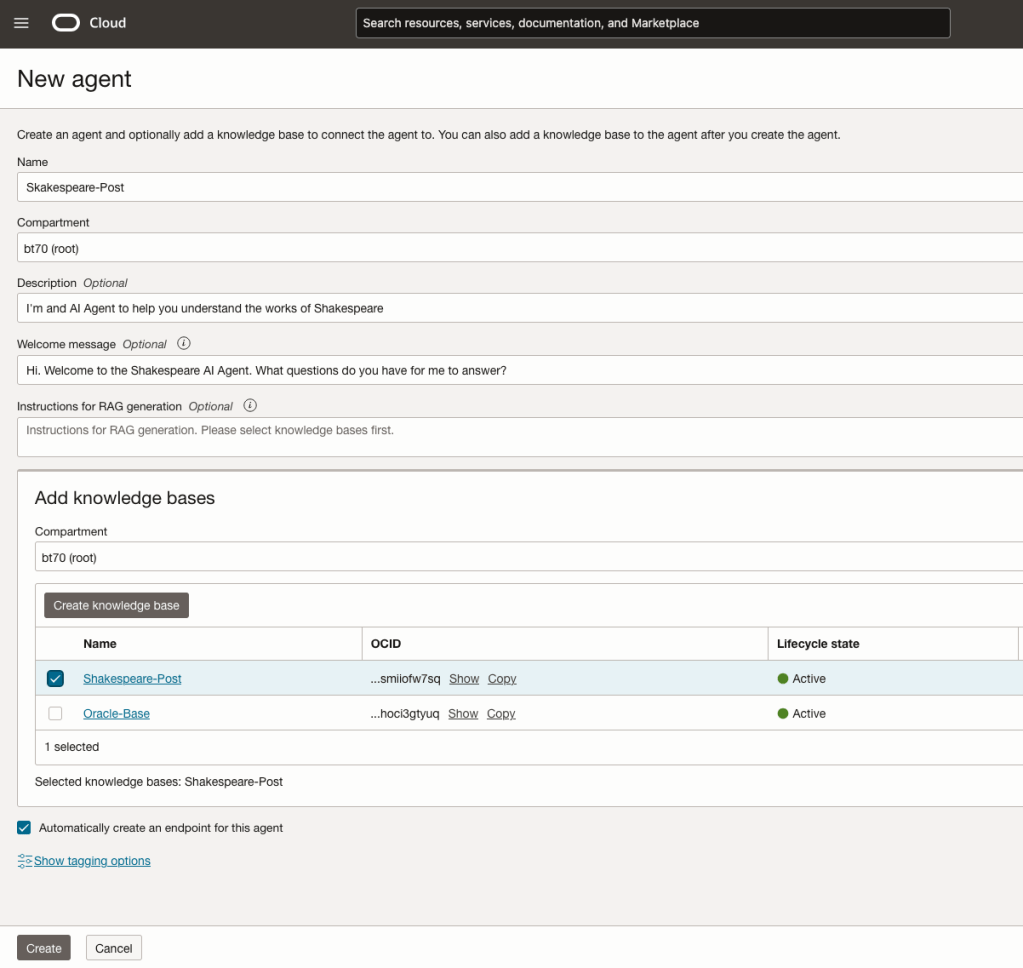
You can enter the following details:
- Name of the Agent
- Some descriptive information
- A Welcome message for people using the Agent
- Select the Knowledge Base from the list.
The checkbox for creating Endpoints should be checked.
Click Create.
A pop-up window will appear asking you to agree to the Llama 3 License. Check this checkbox and click Submit.
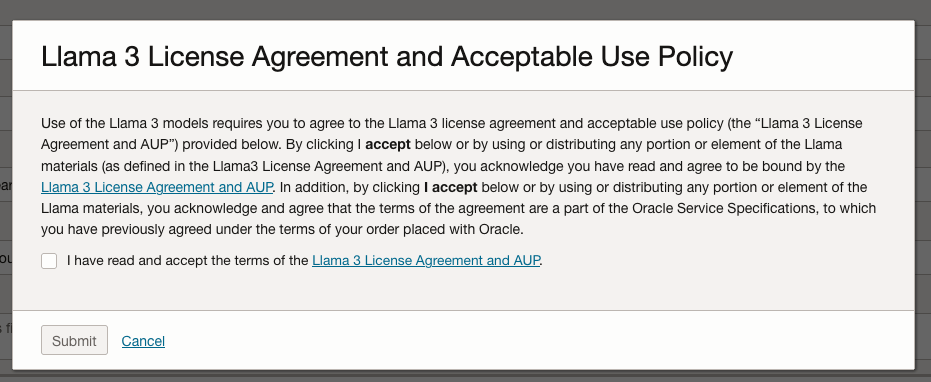
After the agent has been created, check the status of the endpoints. These generally take a little longer to create, and you need these before you can test the Agent using the Chatbot.
Step-4 Test using Chatbot
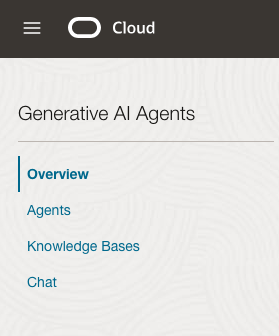
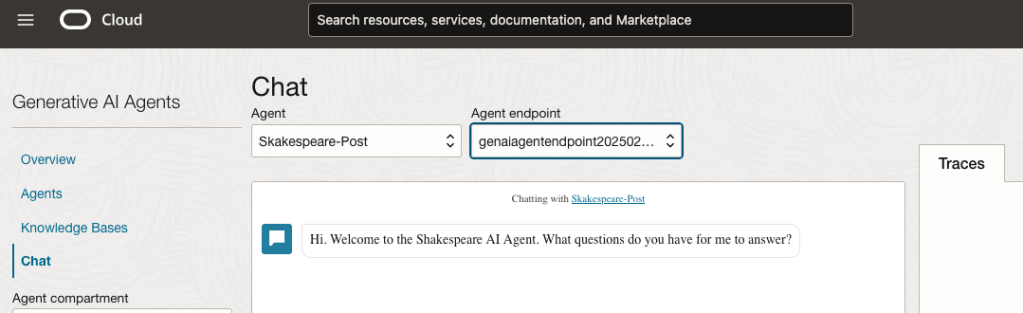
After verifying the endpoints have been created, you can open a Chatbot by clicking on ‘Chat’ from the menu on the left-hand side of the screen.
Select the name of the ‘Agent’ from the drop-down list e.g. Shakespeare-Post.
Select an end-point for the Agent.
After these have been selected you will see the ‘Welcome’ message. This was defined when creating the Agent.
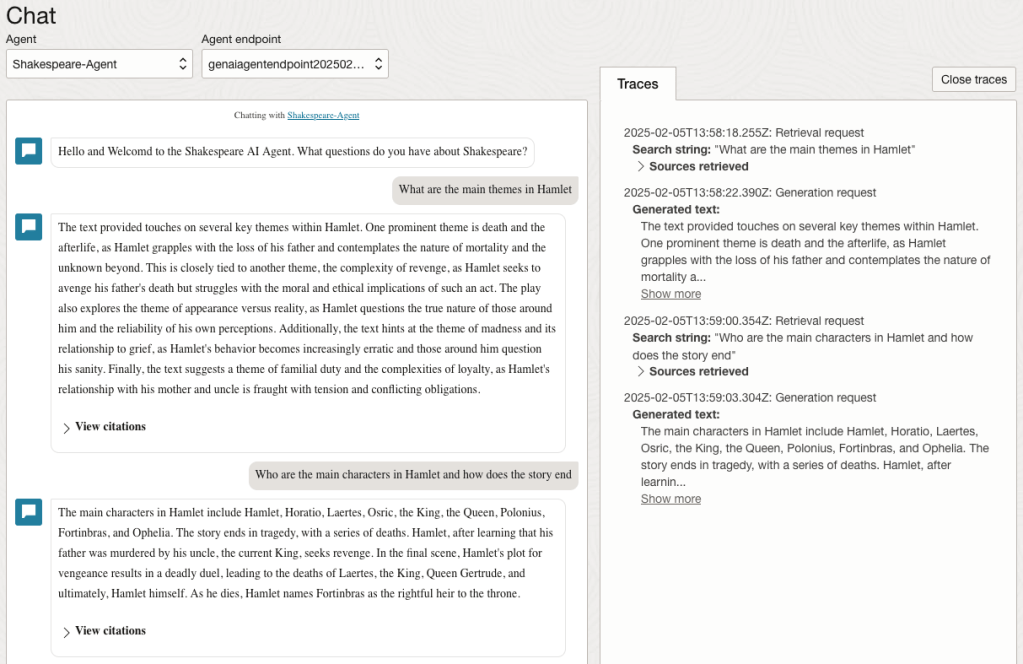
Here are a couple of examples of querying the works by Shakespeare.
In addition to giving a response to the questions, the Chatbot also lists the sections of the underlying documents and passages from those documents used to form the response/answer.
When creating Gen AI Agents, you need to be careful of two things. The first is the Cloud Region. Gen AI Agents are only available in certain Cloud Regions. If they aren’t available in your Region, you’ll need to request access to one of those or setup a new OCI account based in one of those regions. The second thing is the Resource Limits. At the time of writing this post, the following was allowed. Check out the documentation for more details. You might need to request that these limits be increased.
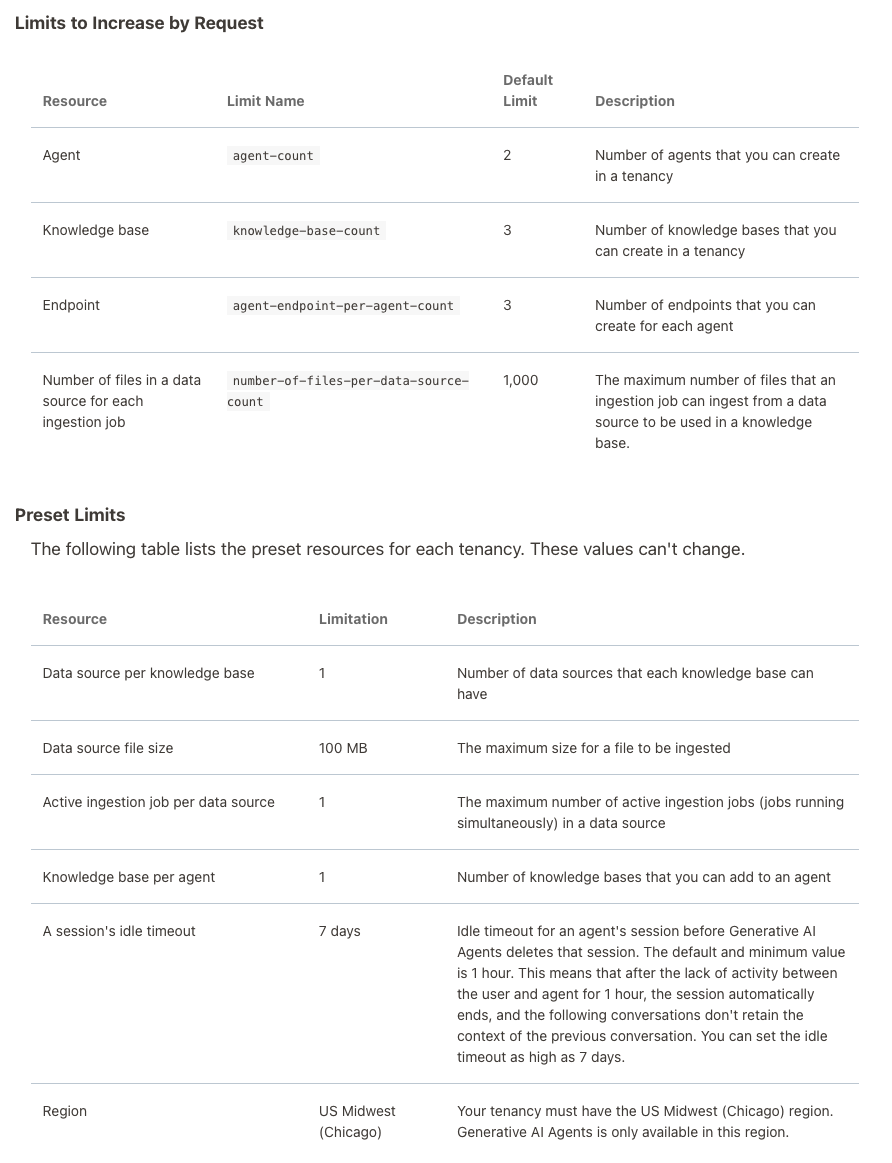
I’ll have another post showing how you can run the Chatbot on your computer or VM as a webpage.
SelectAI – the beginning of a journey
Oracle released Select AI a few months ago, and with any new product it is always a good idea to give it a little time to fix any “bugs” or “features”. To a certain extent, the release of this capability is a long time behind the marketplace. Similar products have been available in different ways, in different products, in different languages, etc for some time now. I’m not going to get into the benefits of this feature/product, as lots have been written about this and most of those are just rehashing the documentation and the marketing materials created for the release. But over all this time, Oracle seems to have been focused on deploying generative AI and LLM related features into their vast collection of applications. Yes, they have done some really cool work with those applications. But during that period the everyday developer, outside of those Apps development teams, has been left waiting for too long to get proper access to this functionality. In most cases, they have gone elsewhere. One thing Oracle does need to address is the public messaging around certain behavioural aspects of Select AI. There has been some contradictory information between what it says in the documentation and what the various Product Managers are saying. This is a problem, as it just confuses customers who will then use something else.
I’m building a particular application that utilizes various OCI products, including some of their AI products, to create a hands-free way of interacting with data and is suitable for those who have various physical and visual impairments. Should I consider including Select AI? Let’s see if it is up to the task.
Let’s get on with setting up and using Select AI. This post focuses on getting it set-up and running with some basic commands, plus a few warnings too as it isn’t all that it’s made out to be! Check out my other posts that explore different aspects (most other posts only show one or two statements), and some of the issues you need to watch out for, as it may not entirely live up to expectations.
The first thing you need to be aware of, this functionality is only available on an ADW/ATP on Oracle Cloud. At some point, we might have it on-premises, but that might be a while coming as I’m sure the developers are still working on improving how it works (and yes it does need some work).
Step 1 – Connect as ADMIN of ADW/ATP
As the ADMIN user for the database, you need to set-up a few things for other users of the Database before they can use Select AI.
Firstly we add the schema which will be using Select AI to the Access Control List. This will allow them to reach things outside of the Database. The following illustrates adding the BRENDAN schema to the list and allowing HTTP calls to the Cohere API interface.
BEGIN
    DBMS_NETWORK_ACL_ADMIN.APPEND_HOST_ACE(
         host => 'api.cohere.ai',
         ace => xs$ace_type(privilege_list => xs$name_list('http'),
         principal_name => 'BRENDAN',
         principal_type => xs_acl.ptype_db)
    );
END;
Next, we need to grant some privileges to some PL/SQL packages.
grant execute on DBMS_CLOUD_AI to BRENDAN;
grant execute on DBMS_CLOUD to BRENDAN;
That’s the admin steps
Step 2 – Connect to your Schema/User – Cohere Example (see OpenAI later in this post)
In my BRENDAN schema, I need to create a Credential.
BEGIN
   -- DBMS_CLOUD.DROP_CREDENTIAL (credential_name => 'COHERE_CRED');

   DBMS_CLOUD.CREATE_CREDENTIAL(
       credential_name => 'COHERE_CRED',
       username => 'COHERE',
       password => '...' );
END;
The … in the above example, indicates where you can place your Cohere API key. It’s very easy to get this and this explains the steps.
Next, you need to create a CLOUD_AI profile.
BEGIN
   --DBMS_CLOUD_AI.drop_profile(profile_name => 'COHERE_AI');

   DBMS_CLOUD_AI.create_profile(
      profile_name => 'COHERE_AI',
      attributes => '{"provider": "cohere",
                      "credential_name": "COHERE_CRED",
                      "object_list": [{"owner": "SH", "name": "customers"},
                                      {"owner": "SH", "name": "sales"},
                                      {"owner": "SH", "name": "products"},
                                      {"owner": "SH", "name": "countries"},
                                      {"owner": "SH", "name": "channels"},
                                      {"owner": "SH", "name": "promotions"},
                                      {"owner": "SH", "name": "times"}]
       }');
END;
When creating the CLOUD_AI profile for your schema, you can list the objects/tables you want to expose to the Cohere or OpenAI models. In theory (so the documentation says) it shares various metadata about these objects/tables, which the models in turn interpret, and use this to formulate their response. I said in theory, as that is what the documentation says, but the PMs on a recent webcast said it did use things like primary keys, foreign keys, etc. There are many other challenges here, and I’ll come back to those at a later time.
At this point, you are all set up to use Select AI.
Step 3 – See if you can get Select AI to work!
Before you can use Select AI, you need to enable it for your session. To do this run,
EXEC DBMS_CLOUD_AI.set_profile('COHERE_AI');If you start a new session/connection or your session/connection gets reset, you will need to run the above command again.
No onto the fun or less fun part. The Fun part is using it and getting results displayed back to you. When this happens (i.e. when it works) it can look like magic is happening. For example here are some commands that worked for me.
select ai how many customers exist;
select AI which customer is the biggest;
select AI what customer is the largest by revenue;
select AI what customer is the largest by sales;
The real challenge with using Select AI is crafting a statement that works i.e. a query is run in the Database and the results are displayed back to you. This can be a real challenge. There are many blog posts out there with lots of examples of using Select AI, along with all the ‘canned’ examples in the documentation and in demos from PMs. I’ve tried all that I could find, and most/all of them didn’t work for me. Something isn’t working correctly behind the scenes. For example here are some examples of statements that didn’t work for me.
select AI how many customers in San Francisco are married;
select AI what is our best selling product by country;
select AI what is our biggest selling product by country;
select AI how many items with the product sub category of Cameras were sold in 1998;
select AI what customer is the biggest;
select AI which customer is the largest by revenue;
Yet some of these statements (above) have been given in docs/posts/demos as working. For a little surprise, have a look at the comment at the bottom of this post.
Don’t let this put you off from trying it. What I’ve shown here is just one part of what Select AI can do. Check out my next post on Select AI where I’ll show examples of the other features, which work and can be used to build some interesting solutions for your users.
Set-up for OpenAI
The steps I’ve given above are for using Cohere. A few others can be used including the popular OpenAI. The setup is very similar to what I’ve shown above and the main difference is the Hostname, OpenAI API key and username. See here for how to get an OpenAI API key.
As ADMIN run.
BEGIN
    DBMS_NETWORK_ACL_ADMIN.APPEND_HOST_ACE(
         host => 'api.openai.com',
         ace  => xs$ace_type(privilege_list => xs$name_list('http'),
                             principal_name => 'BRENDAN',
                             principal_type => xs_acl.ptype_db)
   );
END;
Then in your Schema/user.
BEGIN
   DBMS_CLOUD.DROP_CREDENTIAL (credential_name  => 'OPENAI_CRED');

  DBMS_CLOUD.CREATE_CREDENTIAL(
    credential_name => 'OPENAI_CRED',
    username => '.....',
    password => '...' );
END;
BEGIN
DBMS_CLOUD_AI.drop_profile(profile_name => 'OPEN_AI');
DBMS_CLOUD_AI.create_profile(
profile_name => 'OPEN_AI',
attributes => '{"provider": "openai",
"credential_name": "OPENAI_CRED",
"object_list": [{"owner": "SH", "name": "customers"},
{"owner": "SH", "name": "sales"},
{"owner": "SH", "name": "products"},
{"owner": "SH", "name": "countries"},
{"owner": "SH", "name": "channels"},
{"owner": "SH", "name": "promotions"},
{"owner": "SH", "name": "times"}],
"model":"gpt-3.5-turbo"
}');
END;And then run the following before trying any use Select AI.
EXEC DBMS_CLOUD_AI.set_profile('OPEN_AI');If you look earlier in this post, I listed some questions that couldn’t be answered using Cohere. When I switched to using OpenAPI, all of these worked for me. The question then is, which LLM should you use? based on this simple experiment use Open API and avoid Cohere. But things might be different for you and at a later time when Cohere has time to improve.
Check out the other posts about Select AI.


You must be logged in to post a comment.