
SQL Developer
Oracle SQL Dev – VS Code – Recovering Deleted Connections
With the current early release, there is no way to organise your Database connections like you can in the full Oracle SQL Developer. We are told this will/might be possible in a future release but it might be later this year (or longer) before that feature will be available.
In a previous post, I showed how to import your connections from the full SQL Developer into SQL Dev VS Code. While this is a bit of a fudge, yet relatively straight forward to do, you may or may not want all those connections in your SQL Dev VS Code environment. Typically, you will use different tools, such as SQLcl, SQL*Plus, SQL Developer, etc to perform different tasks, and will only want those connections set up in one of those tools.
As shown in my previous post, SQL Dev VS Code and SQLcl share the same set of connections. These connections and their associated files are stored in the same folder on your computer. On my computer/laptop (which is currently a Mac) this connections folder can be found in the $HOME/.dbtools.
I kind of forgot this important little detail and started to clean up my connections in SQL Dev VS Code, but removing some of my old and less frequently used Connections. Only to discover, that these were no longer listed or available to use in SQLcl, using the connmgr command.
The question I had was, How can I recover these connections?
One option was to reimport the connections into SQLcl following the steps given in a previous blog post. When I do that, the connections are refreshed/overwritten in SQLcl, and because of the shared folder will automatically reappear in SQL Dev VS Code the next time I open it or by clicking on the refresh icon in the Connections pane in SQL Dev VS Code.
But was there a simpler solution? Yes there is, so let’s walk through a simple scenario to illustrate what you need to do.
In SQL Dev VS Code, you can delete a connection by right clicking the connection and selecting Delete from the popup menu. You’ll be asked to confirm the deletion of the connection.

Open a Terminal window and go to your $HOME/.dbtools/connections directory.
In this folder, you will see the deleted connections lists with ‘.removed’. These are your deleted connections. Some might have their original connection name with ‘.removed’ and others will have some weird name, for example, ‘zZqtNdeinniqNhofxqNI9Q.removed‘.
To make the deleted connection usable again just rename the directory removing the ‘.removed’ part. For example,
mv B01-Student2-Brendan.removed B01-Student2-BrendanIf you go back to SQL Dev VS Code, the connection will reappear in the list of Connections after about 5 seconds (on my laptop) but if it doesn’t then click on the refresh icon.
Oracle SQL Dev – VS Code – Import connections via SQLcl
I mentioned in my previous post about importing your SQL Developer connections into the VS Code Extension. The following are the steps you need to complete. A more direct method to import directly from SQL Developer will be available in an upcoming extension update.
To complete this migration of your database connects, you’ll need to have SQLcl (SQL Command Line) version 23.3 installed, as it comes with a new Connection Manager feature.
The first step involves exporting your SQL Developer connections. To do this right-click on ‘Oracle Connections’ in SQL Developer, and then select ‘Export Connections’ from the pop-up menu. Select all your connections and then go through the remaining steps of giving a file name, giving a password, and then Finish.


When the file has been created and the connection exported, go open SQLcl (needs to be a minimum of version 23.3), in /nolog mode.
Set the password used for the SQL Developers connections file. In this example ‘MyPassword’ is the password I entered when creating the file.
SQL> secret set mySecret MyPassword
Secret mySecret stored
Now we can import the connections file.
SQL> connmgr import -key mySecret /Users/brendan.tierney/SQLDev-connections.json
Importing connection 23c-VM-STUDENT: Success
Importing connection B01-Student-Admin: Success
Importing connection B01-Student-Brendan: Success
Importing connection Oracle 23c - Docker - SYS: Success
Importing connection Oracle 23c - Docker - HR: Success
Importing connection 23-Free-VM-SYS: Success
Importing connection B01-Student2-Admin: Success
Importing connection 23-Free-VM-STUDENT: Success
Importing connection 23c-VM-SYSTEM: Success
Importing connection Oracle 23c - Docker - System: Success
Importing connection Oracle 23c - Docker - Benchmark: Success
Importing connection 23-Free-VM-SYSTEM: Success
Importing connection 23c-VM-SYS: Success
Importing connection Oracle 23c - Docker - SH: Success
Importing connection 23c-VM-STUDENT2: Success
Importing connection Oracle 23c - Docker - Brendan: Success
Importing connection B01-Student2-Brendan: Success
17 connection(s) processed
If you need to reimport the connections file, you’ll need to use the replace option. Here’s an example.
connmgr import -duplicates replace -key mySecret /Users/brendan.tierney/SQLDev-connections.jsonYou can see above the connections were imported. You can list these by running
SQL> connmgr list
23-Free-VM-STUDENT
23-Free-VM-SYS
23-Free-VM-SYSTEM
...
To connect to one of these connections using its label by running the following, where the label for the connection is in quotes
SQL> connect -name "Oracle 23c - Docker - Brendan"
Connected.

SQL> show connection
COMMAND_PROPERTIES:
 type: STORE
 name: Oracle 23c - Docker - Brendan
 user: brendan
CONNECTION:
 BRENDAN@jdbc:oracle:thin:@//localhost:1521/FREEPDB1
CONNECTION_IDENTIFIER:
 jdbc:oracle:thin:@//localhost:1521/FREEPDB1
CONNECTION_DB_VERSION:
 Oracle Database 23c Free, Release 23.0.0.0.0 - Developer-Release
 Version 23.2.0.0.0
NOLOG:
 false
PRELIMAUTH:
 false
We’ve just imported and verified the import of our SQL Developer connections into SQLcl. The next step is to import them into VS Code. To do this is very easy. If you don’t have VS Code open, open it and the connections will be automatically imported from SQLcl. How easy is that! or if you have VS Code already open just click on the refresh button in the Connections section.
Note: The connections listed in VS code are shared with SQLcl. If you delete any of these connections in VS Code they will be deleted/removed from SQLcl. It’s the one set of connection details being shared by both applications. So some care is needed. I’m sure future releases of the VS Code extension will provide better options for managing your connections.
SQL Developer for VSCode
We now have a new/different tool for developers to access their Oracle Databases. Traditionally, developers have been using Oracle SQL Developer for maybe 20+ years (if you started using Project Raptor). SQL Developer has developed into a bit of a big beast of a tool, with it trying to be everything to everyone including developers, DBAs, and others. But it does seem like SQL Developer might be coming to an end of life, although that could be for some years to come as it is so wildly used. There have been many challenges with SQL Developer over the years and one of the main challenges is getting new developers to use it. From my experience, developers tell me they just didn’t like it, didn’t like the look and feel of it, it was difficult to use, etc., etc. The list would go on and on and most of those developers would prefer to use other tools (for example DBeaver). For those that are terminal/command line only person, you have SQL*Plus and the modern version called SQLCl (SQL Command Line).
But there is a new kid on the block called Oracle SQL Developer Extension for VS Code. Some reports suggest this will be the future, as all future development will be for this new product, and no new development for the original SQL Developer, with only bug fixing being done.
Although Oracle SQL Developer for VS Code might be the future, it has only recently been released and with all new releases, it can be a little limited in functionality. We are told new functionality will be constantly added, maybe on a monthly or quarterly basis, but let’s see. Look at it, as of now (spring 2024) as being a teenager who will mature over time. And with that, Oracle is trying to appeal to a wider set of developers and with the popularity of VS Code it is not surprising they have made this move. VS Code will automatically update the SQL Developer extension as new updates come available.
To install this Oracle SQL Developer for VS Code, just open VS Code, go to the VS Code Marketplace, search for the extension and install. That’s all there is to it.

Oh, and it’s FREE to use. No licence is needed as it comes under the Oracle Free Use Terms Conditions (FUTC) License.
Installing Oracle Developer for VS Code will keep the extension updated automatically for you, so you don’t have to worry about what version you’re on.
Creating a Connection
If you’ve been using the traditional Oracle SQL Developer, you’ll already have some database connections. At the time of writing this post, there is no easy way to import those. Oracle does say, it will be coming soon (hopefully by the time you are reading this post the import feature will be available), but there is a workaround for this but it does involve a slightly complicated process. I’ll give an example in another post.
To manually create a connection, click the Oracle Explore (the Database icon on left-hand side of the screen). This will open a connections section. The top section is labelled SQL Developer and Connections just under it. You can create connections to your Databases here. There is also an Oracle Cloud Infrastructure Connections. I’ll come back to that another time.

Click on the + icon. A screen like the following will open, and you can enter your database connection details there. In this example, I’m creating a connection to a schema on a 23c Oracle Database running on Docker. These are the same connection details you have in SQL Developer.
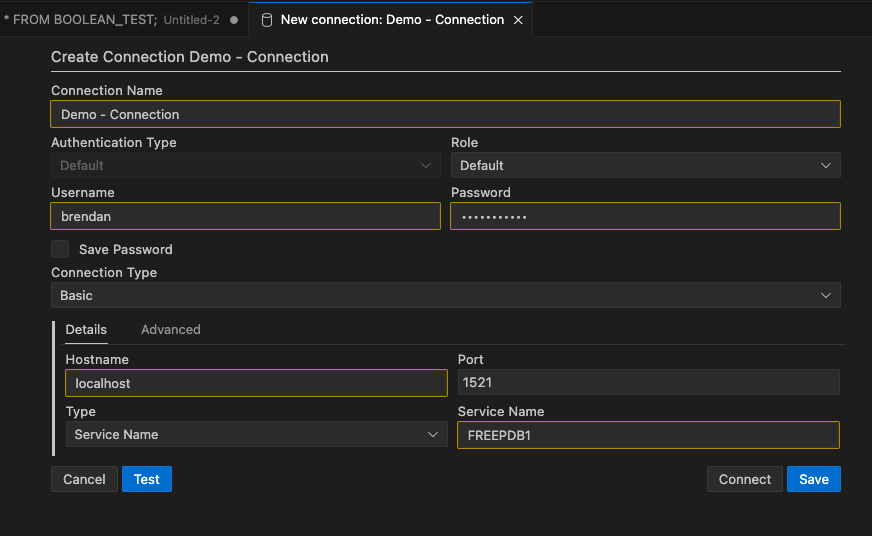
After testing the connection, to make sure it works (a message will display at the bottom of VS Code), you can click on the Save connection. It will now appear in the Databases connections drop-down list and just click on this connection to open it.
Viewing Schema Objects
To see what objects you have in the schema, just click on the connection. It will connect to the schema, and will then display the object list under the schema. You might need to adjust the size of the sections under this Database Connections section to be able to see the full list. Or you might need to close some of them.

SQL Worksheet (writing SQL)
To open a SQL Worksheet, right-click on your Database Connection and click on ‘Open SQL Worksheet’. To run a SQL statement you can click on the Arrow icon in the menu. When you run a SQL statement the results will appear at the bottom of the screen in the Query Results section.

You can run the same query in a couple of other ways. The first is to run it as a script, and the output will be displayed in the ‘Script Output’ tab (beside the ‘Query Results’) and you can also run it in SQLcl (SQL Command Line). SQLcl comes as part of the VS Code extension, although you might have it already installed on your computer, so there might be some slight differences in the version. When you run your SQL query using the SQLcl, it will start SQLcl in the ‘Terminal’ tab, log you into your schema (automatically), run the query and display the results.

There’s a lot to get used to with SQL Developer Extension for VS Code, and there is a lot of functionality yet to come. For a time, you’ll probably end up using both tools. For some, this will not work and they’ll just keep using the traditional SQL Developer. For those people, at some point, you’ll have to make the swap and the sooner you start that transition the easier it will be.
How to speed up your Oracle Data Mining with in-memory and parallel
Have you have found running a workflow in Oracle Data Miner slow or running the scripts in the database slow ?
No. Good, because I haven’t found it slow.
But (there is always a but) it really depends on the volume of data your are dealing with. For the vast majority of us who aren’t of the size of google, amazon, etc have data volumes that are not that large really and a basic server can process many millions of records extremely quickly using Oracle Data Mining.
But what if we have a large volume of data. In one recent project I had a data set containing over 3.5 billion records. Now that is big data. All of this data sitting in an Oracle Database.
So how can we process over 3.5 billion records in a couple of seconds, building 4 machine learning models in that time? Is that really possible with just using an Oracle Database? Yes is the answer and very easily. (Surely I needed Hadoop and Spark to process this data? Nope!)
The Oracle Data Miner (ODMr) tool comes with a new feature in SQL Developer 4 (and higer) that allows you to manage using Parallel execution and the in-memory DB features. These can be accessed on the ODMr Worksheet tool bar.

The best time to look at these setting is when you have created your workflow and are ready to run it for the first time. When you click on the ‘Performance Options’ link, you will get the following window. It will display the list of nodes you have in the workflow and will then indicate if the Degree of Parallel and the In-Memory options can be set for each of the nodes.

The default values are shown and you can changes these. For example, in a lot of scenarios you might prefer to leave the Degree of Parallel as System Determined. This will then use whatever the the default is for the database and controlled by the DBA, but if you want to specify a particular value then you can, for example setting the degree of parallel to 4 for the ‘Class Build’ node, in the above image. Similarly for the in-memory option, this will only be available for nodes where the in-memory option would be applicable. This will be where there is a lot of data processing (preparing data, transforming data, performing specific statistics, etc) and for storing any data that is generated by Oracle Data Mining.
But what if you want to change the default values. You can change these at a global level within the SQL Developer Preferences. Here you can set the default to be used for each of the different types of Oracle Data Mining nodes.

I mentioned at the start that I’ve been able to build 4 machine learning models using Oracle Data Mining on a data set of over 3.5 billion records, all in a couple of seconds. In my scenario Parallel was set to 16 and we didn’t use in-memory as we didn’t have the licence for it. You can see that machine learning at lighting speed (ish) is possible. This timing is only for building the models, which is the step that consumes the most about of resources and time. When it comes to scoring the data, that is lighting fast. In may scenario, scoring over 300,000 was less than a second, and I didn’t use parallel or anything else to speed things up. Because we didn’t need to.
Go give it a try!
Scheduling ODMr Workflows in SQL Developer 4.2+
A new feature for Oracle Data Mining (ODM) (part of SQL Developer 4.2) is the ability to schedule an ODM workflow to run a defined time or frequency.
This blog post will bring you through the steps need to schedule an ODM workflow using this new feature.
The first thing that you need is an ODMr workflow. The following image is a familiar looking one that I typically use to get a very quick demo of how easy it is to build a machine learning workflow.

Just above the workflow worksheet we have a row of icon buttons. In the above image one of these is highlighted by a red box. This is the workflow scheduler. So go ahead on click on it.

In most cases you will want to run the entire workflow. The default option presented to is ‘All Nodes’. If you would only like a subset of the nodes to run, you can click-on or select the node in the workflow and then click on the scheduler icon. In our example we are going to run the entire workflow, so select ‘All Nodes’ from the menu.

The main scheduler window will open. Here you can set the Start Date and time of the first run, what the Repeat frequency is (none, every day, every week or custom) and to End the Repeat (Never, After, On Date). To schedule a once off run of the workflow just set the Date and Time, set the Repeat to ‘None’ and End Repeat should disappear in this instance. If Repeat was set to another value then you can set a value for End Repeat.
Go ahead and run the scheduler by clicking on the OK button.

A Scheduled Jobs window should open that will display the details of the scheduled job. When this job is run in the database, this will be shown in the Workflow Jobs window. Here you can see and monitor the progress of the of the workflow.

and that’s it. Nice an simple.
But there is a something you needed to be WARNED about. When you schedule a workflow, Oracle Data Miner will lock the workflow. This is to ensure that no changes can be made to the scheduled workflow. This is indicated with the Locked button appearing on the icon menu. If you click on this button to unlock the workflow, it will also cancel your scheduled jobs associated with this workflow.

Also when the scheduled workflow is finished, the workflow will remain locked. So you will have to click on this Locked button to unlock the workflow.
There are a few additional advanced features. These can be found by clicking on the ‘Advanced…’ button in the main scheduler window. The first table displayed allows you to specify if you want an email sent for the different stages of the scheduled job. The second tab allows you to set the Job Priority, Max Failures, Max Run Duration and Schedule Limits.


You must be logged in to post a comment.