
OCI Vision
OCI Stored Video Analysis
OCI Video Analysis is a part of the OCI Vision service, designed to process stored videos and identify labels, objects, texts, and faces within each frame. It can analyze the entire video or every frame in the video using pre-trained or custom models. The feature provides information about the detected labels, objects, texts, and faces, and provides the time at which they’re detected. With a timeline bar, you can directly look for a label or object and navigate to the exact timestamp in the video where a particular label or object is found.
To use this feature, you’ll need to upload your video to an OCI Bucket. Here is an example of a video stored in a bucket called OCI-Vision-Video-Demos.
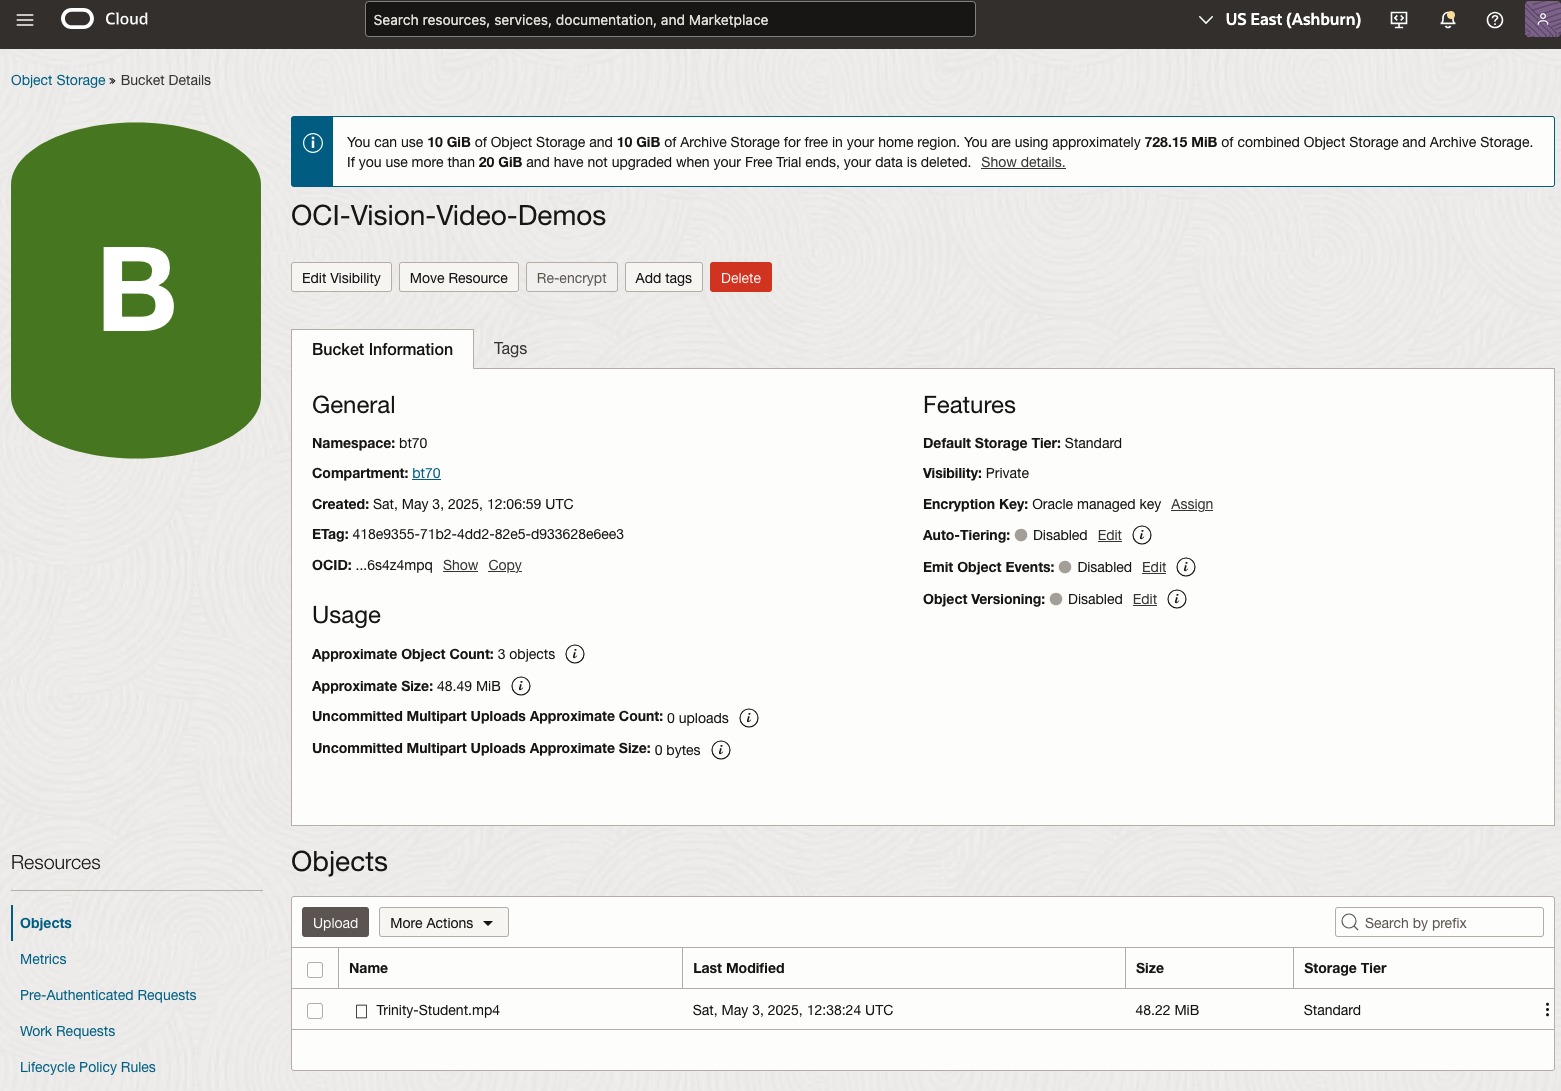
You might need to allow Pre-Authenticated Requests for this bucket. If you don’t do this, you will be prompted by the tool to allow this.
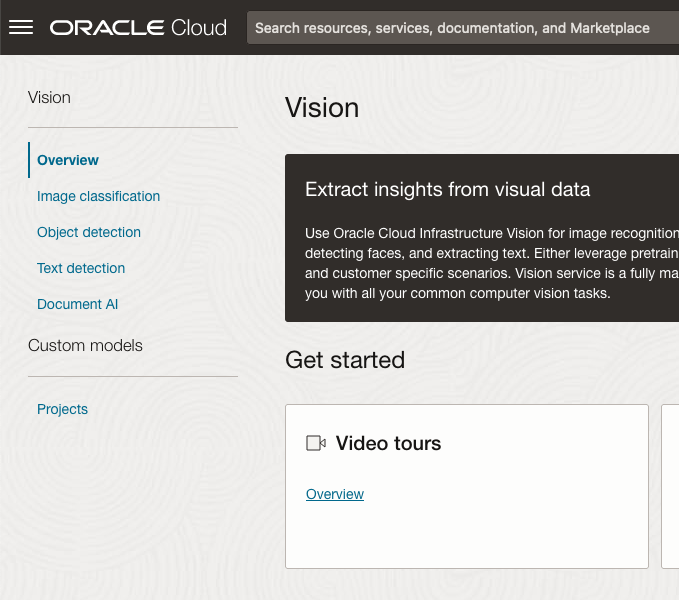
Next, go to the OCI Vision page. You’ll find the Video Analysis tool at the bottom of the menu on the left-hand side of the page.
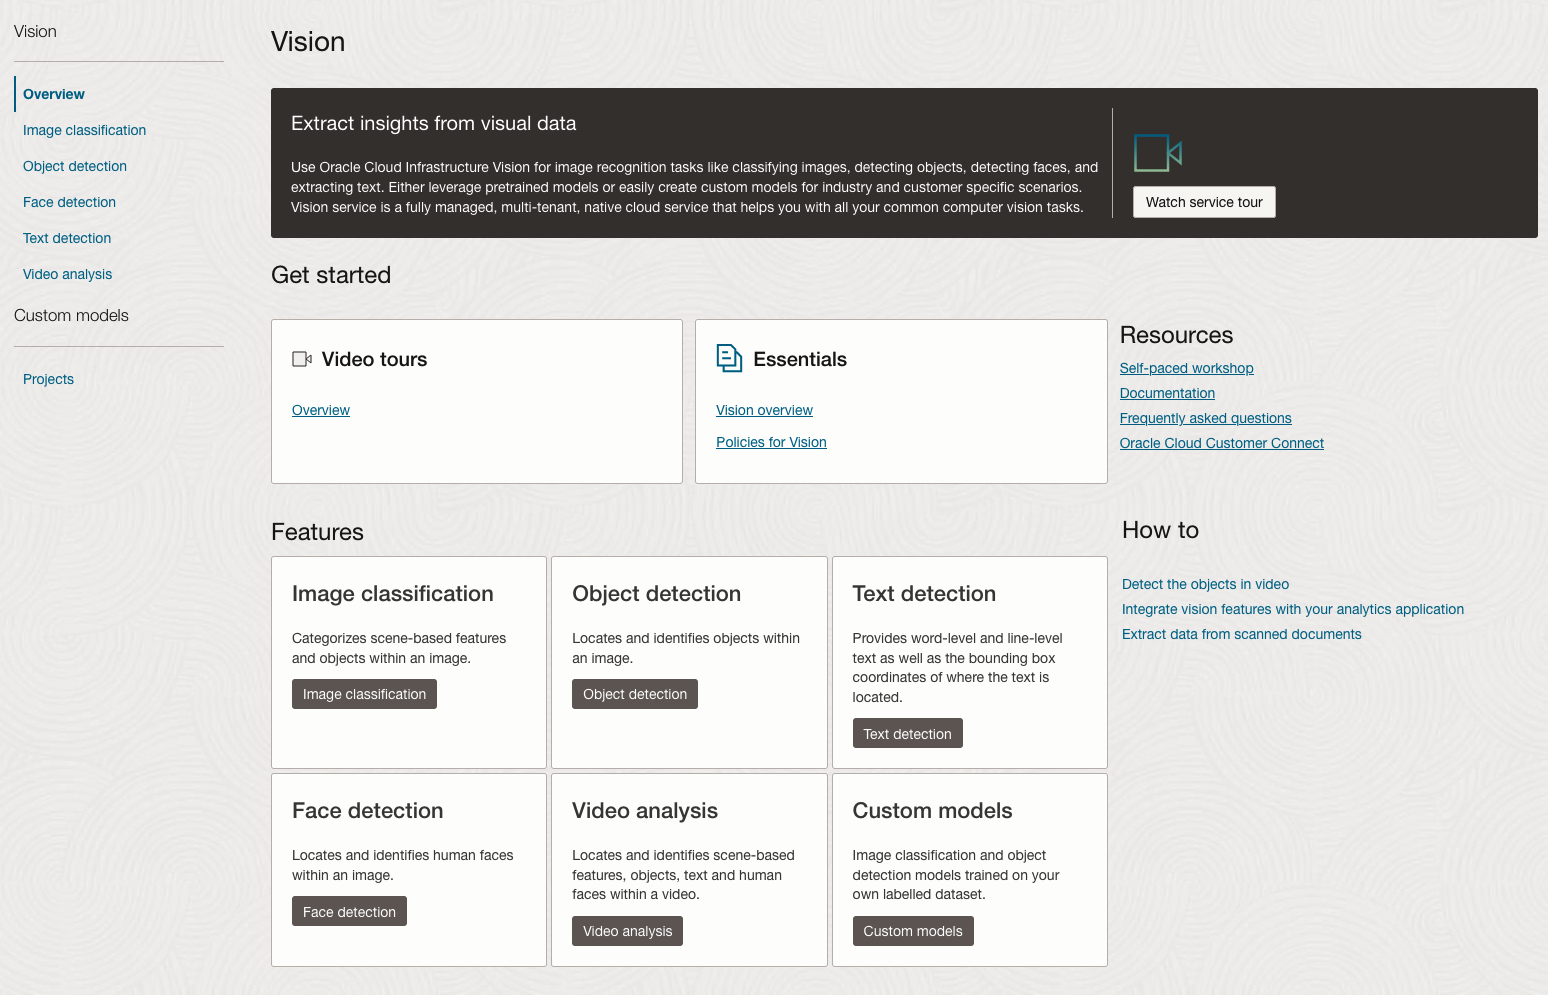
You can check out the demo videos, or load your own video from the Local File system of you computer, or use a file from your OCI Storage. If you select a video from the Local File system, the video will be loaded in the object storage before it is processed.
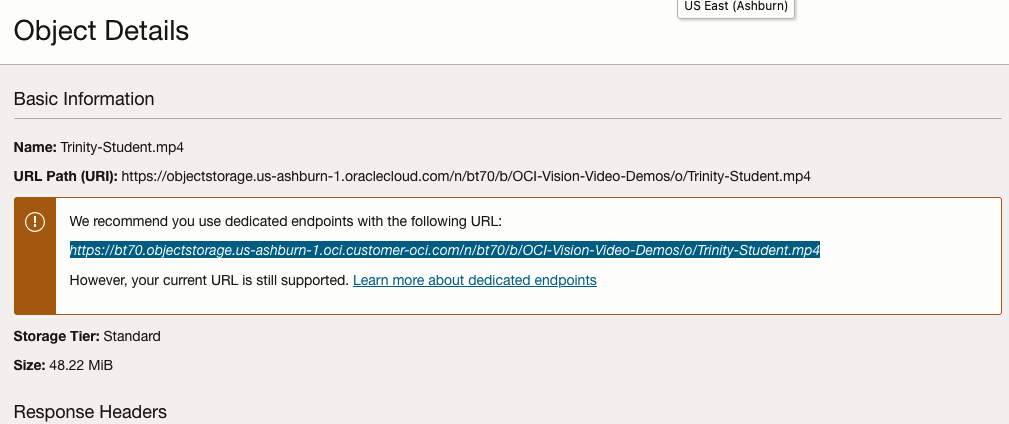
For this example, I’m going to use the video I uploaded earlier called Trinity-Student.mp4. Copy the link to this file from the file information in object storage.

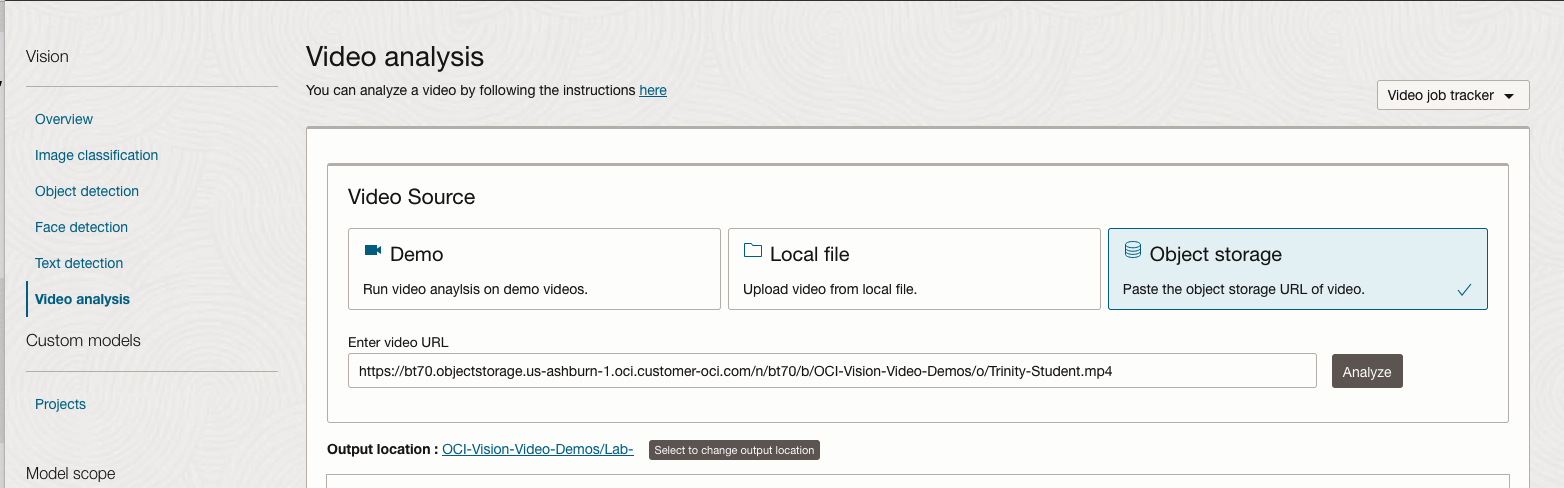
On the Video Analysis page, select Object Storage and paste the link to the file into the URL field. Then click Analyze button. It is at this point that you might get asked to Generate a PAR URL. Do this and then proceed.
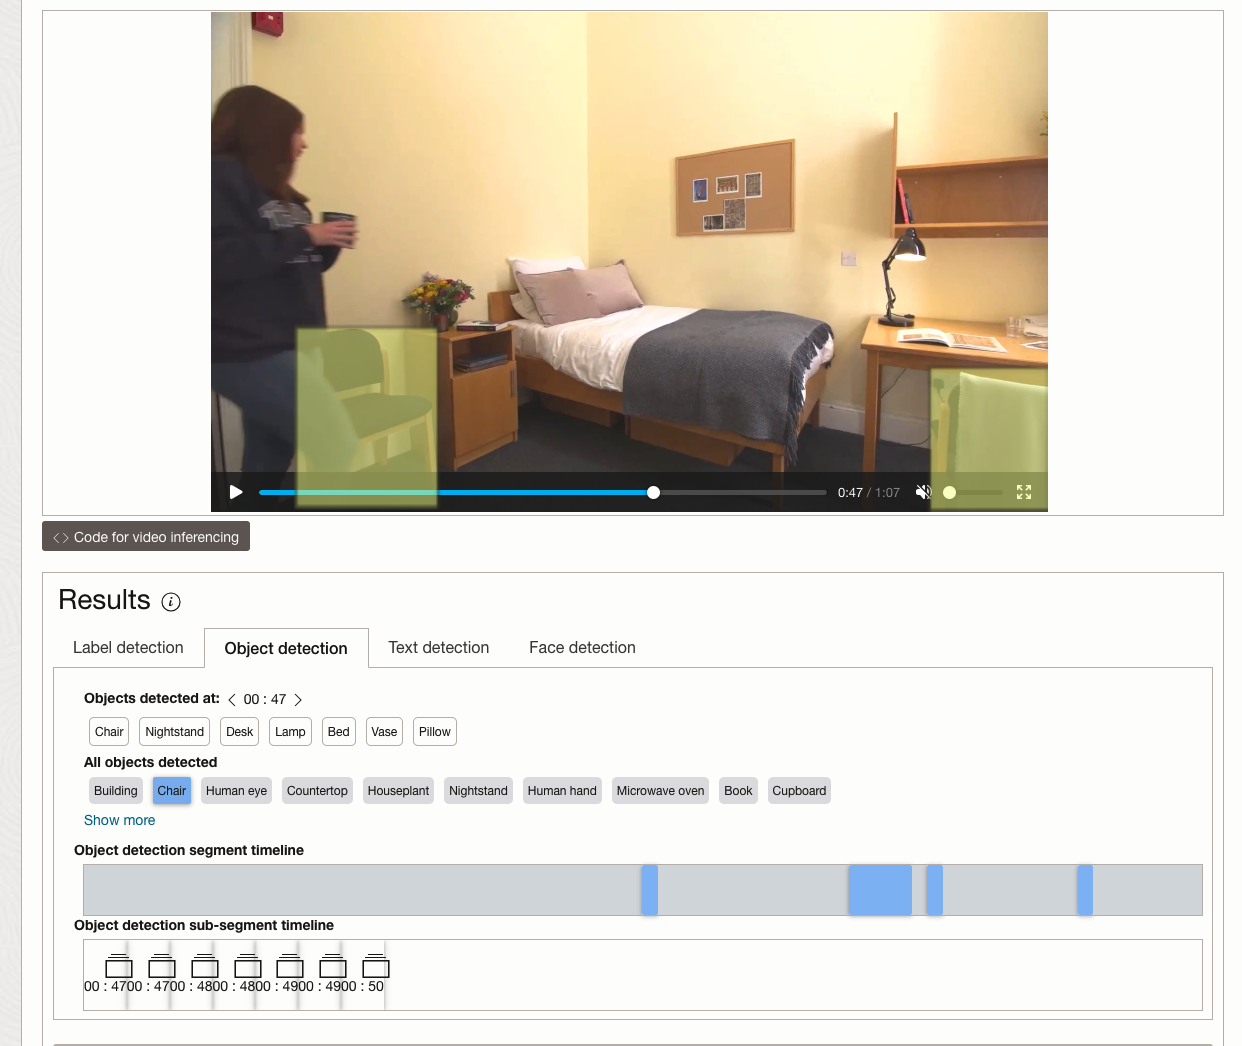
While the video is being parsed, it will appear on the webpage and will start playing. When the video has been Analyzed the details will be displayed below the video. The Analysis will consist of Label Detection, Object Detection, Text Dection and Face Detection.
By clicking on each of these, you’ll see what has been detected, and by clicking on each of these, you’ll be able to see where in the video they were detected. For example, where a Chair was detected.
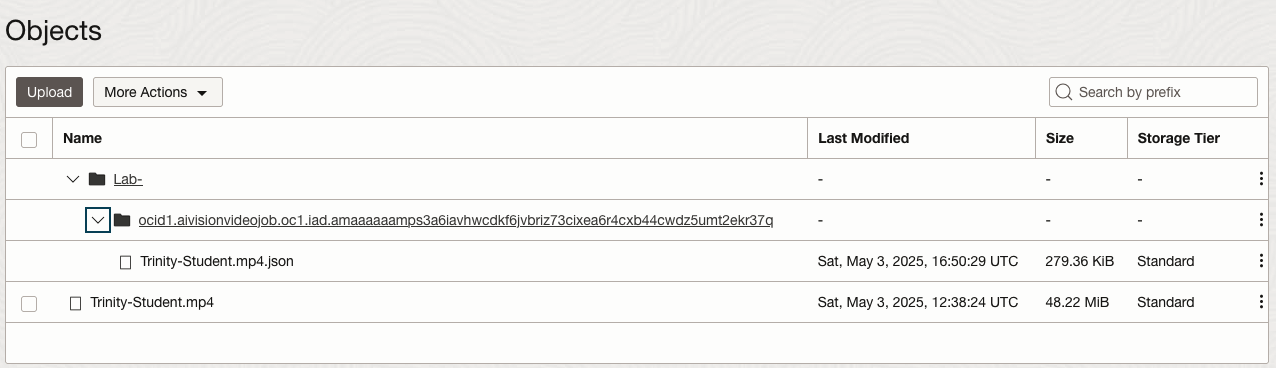
You can also inspect the JSON file containing all the details of various objects detected in the video and the location in the videos they can be found.
This JSON response file is also saved to Object Storage in the same directory, or a sub-directory, where the video is located.
Using Python for OCI Vision – Part 1
I’ve written a few blog posts over the past few weeks/months on how to use OCI Vision, which is part of the Oracle OCI AI Services. My blog posts have shown how to get started with OCI Vision, right up to creating your own customer models using this service.
In this post, the first in a series of blog posts, I’ll give you some examples of how to use these custom AI Vision models using Python. Being able to do this, opens the models you create to a larger audience of developers, who can now easily integrate these custom models into their applications.
In a previous post, I covered how to setup and configure your OCI connection. Have a look at that post as you will need to have completed the steps in it before you can follow the steps below.
To inspect the config file we can spool the contents of that file
!cat ~/.oci/config
I’ve hidden some of the details as these are related to my Oracle Cloud accountThis allows us to quickly inspect that we have everything setup correctly.
The next step is to load this config file, and its settings, into our Python environment.
config = oci.config.from_file()

config
We can now list all the projects I’ve created in my compartment for OCI Vision services.
#My Compartment ID
COMPARTMENT_ID = "<compartment-id>"

#List all the AI Vision Projects available in My compartment
response = ai_service_vision_client.list_projects(compartment_id=COMPARTMENT_ID)

#response.data
for item in response.data.items:
    print('- ', item.display_name)
    print('    ProjectId= ', item.id)
    print('')
Which lists the following OCI Vision projects.

We can also list out all the Models in my various projects. When listing these I print out the OCID of each, as this is needed when we want to use one of these models to process an image. I’ve redacted these as there is a minor cost associated with each time these are called.
#List all the AI Vision Models available in My compartment
list_models = ai_service_vision_client.list_models(
    # this is the compartment containing the model
    compartment_id=COMPARTMENT_ID
)

print("Compartment Id=", COMPARTMENT_ID)
print("")
for item in list_models.data.items:
    print('  ', item.display_name, '--', item.model_type)
    print('     OCID= ',item.id)
    print('     ProjectId= ', item.project_id)
    print('')
I’ll have other posts in this series on using the pre-built and custom model to label different image files on my desktop.
Python for OCI installation and configuration
Having set up your Oracle Cloud account and perhaps initiated some services, such as an Autonomous Database or an AI Service, you have some options with how you’ll interact with those services. The first is to use the online interfaces and tools for them. Another is to access these OCI services from your local PC or laptop. This latter method gives you greater flexibility for accessing these services, automating various tasks and building out some applications. This post will step through how to install the necessary Python library, how to configure for connecting to OCI and will demo some of the simpler APIs for accessing the OCI services. This will help you verify your connection is working correctly.
The simple part of this is installing the OCI library!
pip3 install oci
Like I said that’s the simple part.
The next step involves the configuration of a connection to your OCI tenancy. But before you can do this you need to have an account on OCI. If you don’t have one already, the easiest and FREE way to do this is to set up an account on the Oracle Free Tier. There is some Free stuff you can use, plus getting a few hundred dollars to spend on some of the other non-Free cloud services. When you’ve completed this you can move on to the next step.
We need to create the config file that will contain the required credentials and information for working with OCI. By default, this file is stored in : ~/.oci/config
mkdir ~/oci
cd oci
Now create the config file, using vi or something similar.
vi config
Edit the file to contain the following, but look out for the parts that need to be changed/updated to match your OCI account details.
[ADMIN_USER]
user=ocid1.user.oc1..<unique_ID>
fingerprint=<your_fingerprint>
tenancy = ocid1.tenancy.oc1..<unique_ID>
region = us-phoenix-1
key_file=<path to key .pem file>
The above details can be generated by creating an API key for your OCI user. Copy and Pate the default details to the config file.
- [ADMIN_USER] > you can name this anything you want, but it will referenced in Python.
- user > enter the user ocid. OCID is the unique resource identifier that OCI provides for each resource.
- fingerprint > refers to the fingerprint of the public key you configured for the user.
- tenancy > your tenancy OCID.
- region > the region that you are subscribed to.
- key_file > the path to the .pem file you generated.

Just download the .epm file and the config file details. Add them to the config file, and give the full path to the .epm file, including it’s name.
You are now ready to use the OCI Python library to access and use your OCI cloud environment. Let’s run some tests to see if everything works and connects ok.
config = oci.config.from_file(
     "~/.oci/config")
identity = oci.identity.IdentityClient(config)
user = identity.get_user(config["user"]).data
print(user)
The above connects to OCI using the config file we’ve just created and will print the following details about the connect.

The following lists all the available shapes available to me in the us-ashburn-1 region.
database_client = oci.database.DatabaseClient(config)

# Send the request to service, some parameters are not required, see API
# doc for more info
list_db_system_shapes_response = database_client.list_db_system_shapes(
    compartment_id=compart_id,
    availability_domain="us-ashburn-1")

# Get the data from response
print(list_db_system_shapes_response.data)
The listing for the above is very long, so I’ll leave that for you to explore.
For more details of the APIs available check out the Documentation and the GitHub Respository for more examples.
OCI Data Labeling using Bounding Box
In a previous post, I gave examples of how to label data using OCI Data Labeling. It was a simple approach to data labeling images for input to AI Vision. In that post, we just gave a label for the image to indicate if the image contained a Cat or a Dog. Yes, that’s a very simple approach, and we can build image classification models, and use the resulting model to predict a label for new images. These would be labeled as a Cat or a Dog with a degree of certainty. Although this simple approach can give OK-ish results, we typically want a more detailed model and predictions. For a more detailed approach, we can use Object Detection. For this, we need to prepare our data set in a slightly different way and Yes it does take a bit more time to prepare. Or perhaps it takes a lot more time to prepare the data. But this extra time in preparing the data should (in theory) give us a more accurate model.
This post will focus on creating a new labeled dataset using bounding boxes, and in a later post, we’ll examine the resulting model to see if it gives better or more accurate results.
I’ve mentioned the phrase ‘bounding box’ a few times and this approach does exactly as the phrase indicates. Draw a box around the object and assign a label to it. In our example, we have used a Cats and Dogs dataset. We’ll use that same dataset (50 images of each animal). This approach to labelling the images takes much longer to complete, as we have to draw a box around each animal. But it is worth the effort, as the models can focus on what is inside the box and ignore anything outside the box.
The first task is to define the dataset that will contain our newly labelled data based on the bound box method.
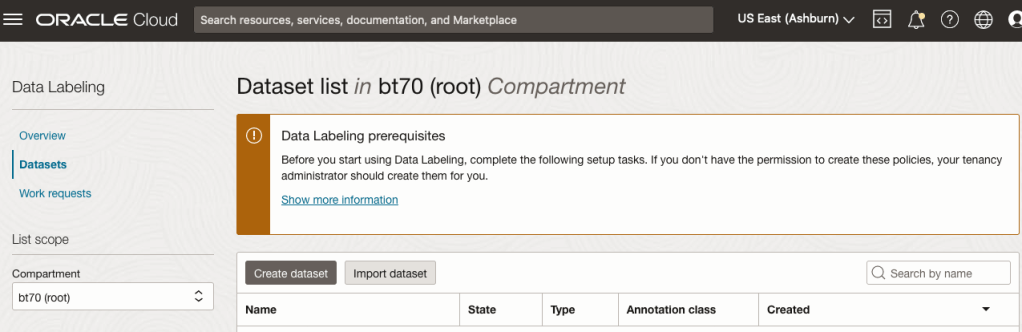
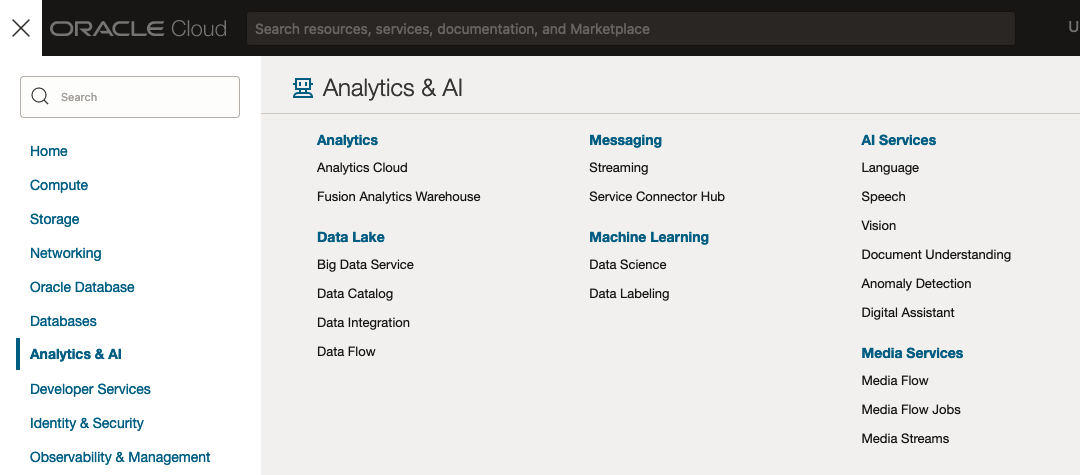
From the OCI menu, go to the Analytics & AI section and select Data Labeling.
Select the Dataset menu items(on the left hand side of the screen, and then click on the Create dataset button.
The Add Dataset screen allows us to enter the details of the dataset we want to use.
Our dataset is based on a dataset in Object storage, and we can define it as the basis of creating a newly labelled dataset. This does not affect the underlying original dataset.
In this case, we want to select Object Detection in the section called Annotation Class.


On the next screen, you can define the Bucket containing the images we want to label.
In our case, we will be using the Cats and Dogs dataset previously loaded into Object Storage.
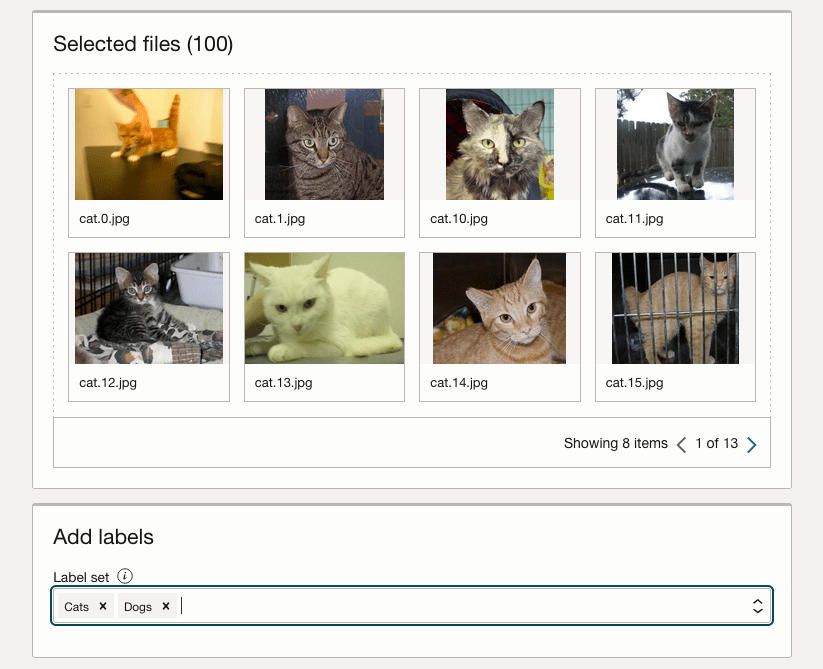
In the next section, it will tell you how many files are part of the underlying dataset. By default, it will use all of them.
Add the labels you want to use, although you can add more during the labelling process.
Click Next to move to the next screen and then Click Finish to complete this setup.

After a moments, depending on the number of images in the underlying dataset, the version of the dataset for labelling can now be processed.
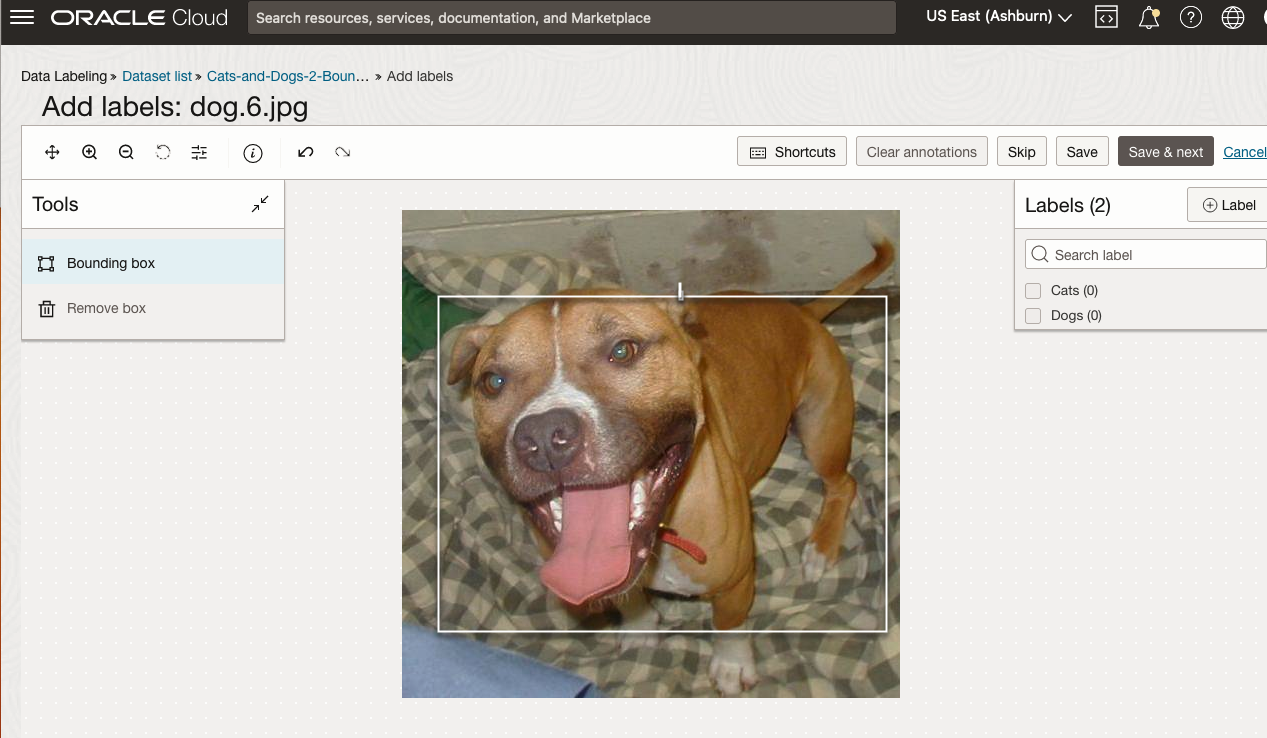
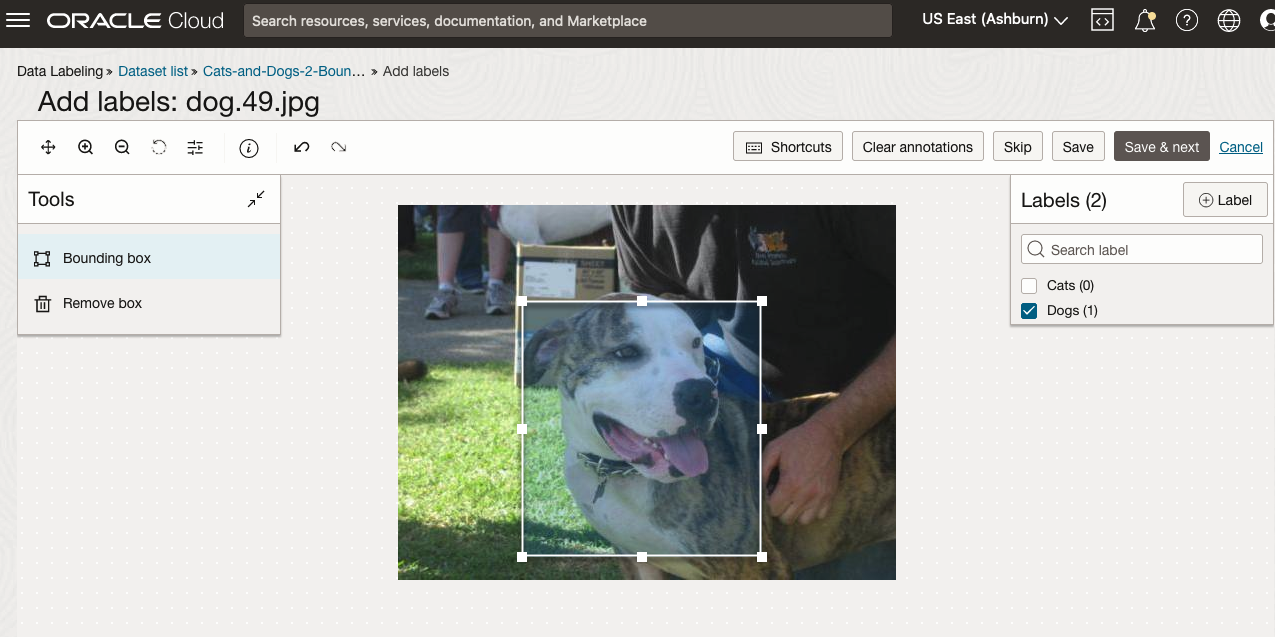
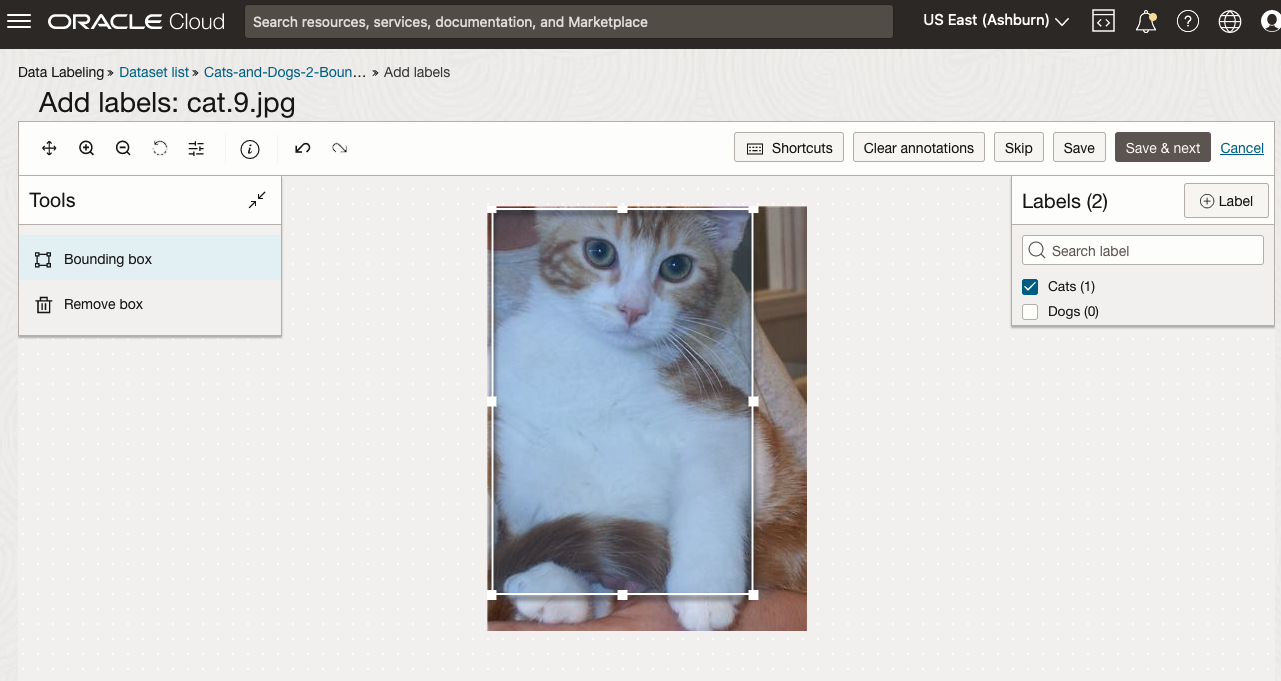
To stat the labelling process, click on the first on the first image. Using your mouse drag a box over the main item you want to label. In my example, I’m drawing a box around the animals while trying to exclude as much of the surrounding and background parts of the image. After drawing the box, you can then select the label, from the list on the right-hand side of the screen and then click the Save & Next button. Continue doing this until you complete all images. Yes this can take some time, but it should help OCI Vision create a better-informed model for these animals

OCI Vision – Creating a Custom Model for Cats and Dogs
In this post, I’ll build on the previous work on preparing data, to using this dataset as input to building a Custom AI Vision model. In the previous post, the dataset was labelled into images containing Cats and Dogs. The following steps takes you through creating the Customer AI Vision model and to test this model using some different images of Cats.
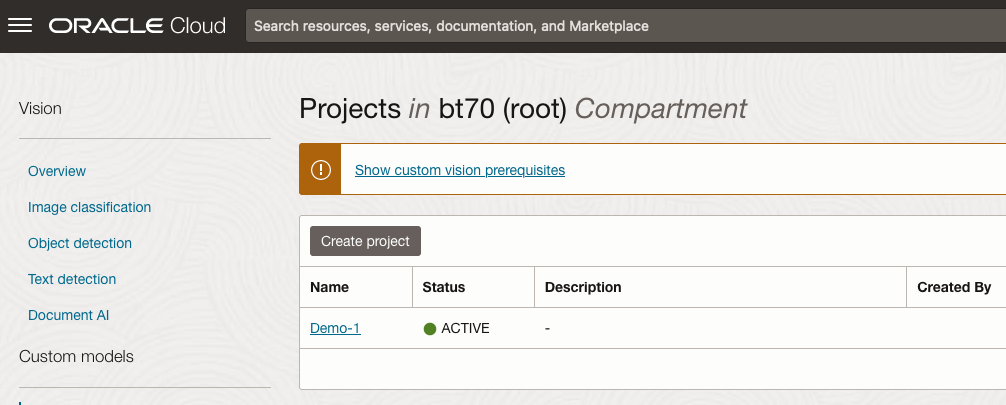
Open the OCI Vision page. On the bottom left-hand side of the menu you will see Projects. Click on this to open the Projects page for creating a Custom AI Vision model.
On the Create Projects page, click on the Create Project button. A pop-up window will appear. Enter the name for the model and click on the Create Project bottom at the bottom of the pop-up.

After the Project has been created, click on the project name from the list. This will open the Project specific page. A project can contain multiple models and they will be listed here. For the Cats-and-Dogs project we and to create our model. Click on the Create Model button.
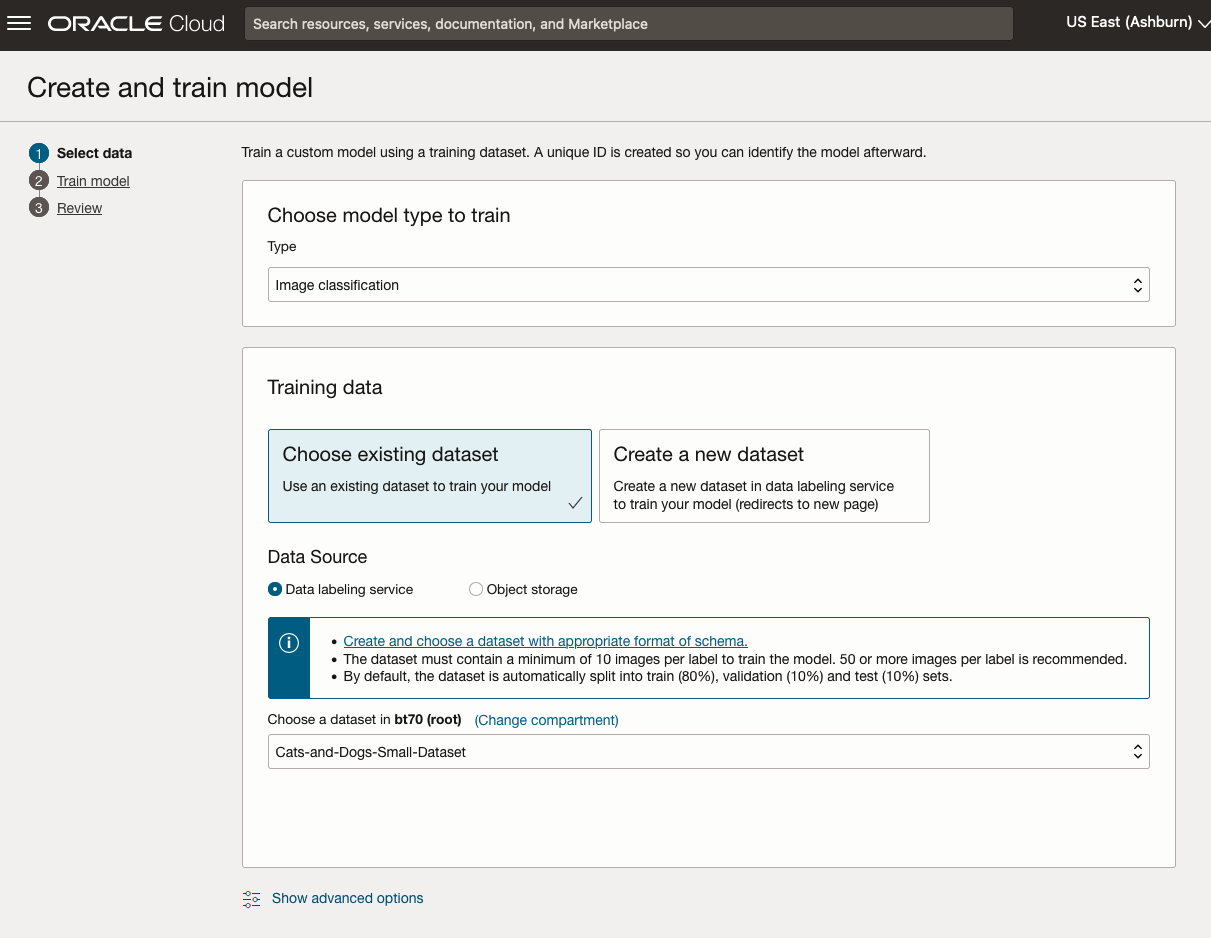
Next, you can define some of the settings for the Model. These include what dataset to use, or upload a new one, define what data labelling to use and the training duration. For this later setting, you can decide how much time you’d like to allocate to creating the custom model. Maybe consider selecting Quick mode, as that will give you a model within a few minutes (or up to an hour), whereas the other options can allow the model process to run for longer and hopefully those will create a more accurate model. As with all machine learning type models, you need to take some time to test which configuration works best for your scenario. In the following, the Quick mode option is selected. When read, click Create Model.

It can take a little bit of time to create the model. We selected the Quick mode, which has a maximum of one hour. In my scenario, the model build process was completed after four minutes. The Precentage Complete is updated during the build allowing you to monitor it’s progress.

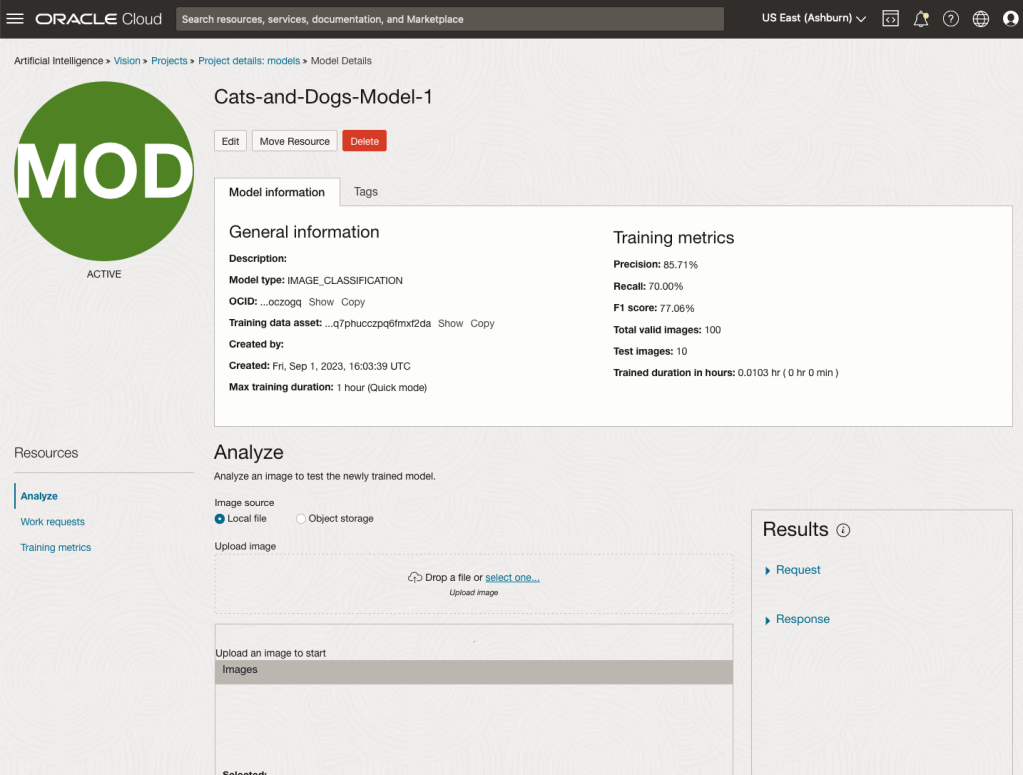
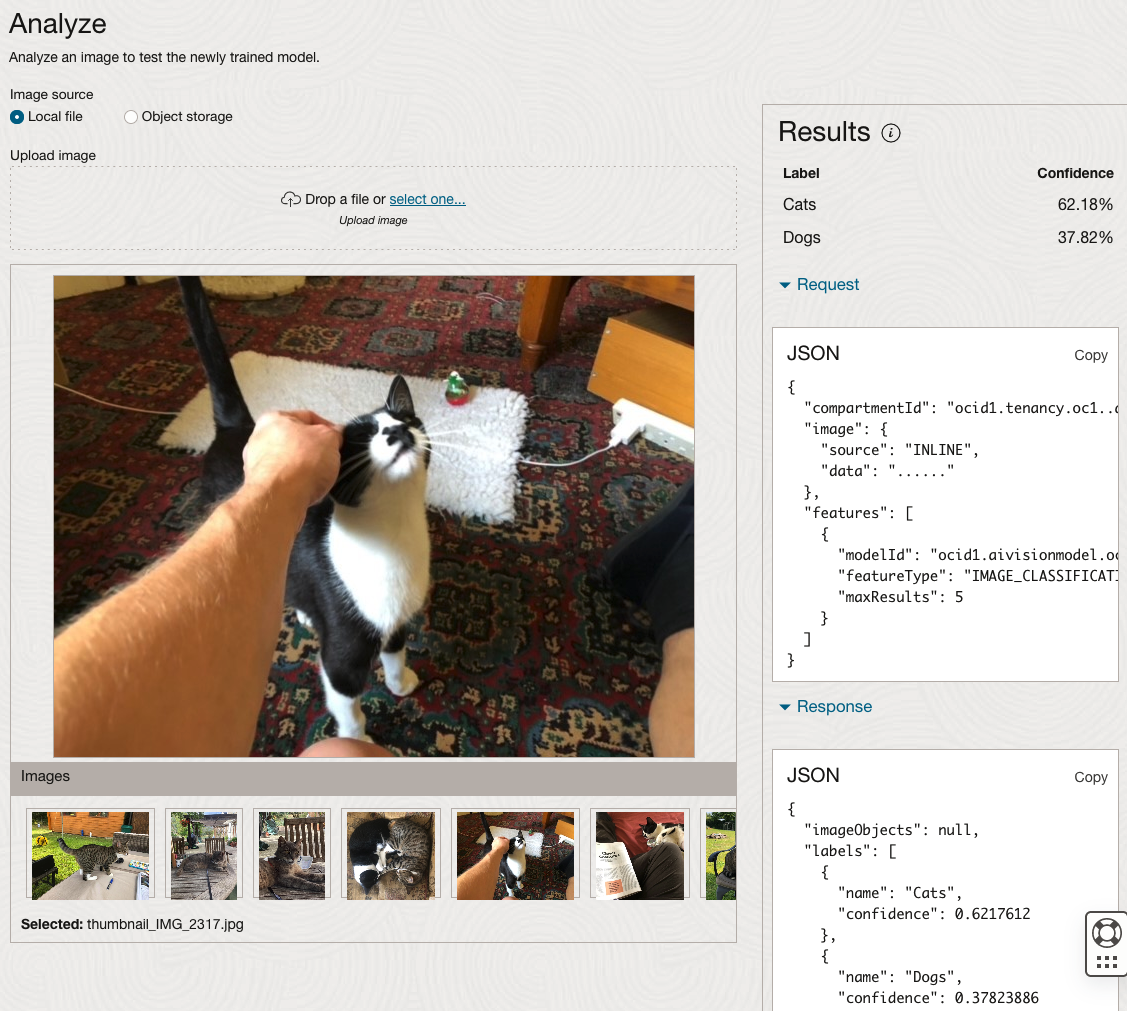
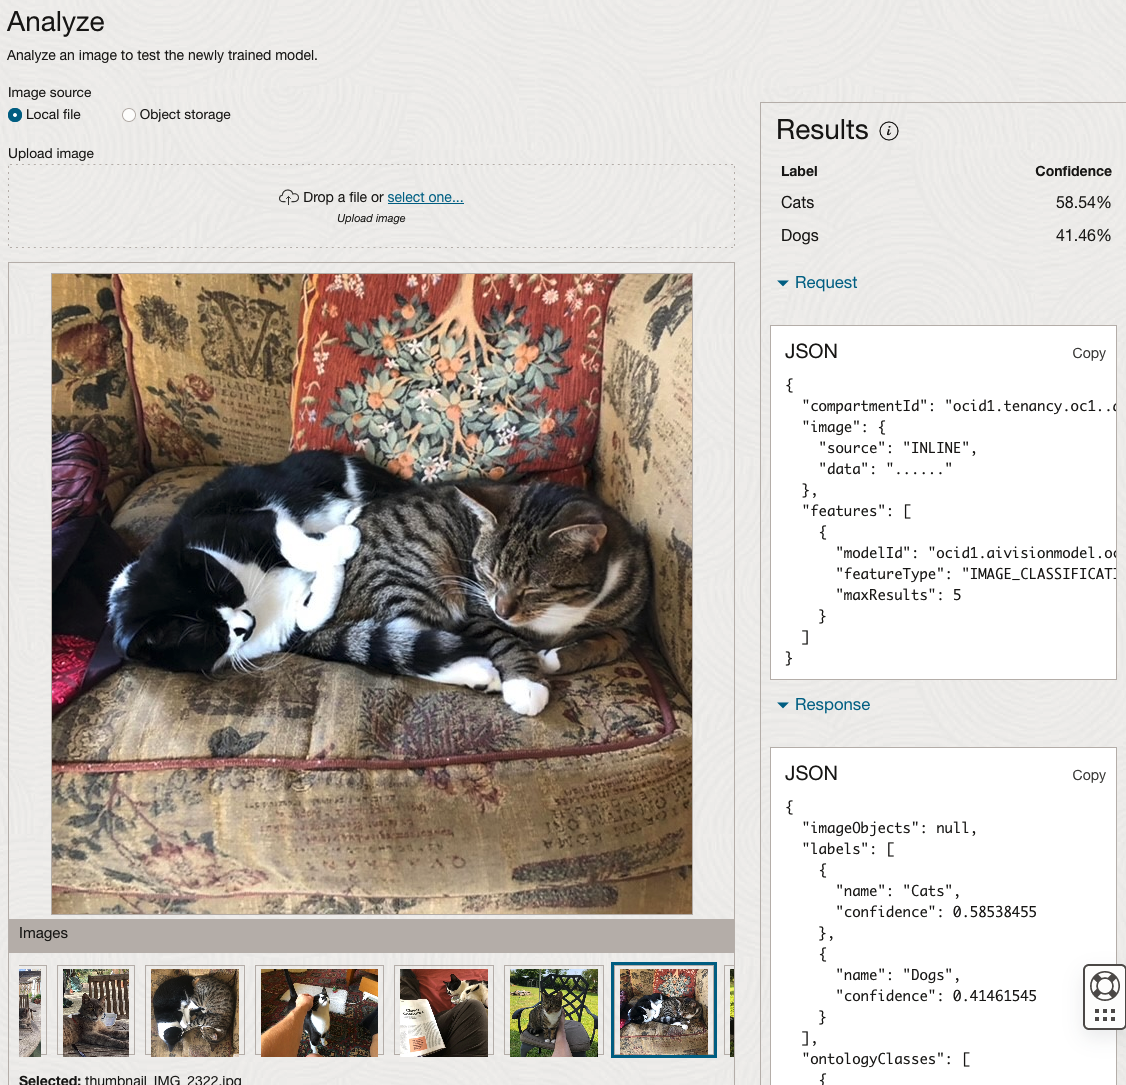
When the model is completed, you can test it using the Model page. Just click on the link for the model and you’ll get a page like the one to the right.
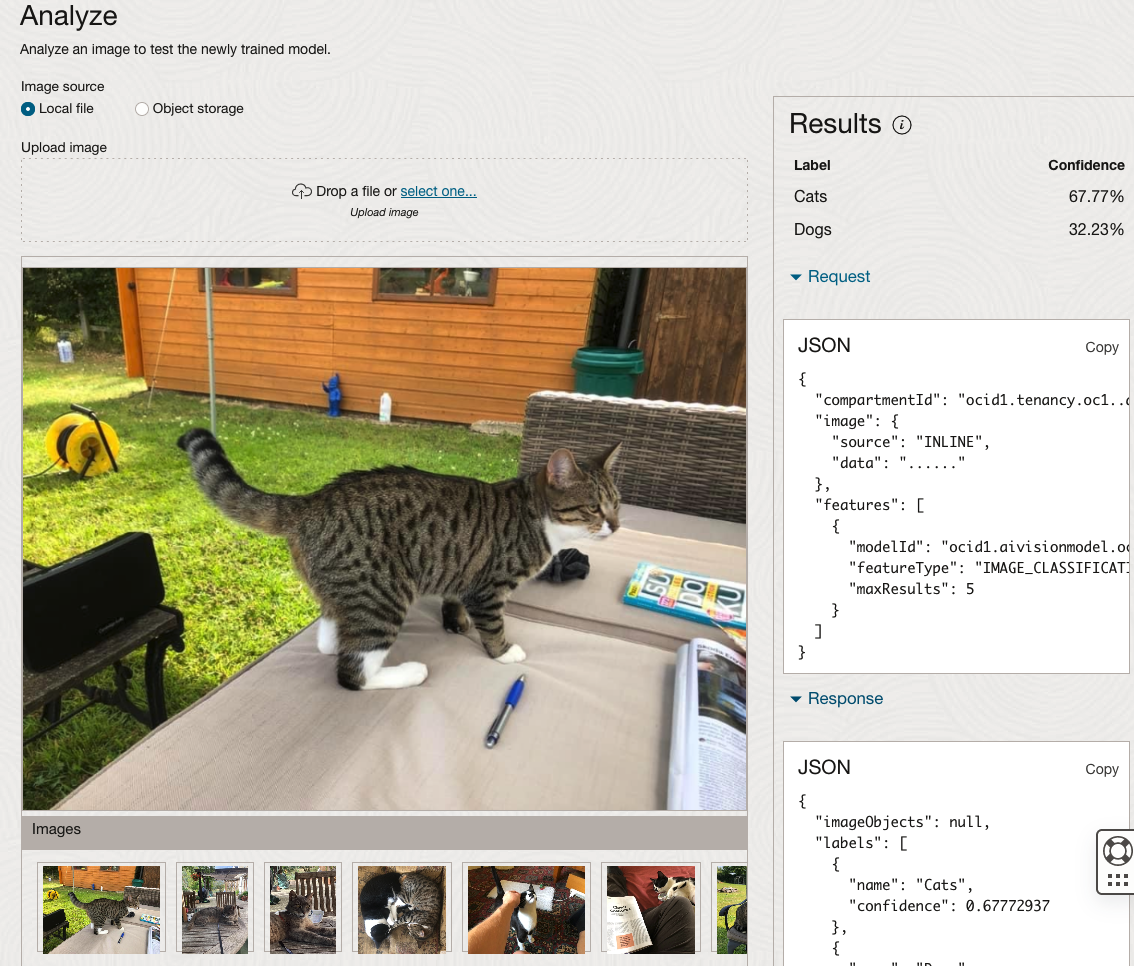
The bottom half of this page allows you to upload and evaluate images. The following images are example images of cats (do you know the owner) and the predictions and information about these are displayed on the screen. Have a look at the following to see which images scored better than others for identifying a Cat.
OCI Object Storage Buckets
We can upload and store data in Object Storage on OCI. This allows us to load and store data in a variety of different formats and sizes. With this data/files in object storage, it can be easily accessed from an Oracle Database (e.g. Autonomous Database) and any other service on OCI. This allows building more complete business solutions in a more integrated way.
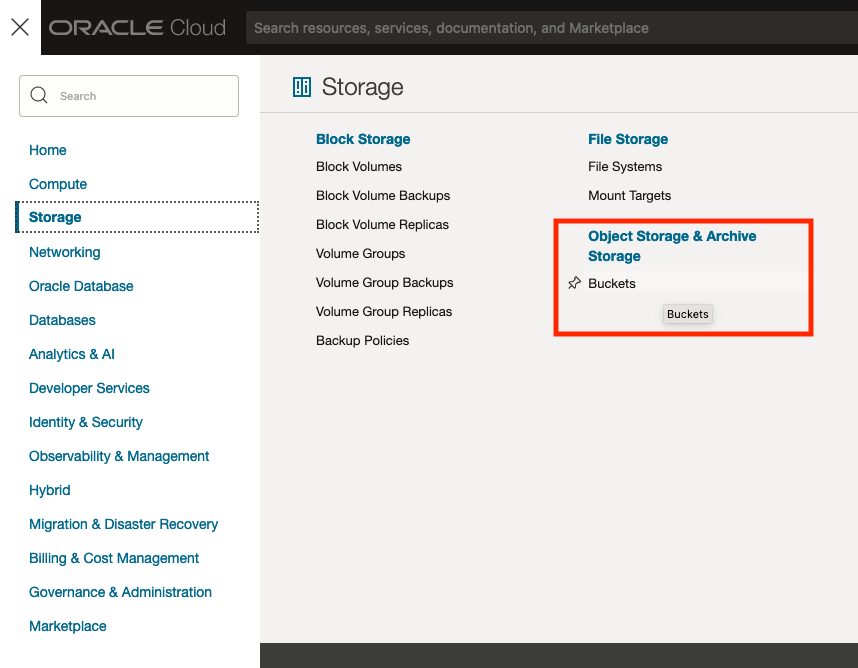
The Buckets feature can be found under the Storage option in the main Menu. From the popup screen look under Object Storage & Archive Storage and click on Buckets.
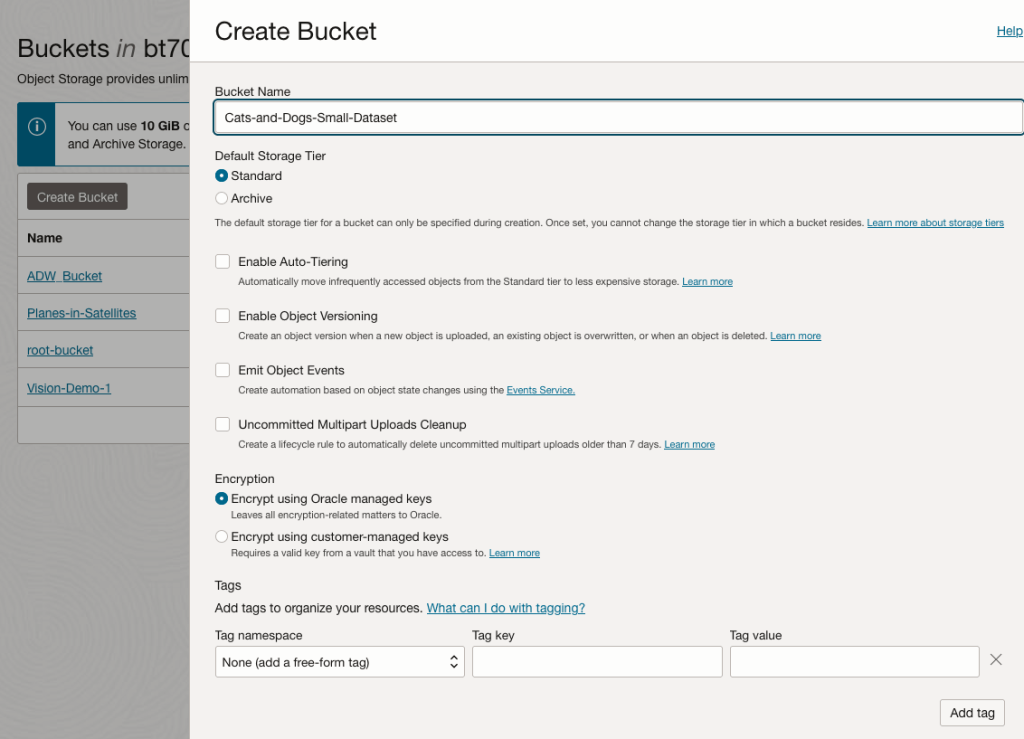
In the Objects Storage screen click on Create Bucket button.
In the Create Bucket screen, change the name of the Bucket. In this example, I’ve called it ‘Cats-and-Dogs-Small-Dataset’. No spaces are allowed. You can leave the defaults for the other settings. Then click the Create button.
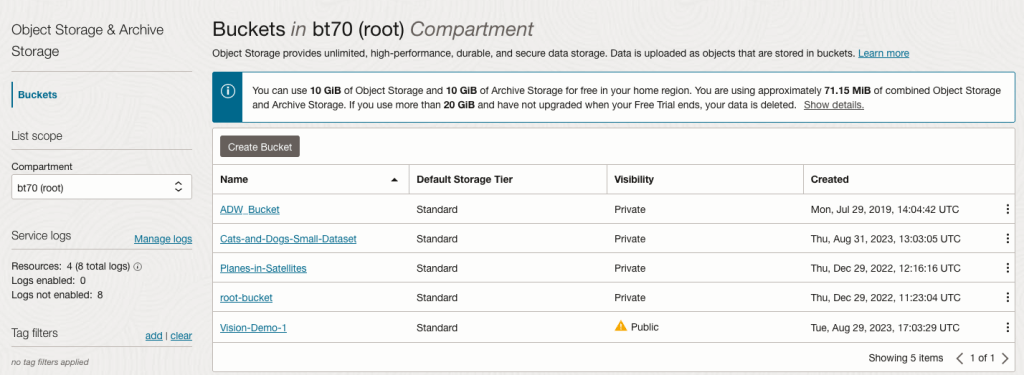
It will then be displayed along with any other buckets you have. I’ve a few other buckets.
Click on the Bucket name to open the bucket and add files to it.
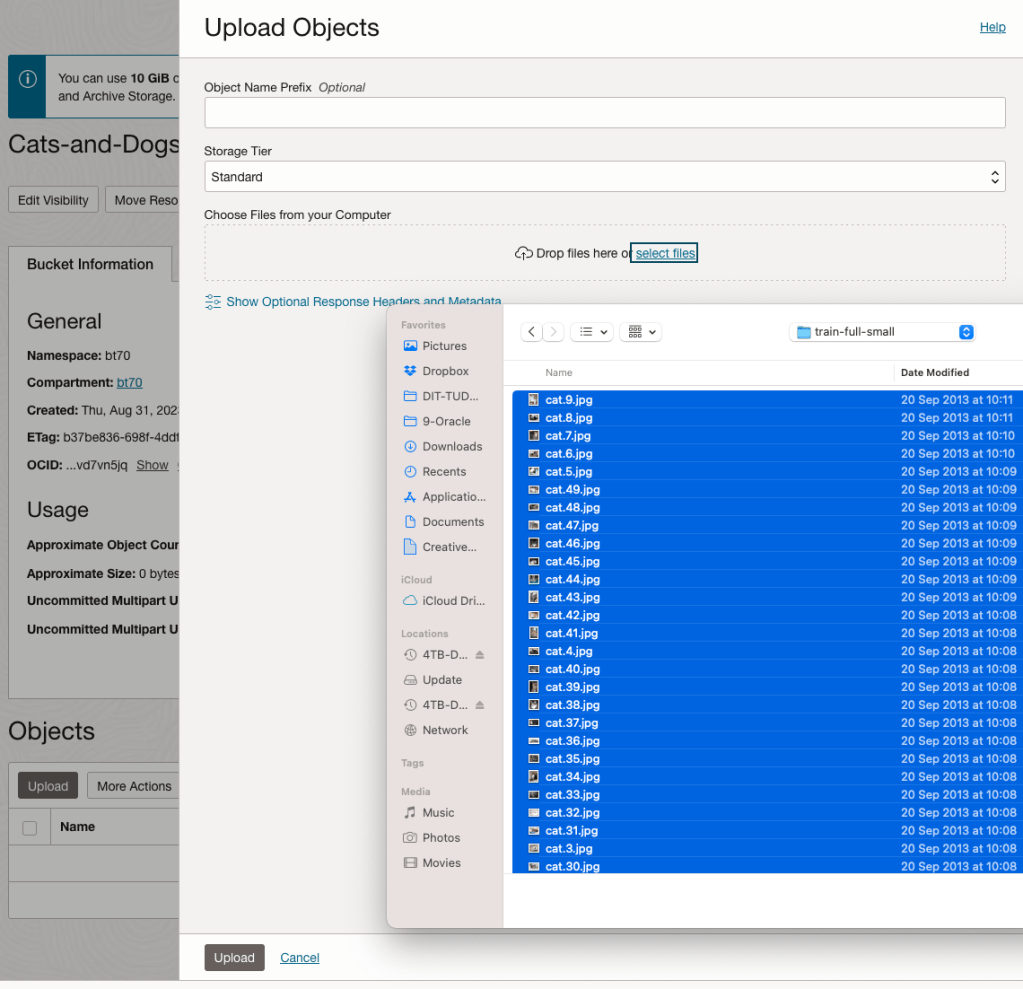
Click on the Upload button. Locate the files on your computer, select the files you want to upload.
The files will be listed in the Upload Object window. Click the Upload button to start transferring them to OCI.
If you wish you can set a prefix for all the files being uploaded.
When the files have been uploaded, click the Close button.
Note: The larger the dateset, in files and file size, it can take some time (depending on interest connection speed) for all the files to load into the Bucket.
To view the details of an image, click on the three dots to the right of the image files. This will open a menu for the image, where you can select to view image Details, download, copy, rename, delete, etc. the image.
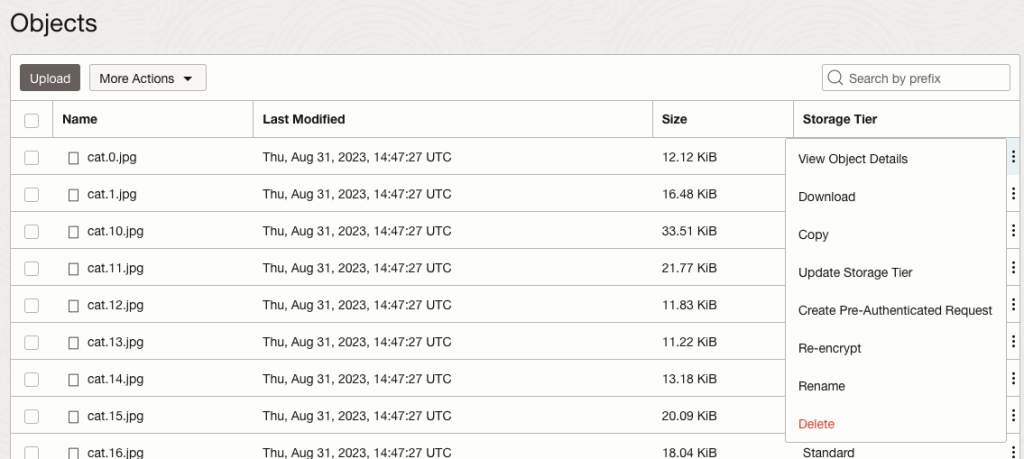

Click on View Object Details to get the details of the image.
This will display details about the object and the URI for the image.
OCI:Vision – AI for image processing – the Basics
Every cloud service provides some form of AI offering. Some of these can range from very basic features right up to a mediocre level. Only a few are delivering advanced AI services in a useful way.
Oracle AI Services have been around for about a year now, and with all new products or cloud services, a little time is needed to let it develop from an MVP (minimum viable produce) to something that’s more mature, feature-rich, stable and reliable. Oracle’s OCI AI Services come with some pre-training models and to create your own custom models based on your own training datasets.
Oracle’s OCI AI Services include:
- Digital Assistant
- Language
- Speech
- Vision
- Document Understand
- Anomaly Detection
- Forecasting
In this post, we’ll explore OCI Vision, and what the capabilities are available with their pre-trained models. To demonstrate this their online/webpage application will be used to demonstrate what it does and what it creates and identifies. You can access the Vision AI Services from the menu as shown in the following image.
From the main AI Vision webpage, we can see on the menu (on left-hand side of the page), we have three main Vision related options. These are Image Classification, Object Detection and Document AI. These are pre-trained models that perform slightly different tasks.
Let’s start with Image Classification and explore what is possible. Just Click on the link.
Note: The Document AI feature will be moving to its own cloud Service in 2024, so it will disappear from them many but will appear as a new service on the main Analytics & AI webpage (shown above).
The webpage for each Vision feature comes with a couple of images for you to examine to see how it works. But a better way to explore the capabilities of each feature is to use your own images or images you have downloaded. Here are examples.
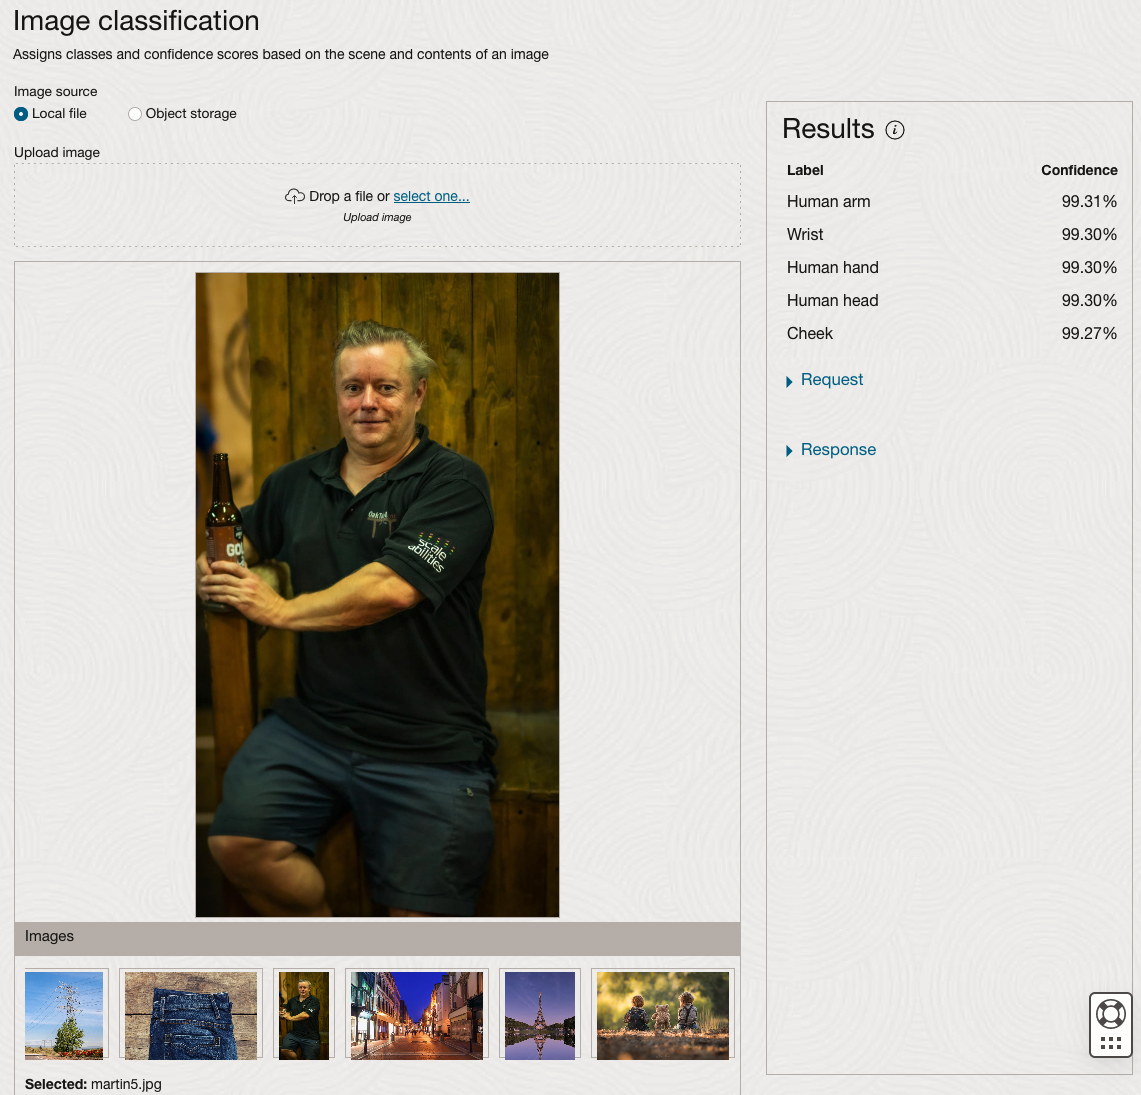
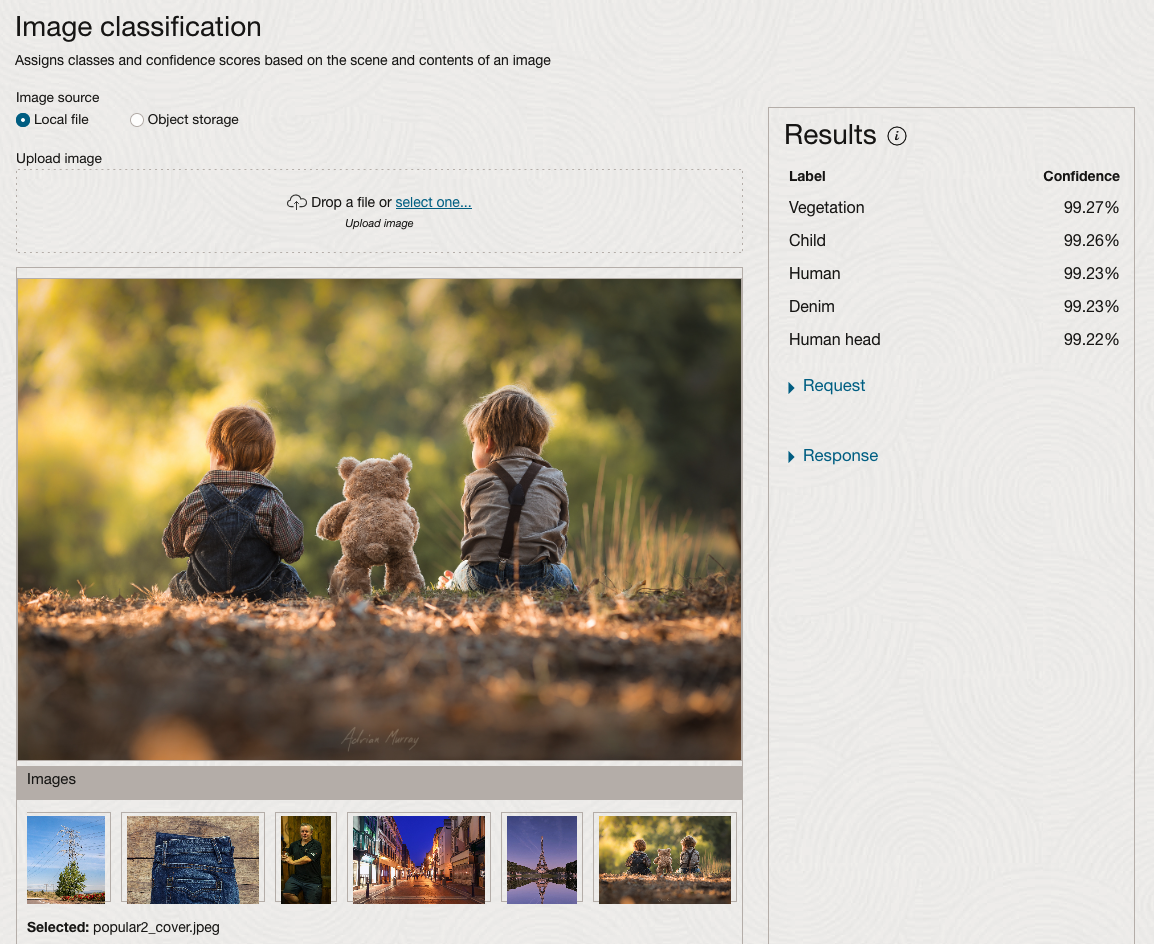
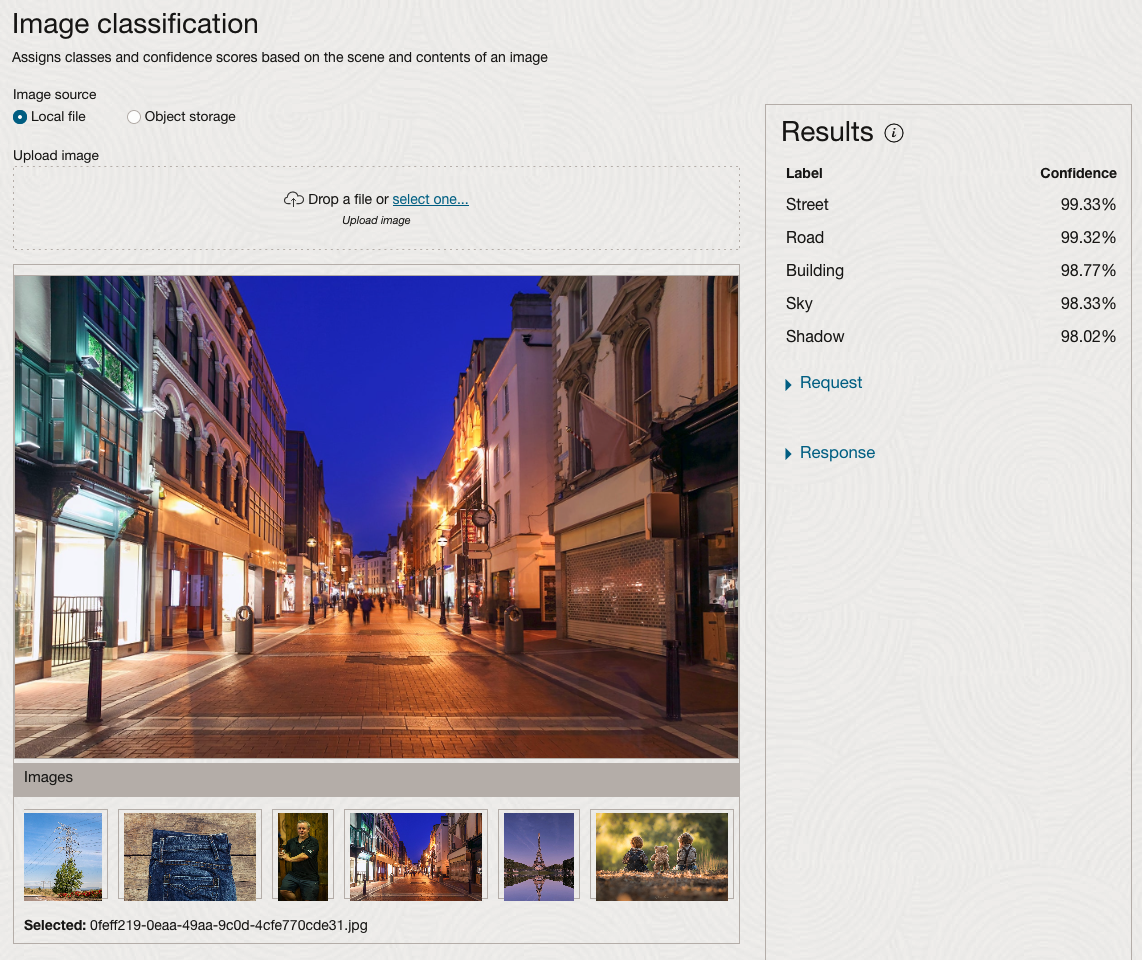
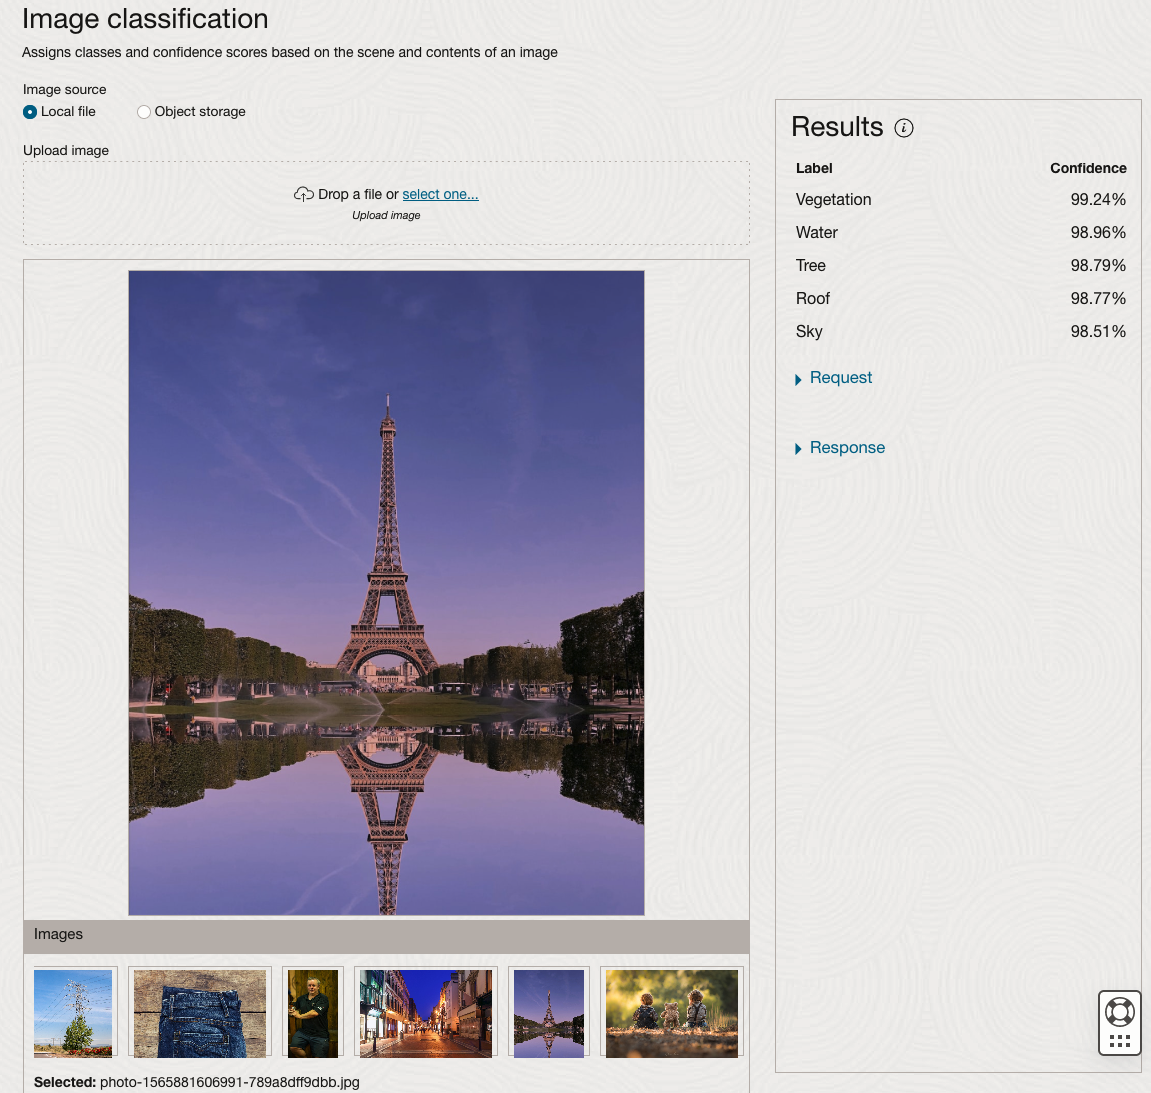
We can see the pre-trained model assigns classes and confidence for each image based on the main components it has identified in the image. For example with the Eiffel Tower image, the model has identified Water, Trees, Sky, Vegetation and Roof (of build). But it didn’t do so well with identifying the main object in the image as being a tower, or building of some form. Where with the streetscape image it was able to identify Street, Road, Building, Sky and Shadow.
Just under the Result section, we see two labels that can be expanded. One of these is the Response which contains JSON structure containing the labels, and confidences it has identified. This is what the pre-trained model returns and if you were to use Python to call this pre-trained model, it is this JSON object that you will get returned. You can then use the information contained in the JSON object to perform additional tasks for the image.
As you can see the webpage for OCI Vision and other AI services gives you a very simple introduction to what is possible, but it over simplifies the task and a lot of work is needed outside of this page to make the use of these pre-trained models useful.
Moving onto the Object Detection feature (left-hand menu) and using the pre-trained model on the same images, we get slightly different results.
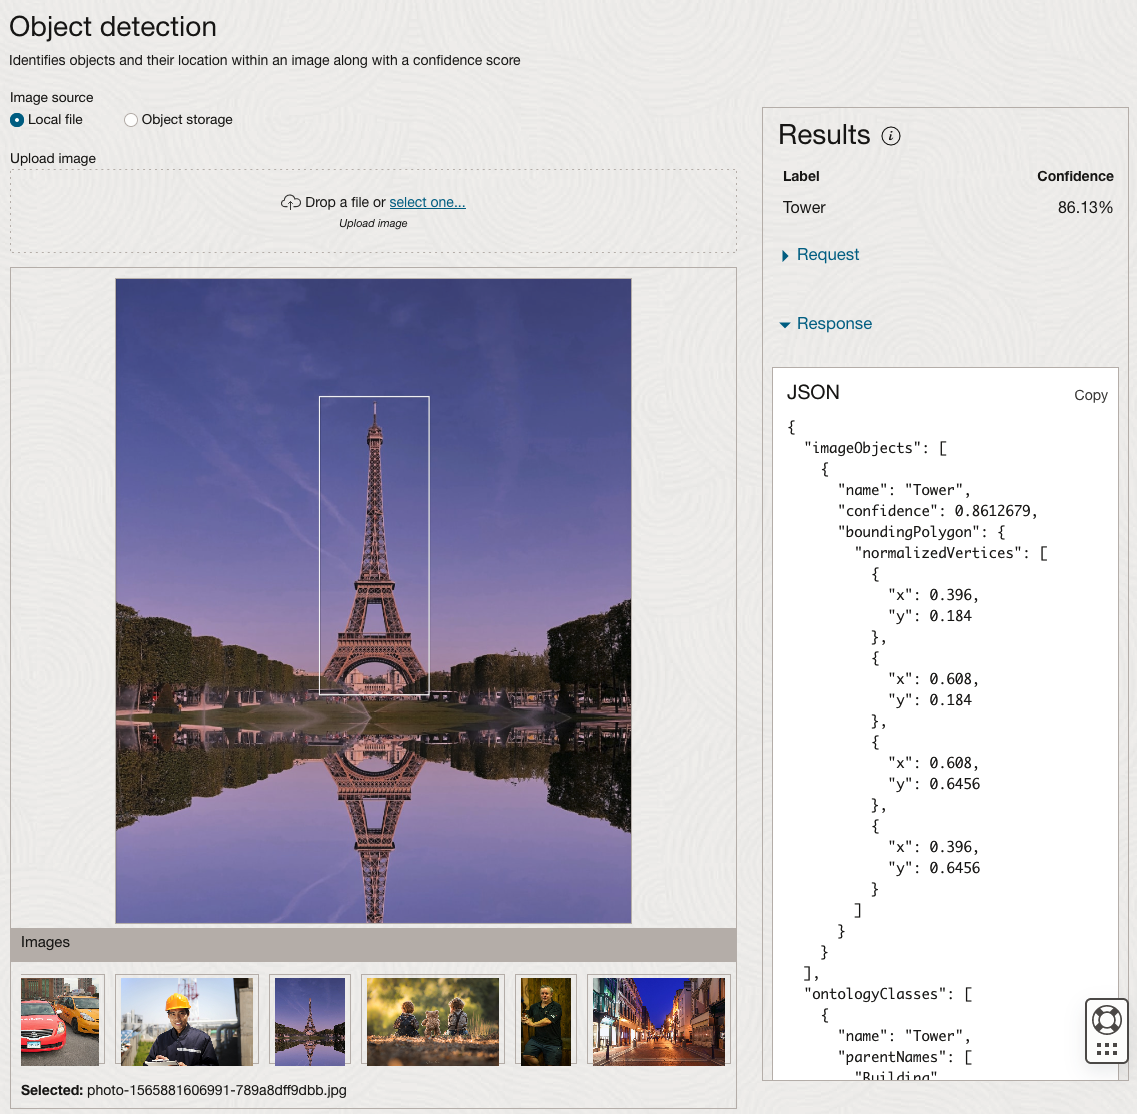
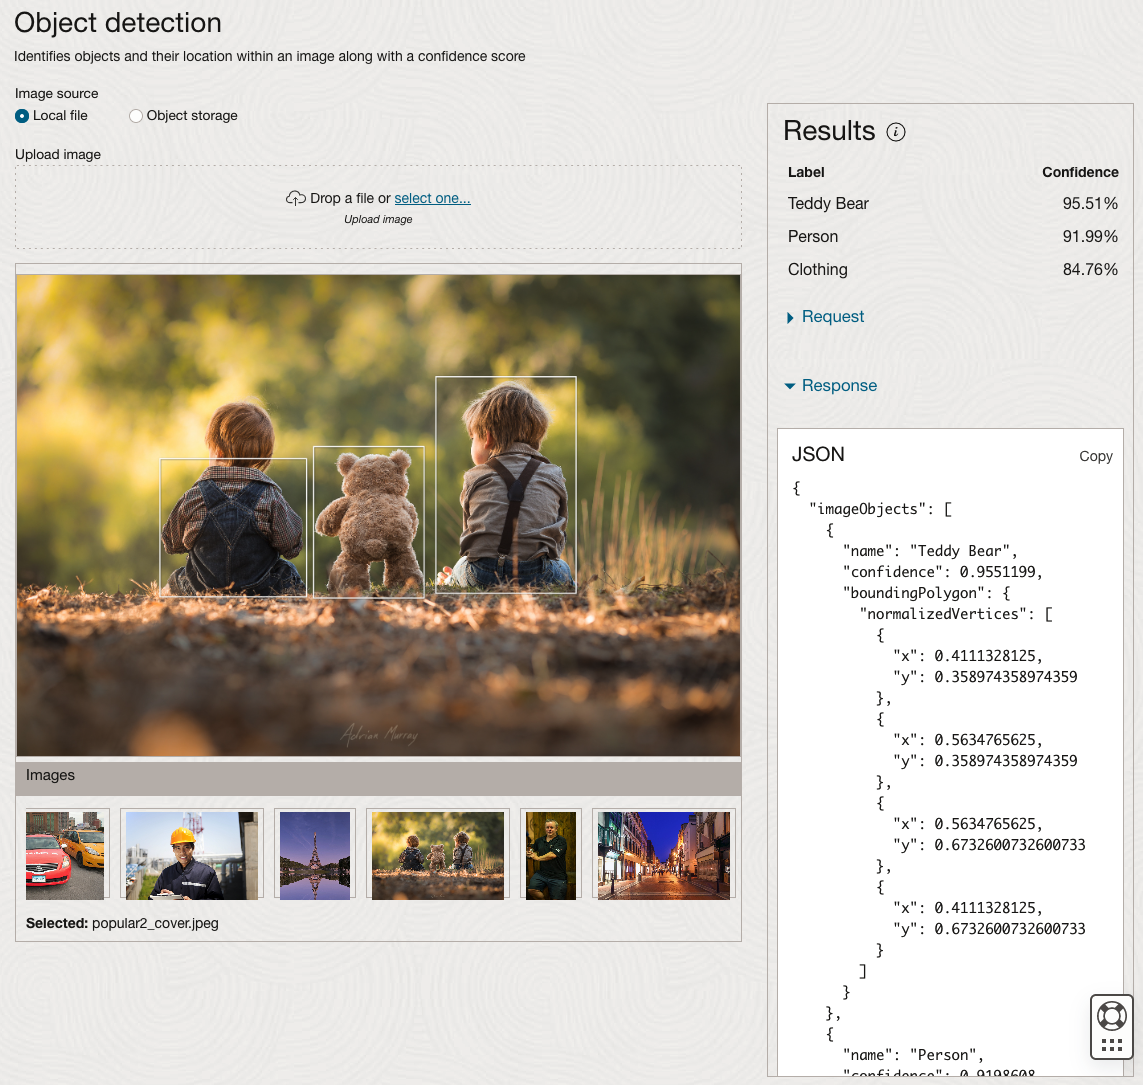
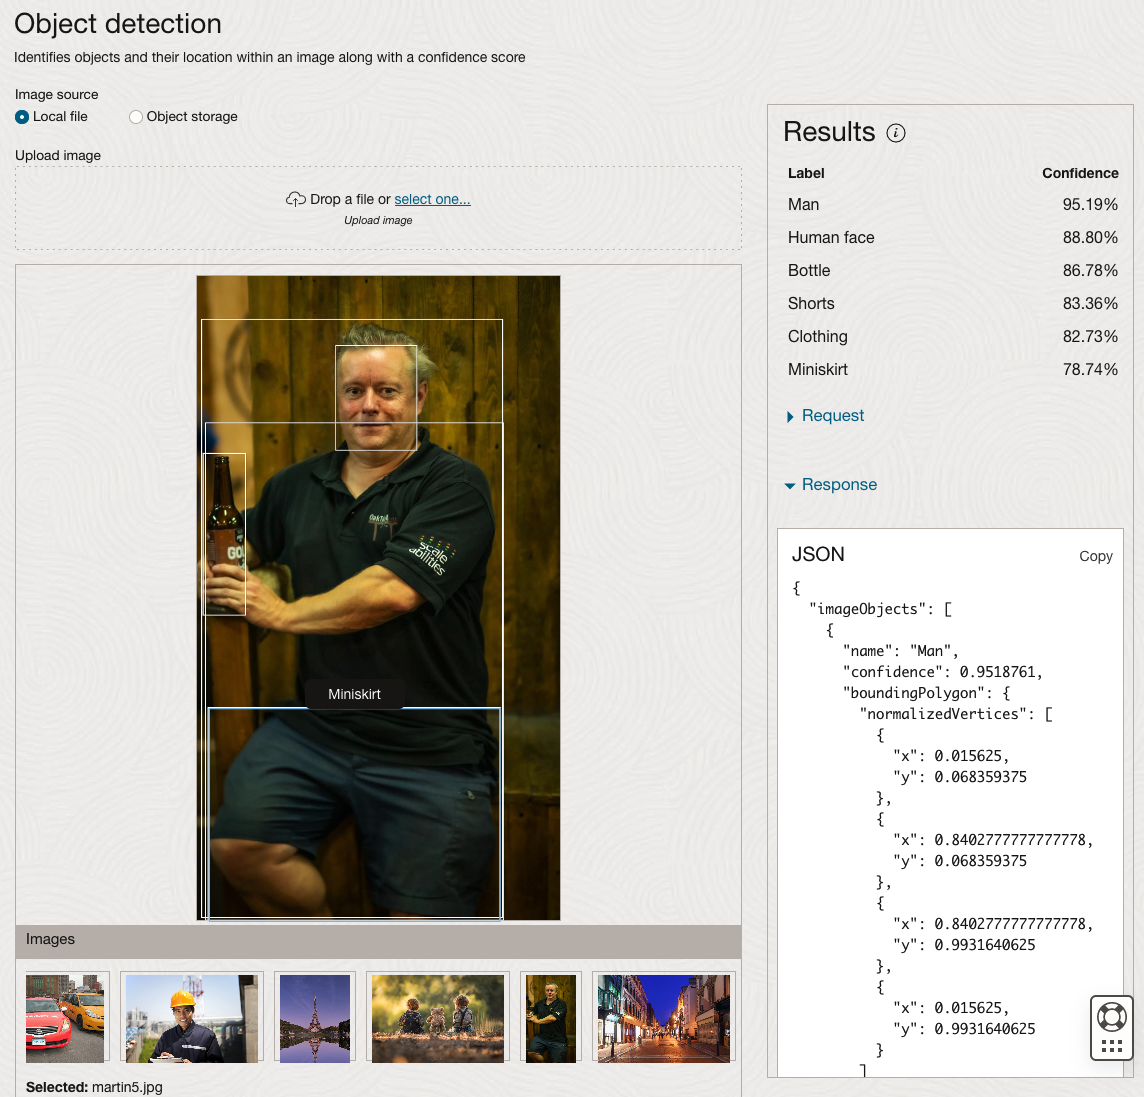
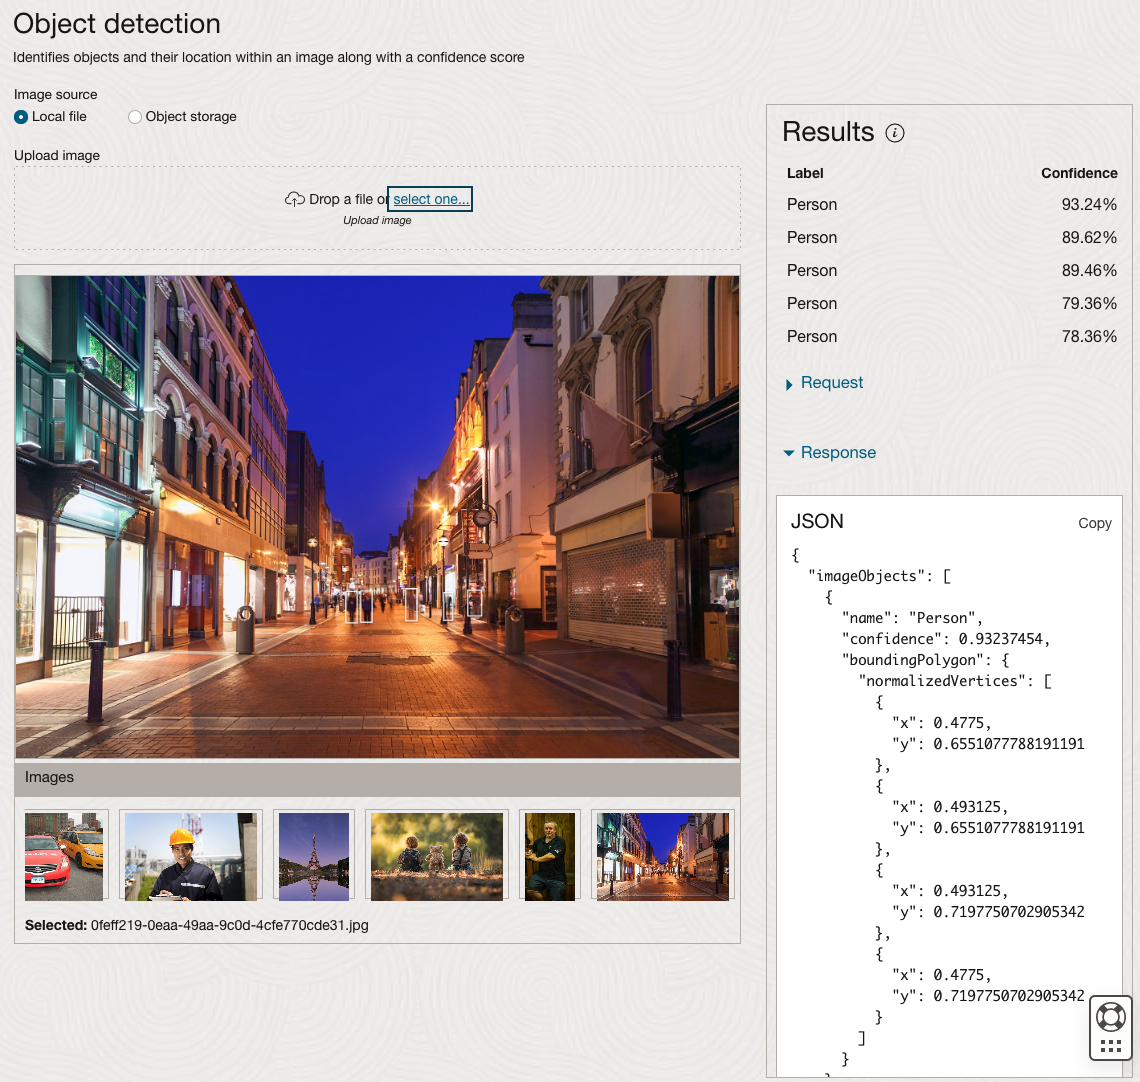
The object detection pre-trained model works differently as it can identify different things in the image. For example, with the Eiffel Tower image, it identifies a Tower in the image. In a similar way to the previous example, the model returns a JSON object with the label and also provides the coordinates for a bounding box for the objects detected. In the street scape image, it has identified five people. You’ll probably identify many more but the model identified five. Have a look at the other images and see what it has identified for each.
As I mentioned above, using these pre-trained models are kind of interesting, but are of limited use and do not really demonstrate the full capabilities of what is possible. Look out of additional post which will demonstrate this and steps needed to create and use your own custom model.
OCI:Vision Template for Policies
When using OCI you’ll need to configure your account and other users to have the necessary privileges and permissions to run the various offerings. OCI Vision is no different. You have two options for doing this. The first is to manually configure these. There isn’t a lot to do but some issues can arise. The other option is to use a template. The OCI Vision team have created a template of what is required and I’ll walk through the steps of setting this up along with some additional steps you’ll need.
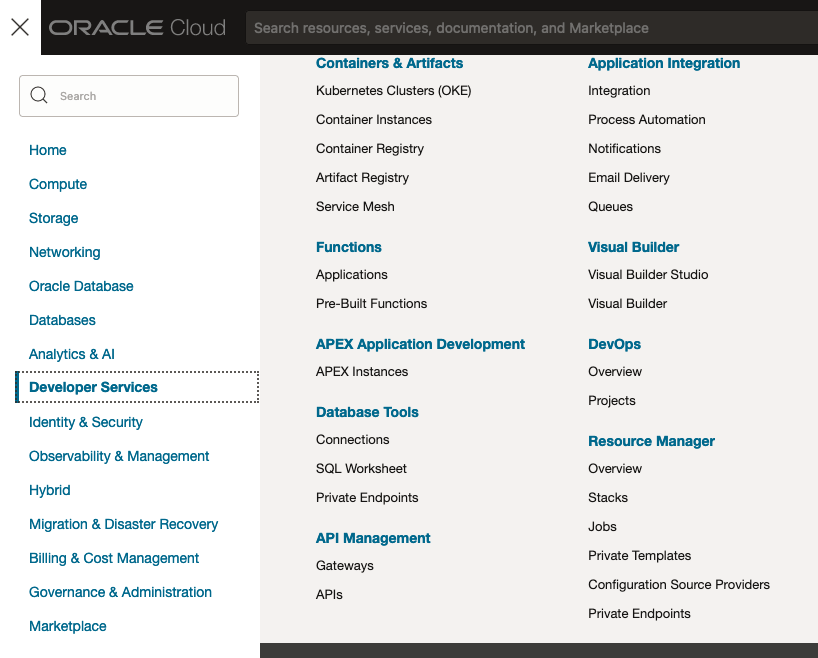
You’ll need to go to the Resource Manager page. This can be found under the menu by going to the Developer Services and then selecting Resource Manager.
First, you’ll need to go to the Resource Manager page. This can be found under the menu by going to the Developer Services and then selecting Resource Manager.
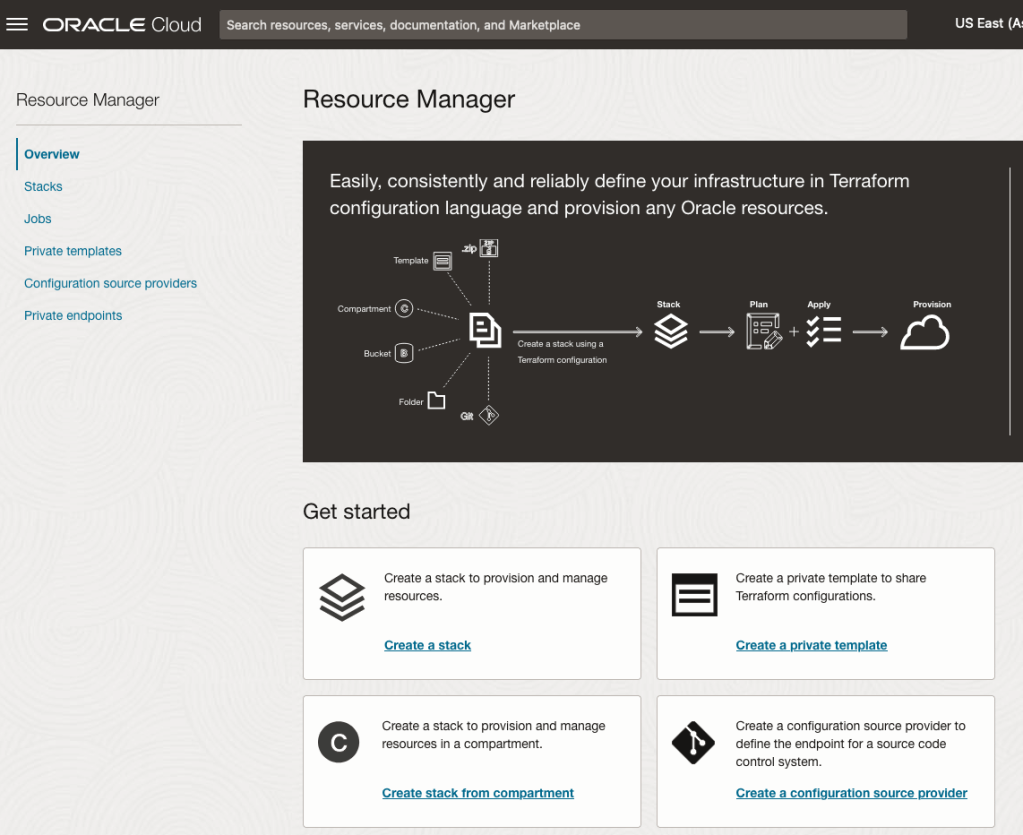
Located just under the main banner image you’ll see a section labelled ‘Create a stack’. Click on this link.
In the Create stack screen select Template from the radio group at the top of the page. Then in the Browse template pop-up screen, select the Service tab (across the top) and locate Vision. Once selected click the Select Template button.
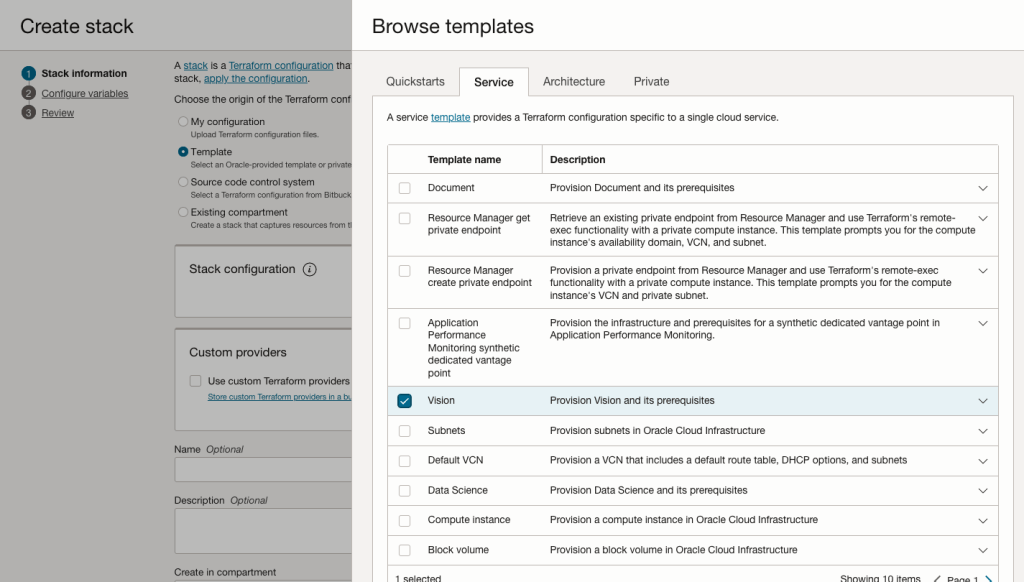
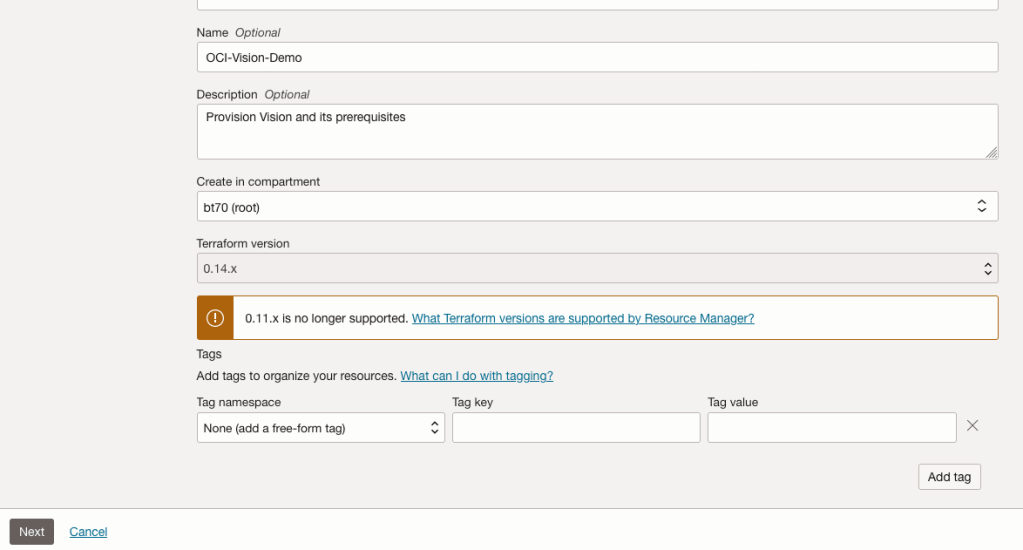
The page will load the necessary configuration. The only other thing you need to change on this page is the Name of the Service. Make it meaningful for you and your project. Click the Next button to continue to the next screen.
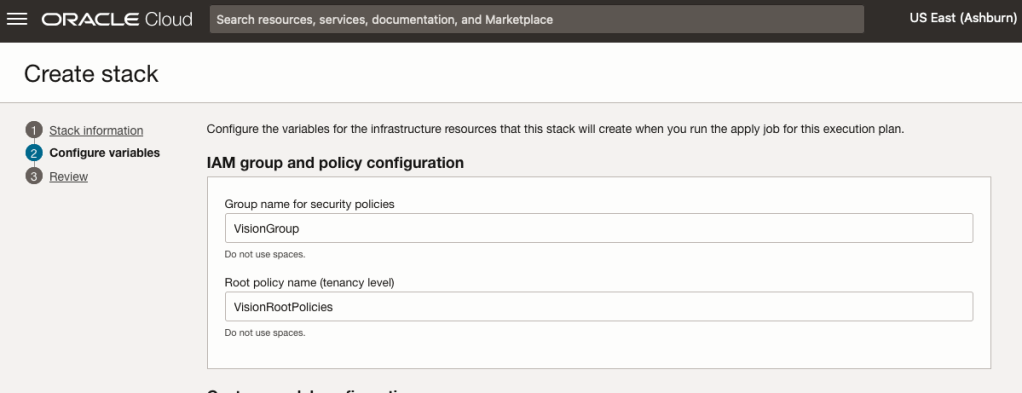
The top section relates to IAM Group name and policy configuration. You take the defaults or if you have specific groups already configured you can change it to it.
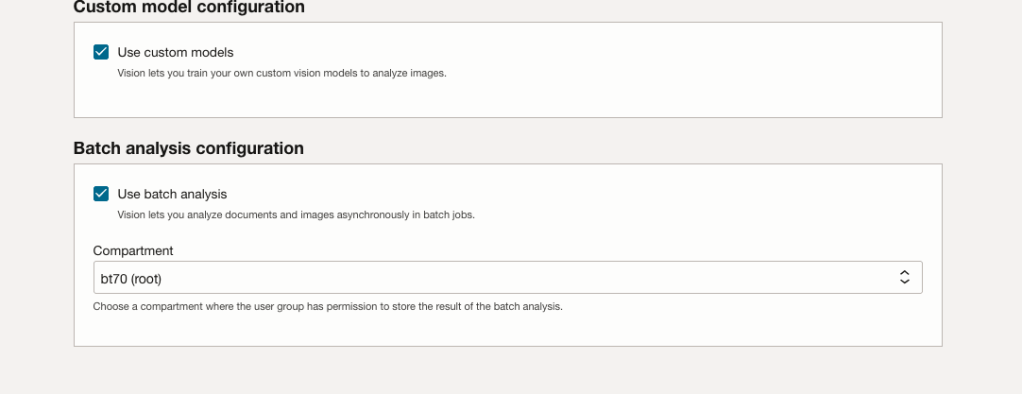
Most people will want to create their own customer models, as the supplied pre-built models are a bit basic. To enable Custom Built models, just tick the checkbox in the Custom Model Configuration section.
The second checkbox enables the batch processing of documents/images. If you check this box, you’ll need to specify the compartment you want the workload to be assigned to. Then click the Next button.
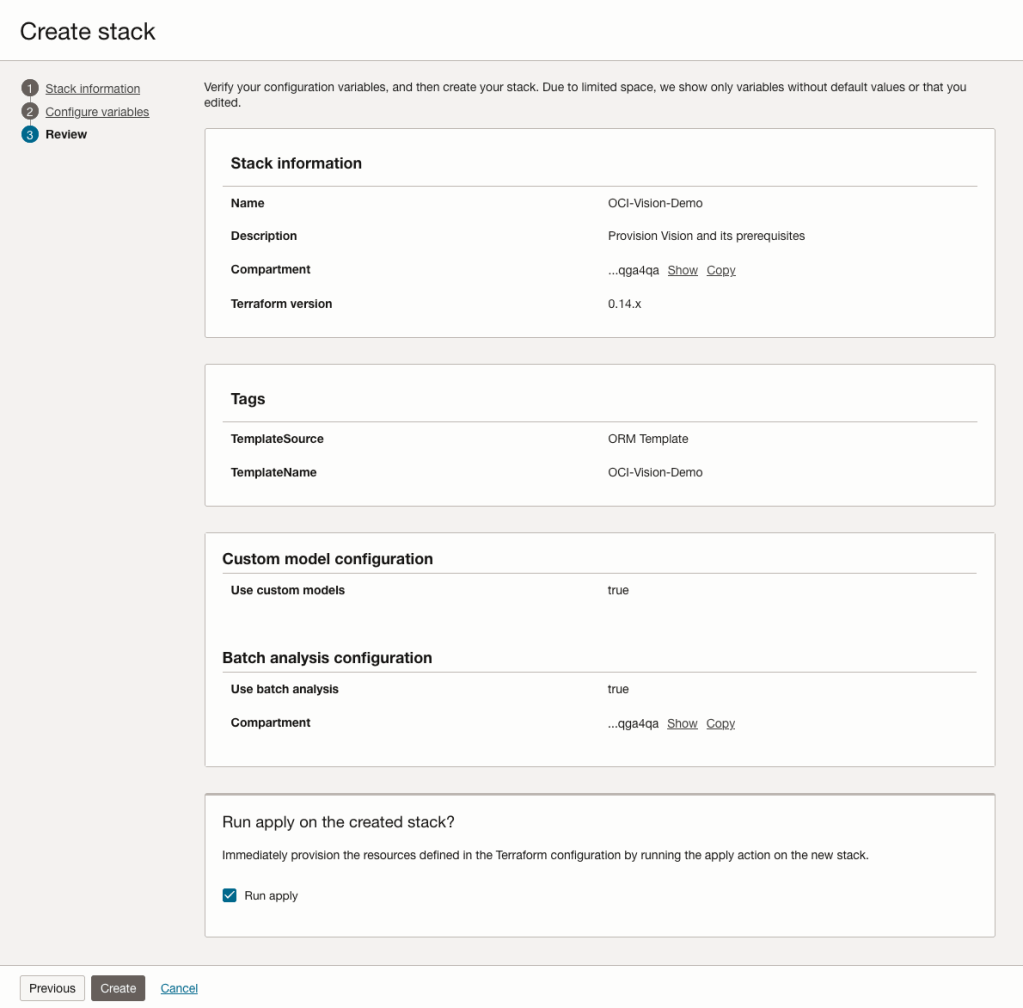
The final part displays a verification page of what was selected in the previous steps.
When ready click on the Run Apply check box and then click on the Create button.
It can take anything from a few seconds or a couple of minutes for the scripts to run.
When completed you’ll a Green box at the top of the screen and the message ‘SUCCEEDED’ under it.


You must be logged in to post a comment.