
OCI
Exploring Apache Iceberg – Part 5 – Iceberg Tables and Oracle Autonomous Database
I’ve been writing a series of posts on using Apache Iceberg tables, and this fifth post will focus on using the Iceberg Tables in the Oracle LakeHouse Databae or Oracle Autonomous Data Warehouse database. Make sure to check out the previous posts as some of the steps needed to create the Iceberg files and some initital setup in an Oracle Autonomous Database. Here’s the link to Part-4.
For the example below I’ve already pre-loaded the Iceberg Table catalog and associated set of files. For this I’ve uploaded the files into a bucket called ‘iceberg-lakehouse’ and you’ll see references to this in the examples below.
One of the first things you’ll need to to is to grant certain privileges to your schema to allow it to use the Lakehouse features, like working with Iceberg Tables, setting up the Access Control Lists if needed and to have access to the DBMS_CATALOG package.
Here is the url for the ‘iceberg-lakehouse’. I’ve removed my nampespace from the url. When you setup your own one the part with <namespace> will contain the name of for your tenency.
https://objectstorage.us-ashburn-1.oraclecloud.com/n/<namespace>/b/iceberg-lakehouse/o/
The schema I’m using the the database is called ‘brendan’. Yes I could have been more creative!
Grant the DWROLE to the schema that will contain the external table to the Iceberg Table. Do this using ADMIN. Permissions on DBMS_CLOUD is also needed.
grant DWROLE to brendan;grant execute on DBMS_CLOUD to brendan;
While still connected to ADMIN, we need to configure an Access Control List (ACL) for the Lakehouse schema.
BEGIN DBMS_NETWORK_ACL_ADMIN.APPEND_HOST_ACE( host => 'objectstorage.us-ashburn-1.oraclecloud.com', lower_port => 443, upper_port => 443, ace => xs$ace_type( privilege_list => xs$name_list('http'), principal_name => 'BRENDAN', -- the Lakehouse schema principal_type => xs_acl.ptype_db ) );END;
My tenency is based in Ashburn, and that’s why you see ‘us-ashburn-1’ listed in the value for host, given in the above example. You’ll need to change that to your region.
As the ‘BRENDAN’ schema we can define Credentials to autenticate to OCI Object Storage.
BEGIN DBMS_CLOUD.CREATE_CREDENTIAL( credential_name => 'LAKEHOUSE_CRED', username => '<your cloud username>', password => '<generated auth token>' );END;
Now we can create an External Table to point to our Iceberg Table.
BEGIN DBMS_CLOUD.CREATE_EXTERNAL_TABLE( table_name => 'ICEBERG_TABLE', credential_name => 'LAKEHOUSE_CRED', file_uri_list => 'https://objectstorage.us-ashburn-1.oraclecloud.com/n/<namespace>/b/iceberg-lakehouse/o/', format => '{"access_protocol": {"protocol_type": "iceberg"}}' );END;
We can not query the Iceberg Table like a regular table.
select * from iceberg_table;
Important: When work with the scenario above, it is assumed the Iceberg Table contains only one table. Another limitation is, if the structure of the Iceberg Table changes you will need to re-create the external table. As you can imagine that is not ideal, although you can schedule that to happen as needed.
To over come those limitations and to allow for the Iceberg Catalog to contain multiple tables, and for those to be picked up automatically, we need to use the package DBMS_CATALOG. This allows use to work with multiple tables within the catalog and it will also pickup any schema changes to those Iceberg Tables. Let’s have a look at doing this.
There are two steps needed before creating the external table. Both create credentials to point to the external Iceberg REST catalog and another to point to the bucket in object storage where the data files are located.
-- create credential for the REST API link to the catalogBEGIN DBMS_CLOUD.CREATE_CREDENTIAL( credential_name => 'ICEBERG_CATALOG_CRED', username => '<username for REST API>', password => '<password for REST API>' );END;
The REST API details can be found in your OCI accout under Users & Security-> Users.
The OCI Object Storage Credentials is where the data files are stored in an OCI bucket. We can now mount the Iceberg Catalog
BEGIN DBMS_CATALOG.MOUNT_ICEBERG( catalog_name => 'ICEBEG_CATALOG', endpoint => '<endpoint for the catalog>', catalog_credential => 'ICEBERG_CATALOG_CRED', data_storage_credential => '<OCI Object Storge Credential>' );END;
Once mounted we can explore the tables available in the Catalog using,
select * from all_tables@ICEBERG_CATALOG;
When querying the tables in the catalog, it will resolve to the latest snapshot. [see previous posts on how the catalog and the following tabl was created]
select * from sales_db.orders@ICEBERG_CATALOG;
If we want the Iceberg table to be used as an External Table in the database we can create it using the following.
BEGIN DBMS_CATALOG.CREATE_EXTERNAL_TABLE( catalog_name => 'ICEBERG_CATALOG', table_name => 'ICEBERG_ORDERS', schema_name => 'sales_db', table_name => 'orders' );END;
It is now a bit easier to include in our queries.
select * from ICEBERG_ORDERS;
Exploring Apache Iceberg – Part 4 – Parquet Files with Oracle Autonomous Database
In this post I’ll walk through the steps needed to setup and use Parquet files with an Oracle Autonomous Database and with the parquet files stored in Oracle Cloud. In my previous post, did something similar but for an on-premises Oracle Database.
Generally the setup is very similar except for two particular parts where we need to load the parquet files into a bucket on Oracle cloud (OCI) and the secondly we need some additional configuration in the Database to be able to access those files in an OCI bucket.
Create Bucket and Upload files
In OCI Storage section of OCI, create a new bucket (Parquet-files) and upload the parquet files. You can automate this step with a simple piece of Python code.
Create Credential
Log into the schema you are going to use to create the external table. You’ll need to generate an authentication token.
BEGIN DBMS_CLOUD.CREATE_CREDENTIAL( credential_name => 'PARQUET_FILES_CRED', username => '<your cloud username>', password => '<generated auth token>' );END;
Create the External table
We can now create the external table pointing to the parquet files in the OCI bucket.
BEGIN DBMS_CLOUD.CREATE_EXTERNAL_TABLE( table_name => 'PARQUET_FILES_EXT', credential_name => 'PARQUET_FILES_CRED', file_uri_list => 'https://objectstorage.us-ashburn-1.oraclecloud.com/n/<namespace>/b/Parquet-Files/o/*.parquet', format => JSON_OBJECT( 'type' VALUE 'parquet', 'schema' VALUE 'first', 'blankasnull' VALUE 'true', 'trimspaces' VALUE 'lrtrim' ) );END;/
Query the Parquet Files
We can now query the parquet files.
SELECT region, product, SUM(amount) AS total_salesFROM parquet_files_extGROUP BY regionORDER BY total_sales DESC;
OCI Speech Real-time Capture
Capturing Speech-to-Text is a straight forward step. I’ve written previously about this, giving an example. But what if you want the code to constantly monitor for text input, giving a continuous. For this we need to use the asyncio python library. Using the OCI Speech-to-Text API in combination with asyncio we can monitor a microphone (speech input) on a continuous basis.
There are a few additional configuration settings needed, including configuring a speech-to-text listener. Here is an example of what is needed
lass MyListener(RealtimeSpeechClientListener):
    def on_result(self, result):
        if result["transcriptions"][0]["isFinal"]:
            print(f"1-Received final results: {transcription}")
        else:
            print(f"2-{result['transcriptions'][0]['transcription']} \n")

    def on_ack_message(self, ackmessage):
        return super().on_ack_message(ackmessage)

    def on_connect(self):
        return super().on_connect()

    def on_connect_message(self, connectmessage):
        return super().on_connect_message(connectmessage)

    def on_network_event(self, ackmessage):
        return super().on_network_event(ackmessage)

    def on_error(self, error_message):
        return super().on_error(error_message)

    def on_close(self, error_code, error_message):
        print(f'\nOCI connection closing.')

async def start_realtime_session(customizations=[], compartment_id=None, region=None):
    rt_client = RealtimeSpeechClient(
        config=config,
        realtime_speech_parameters=realtime_speech_parameters,
        listener=MyListener(),
        service_endpoint=realtime_speech_url,
        signer=None,   #authenticator(),
        compartment_id=compartment_id,
    )
    asyncio.create_task(send_audio(rt_client))

if __name__ == "__main__":
    asyncio.run(
        start_realtime_session(
            customizations=customization_ids,
            compartment_id=COMPARTMENT_ID,
            region=REGION_ID,
        )
    )
Additional customizations can be added to the Listener, for example, what to do with the Audio captured, what to do with the text, how to mange the speech-to-text (there are lots of customizations)
OCI Stored Video Analysis
OCI Video Analysis is a part of the OCI Vision service, designed to process stored videos and identify labels, objects, texts, and faces within each frame. It can analyze the entire video or every frame in the video using pre-trained or custom models. The feature provides information about the detected labels, objects, texts, and faces, and provides the time at which they’re detected. With a timeline bar, you can directly look for a label or object and navigate to the exact timestamp in the video where a particular label or object is found.
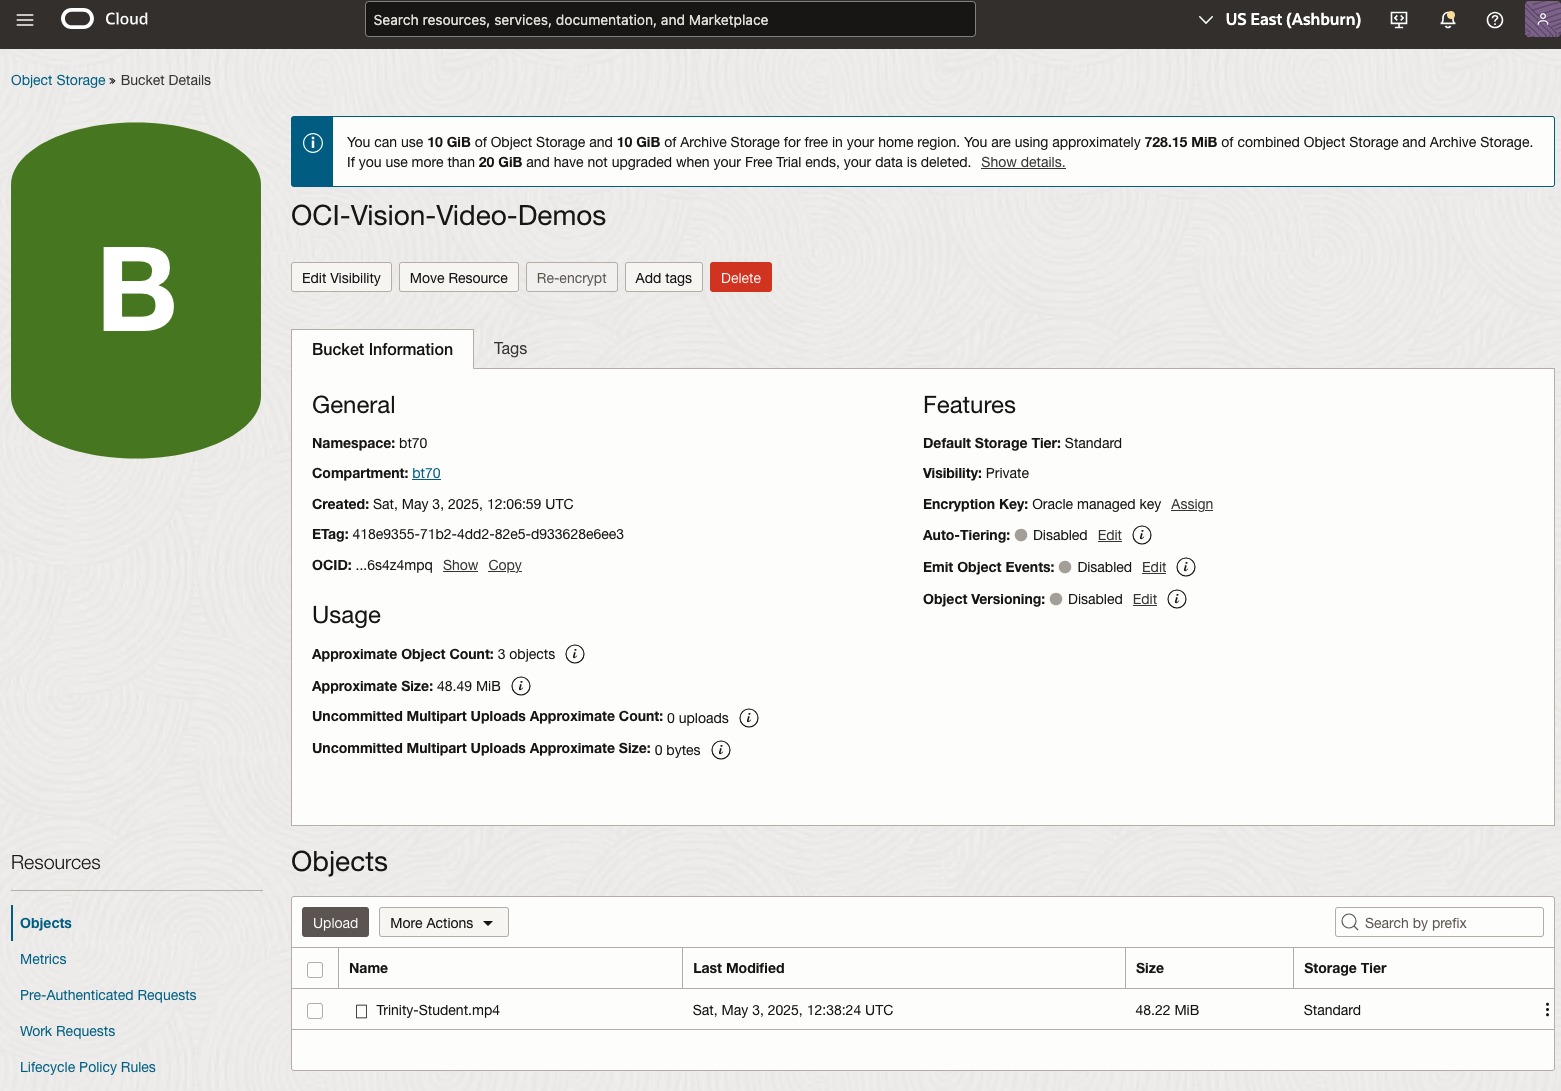
To use this feature, you’ll need to upload your video to an OCI Bucket. Here is an example of a video stored in a bucket called OCI-Vision-Video-Demos.
You might need to allow Pre-Authenticated Requests for this bucket. If you don’t do this, you will be prompted by the tool to allow this.
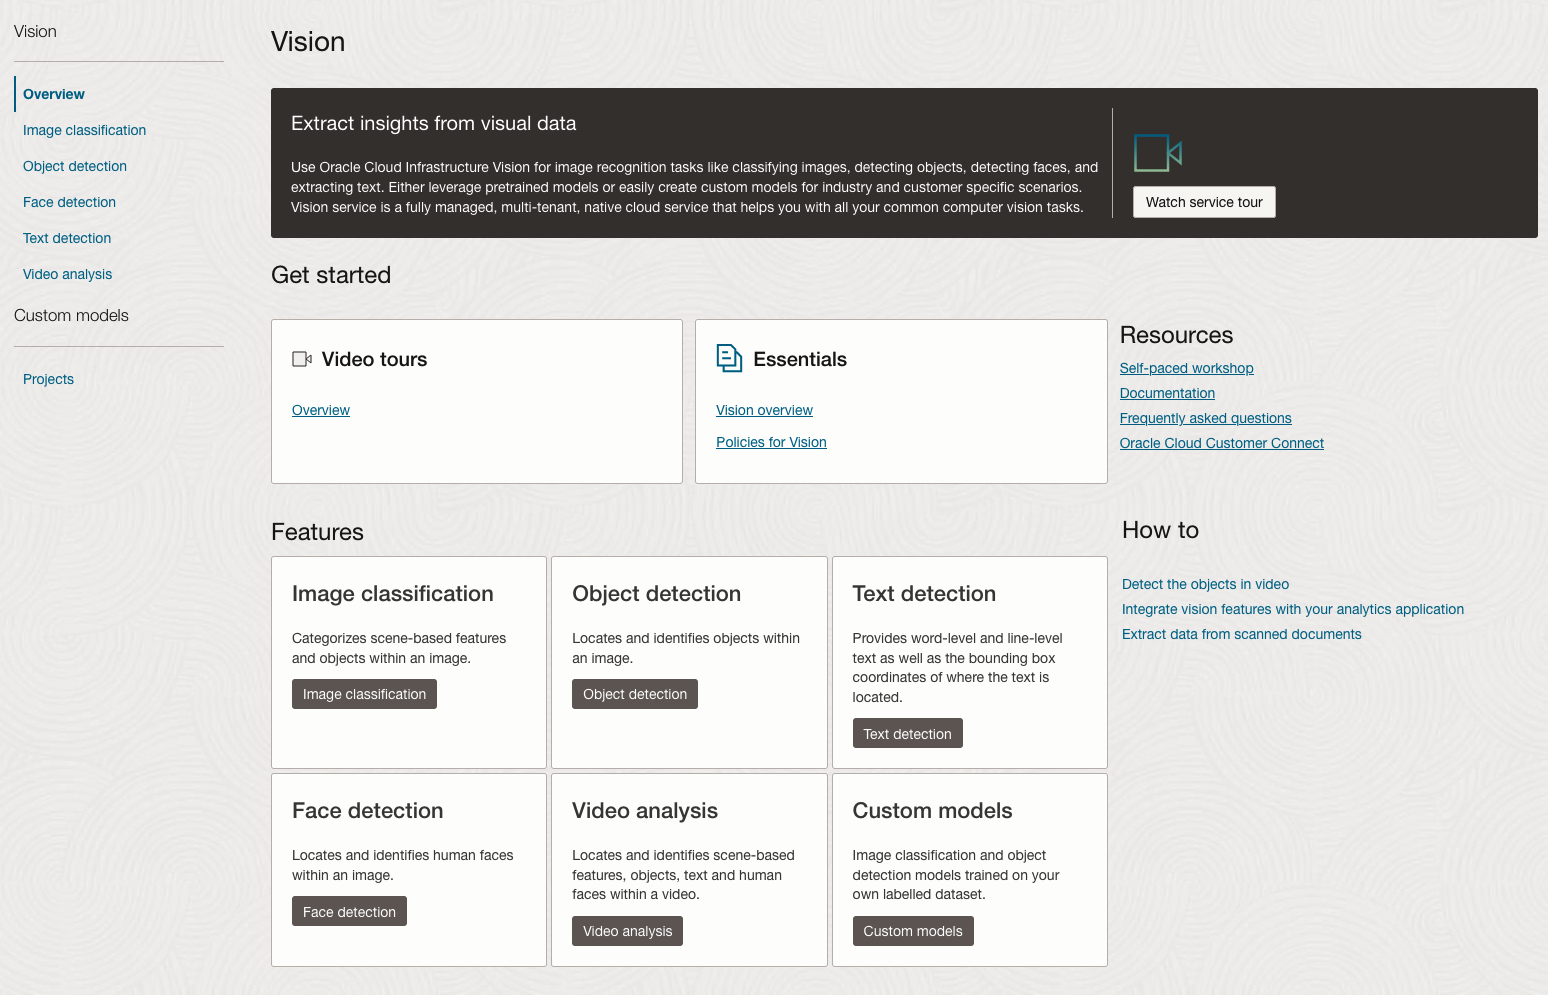
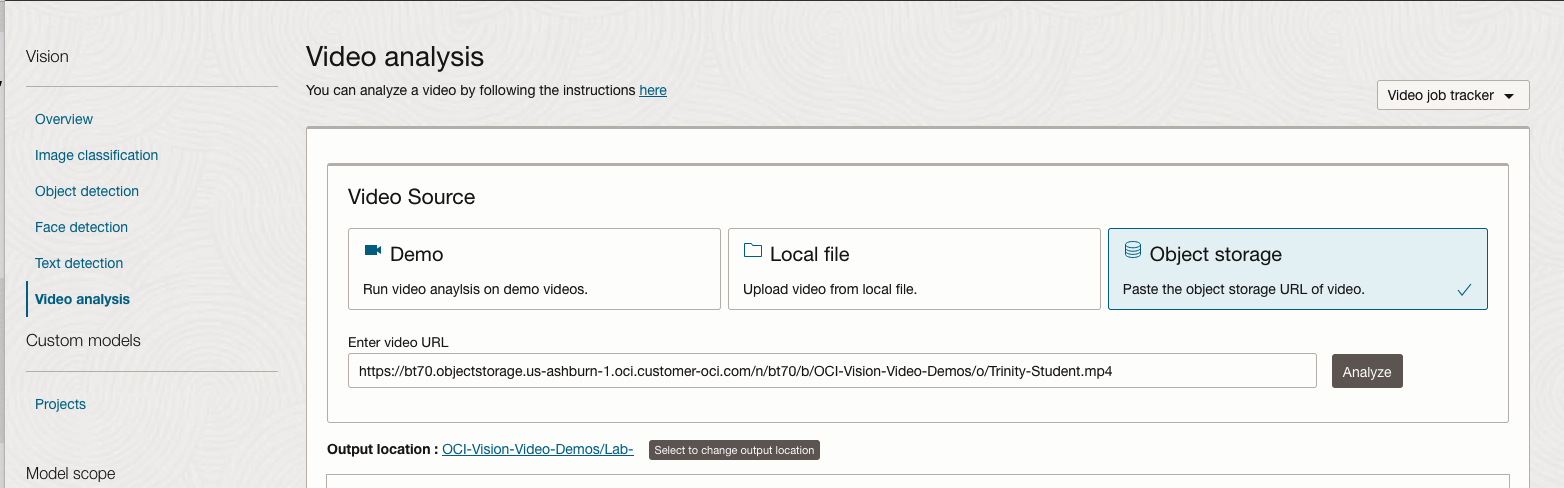
Next, go to the OCI Vision page. You’ll find the Video Analysis tool at the bottom of the menu on the left-hand side of the page.
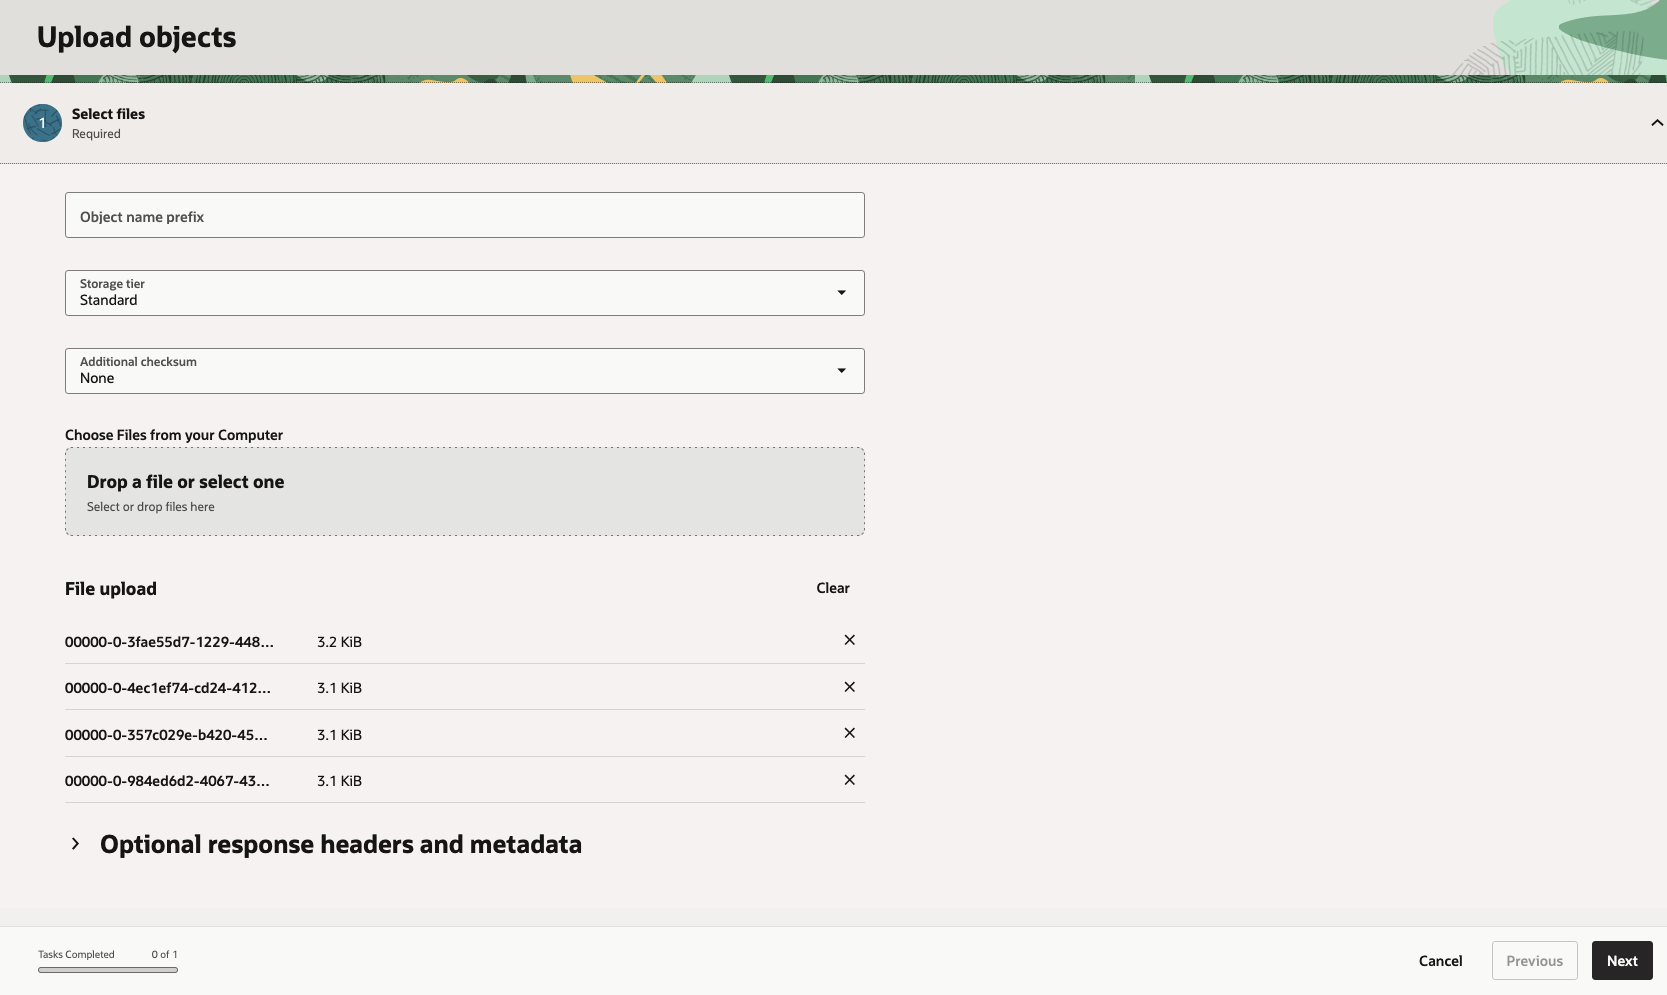
You can check out the demo videos, or load your own video from the Local File system of you computer, or use a file from your OCI Storage. If you select a video from the Local File system, the video will be loaded in the object storage before it is processed.
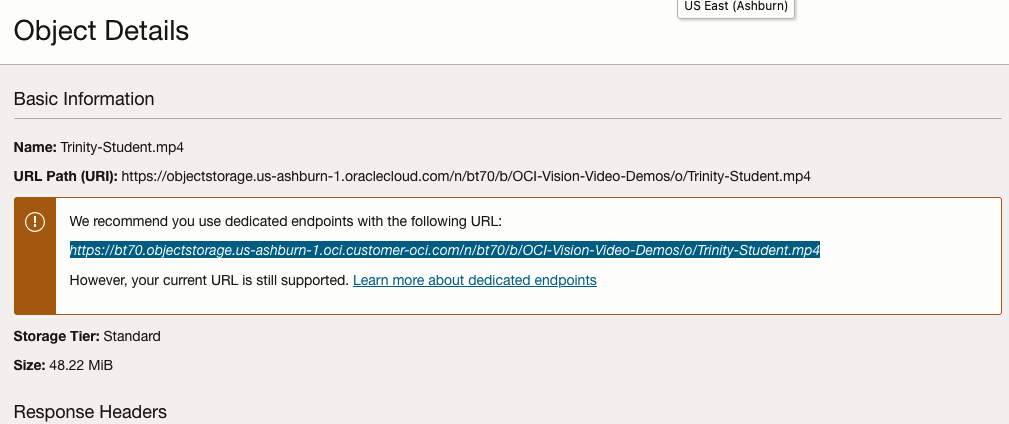
For this example, I’m going to use the video I uploaded earlier called Trinity-Student.mp4. Copy the link to this file from the file information in object storage.

On the Video Analysis page, select Object Storage and paste the link to the file into the URL field. Then click Analyze button. It is at this point that you might get asked to Generate a PAR URL. Do this and then proceed.
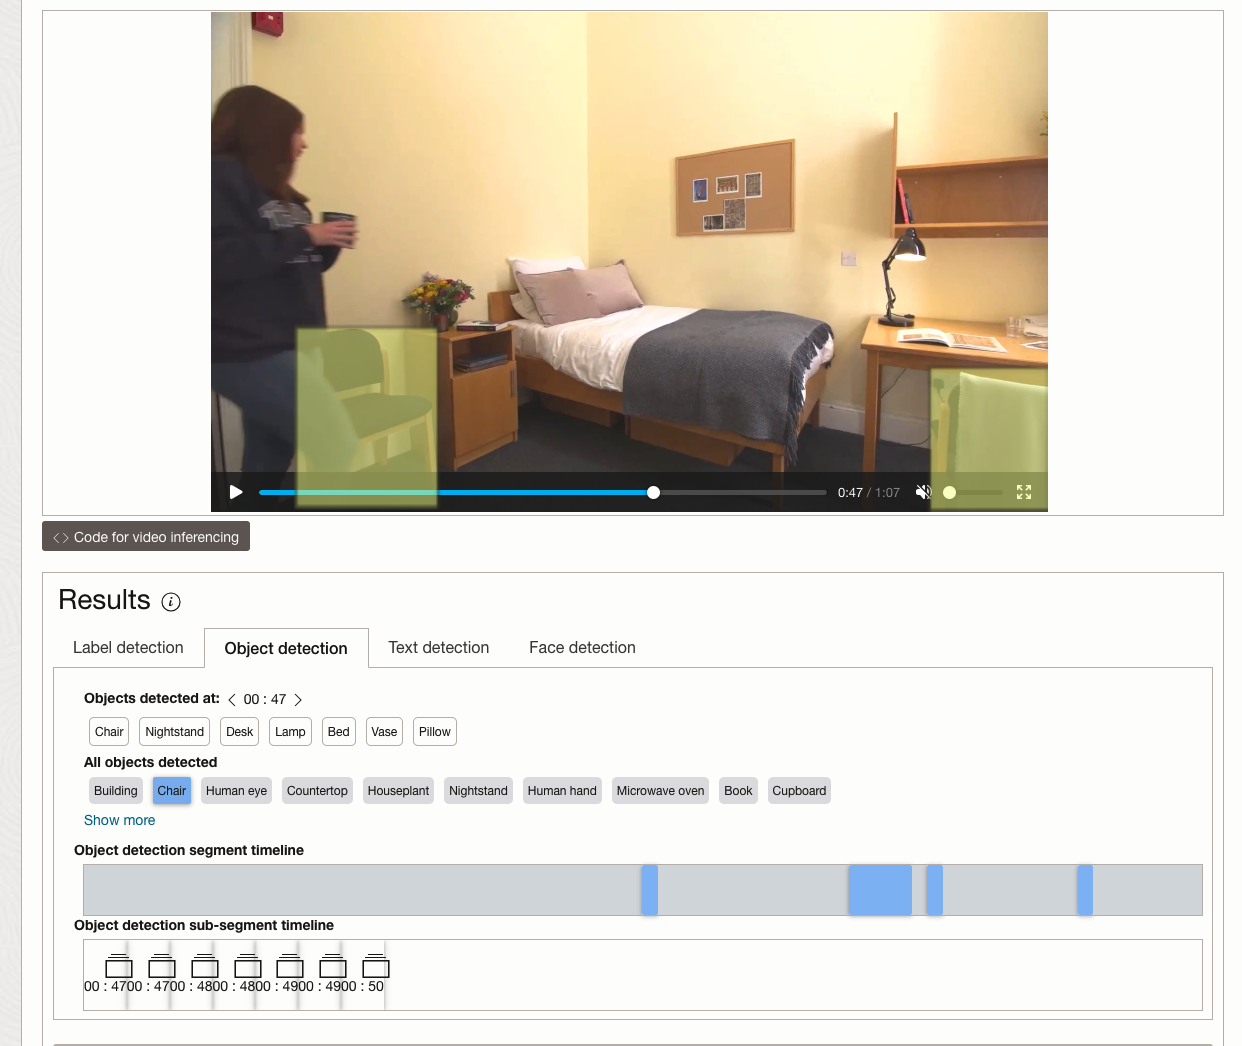
While the video is being parsed, it will appear on the webpage and will start playing. When the video has been Analyzed the details will be displayed below the video. The Analysis will consist of Label Detection, Object Detection, Text Dection and Face Detection.
By clicking on each of these, you’ll see what has been detected, and by clicking on each of these, you’ll be able to see where in the video they were detected. For example, where a Chair was detected.
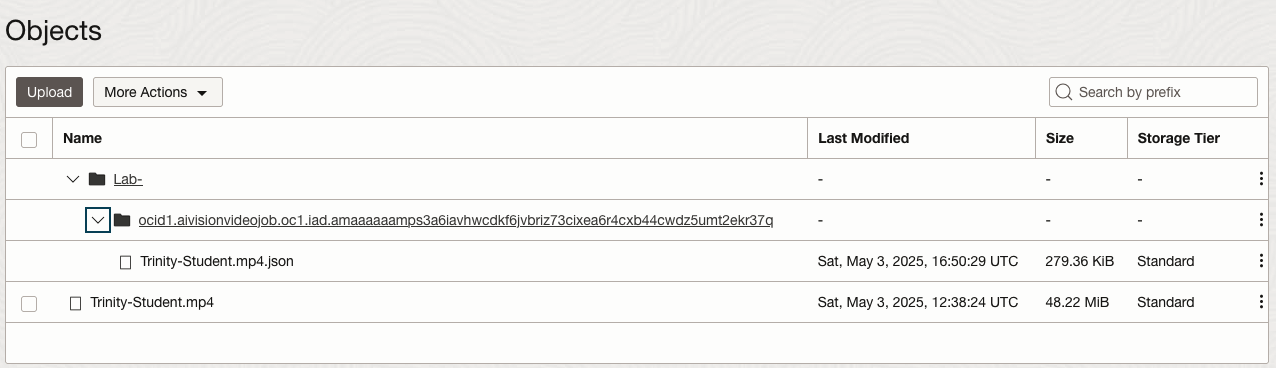
You can also inspect the JSON file containing all the details of various objects detected in the video and the location in the videos they can be found.
This JSON response file is also saved to Object Storage in the same directory, or a sub-directory, where the video is located.
OCI Text to Speech example
In this post, I’ll walk through the steps to get a very simple example of Text-to-Speech working. This example builds upon my previous posts on OCI Language, OCI Speech and others, so make sure you check out those posts.
The first thing you need to be aware of, and to check, before you proceed, is whether the Text-to-Speech is available in your region. At the time of writing, this feature was only available in Phoenix, which is one of the cloud regions I have access to. There are plans to roll it out to other regions, but I’m not aware of the timeline for this. Although you might see Speech listed on your AI menu in OCI, that does not guarantee the Text-to-Speech feature is available. What it does mean is the text trans scribing feature is available.
So if Text-to-Speech is available in your region, the following will get you up and running.
The first thing you need to do is read in the Config file from the OS.
#initial setup, read Config file, create OCI Client
import oci
from oci.config import from_file
##########
from oci_ai_speech_realtime import RealtimeSpeechClient, RealtimeSpeechClientListener
from oci.ai_speech.models import RealtimeParameters
##########

CONFIG_PROFILE = "DEFAULT"
config = oci.config.from_file('~/.oci/config', profile_name=CONFIG_PROFILE)
###
ai_speech_client = ai_speech_client = oci.ai_speech.AIServiceSpeechClient(config)
###
print(config)
### Update region to point to Phoenix
config.update({'region':'us-phoenix-1'})
A simple little test to see if the Text-to-Speech feature is enabled for your region is to display the available list of voices.
list_voices_response = ai_speech_client.list_voices(
    compartment_id=COMPARTMENT_ID,
    display_name="Text-to-Speech")
#    opc_request_id="1GD0CV5QIIS1RFPFIOLF<unique_ID>")

# Get the data from response
print(list_voices_response.data)
This produces a long json object with many characteristics of the available voices. A simpler listing gives the names and gender)
for i in range(len(list_voices_response.data.items)):
    print(list_voices_response.data.items[i].display_name + ' [' + list_voices_response.data.items[i].gender + ']\t' + list_voices_response.data.items[i].language_description )
------
Brian [MALE]	English (United States)
Annabelle [FEMALE]	English (United States)
Bob [MALE]	English (United States)
Stacy [FEMALE]	English (United States)
Phil [MALE]	English (United States)
Cindy [FEMALE]	English (United States)
Brad [MALE]	English (United States)
Richard [MALE]	English (United States)
Now lets setup a Text-to-Speech example using the simple text, Hello. My name is Brendan and this is an example of using Oracle OCI Speech service. First lets define a function to save the audio to a file.
def save_audi_response(data):
    with open(filename, 'wb') as f:
        for b in data.iter_content():
            f.write(b)
    f.close()
We can now establish a connection, define the text, call the OCI Speech function to create the audio, and then to save the audio file.
import IPython.display as ipd

# Initialize service client with default config file
ai_speech_client = oci.ai_speech.AIServiceSpeechClient(config)

TEXT_DEMO = "Hello. My name is Brendan and this is an example of using Oracle OCI Speech service"

#speech_response = ai_speech_client.synthesize_speech(compartment_id=COMPARTMENT_ID)

speech_response = ai_speech_client.synthesize_speech(
    synthesize_speech_details=oci.ai_speech.models.SynthesizeSpeechDetails(
        text=TEXT_DEMO,
        is_stream_enabled=True,
        compartment_id=COMPARTMENT_ID,

        configuration=oci.ai_speech.models.TtsOracleConfiguration(
            model_family="ORACLE",
            model_details=oci.ai_speech.models.TtsOracleTts2NaturalModelDetails(
                model_name="TTS_2_NATURAL",
                voice_id="Annabelle"),
            speech_settings=oci.ai_speech.models.TtsOracleSpeechSettings(
                text_type="SSML",
                sample_rate_in_hz=18288,
                output_format="MP3",
                speech_mark_types=["WORD"])),

        audio_config=oci.ai_speech.models.TtsBaseAudioConfig(config_type="BASE_AUDIO_CONFIG") #, save_path='I'm not sure what this should be')
    ) )

# Get the data from response
#print(speech_response.data)
save_audi_response(speech_response.data)Unlock Text Analytics with Oracle OCI Python – Part 2
This is my second post on using Oracle OCI Language service to perform Text Analytics. These include Language Detection, Text Classification, Sentiment Analysis, Key Phrase Extraction, Named Entity Recognition, Private Data detection and masking, and Healthcare NLP.
In my Previous post (Part 1), I covered examples on Language Detection, Text Classification and Sentiment Analysis.
In this post (Part 2), I’ll cover:
- Key Phrase
- Named Entity Recognition
- Detect private information and marking
Make sure you check out Part 1 for details on setting up the client and establishing a connection. These details are omitted in the examples below.
Key Phrase Extraction
With Key Phrase Extraction, it aims to identify the key works and/or phrases from the text. The keywords/phrases are selected based on what are the main topics in the text along with the confidence score. The text is parsed to extra the words/phrase that are important in the text. This can aid with identifying the key aspects of the document without having to read it. Care is needed as these words/phrases do not represent the meaning implied in the text.
Using some of the same texts used in Part-1, let’s see what gets generated for the text about a Hotel experience.
t_doc = oci.ai_language.models.TextDocument(
    key="Demo",
    text="This hotel is a bad place, I would strongly advise against going there. There was one helpful member of staff",
    language_code="en")

key_phrase = ai_language_client.batch_detect_language_key_phrases((oci.ai_language.models.BatchDetectLanguageKeyPhrasesDetails(documents=[t_doc])))

print(key_phrase.data)
print('==========')
for i in range(len(key_phrase.data.documents)):
        for j in range(len(key_phrase.data.documents[i].key_phrases)):
            print("phrase: ", key_phrase.data.documents[i].key_phrases[j].text +' [' + str(key_phrase.data.documents[i].key_phrases[j].score) + ']')
{
"documents": [
{
"key": "Demo",
"key_phrases": [
{
"score": 0.9998106383818767,
"text": "bad place"
},
{
"score": 0.9998106383818767,
"text": "one helpful member"
},
{
"score": 0.9944029848214838,
"text": "staff"
},
{
"score": 0.9849306609397931,
"text": "hotel"
}
],
"language_code": "en"
}
],
"errors": []
}
==========
phrase: bad place [0.9998106383818767]
phrase: one helpful member [0.9998106383818767]
phrase: staff [0.9944029848214838]
phrase: hotel [0.9849306609397931]The output from the Key Phrase Extraction is presented into two formats about. The first is the JSON object returned from the function, containing the phrases and their confidence score. The second (below the ==========) is a formatted version of the same JSON object but parsed to extract and present the data in a more compact manner.
The next piece of text to be examined is taken from an article on the F1 website about a change of divers.
text_f1 = "Red Bull decided to take swift action after Liam Lawsons difficult start to the 2025 campaign, demoting him to Racing Bulls and promoting Yuki Tsunoda to the senior team alongside reigning world champion Max Verstappen. F1 Correspondent Lawrence Barretto explains why… Sergio Perez had endured a painful campaign that saw him finish a distant eighth in the Drivers Championship for Red Bull last season – while team mate Verstappen won a fourth successive title – and after sticking by him all season, the team opted to end his deal early after Abu Dhabi finale."

t_doc = oci.ai_language.models.TextDocument(
    key="Demo",
    text=text_f1,
    language_code="en")

key_phrase = ai_language_client.batch_detect_language_key_phrases(oci.ai_language.models.BatchDetectLanguageKeyPhrasesDetails(documents=[t_doc]))
print(key_phrase.data)
print('==========')
for i in range(len(key_phrase.data.documents)):
        for j in range(len(key_phrase.data.documents[i].key_phrases)):
            print("phrase: ", key_phrase.data.documents[i].key_phrases[j].text +' [' + str(key_phrase.data.documents[i].key_phrases[j].score) + ']')
I won’t include all the output and the following shows the key phrases in the compact format
phrase:  red bull [0.9991468440416812]
phrase:  swift action [0.9991468440416812]
phrase:  liam lawsons difficult start [0.9991468440416812]
phrase:  2025 campaign [0.9991468440416812]
phrase:  racing bulls [0.9991468440416812]
phrase:  promoting yuki tsunoda [0.9991468440416812]
phrase:  senior team [0.9991468440416812]
phrase:  sergio perez [0.9991468440416812]
phrase:  painful campaign [0.9991468440416812]
phrase:  drivers championship [0.9991468440416812]
phrase:  red bull last season [0.9991468440416812]
phrase:  team mate verstappen [0.9991468440416812]
phrase:  fourth successive title [0.9991468440416812]
phrase:  all season [0.9991468440416812]
phrase:  abu dhabi finale [0.9991468440416812]
phrase:  team [0.9420016064526977]
While some aspects of this is interesting, care is needed to not overly rely upon it. It really depends on the usecase.
Named Entity Recognition
For Named Entity Recognition is a natural language process for finding particular types of entities listed as words or phrases in the text. The named entities are a defined list of items. For OCI Language there is a list available here. Some named entities have a sub entities. The return JSON object from the function has a format like the following.
{
  "documents": [
    {
      "entities": [
        {
          "length": 5,
          "offset": 5,
          "score": 0.969588577747345,
          "sub_type": "FACILITY",
          "text": "hotel",
          "type": "LOCATION"
        },
        {
          "length": 27,
          "offset": 82,
          "score": 0.897526216506958,
          "sub_type": null,
          "text": "one helpful member of staff",
          "type": "QUANTITY"
        }
      ],
      "key": "Demo",
      "language_code": "en"
    }
  ],
  "errors": []
}
For each named entity discovered the returned object will contain the Text identifed, the Entity Type, the Entity Subtype, Confidence Score, offset and length.
Using the text samples used previous, let’s see what gets produced. The first example is for the hotel review.
t_doc = oci.ai_language.models.TextDocument(
    key="Demo",
    text="This hotel is a bad place, I would strongly advise against going there. There was one helpful member of staff",
    language_code="en")

named_entities = ai_language_client.batch_detect_language_entities(
            batch_detect_language_entities_details=oci.ai_language.models.BatchDetectLanguageEntitiesDetails(documents=[t_doc]))

for i in range(len(named_entities.data.documents)):
        for j in range(len(named_entities.data.documents[i].entities)):
            print("Text: ", named_entities.data.documents[i].entities[j].text, ' [' + named_entities.data.documents[i].entities[j].type + ']'
                 + '[' + str(named_entities.data.documents[i].entities[j].sub_type) + ']' + '{offset:'
                 + str(named_entities.data.documents[i].entities[j].offset) + '}')
Text: hotel [LOCATION][FACILITY]{offset:5}
Text: one helpful member of staff [QUANTITY][None]{offset:82}The last two lines above are the formatted output of the JSON object. It contains two named entities. The first one is for the text “hotel” and it has a Entity Type of Location, and a Sub Entitity Type of Location. The second named entity is for a long piece of string and for this it has a Entity Type of Quantity, but has no Sub Entity Type.
Now let’s see what is creates for the F1 text. (the text has been given above and the code is very similar/same as above).
Text:  Red Bull  [ORGANIZATION][None]{offset:0}
Text:  swift  [ORGANIZATION][None]{offset:25}
Text:  Liam Lawsons  [PERSON][None]{offset:44}
Text:  2025  [DATETIME][DATE]{offset:80}
Text:  Yuki Tsunoda  [PERSON][None]{offset:138}
Text:  senior  [QUANTITY][AGE]{offset:158}
Text:  Max Verstappen  [PERSON][None]{offset:204}
Text:  F1  [ORGANIZATION][None]{offset:220}
Text:  Lawrence Barretto  [PERSON][None]{offset:237}
Text:  Sergio Perez  [PERSON][None]{offset:269}
Text:  campaign  [EVENT][None]{offset:304}
Text:  eighth in the  [QUANTITY][None]{offset:343}
Text:  Drivers Championship  [EVENT][None]{offset:357}
Text:  Red Bull  [ORGANIZATION][None]{offset:382}
Text:  Verstappen  [PERSON][None]{offset:421}
Text:  fourth successive title  [QUANTITY][None]{offset:438}
Text:  Abu Dhabi  [LOCATION][GPE]{offset:545}
Detect Private Information and Marking
The ability to perform data masking has been available in SQL for a long time. There are lots of scenarios where masking is needed and you are not using a Database or not at that particular time.
With Detect Private Information or Personal Identifiable Information the OCI AI function search for data that is personal and gives you options on how to present this back to the users. Examples of the types of data or Entity Types it will detect include Person, Adddress, Age, SSN, Passport, Phone Numbers, Bank Accounts, IP Address, Cookie details, Private and Public keys, various OCI related information, etc. The list goes on. Check out the documentation for more details on these. Unfortunately the documentation for how the Python API works is very limited.
The examples below illustrate some of the basic options. But there is lots more you can do with this feature like defining you own rules.
For these examples, I’m going to use the following text which I’ve assigned to a variable called text_demo.
Hi Martin. Thanks for taking my call on 1/04/2025. Here are the details you requested. My Bank Account Number is 1234-5678-9876-5432 and my Bank Branch is Main Street, Dublin. My Date of Birth is 29/02/1993 and I’ve been living at my current address for 15 years. Can you also update my email address to brendan.tierney@email.com. If toy have any problems with this you can contact me on +353-1-493-1111. Thanks for your help. Brendan.
m_mode = {"ALL":{"mode":'MASK'}}

t_doc = oci.ai_language.models.TextDocument(key="Demo", text=text_demo,language_code="en")

pii_entities = ai_language_client.batch_detect_language_pii_entities(oci.ai_language.models.BatchDetectLanguagePiiEntitiesDetails(documents=[t_doc], masking=m_mode))

print(text_demo)
print('--------------------------------------------------------------------------------')
print(pii_entities.data.documents[0].masked_text)
print('--------------------------------------------------------------------------------')
for i in range(len(pii_entities.data.documents)):
        for j in range(len(pii_entities.data.documents[i].entities)):
            print("phrase: ", pii_entities.data.documents[i].entities[j].text +' [' + str(pii_entities.data.documents[i].entities[j].type) + ']')
Hi Martin. Thanks for taking my call on 1/04/2025. Here are the details you requested. My Bank Account Number is 1234-5678-9876-5432 and my Bank Branch is Main Street, Dublin. My Date of Birth is 29/02/1993 and I've been living at my current address for 15 years. Can you also update my email address to brendan.tierney@email.com. If toy have any problems with this you can contact me on +353-1-493-1111. Thanks for your help. Brendan.
--------------------------------------------------------------------------------
Hi ******. Thanks for taking my call on *********. Here are the details you requested. My Bank Account Number is ******************* and my Bank Branch is Main Street, Dublin. My Date of Birth is ********** and I've been living at my current address for ********. Can you also update my email address to *************************. If toy have any problems with this you can contact me on ***************. Thanks for your help. *******.
--------------------------------------------------------------------------------
phrase:  Martin [PERSON]
phrase:  1/04/2025 [DATE_TIME]
phrase:  1234-5678-9876-5432 [CREDIT_DEBIT_NUMBER]
phrase:  29/02/1993 [DATE_TIME]
phrase:  15 years [DATE_TIME]
phrase:  brendan.tierney@email.com [EMAIL]
phrase:  +353-1-493-1111 [TELEPHONE_NUMBER]
phrase:  Brendan [PERSON]
The above this the basic level of masking.
A second option is to use the REMOVE mask. For this, change the mask format to the following.
m_mode = {"ALL":{'mode':'REMOVE'}} For this option the indentified information is removed from the text.
Hi . Thanks for taking my call on . Here are the details you requested. My Bank Account Number is  and my Bank Branch is Main Street, Dublin. My Date of Birth is  and I've been living at my current address for . Can you also update my email address to . If toy have any problems with this you can contact me on . Thanks for your help. .
--------------------------------------------------------------------------------
phrase:  Martin [PERSON]
phrase:  1/04/2025 [DATE_TIME]
phrase:  1234-5678-9876-5432 [CREDIT_DEBIT_NUMBER]
phrase:  29/02/1993 [DATE_TIME]
phrase:  15 years [DATE_TIME]
phrase:  brendan.tierney@email.com [EMAIL]
phrase:  +353-1-493-1111 [TELEPHONE_NUMBER]
phrase:  Brendan [PERSON]
For the REPLACE option we have.
m_mode = {"ALL":{'mode':'REPLACE'}} Which gives us the following, where we can see the key information is removed and replace with the name of Entity Type.
Hi <PERSON>. Thanks for taking my call on <DATE_TIME>. Here are the details you requested. My Bank Account Number is <CREDIT_DEBIT_NUMBER> and my Bank Branch is Main Street, Dublin. My Date of Birth is <DATE_TIME> and I've been living at my current address for <DATE_TIME>. Can you also update my email address to <EMAIL>. If toy have any problems with this you can contact me on <TELEPHONE_NUMBER>. Thanks for your help. <PERSON>.
--------------------------------------------------------------------------------
phrase:  Martin [PERSON]
phrase:  1/04/2025 [DATE_TIME]
phrase:  1234-5678-9876-5432 [CREDIT_DEBIT_NUMBER]
phrase:  29/02/1993 [DATE_TIME]
phrase:  15 years [DATE_TIME]
phrase:  brendan.tierney@email.com [EMAIL]
phrase:  +353-1-493-1111 [TELEPHONE_NUMBER]
phrase:  Brendan [PERSON]
We can also change the character used for the masking. In this example we change the masking character to + symbol.
m_mode = {"ALL":{'mode':'MASK','maskingCharacter':'+'}} Hi ++++++. Thanks for taking my call on +++++++++. Here are the details you requested. My Bank Account Number is +++++++++++++++++++ and my Bank Branch is Main Street, Dublin. My Date of Birth is ++++++++++ and I've been living at my current address for ++++++++. Can you also update my email address to +++++++++++++++++++++++++. If toy have any problems with this you can contact me on +++++++++++++++. Thanks for your help. +++++++.I mentioned at the start of this section there was lots of options available to you, including defining your own rules, using regular expressions, etc. Let me know if you’re interested in exploring some of these and I can share a few more examples.
Unlock Text Analytics with Oracle OCI Python – Part 1
Oracle OCI has a number of features that allows you to perform Text Analytics such as Language Detection, Text Classification, Sentiment Analysis, Key Phrase Extraction, Named Entity Recognition, Private Data detection and masking, and Healthcare NLP.

While some of these have particular (and in some instances limited) use cases, the following examples will illustrate some of the main features using the OCI Python library. Why am I using Python to illustrate these? This is because most developers are using Python to build applications.
In this post, the Python examples below will cover the following:
- Language Detection
- Text Classification
- Sentiment Analysis
In my next post on this topic, I’ll cover:
- Key Phrase
- Named Entity Recognition
- Detect private information and marking
Before you can use any of the OCI AI Services, you need to set up a config file on your computer. This will contain the details necessary to establish a secure connection to your OCI tendency. Check out this blog post about setting this up.
The following Python examples illustrate what is possible for each feature. In the first example, I include what is needed for the config file. This is not repeated in the examples that follow, but it is still needed.
Language Detection
Let’s begin with a simple example where we provide a simple piece of text and as OCI Language Service, using OCI Python, to detect the primary language for the text and display some basic information about this prediction.
import oci
from oci.config import from_file

#Read in config file - this is needed for connecting to the OCI AI Services
CONFIG_PROFILE = "DEFAULT"
config = oci.config.from_file('~/.oci/config', profile_name=CONFIG_PROFILE)
###

ai_language_client = oci.ai_language.AIServiceLanguageClient(config)

# French :
text_fr = "Bonjour et bienvenue dans l'analyse de texte à l'aide de ce service cloud"

response = ai_language_client.detect_dominant_language(
    oci.ai_language.models.DetectLanguageSentimentsDetails(
        text=text_fr
    )
)

print(response.data.languages[0].name)
----------
French
In this example, I’ve a simple piece of French (for any native French speakers, I do apologise). We can see the language was identified as French. Let’s have a closer look at what is returned by the OCI function.
print(response.data)
----------
{
  "languages": [
    {
      "code": "fr",
      "name": "French",
      "score": 1.0
    }
  ]
}
We can see from the above, the object contains the language code, the full name of the language and the score to indicate how strong or how confident the function is with the prediction. When the text contains two or more languages, the function will return the primary language used.
Note: OCI Language can detect at least 113 different languages. Check out the full list here.
Let’s give it a try with a few other languages, including Irish, which localised to certain parts of Ireland. Using the same code as above, I’ve included the same statement (google) translated into other languages. The code loops through each text statement and detects the language.
import oci
from oci.config import from_file

###
CONFIG_PROFILE = "DEFAULT"
config = oci.config.from_file('~/.oci/config', profile_name=CONFIG_PROFILE)
###

ai_language_client = oci.ai_language.AIServiceLanguageClient(config)

# French :
text_fr = "Bonjour et bienvenue dans l'analyse de texte à l'aide de ce service cloud"
# German:
text_ger = "Guten Tag und willkommen zur Textanalyse mit diesem Cloud-Dienst"
# Danish
text_dan = "Goddag, og velkommen til at analysere tekst ved hjælp af denne skytjeneste"
# Italian
text_it = "Buongiorno e benvenuti all'analisi del testo tramite questo servizio cloud"
# English:
text_eng = "Good day, and welcome to analysing text using this cloud service"
# Irish
text_irl = "Lá maith, agus fáilte romhat chuig anailís a dhéanamh ar théacs ag baint úsáide as an tseirbhís scamall seo"

for text in [text_eng, text_ger, text_dan, text_it, text_irl]:
    response = ai_language_client.detect_dominant_language(
        oci.ai_language.models.DetectLanguageSentimentsDetails(
            text=text
        )
    )
    print('[' + response.data.languages[0].name + ' ('+ str(response.data.languages[0].score) +')' + '] '+ text)

----------
[English (1.0)] Good day, and welcome to analysing text using this cloud service
[German (1.0)] Guten Tag und willkommen zur Textanalyse mit diesem Cloud-Dienst
[Danish (1.0)] Goddag, og velkommen til at analysere tekst ved hjælp af denne skytjeneste
[Italian (1.0)] Buongiorno e benvenuti all'analisi del testo tramite questo servizio cloud
[Irish (1.0)] Lá maith, agus fáilte romhat chuig anailís a dhéanamh ar théacs ag baint úsáide as an tseirbhís scamall seo
When you run this code yourself, you’ll notice how quick the response time is for each.
Text Classification
Now that we can perform some simple language detections, we can move on to some more insightful functions. The first of these is Text Classification. With Text Classification, it will analyse the text to identify categories and a confidence score of what is covered in the text. Let’s have a look at an example using the English version of the text used above. This time, we need to perform two steps. The first is to set up and prepare the document to be sent. The second step is to perform the classification.
### Text Classification
text_document = oci.ai_language.models.TextDocument(key="Demo", text=text_eng, language_code="en")
text_class_resp = ai_language_client.batch_detect_language_text_classification(
            batch_detect_language_text_classification_details=oci.ai_language.models.BatchDetectLanguageTextClassificationDetails(
                documents=[text_document]
            )
        )
print(text_class_resp.data)
----------
{
  "documents": [
    {
      "key": "Demo",
      "language_code": "en",
      "text_classification": [
        {
          "label": "Internet and Communications/Web Services",
          "score": 1.0
        }
      ]
    }
  ],
  "errors": []
}
We can see it has correctly identified the text is referring to or is about “Internet and Communications/Web Services”. For a second example, let’s use some text about F1. The following is taken from an article on F1 app and refers to the recent Driver issues, and we’ll use the first two paragraphs.
{
  "documents": [
    {
      "key": "Demo",
      "language_code": "en",
      "text_classification": [
        {
          "label": "Sports and Games/Motor Sports",
          "score": 1.0
        }
      ]
    }
  ],
  "errors": []
}
We can format this response object as follows.
print(text_class_resp.data.documents[0].text_classification[0].label
      + ' [' + str(text_class_resp.data.documents[0].text_classification[0].score) + ']')
----------
Sports and Games/Motor Sports [1.0]
It is possible to get multiple classifications being returned. To handle this we need to use a couple of loops.
for i in range(len(text_class_resp.data.documents)):
        for j in range(len(text_class_resp.data.documents[i].text_classification)):
            print("Label: ", text_class_resp.data.documents[i].text_classification[j].label)
            print("Score: ", text_class_resp.data.documents[i].text_classification[j].score)
----------
Label:  Sports and Games/Motor Sports
Score:  1.0
Yet again, it correctly identified the type of topic area for the text. At this point, you are probably starting to get ideas about how this can be used and in what kinds of scenarios. This list will probably get longer over time.
Sentiement Analysis
For Sentiment Analysis we are looking to gauge the mood or tone of a text. For example, we might be looking to identify opinions, appraisals, emotions, attitudes towards a topic or person or an entity. The function returned an object containing a positive, neutral, mixed and positive sentiments and a confidence score. This feature currently supports English and Spanish.
The Sentiment Analysis function provides two way of analysing the text:
- At a Sentence level
- Looks are certain Aspects of the text. This identifies parts/words/phrase and determines the sentiment for each
Let’s start with the Sentence level Sentiment Analysis with a piece of text containing two sentences with both negative and positive sentiments.
#Sentiment analysis
text = "This hotel was in poor condition and I'd recommend not staying here. There was one helpful member of staff"

text_document = oci.ai_language.models.TextDocument(key="Demo", text=text, language_code="en")
text_doc=oci.ai_language.models.BatchDetectLanguageSentimentsDetails(documents=[text_document])

text_sentiment_resp = ai_language_client.batch_detect_language_sentiments(text_doc, level=["SENTENCE"])

print (text_sentiment_resp.data)
The response object gives us:
{
  "documents": [
    {
      "aspects": [],
      "document_scores": {
        "Mixed": 0.3458947,
        "Negative": 0.41229093,
        "Neutral": 0.0061426135,
        "Positive": 0.23567174
      },
      "document_sentiment": "Negative",
      "key": "Demo",
      "language_code": "en",
      "sentences": [
        {
          "length": 68,
          "offset": 0,
          "scores": {
            "Mixed": 0.17541811,
            "Negative": 0.82458186,
            "Neutral": 0.0,
            "Positive": 0.0
          },
          "sentiment": "Negative",
          "text": "This hotel was in poor condition and I'd recommend not staying here."
        },
        {
          "length": 37,
          "offset": 69,
          "scores": {
            "Mixed": 0.5163713,
            "Negative": 0.0,
            "Neutral": 0.012285227,
            "Positive": 0.4713435
          },
          "sentiment": "Mixed",
          "text": "There was one helpful member of staff"
        }
      ]
    }
  ],
  "errors": []
}
There are two parts to this object. The first part gives us the overall Sentiment for the text, along with the confidence scores for all possible sentiments. The second part of the object breaks the test into individual sentences and gives the Sentiment and confidence scores for the sentence. Overall, the text used in “Negative” with a confidence score of 0.41229093. When we look at the sentences, we can see the first sentence is “Negative” and the second sentence is “Mixed”.
When we switch to using Aspect we can see the difference in the response.
text_sentiment_resp = ai_language_client.batch_detect_language_sentiments(text_doc, level=["ASPECT"])

print (text_sentiment_resp.data)
The response object gives us:
{
  "documents": [
    {
      "aspects": [
        {
          "length": 5,
          "offset": 5,
          "scores": {
            "Mixed": 0.17299445074935532,
            "Negative": 0.8268503302365734,
            "Neutral": 0.0,
            "Positive": 0.0001552190140712097
          },
          "sentiment": "Negative",
          "text": "hotel"
        },
        {
          "length": 9,
          "offset": 23,
          "scores": {
            "Mixed": 0.0020200687053503,
            "Negative": 0.9971282906307877,
            "Neutral": 0.0,
            "Positive": 0.0008516406638620019
          },
          "sentiment": "Negative",
          "text": "condition"
        },
        {
          "length": 6,
          "offset": 91,
          "scores": {
            "Mixed": 0.0,
            "Negative": 0.002300517913679934,
            "Neutral": 0.023815747524769032,
            "Positive": 0.973883734561551
          },
          "sentiment": "Positive",
          "text": "member"
        },
        {
          "length": 5,
          "offset": 101,
          "scores": {
            "Mixed": 0.10319573538533408,
            "Negative": 0.2070680870320537,
            "Neutral": 0.0,
            "Positive": 0.6897361775826122
          },
          "sentiment": "Positive",
          "text": "staff"
        }
      ],
      "document_scores": {},
      "document_sentiment": "",
      "key": "Demo",
      "language_code": "en",
      "sentences": []
    }
  ],
  "errors": []
}
The different aspects are extracted, and the sentiment for each within the text is determined. What you need to look out for are the labels “text” and “sentiment.
BOCAS – using OCI GenAI Agent and Stremlit
BOCAS stands for Brendan’s Oracle Chatbot Agent for Shakespeare. I’ve previously posted on how to go about creating a GenAI Agent on a specific data set. In this post, I’ll share code on how I did this using Python Streamlit.
And here’s the code
import streamlit as st
import time
import oci
from oci import generative_ai_agent_runtime
import json
# Page Title
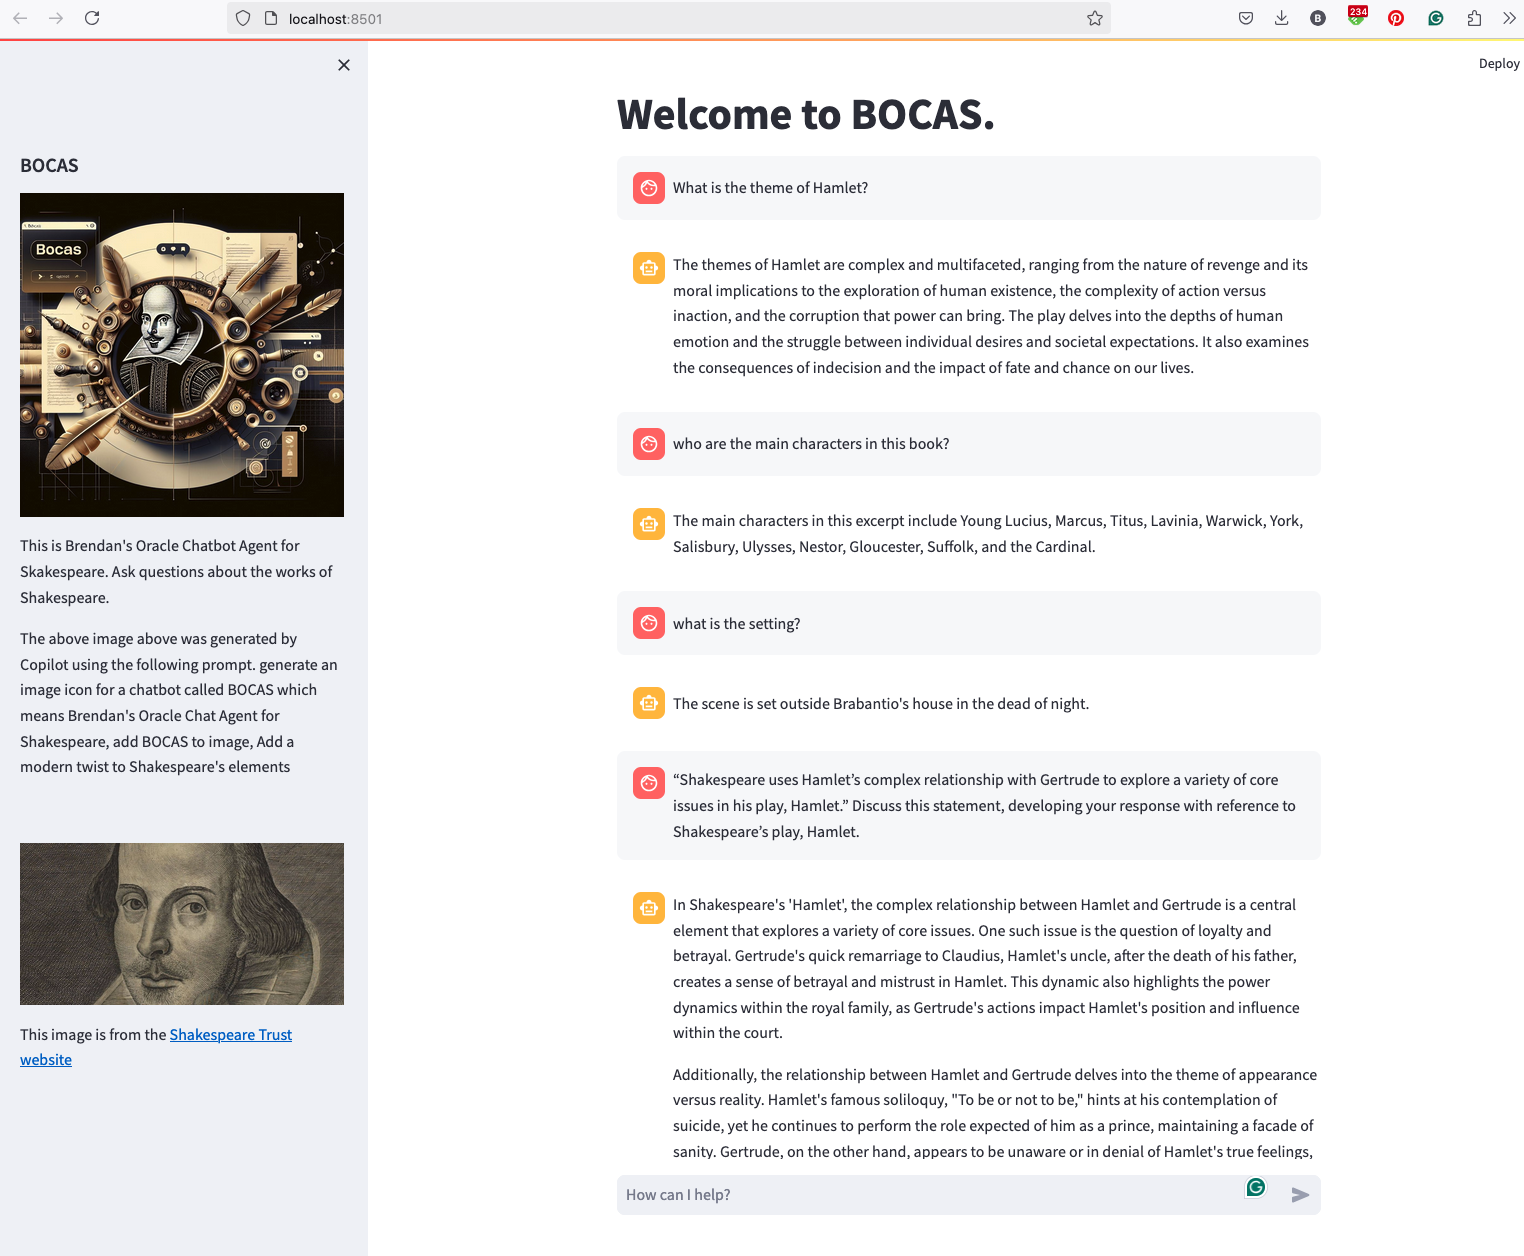
welcome_msg = "Welcome to BOCAS."
welcome_msg2 = "This is Brendan's Oracle Chatbot Agent for Skakespeare. Ask questions about the works of Shakespeare."
st.title(welcome_msg)
# Sidebar Image
st.sidebar.header("BOCAS")
st.sidebar.image("bocas-3.jpg", use_column_width=True)
#with st.sidebar:
# with st.echo:
# st.write(welcome_msg2)
st.sidebar.markdown(welcome_msg2)
st.sidebar.markdown("The above image above was generated by Copilot using the following prompt. generate an image icon for a chatbot called BOCAS which means Brendan's Oracle Chat Agent for Shakespeare, add BOCAS to image, Add a modern twist to Shakespeare's elements")
st.sidebar.write("")
st.sidebar.write("")
st.sidebar.write("")
st.sidebar.image("https://media.shakespeare.org.uk/images/SBT_SR_OS_37_Shakespeare_Firs.ec42f390.fill-1200x600-c75.jpg")
link="This image is from the [Shakespeare Trust website](https://media.shakespeare.org.uk/images/SBT_SR_OS_37_Shakespeare_Firs.ec42f390.fill-1200x600-c75.jpg)"
st.sidebar.write(link,unsafe_allow_html=True)
# OCI GenAI settings
CONFIG_PROFILE = "DEFAULT"
config = oci.config.from_file('~/.oci/config', CONFIG_PROFILE)
###
SERVICE_EP = <your service endpoint>
AGENT_EP_ID = <your agent endpoint>
###
# Response Generator
def response_generator(text_input):
#Initiate AI Agent runtime client
genai_agent_runtime_client = generative_ai_agent_runtime.GenerativeAiAgentRuntimeClient(config, service_endpoint=SERVICE_EP, retry_strategy=oci.retry.NoneRetryStrategy())
create_session_details = generative_ai_agent_runtime.models.CreateSessionDetails()
create_session_details.display_name = "Welcome to BOCAS"
create_session_details.idle_timeout_in_seconds = 20
create_session_details.description = welcome_msg
create_session_response = genai_agent_runtime_client.create_session(create_session_details, AGENT_EP_ID)
#Define Chat details and input message/question
session_details = generative_ai_agent_runtime.models.ChatDetails()
session_details.session_id = create_session_response.data.id
session_details.should_stream = False
session_details.user_message = text_input
#Get AI Agent Respose
session_response = genai_agent_runtime_client.chat(agent_endpoint_id=AGENT_EP_ID, chat_details=session_details)
#print(str(response.data))
response = session_response.data.message.content.text
return response
# Initialize chat history
if "messages" not in st.session_state:
st.session_state.messages = []
# Display chat messages from history on app rerun
for message in st.session_state.messages:
with st.chat_message(message["role"]):
st.markdown(message["content"])
# Accept user input
if prompt := st.chat_input("How can I help?"):
# Add user message to chat history
st.session_state.messages.append({"role": "user", "content": prompt})
# Display user message in chat message container
with st.chat_message("user"):
st.markdown(prompt)
# Display assistant response in chat message container
with st.chat_message("assistant"):
response = response_generator(prompt)
write_response = st.write(response)
st.session_state.messages.append({"role": "ai", "content": response})
# Add assistant response to chat historyOCI Gen AI – How to call using Python
Oracle OCI has some Generative AI features, one of which is a Playground allowing you to play or experiment with using several of the Cohere models. The Playground includes Chat, Generation, Summarization and Embedding.
OCI Generative AI services are only available in a few Cloud Regions. You can check the available regions in the documentation. A simple way to check if it is available in your cloud account is to go to the menu and see if it is listed in the Analytics & AI section.

When the webpage opens you can select the Playground from the main page or select one of the options from the menu on the right-hand-side of the page. The following image shows this menu and in this image, I’ve selected the Chat option.

You can enter your questions into the chat box at the bottom of the screen. In the image, I’ve used the following text to generate a Retirement email.
A university professor has decided to retire early. write and email to faculty management and HR of his decision. The job has become very stressful and without proper supports I cannot continue in the role. write me an email for this
Using this playground is useful for trying things out and to see what works and doesn’t work for you. When you are ready to use or deploy such a Generative AI solution, you’ll need to do so using some other coding environment. If you look toward the top right hand corner of this playground page, you’ll see a ‘View code’ button. When you click on this Code will be generated for you in Java and Python. You can copy and paste this to any environment and quickly have a Chatbot up and running in few minutes. I was going to say a few second but you do need to setup a .config file to setup a secure connection to your OCI account. Here is a blog post I wrote about setting this up.
Here is a copy of that Python code with some minor edits, 1) to remove my Compartment ID, 2) I’ve added some message requests. You can comment/uncomment as you like or add something new.
import oci

# Setup basic variables
# Auth Config
# TODO: Please update config profile name and use the compartmentId that has policies grant permissions for using Generative AI Service
compartment_id =  <add your Compartment ID>
CONFIG_PROFILE = "DEFAULT"
config = oci.config.from_file('~/.oci/config', CONFIG_PROFILE)

# Service endpoint
endpoint = "https://inference.generativeai.us-chicago-1.oci.oraclecloud.com"

generative_ai_inference_client = oci.generative_ai_inference.GenerativeAiInferenceClient(config=config, service_endpoint=endpoint, retry_strategy=oci.retry.NoneRetryStrategy(), timeout=(10,240))
chat_detail = oci.generative_ai_inference.models.ChatDetails()

chat_request = oci.generative_ai_inference.models.CohereChatRequest()
#chat_request.message = "Tell me what you can do?"
#chat_request.message = "How does GenAI work?"
chat_request.message = "What's the weather like today where I live?"
chat_request.message = "Could you look it up for me?"
chat_request.message = "Will Elon Musk buy OpenAI?"
chat_request.message = "Tell me about Stargate Project and how it will work?"
chat_request.message = "What is the most recent date your model is built on?"


chat_request.max_tokens = 600
chat_request.temperature = 1
chat_request.frequency_penalty = 0
chat_request.top_p = 0.75
chat_request.top_k = 0
chat_request.seed = None


chat_detail.serving_mode = oci.generative_ai_inference.models.OnDemandServingMode(model_id="ocid1.generativeaimodel.oc1.us-chicago-1.amaaaaaask7dceyanrlpnq5ybfu5hnzarg7jomak3q6kyhkzjsl4qj24fyoq")
chat_detail.chat_request = chat_request
chat_detail.compartment_id = compartment_id
chat_response = generative_ai_inference_client.chat(chat_detail)
# Print result
print("**************************Chat Result**************************")
print(vars(chat_response))
When I run the above code I get the following output.
NB: If you have the OCI Python package already installed you might need to update it to the most recent version
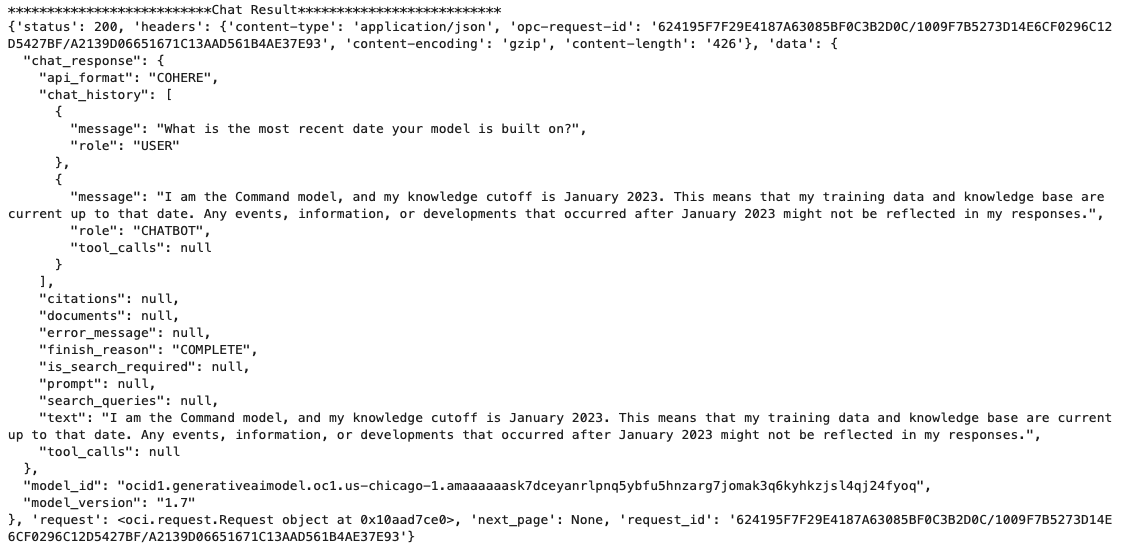
You can see there is a lot generated and returned in the response. We can tidy this up a little using the following and only display the response message.
import json
# Convert JSON output to a dictionary
data = chat_response.__dict__["data"]
output = json.loads(str(data))

# Print the output
print("---Message Returned by LLM---")
print(output["chat_response"]["chat_history"][1]["message"])
That’s it. Give it a try and see how you can build it into your applications.
How to Create an Oracle Gen AI Agent
In this post, I’ll walk you through the steps needed to create a Gen AI Agent on Oracle Cloud. We have seen lots of solutions offered by my different providers for Gen AI Agents. This post focuses on just what is available on Oracle Cloud. You can create a Gen AI Agent manually. However, testing and fine-tuning based on various chunking strategies can take some time. With the automated options available on Oracle Cloud, you don’t have to worry about chunking. It handles all the steps automatically for you. This means you need to be careful when using it. Allocate some time for testing to ensure it meets your requirements. The steps below point out some checkboxes. You need to check them to ensure you generate a more complete knowledge base and outcome.
For my example scenario, I’m going to build a Gen AI Agent for some of the works by Shakespeare. I got the text of several plays from the Gutenberg Project website. The process for creating the Gen AI Agent is:

Step-1 Load Files to a Bucket on OCI
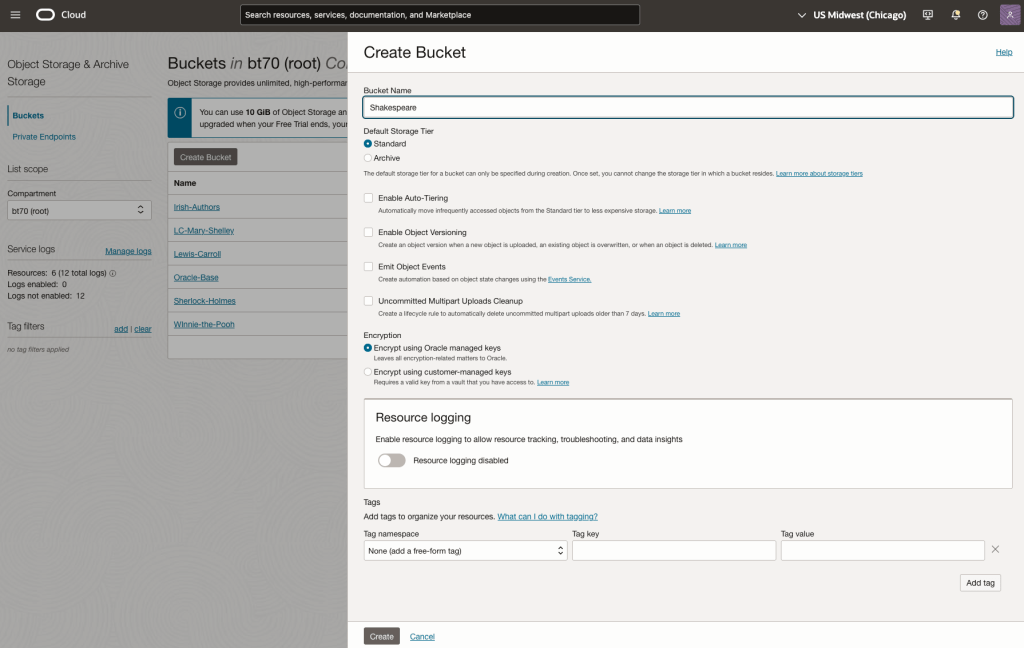
Create a bucket called Shakespeare.
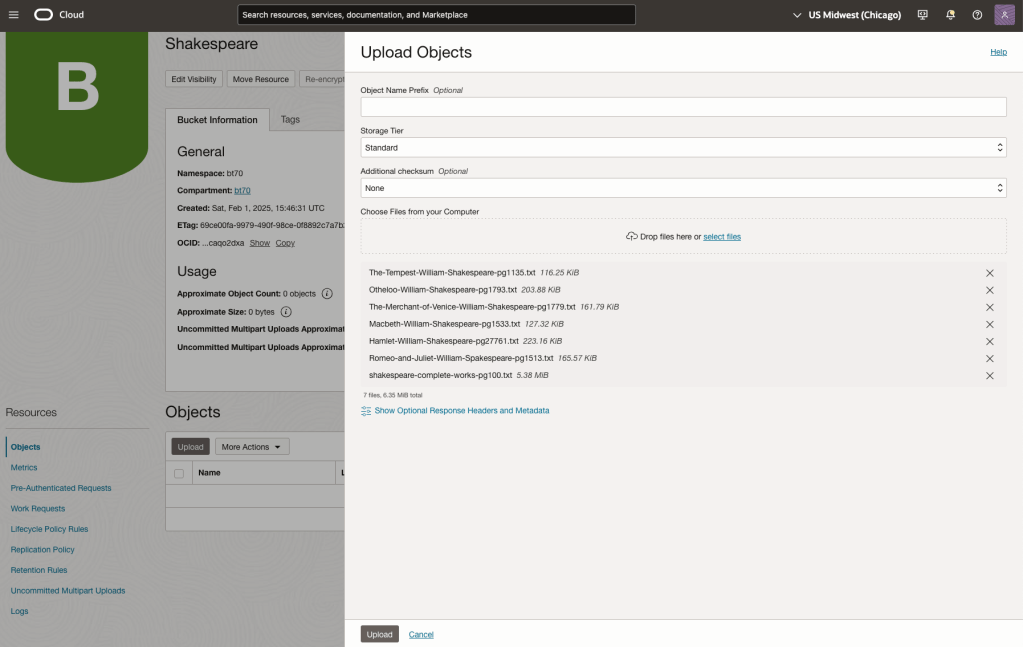
Load the files from your computer into the Bucket. These files were obtained from the Gutenberg Project site.
Step-2 Define a Data Source (documents you want to use) & Create a Knowledge Base
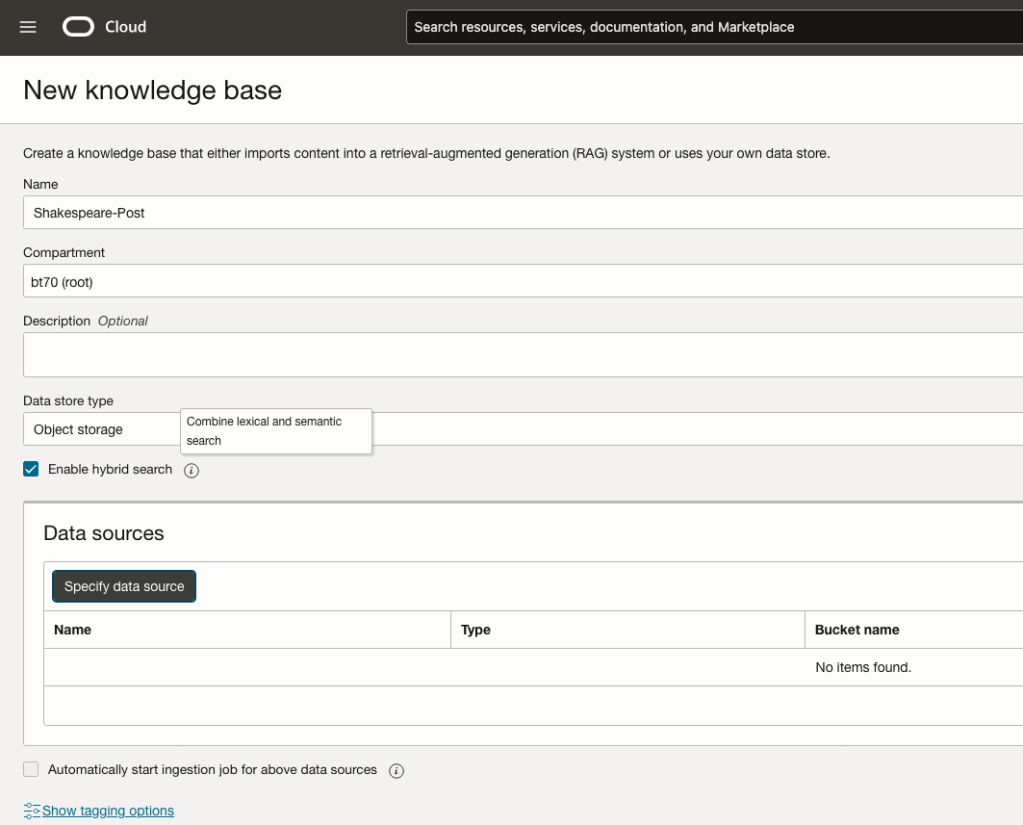
Click on Create Knowledge Base and give it a name ‘Shakespeare’.
Check the ‘Enable Hybrid Search’. checkbox. This will enable both lexical and semantic search. [this is Important]
Click on ‘Specify Data Source’
Select the Bucket from the drop-down list (Shakespeare bucket).
Check the ‘Enable multi-modal parsing’ checkbox.
Select the files to use or check the ‘Select all in bucket’
Click Create.

The Knowledge Base will be created. The files in the bucket will be parsed, and structured for search by the AI Agent. This step can take a few minutes as it needs to process all the files. This depends on the number of files to process, their format and the size of the contents in each file.
Step-3 Create Agent
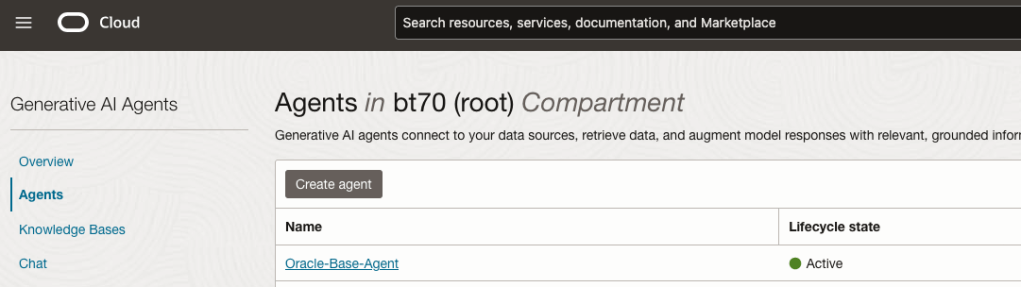
Go back to the main Gen AI menu and select Agent and then Create Agent.
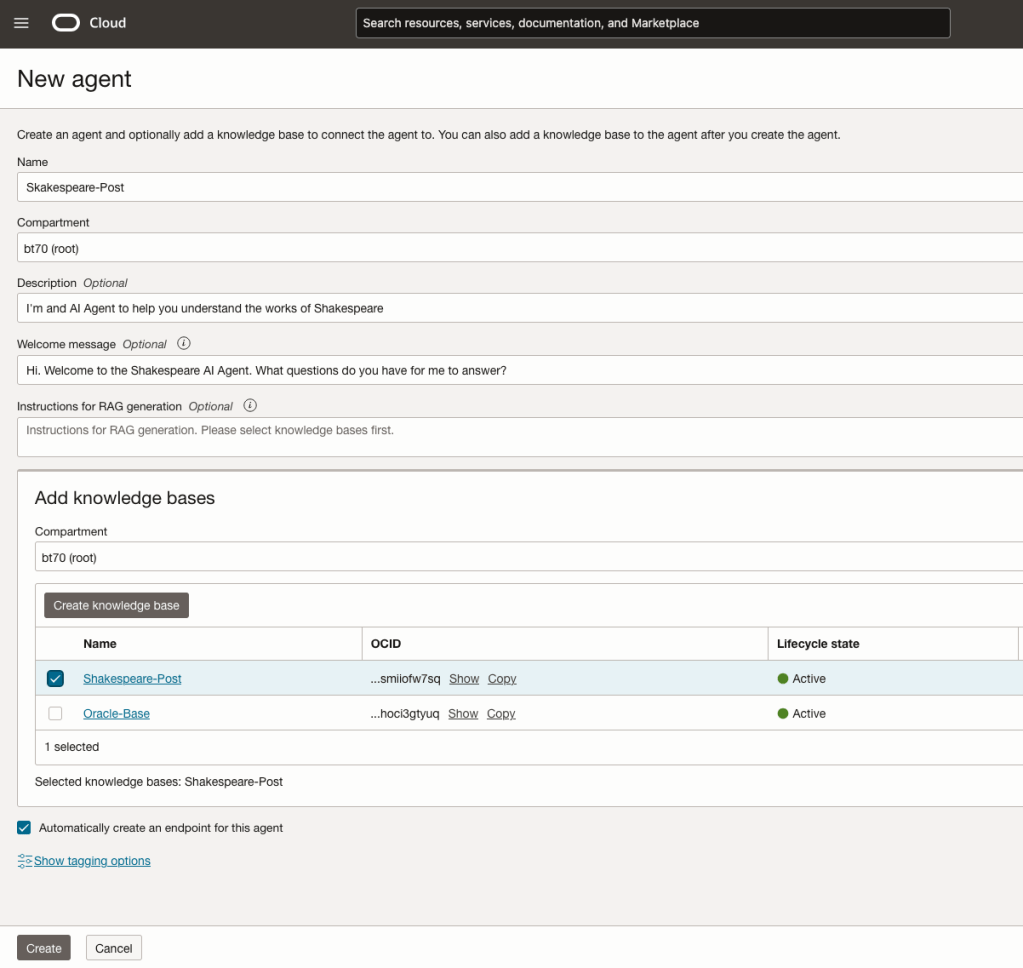
You can enter the following details:
- Name of the Agent
- Some descriptive information
- A Welcome message for people using the Agent
- Select the Knowledge Base from the list.
The checkbox for creating Endpoints should be checked.
Click Create.
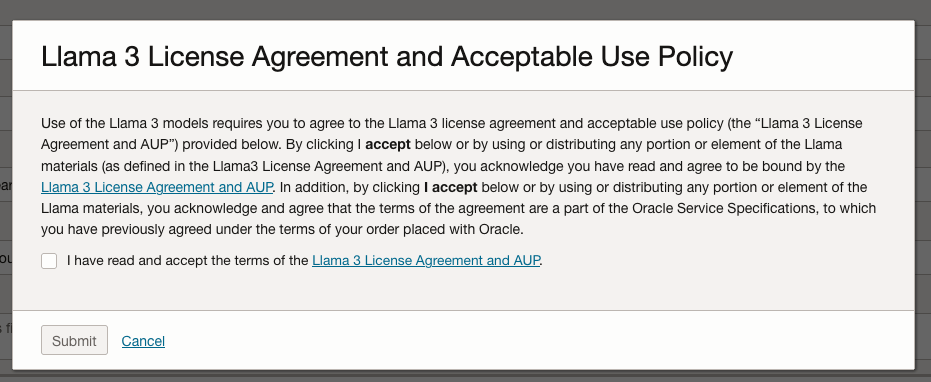
A pop-up window will appear asking you to agree to the Llama 3 License. Check this checkbox and click Submit.
After the agent has been created, check the status of the endpoints. These generally take a little longer to create, and you need these before you can test the Agent using the Chatbot.
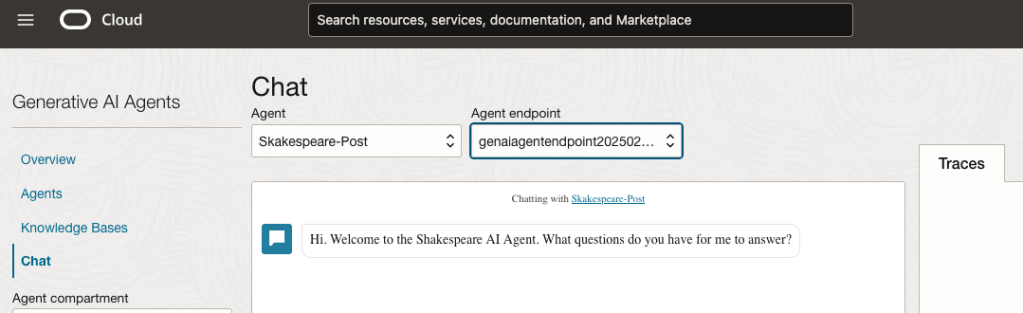
Step-4 Test using Chatbot
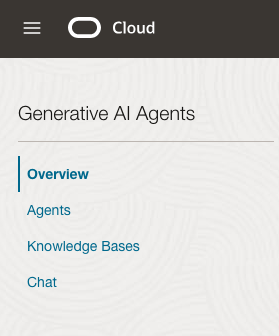
After verifying the endpoints have been created, you can open a Chatbot by clicking on ‘Chat’ from the menu on the left-hand side of the screen.
Select the name of the ‘Agent’ from the drop-down list e.g. Shakespeare-Post.
Select an end-point for the Agent.
After these have been selected you will see the ‘Welcome’ message. This was defined when creating the Agent.
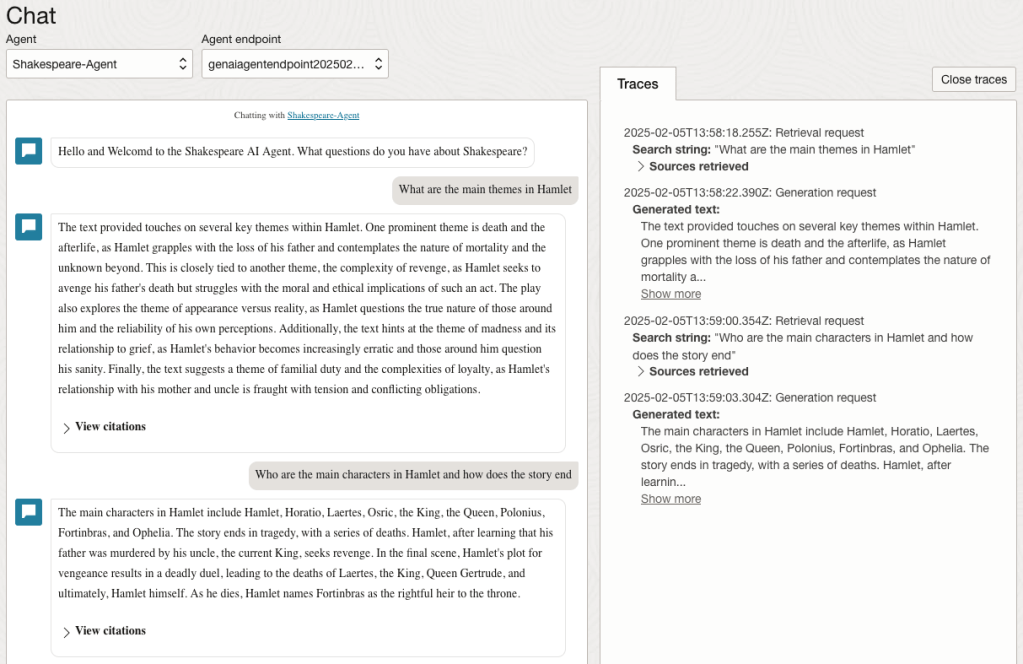
Here are a couple of examples of querying the works by Shakespeare.
In addition to giving a response to the questions, the Chatbot also lists the sections of the underlying documents and passages from those documents used to form the response/answer.
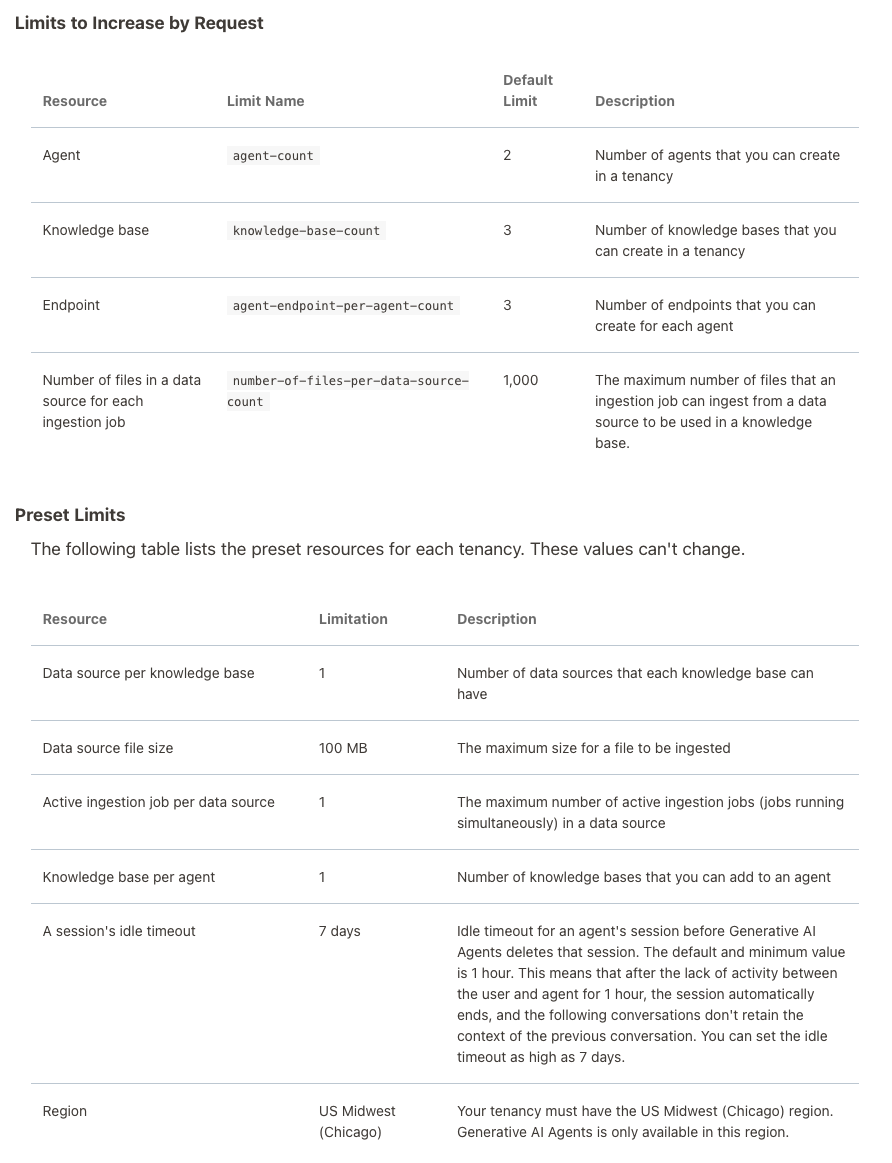
When creating Gen AI Agents, you need to be careful of two things. The first is the Cloud Region. Gen AI Agents are only available in certain Cloud Regions. If they aren’t available in your Region, you’ll need to request access to one of those or setup a new OCI account based in one of those regions. The second thing is the Resource Limits. At the time of writing this post, the following was allowed. Check out the documentation for more details. You might need to request that these limits be increased.
I’ll have another post showing how you can run the Chatbot on your computer or VM as a webpage.
Oracle Object Storage – Parallel Downloading
In previous posts, I’ve given example Python code (and functions) for processing files into and out of OCI Object and Bucket Storage. One of these previous posts includes code and a demonstration of uploading files to an OCI Bucket using the multiprocessing package in Python.
Building upon these previous examples, the code below will download a Bucket using parallel processing. Like my last example, this code is based on the example code I gave in an earlier post on functions within a Jupyter Notebook.
Here’s the code.
import oci
import os
import argparse
from multiprocessing import Process
from glob import glob
import time

####
def upload_file(config, NAMESPACE, b, f, num):
    file_exists = os.path.isfile(f)
    if file_exists == True:
        try:
            start_time = time.time()
            object_storage_client = oci.object_storage.ObjectStorageClient(config)
            object_storage_client.put_object(NAMESPACE, b, os.path.basename(f), open(f,'rb'))
            print(f'. Finished {num} uploading {f}   in {round(time.time()-start_time,2)} seconds')
        except Exception as e:
            print(f'Error uploading file {num}. Try again.')
            print(e)
    else:
        print(f'... File {f} does not exist or cannot be found. Check file name and full path')

####
def check_bucket_exists(config, NAMESPACE, b_name):
    #check if Bucket exists
    is_there = False
    object_storage_client = oci.object_storage.ObjectStorageClient(config)
    l_b = object_storage_client.list_buckets(NAMESPACE, config.get("tenancy")).data
    for bucket in l_b:
        if bucket.name == b_name:
            is_there = True

    if is_there == True:
        print(f'Bucket {b_name} exists.')
    else:
        print(f'Bucket {b_name} does not exist.')

    return is_there

####

def download_bucket_file(config, NAMESPACE, b, d, f, num):
    print(f'..Starting Download File ({num}):',f, ' from Bucket', b, ' at ', time.strftime("%H:%M:%S"))

    try:
        start_time = time.time()
        object_storage_client = oci.object_storage.ObjectStorageClient(config)
        get_obj = object_storage_client.get_object(NAMESPACE, b, f)
        with open(os.path.join(d, f), 'wb') as f:
            for chunk in get_obj.data.raw.stream(1024 * 1024, decode_content=False):
                f.write(chunk)

        print(f'..Finished Download ({num}) in ', round(time.time()-start_time,2), 'seconds.')
    except:
        print(f'Error trying to download file {f}. Check parameters and try again')

####

if __name__ == "__main__":
	#setup for OCI
    config = oci.config.from_file()
    object_storage = oci.object_storage.ObjectStorageClient(config)
    NAMESPACE = object_storage.get_namespace().data

    ####
    description = "\n".join(["Upload files in parallel to OCI storage.",
                             "All files in <directory> will be uploaded. Include '/' at end.",
                             "",
                             "<bucket_name> must already exist."])

    parser = argparse.ArgumentParser(description=description,
                                     formatter_class=argparse.RawDescriptionHelpFormatter)
    parser.add_argument(dest='bucket_name',
                        help="Name of object storage bucket")
    parser.add_argument(dest='directory',
                        help="Path to local directory containing files to upload.")
    args = parser.parse_args()

    ####
    bucket_name = args.bucket_name
    directory = args.directory
    if not os.path.isdir(directory):
        parser.usage()
    else:
        dir = directory + os.path.sep + "*"

    start_time = time.time()
    print('Starting Downloading Bucket - Parallel:', bucket_name, '  at ', time.strftime("%H:%M:%S"))
    object_storage_client = oci.object_storage.ObjectStorageClient(config)
    object_list = object_storage_client.list_objects(NAMESPACE, bucket_name).data
    count = 0
    for i in object_list.objects:
        count+=1

    print(f'... {count} files to download')

    proc_list = []
    num=0
    for o in object_list.objects:
        p = Process(target=download_bucket_file, args=(config, NAMESPACE, bucket_name, directory, o.name, num))
        p.start()
        num+=1
        proc_list.append(p)

    for job in proc_list:
        job.join()

    print('---')
    print(f'Download Finished in {round(time.time()-start_time,2)} seconds.({time.strftime("%H:%M:%S")})')

#### the end ####
I’ve saved the code to a file called bucket_parallel_download.py.
To call this, I run the following using the same DEMO_Bucket and directory of files I used in my previous posts.
python bucket_parallel_download.py DEMO_Bucket /Users/brendan.tierney/Dropbox/OCI-Vision-Images/Blue-Peter/
This creates the following output, and between 3.6 seconds to 4.4 seconds to download the 13 files, based on my connection.
[16:30~/Dropbox]> python bucket_parallel_download.py DEMO_Bucket /Users/brendan.tierney/DEMO_BUCKET
Starting Downloading Bucket - Parallel: DEMO_Bucket   at  16:30:05
... 13 files to download
..Starting Download File (0): 2017-08-31 19.46.42.jpg  from Bucket DEMO_Bucket  at  16:30:08
..Starting Download File (1): 2017-10-16 13.13.20.jpg  from Bucket DEMO_Bucket  at  16:30:08
..Starting Download File (2): 2017-11-22 20.18.58.jpg  from Bucket DEMO_Bucket  at  16:30:08
..Starting Download File (3): 2018-12-03 11.04.57.jpg  from Bucket DEMO_Bucket  at  16:30:08
..Starting Download File (11): thumbnail_IMG_2333.jpg  from Bucket DEMO_Bucket  at  16:30:08
..Starting Download File (5): IMG_2347.jpg  from Bucket DEMO_Bucket  at  16:30:08
..Starting Download File (9): thumbnail_IMG_1711.jpg  from Bucket DEMO_Bucket  at  16:30:08
..Starting Download File (4): 347397087_620984963239631_2131524631626484429_n.jpg  from Bucket DEMO_Bucket  at  16:30:08
..Starting Download File (10): thumbnail_IMG_1712.jpg  from Bucket DEMO_Bucket  at  16:30:08
..Starting Download File (8): thumbnail_IMG_1710.jpg  from Bucket DEMO_Bucket  at  16:30:08
..Starting Download File (7): oug_ire18_1.jpg  from Bucket DEMO_Bucket  at  16:30:08
..Starting Download File (6): IMG_6779.jpg  from Bucket DEMO_Bucket  at  16:30:08
..Starting Download File (12): thumbnail_IMG_2336.jpg  from Bucket DEMO_Bucket  at  16:30:08
..Finished Download (9) in  0.67 seconds.
..Finished Download (11) in  0.74 seconds.
..Finished Download (10) in  0.7 seconds.
..Finished Download (5) in  0.8 seconds.
..Finished Download (7) in  0.7 seconds.
..Finished Download (1) in  1.0 seconds.
..Finished Download (12) in  0.81 seconds.
..Finished Download (4) in  1.02 seconds.
..Finished Download (6) in  0.97 seconds.
..Finished Download (2) in  1.25 seconds.
..Finished Download (8) in  1.16 seconds.
..Finished Download (0) in  1.47 seconds.
..Finished Download (3) in  1.47 seconds.
---
Download Finished in 4.09 seconds.(16:30:09)Oracle Object Storage – Parallel Uploading
In my previous posts on using Python to work with OCI Object Storage, I gave code examples and illustrated how to create Buckets, explore Buckets, upload files, download files and delete files and buckets, all using Python and files on your computer.
- Oracle Object Storage – Setup and Explore
- Oracle Object Storage – Buckets & Loading files
- Oracle Object Storage – Downloading and Deleting
- Oracle Object Storage – Parallel Uploading
Building upon the code I’ve given for uploading files, which did so sequentially, in his post I’ve taken that code and expanded it to allow the files to be uploaded in parallel to an OCI Bucket. This is achieved using the Python multiprocessing library.
Here’s the code.
import oci
import os
import argparse
from multiprocessing import Process
from glob import glob
import time

####
def upload_file(config, NAMESPACE, b, f, num):
    file_exists = os.path.isfile(f)
    if file_exists == True:
        try:
            start_time = time.time()
            object_storage_client = oci.object_storage.ObjectStorageClient(config)
            object_storage_client.put_object(NAMESPACE, b, os.path.basename(f), open(f,'rb'))
            print(f'. Finished {num} uploading {f}   in {round(time.time()-start_time,2)} seconds')
        except Exception as e:
            print(f'Error uploading file {num}. Try again.')
            print(e)
    else:
        print(f'... File {f} does not exist or cannot be found. Check file name and full path')

####
def check_bucket_exists(config, NAMESPACE, b_name):
    #check if Bucket exists
    is_there = False
    object_storage_client = oci.object_storage.ObjectStorageClient(config)
    l_b = object_storage_client.list_buckets(NAMESPACE, config.get("tenancy")).data
    for bucket in l_b:
        if bucket.name == b_name:
            is_there = True

    if is_there == True:
        print(f'Bucket {b_name} exists.')
    else:
        print(f'Bucket {b_name} does not exist.')

    return is_there

####
if __name__ == "__main__":
	#setup for OCI
    config = oci.config.from_file()
    object_storage = oci.object_storage.ObjectStorageClient(config)
    NAMESPACE = object_storage.get_namespace().data

    ####
    description = "\n".join(["Upload files in parallel to OCI storage.",
                             "All files in <directory> will be uploaded. Include '/' at end.",
                             "",
                             "<bucket_name> must already exist."])

    parser = argparse.ArgumentParser(description=description,
                                     formatter_class=argparse.RawDescriptionHelpFormatter)
    parser.add_argument(dest='bucket_name',
                        help="Name of object storage bucket")
    parser.add_argument(dest='directory',
                        help="Path to local directory containing files to upload.")
    args = parser.parse_args()

    ####
    bucket_name = args.bucket_name
    directory = args.directory
    if not os.path.isdir(directory):
        parser.usage()
    else:
        dir = directory + os.path.sep + "*"

    #### Check if Bucket Exists ####
    b_exists = check_bucket_exists(config, NAMESPACE, bucket_name)
    if b_exists == True:
        try:
            proc_list = []
            num=0
            start_time = time.time()
            #### Start uploading files ####
            for file_path in glob(dir):
                print(f"Starting {num} upload for {file_path}")
                p = Process(target=upload_file, args=(config, NAMESPACE, bucket_name, file_path, num))
                p.start()
                num+=1
                proc_list.append(p)
        except Exception as e:
            print(f'Error uploading file ({num}). Try again.')
            print(e)
    else:
        print('... Create Bucket before uploading Directory.')

    for job in proc_list:
        job.join()

    print('---')
    print(f'Finished uploading all files ({num}) in {round(time.time()-start_time,2)} seconds')
#### the end ####
I’ve saved the code to a file called bucket_parallel.py.
To call this, I run the following using the same DEMO_Bucket and directory of files I used in my previous posts.
python bucket_parallel.py DEMO_Bucket /Users/brendan.tierney/Dropbox/OCI-Vision-Images/Blue-Peter/
This creates the following output, and between 3.3 seconds to 4.6 seconds to upload the 13 files, based on my connection.
[15:29~/Dropbox]> python bucket_parallel.py DEMO_Bucket /Users/brendan.tierney/Dropbox/OCI-Vision-Images/Blue-Peter/
Bucket DEMO_Bucket exists.
Starting 0 upload for /Users/brendan.tierney/Dropbox/OCI-Vision-Images/Blue-Peter/thumbnail_IMG_2336.jpg
Starting 1 upload for /Users/brendan.tierney/Dropbox/OCI-Vision-Images/Blue-Peter/2017-08-31 19.46.42.jpg
Starting 2 upload for /Users/brendan.tierney/Dropbox/OCI-Vision-Images/Blue-Peter/thumbnail_IMG_2333.jpg
Starting 3 upload for /Users/brendan.tierney/Dropbox/OCI-Vision-Images/Blue-Peter/347397087_620984963239631_2131524631626484429_n.jpg
Starting 4 upload for /Users/brendan.tierney/Dropbox/OCI-Vision-Images/Blue-Peter/thumbnail_IMG_1712.jpg
Starting 5 upload for /Users/brendan.tierney/Dropbox/OCI-Vision-Images/Blue-Peter/thumbnail_IMG_1711.jpg
Starting 6 upload for /Users/brendan.tierney/Dropbox/OCI-Vision-Images/Blue-Peter/2017-11-22 20.18.58.jpg
Starting 7 upload for /Users/brendan.tierney/Dropbox/OCI-Vision-Images/Blue-Peter/thumbnail_IMG_1710.jpg
Starting 8 upload for /Users/brendan.tierney/Dropbox/OCI-Vision-Images/Blue-Peter/2018-12-03 11.04.57.jpg
Starting 9 upload for /Users/brendan.tierney/Dropbox/OCI-Vision-Images/Blue-Peter/IMG_6779.jpg
Starting 10 upload for /Users/brendan.tierney/Dropbox/OCI-Vision-Images/Blue-Peter/oug_ire18_1.jpg
Starting 11 upload for /Users/brendan.tierney/Dropbox/OCI-Vision-Images/Blue-Peter/2017-10-16 13.13.20.jpg
Starting 12 upload for /Users/brendan.tierney/Dropbox/OCI-Vision-Images/Blue-Peter/IMG_2347.jpg
. Finished 2 uploading /Users/brendan.tierney/Dropbox/OCI-Vision-Images/Blue-Peter/thumbnail_IMG_2333.jpg   in 0.752561092376709 seconds
. Finished 5 uploading /Users/brendan.tierney/Dropbox/OCI-Vision-Images/Blue-Peter/thumbnail_IMG_1711.jpg   in 0.7750208377838135 seconds
. Finished 4 uploading /Users/brendan.tierney/Dropbox/OCI-Vision-Images/Blue-Peter/thumbnail_IMG_1712.jpg   in 0.7535321712493896 seconds
. Finished 0 uploading /Users/brendan.tierney/Dropbox/OCI-Vision-Images/Blue-Peter/thumbnail_IMG_2336.jpg   in 0.8419861793518066 seconds
. Finished 7 uploading /Users/brendan.tierney/Dropbox/OCI-Vision-Images/Blue-Peter/thumbnail_IMG_1710.jpg   in 0.7582859992980957 seconds
. Finished 10 uploading /Users/brendan.tierney/Dropbox/OCI-Vision-Images/Blue-Peter/oug_ire18_1.jpg   in 0.8714470863342285 seconds
. Finished 12 uploading /Users/brendan.tierney/Dropbox/OCI-Vision-Images/Blue-Peter/IMG_2347.jpg   in 0.8753311634063721 seconds
. Finished 1 uploading /Users/brendan.tierney/Dropbox/OCI-Vision-Images/Blue-Peter/2017-08-31 19.46.42.jpg   in 1.2201581001281738 seconds
. Finished 11 uploading /Users/brendan.tierney/Dropbox/OCI-Vision-Images/Blue-Peter/2017-10-16 13.13.20.jpg   in 1.2848408222198486 seconds
. Finished 3 uploading /Users/brendan.tierney/Dropbox/OCI-Vision-Images/Blue-Peter/347397087_620984963239631_2131524631626484429_n.jpg   in 1.325110912322998 seconds
. Finished 9 uploading /Users/brendan.tierney/Dropbox/OCI-Vision-Images/Blue-Peter/IMG_6779.jpg   in 1.6633048057556152 seconds
. Finished 8 uploading /Users/brendan.tierney/Dropbox/OCI-Vision-Images/Blue-Peter/2018-12-03 11.04.57.jpg   in 1.8549730777740479 seconds
. Finished 6 uploading /Users/brendan.tierney/Dropbox/OCI-Vision-Images/Blue-Peter/2017-11-22 20.18.58.jpg   in 2.018144130706787 seconds
---
Finished uploading all files (13) in 3.9126579761505127 seconds
You must be logged in to post a comment.