
OCI AI Services
OCI Speech Real-time Capture
Capturing Speech-to-Text is a straight forward step. I’ve written previously about this, giving an example. But what if you want the code to constantly monitor for text input, giving a continuous. For this we need to use the asyncio python library. Using the OCI Speech-to-Text API in combination with asyncio we can monitor a microphone (speech input) on a continuous basis.
There are a few additional configuration settings needed, including configuring a speech-to-text listener. Here is an example of what is needed
lass MyListener(RealtimeSpeechClientListener):
    def on_result(self, result):
        if result["transcriptions"][0]["isFinal"]:
            print(f"1-Received final results: {transcription}")
        else:
            print(f"2-{result['transcriptions'][0]['transcription']} \n")

    def on_ack_message(self, ackmessage):
        return super().on_ack_message(ackmessage)

    def on_connect(self):
        return super().on_connect()

    def on_connect_message(self, connectmessage):
        return super().on_connect_message(connectmessage)

    def on_network_event(self, ackmessage):
        return super().on_network_event(ackmessage)

    def on_error(self, error_message):
        return super().on_error(error_message)

    def on_close(self, error_code, error_message):
        print(f'\nOCI connection closing.')

async def start_realtime_session(customizations=[], compartment_id=None, region=None):
    rt_client = RealtimeSpeechClient(
        config=config,
        realtime_speech_parameters=realtime_speech_parameters,
        listener=MyListener(),
        service_endpoint=realtime_speech_url,
        signer=None,   #authenticator(),
        compartment_id=compartment_id,
    )
    asyncio.create_task(send_audio(rt_client))

if __name__ == "__main__":
    asyncio.run(
        start_realtime_session(
            customizations=customization_ids,
            compartment_id=COMPARTMENT_ID,
            region=REGION_ID,
        )
    )
Additional customizations can be added to the Listener, for example, what to do with the Audio captured, what to do with the text, how to mange the speech-to-text (there are lots of customizations)
OCI Stored Video Analysis
OCI Video Analysis is a part of the OCI Vision service, designed to process stored videos and identify labels, objects, texts, and faces within each frame. It can analyze the entire video or every frame in the video using pre-trained or custom models. The feature provides information about the detected labels, objects, texts, and faces, and provides the time at which they’re detected. With a timeline bar, you can directly look for a label or object and navigate to the exact timestamp in the video where a particular label or object is found.
To use this feature, you’ll need to upload your video to an OCI Bucket. Here is an example of a video stored in a bucket called OCI-Vision-Video-Demos.
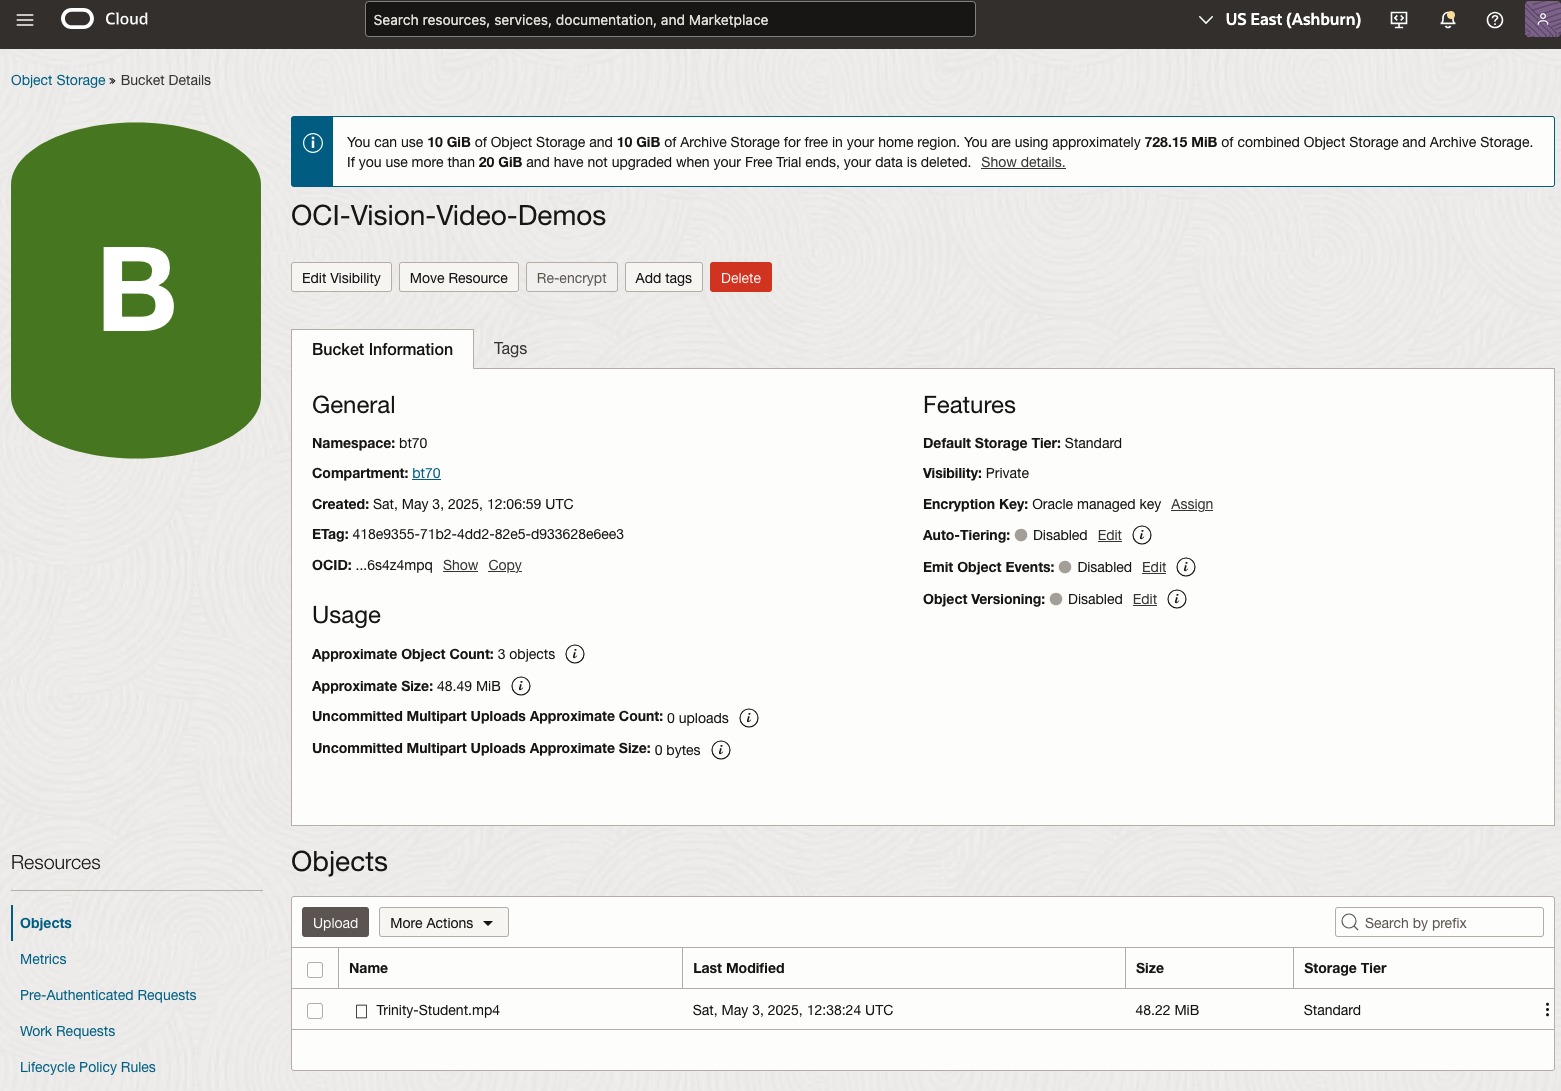
You might need to allow Pre-Authenticated Requests for this bucket. If you don’t do this, you will be prompted by the tool to allow this.
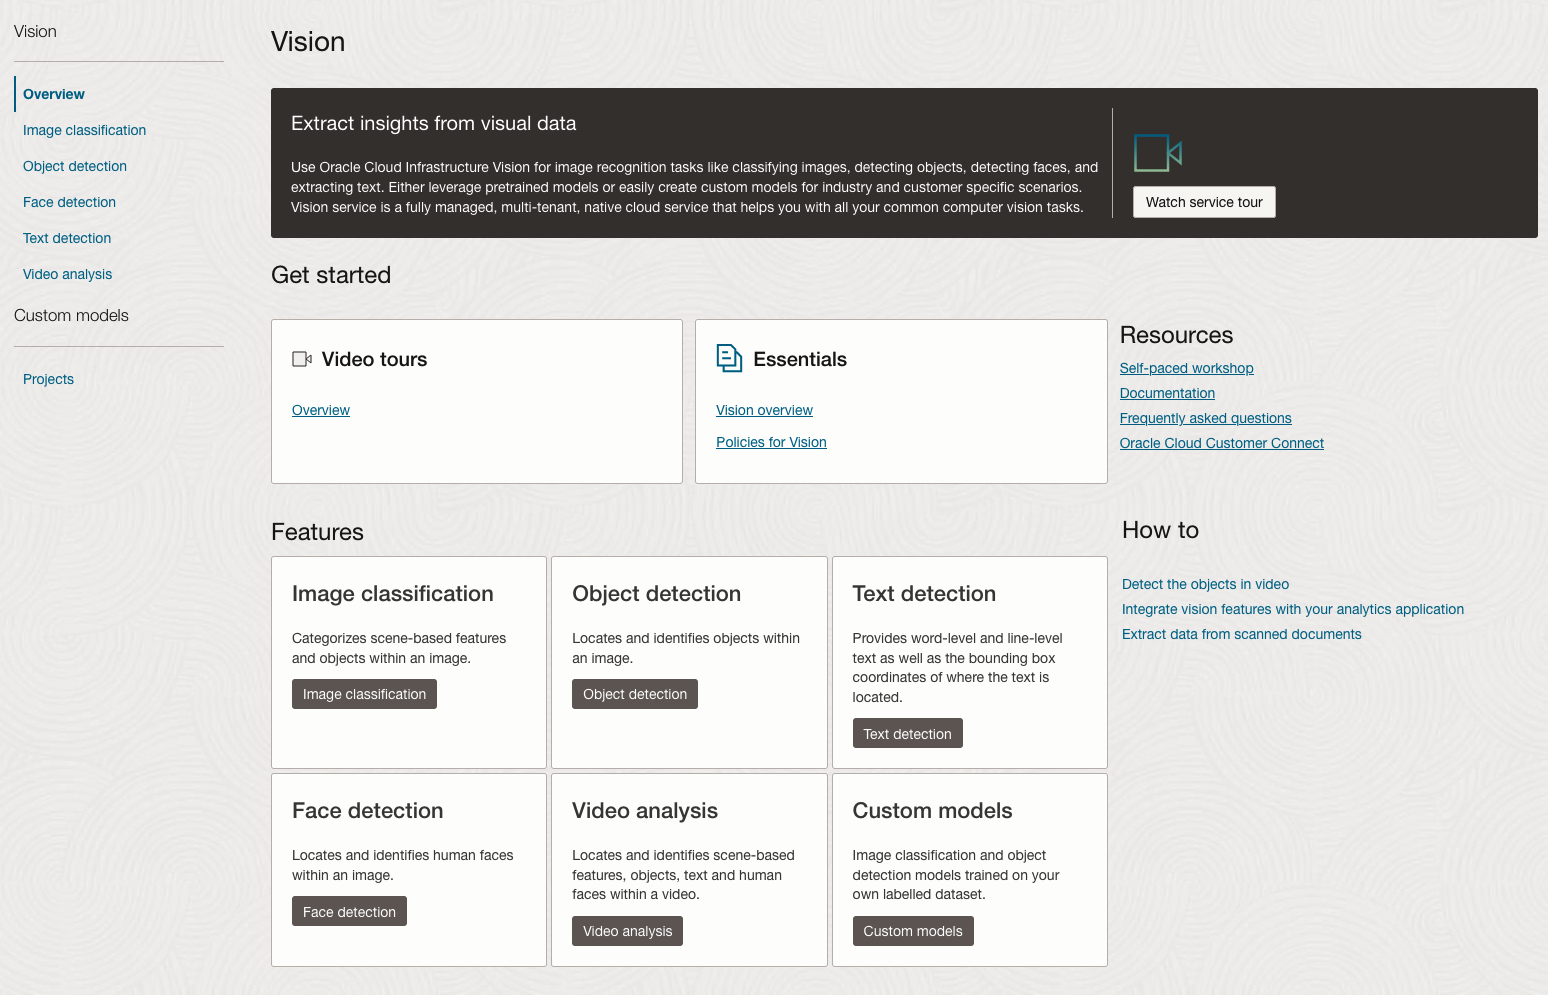
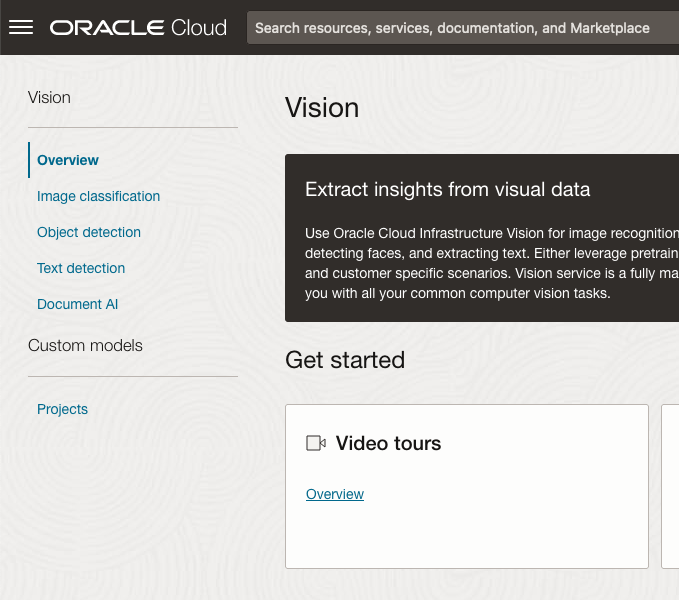
Next, go to the OCI Vision page. You’ll find the Video Analysis tool at the bottom of the menu on the left-hand side of the page.
You can check out the demo videos, or load your own video from the Local File system of you computer, or use a file from your OCI Storage. If you select a video from the Local File system, the video will be loaded in the object storage before it is processed.
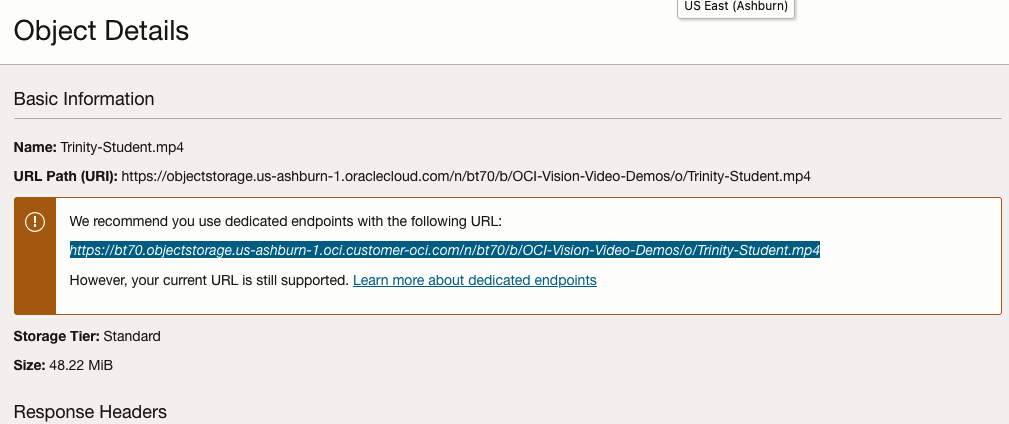
For this example, I’m going to use the video I uploaded earlier called Trinity-Student.mp4. Copy the link to this file from the file information in object storage.

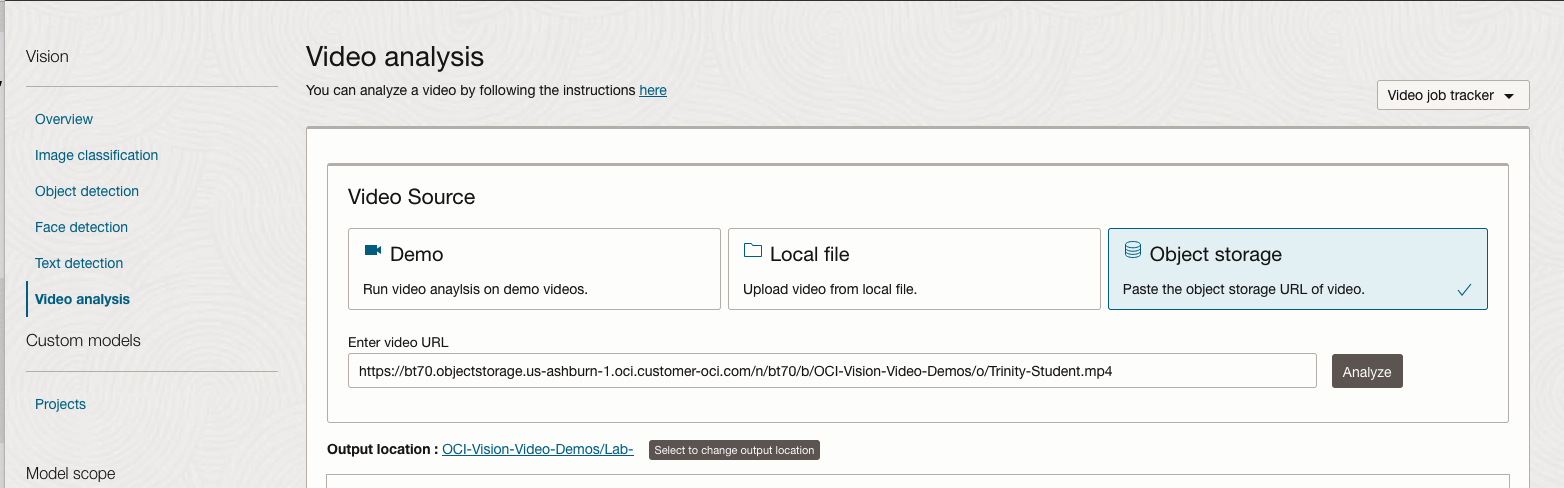
On the Video Analysis page, select Object Storage and paste the link to the file into the URL field. Then click Analyze button. It is at this point that you might get asked to Generate a PAR URL. Do this and then proceed.
While the video is being parsed, it will appear on the webpage and will start playing. When the video has been Analyzed the details will be displayed below the video. The Analysis will consist of Label Detection, Object Detection, Text Dection and Face Detection.
By clicking on each of these, you’ll see what has been detected, and by clicking on each of these, you’ll be able to see where in the video they were detected. For example, where a Chair was detected.
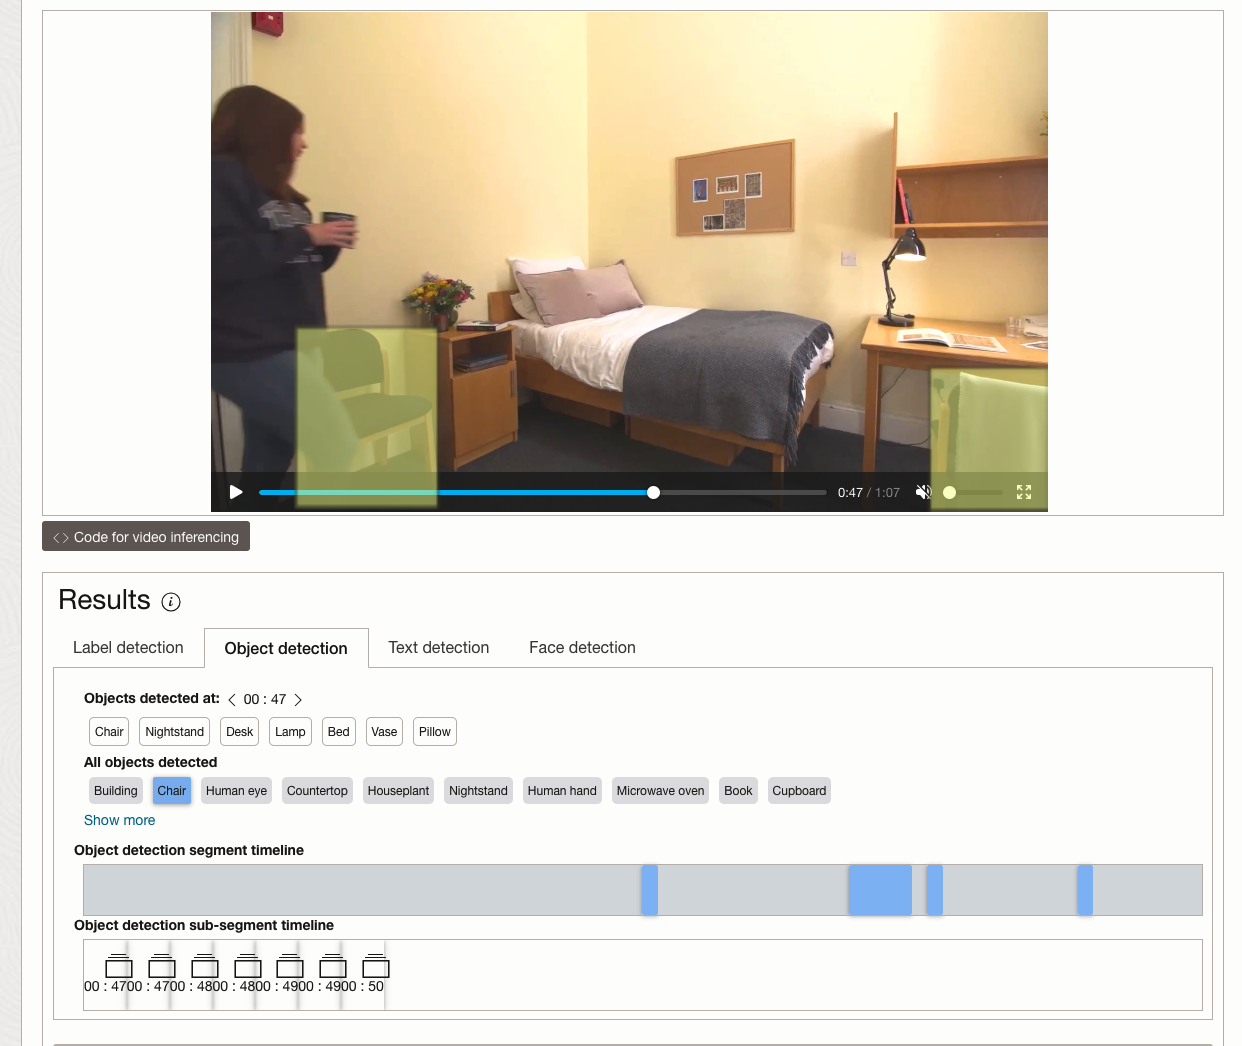
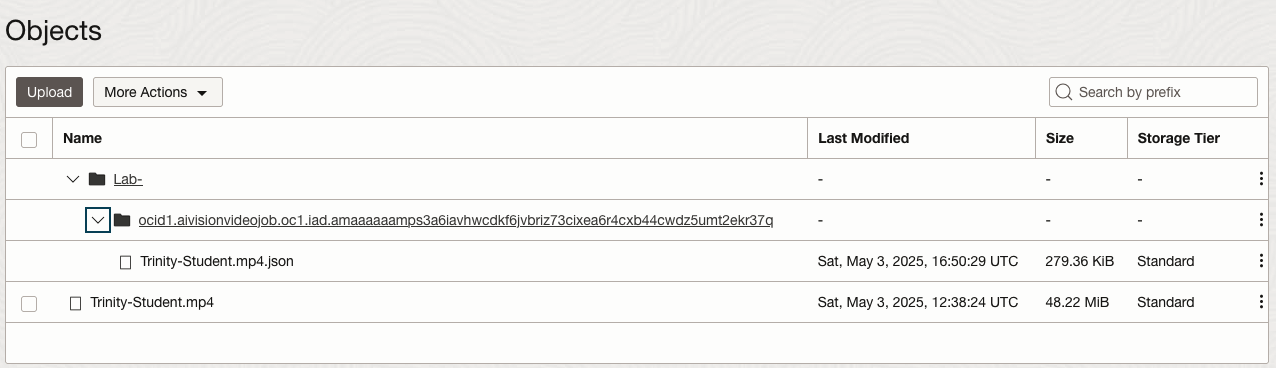
You can also inspect the JSON file containing all the details of various objects detected in the video and the location in the videos they can be found.
This JSON response file is also saved to Object Storage in the same directory, or a sub-directory, where the video is located.
OCI Text to Speech example
In this post, I’ll walk through the steps to get a very simple example of Text-to-Speech working. This example builds upon my previous posts on OCI Language, OCI Speech and others, so make sure you check out those posts.
The first thing you need to be aware of, and to check, before you proceed, is whether the Text-to-Speech is available in your region. At the time of writing, this feature was only available in Phoenix, which is one of the cloud regions I have access to. There are plans to roll it out to other regions, but I’m not aware of the timeline for this. Although you might see Speech listed on your AI menu in OCI, that does not guarantee the Text-to-Speech feature is available. What it does mean is the text trans scribing feature is available.
So if Text-to-Speech is available in your region, the following will get you up and running.
The first thing you need to do is read in the Config file from the OS.
#initial setup, read Config file, create OCI Client
import oci
from oci.config import from_file
##########
from oci_ai_speech_realtime import RealtimeSpeechClient, RealtimeSpeechClientListener
from oci.ai_speech.models import RealtimeParameters
##########

CONFIG_PROFILE = "DEFAULT"
config = oci.config.from_file('~/.oci/config', profile_name=CONFIG_PROFILE)
###
ai_speech_client = ai_speech_client = oci.ai_speech.AIServiceSpeechClient(config)
###
print(config)
### Update region to point to Phoenix
config.update({'region':'us-phoenix-1'})
A simple little test to see if the Text-to-Speech feature is enabled for your region is to display the available list of voices.
list_voices_response = ai_speech_client.list_voices(
    compartment_id=COMPARTMENT_ID,
    display_name="Text-to-Speech")
#    opc_request_id="1GD0CV5QIIS1RFPFIOLF<unique_ID>")

# Get the data from response
print(list_voices_response.data)
This produces a long json object with many characteristics of the available voices. A simpler listing gives the names and gender)
for i in range(len(list_voices_response.data.items)):
    print(list_voices_response.data.items[i].display_name + ' [' + list_voices_response.data.items[i].gender + ']\t' + list_voices_response.data.items[i].language_description )
------
Brian [MALE]	English (United States)
Annabelle [FEMALE]	English (United States)
Bob [MALE]	English (United States)
Stacy [FEMALE]	English (United States)
Phil [MALE]	English (United States)
Cindy [FEMALE]	English (United States)
Brad [MALE]	English (United States)
Richard [MALE]	English (United States)
Now lets setup a Text-to-Speech example using the simple text, Hello. My name is Brendan and this is an example of using Oracle OCI Speech service. First lets define a function to save the audio to a file.
def save_audi_response(data):
    with open(filename, 'wb') as f:
        for b in data.iter_content():
            f.write(b)
    f.close()
We can now establish a connection, define the text, call the OCI Speech function to create the audio, and then to save the audio file.
import IPython.display as ipd

# Initialize service client with default config file
ai_speech_client = oci.ai_speech.AIServiceSpeechClient(config)

TEXT_DEMO = "Hello. My name is Brendan and this is an example of using Oracle OCI Speech service"

#speech_response = ai_speech_client.synthesize_speech(compartment_id=COMPARTMENT_ID)

speech_response = ai_speech_client.synthesize_speech(
    synthesize_speech_details=oci.ai_speech.models.SynthesizeSpeechDetails(
        text=TEXT_DEMO,
        is_stream_enabled=True,
        compartment_id=COMPARTMENT_ID,

        configuration=oci.ai_speech.models.TtsOracleConfiguration(
            model_family="ORACLE",
            model_details=oci.ai_speech.models.TtsOracleTts2NaturalModelDetails(
                model_name="TTS_2_NATURAL",
                voice_id="Annabelle"),
            speech_settings=oci.ai_speech.models.TtsOracleSpeechSettings(
                text_type="SSML",
                sample_rate_in_hz=18288,
                output_format="MP3",
                speech_mark_types=["WORD"])),

        audio_config=oci.ai_speech.models.TtsBaseAudioConfig(config_type="BASE_AUDIO_CONFIG") #, save_path='I'm not sure what this should be')
    ) )

# Get the data from response
#print(speech_response.data)
save_audi_response(speech_response.data)Translating Text using OCI AI Services
I’ve written several blog posts on using various features and functions of the OCI AI Services, and the most recent of these have been about some of the Language features. In this blog post, I’ll show you how to use the OCI Language Translation service.
As with the previous posts, there is some initial configuration and setup for your computer to access the OCI cloud services. Check out my previous posts on this. The following examples assume you have that configuration setup.
The OCI Translation service can translate text into over 30 different languages, with more being added over time.
There are 3 things needed to use the Translation Service. The Text to be translated, what language that text is in and what language you’d like the text translated into. Sounds simple. Well, it kind of is, but some care is needed to ensure it all works smoothly.
Let’s start with the basic setup of importing libraries, reading the config file and initialising the OCI AI Client.
import oci
from oci.config import from_file

#Read in config file - this is needed for connecting to the OCI AI Services
#COMPARTMENT_ID = "ocid1.tenancy.oc1..aaaaaaaaop3yssfqnytz5uhc353cmel22duc4xn2lnxdr4f4azmi2fqga4qa"
CONFIG_PROFILE = "DEFAULT"
config = oci.config.from_file('~/.oci/config', profile_name=CONFIG_PROFILE)
###
ai_language_client = oci.ai_language.AIServiceLanguageClient(config)
Next, we can define what text we want to translate and what Language we want to translate the text into. In this case, I want to translate the text into French and to do so, we need to use the language abbreviation.
text_to_trans = "Hello. My name is Brendan and this is an example of using Oracle OCI Language translation service"
print(text_to_trans)
target_lang = "fr"
Next, we need to prepare the text and then send it to the translation service. Then, print the returned object
t_doc = oci.ai_language.models.TextDocument(key="Demo", text=text_to_trans, language_code="en")
trans_response = ai_language_client.batch_language_translation(oci.ai_language.models.BatchLanguageTranslationDetails(documents=[t_doc], target_language_code=target_lang))
print(trans_response.data)
The returned translated object is the following.
{
  "documents": [
    {
      "key": "Demo",
      "source_language_code": "en",
      "target_language_code": "fr",
      "translated_text": "Bonjour. Je m'appelle Brendan et voici un exemple d'utilisation du service de traduction Oracle OCI Language"
    }
  ],
  "errors": []
}
We can automate this process a little to automatically detect the input language. For example:
source_lang = ai_language_client.detect_dominant_language(oci.ai_language.models.DetectLanguageSentimentsDetails(text=text_to_trans))

t_doc = oci.ai_language.models.TextDocument(key="Demo", text=text_to_trans, language_code=source_lang.data.languages[0].code)
trans_response = ai_language_client.batch_language_translation(oci.ai_language.models.BatchLanguageTranslationDetails(documents=[t_doc], target_language_code=target_lang))
print(trans_response.data)
And we can also automate the translation into multiple different langues.
text_to_trans = "Hello. My name is Brendan and this is an example of using Oracle OCI Language translation service"
print(text_to_trans)
#target_lang = "fr"
target_lang = {"fr":"French", "nl":"Dutch", "de":"German", "it":"Italian", "ja":"Japaneese", "ko":"Korean", "pl":"polish"}

for lang_key, lang_name in target_lang.items():
    t_doc = oci.ai_language.models.TextDocument(key="Demo", text=text_to_trans, language_code="en")
    trans_response = ai_language_client.batch_language_translation(oci.ai_language.models.BatchLanguageTranslationDetails(documents=[t_doc], target_language_code=lang_key))
    ####
    print('    [' +  lang_name + '] ' + trans_response.data.documents[0].translated_text)
Hello. My name is Brendan and this is an example of using Oracle OCI Language translation service
[French] Bonjour. Je m'appelle Brendan et voici un exemple d'utilisation du service de traduction Oracle OCI Language
[Dutch] Hallo. Mijn naam is Brendan en dit is een voorbeeld van het gebruik van de Oracle OCI Language vertaalservice.
[German] Hallo. Mein Name ist Brendan und dies ist ein Beispiel für die Verwendung des Oracle OCI Language-Übersetzungsservice
[Italian] Ciao. Il mio nome è Brendan e questo è un esempio di utilizzo del servizio di traduzione di Oracle OCI Language
[Japaneese] こんにちは。私の名前はBrendanで、これはOracle OCI Language翻訳サービスの使用例です
[Korean] 안녕하세요. 내 이름은 브렌단이며 Oracle OCI 언어 번역 서비스를 사용하는 예입니다.
[polish] Dzień dobry. Nazywam się Brendan i jest to przykład korzystania z usługi tłumaczeniowej OCI LanguageUnlock Text Analytics with Oracle OCI Python – Part 2
This is my second post on using Oracle OCI Language service to perform Text Analytics. These include Language Detection, Text Classification, Sentiment Analysis, Key Phrase Extraction, Named Entity Recognition, Private Data detection and masking, and Healthcare NLP.
In my Previous post (Part 1), I covered examples on Language Detection, Text Classification and Sentiment Analysis.
In this post (Part 2), I’ll cover:
- Key Phrase
- Named Entity Recognition
- Detect private information and marking
Make sure you check out Part 1 for details on setting up the client and establishing a connection. These details are omitted in the examples below.
Key Phrase Extraction
With Key Phrase Extraction, it aims to identify the key works and/or phrases from the text. The keywords/phrases are selected based on what are the main topics in the text along with the confidence score. The text is parsed to extra the words/phrase that are important in the text. This can aid with identifying the key aspects of the document without having to read it. Care is needed as these words/phrases do not represent the meaning implied in the text.
Using some of the same texts used in Part-1, let’s see what gets generated for the text about a Hotel experience.
t_doc = oci.ai_language.models.TextDocument(
    key="Demo",
    text="This hotel is a bad place, I would strongly advise against going there. There was one helpful member of staff",
    language_code="en")

key_phrase = ai_language_client.batch_detect_language_key_phrases((oci.ai_language.models.BatchDetectLanguageKeyPhrasesDetails(documents=[t_doc])))

print(key_phrase.data)
print('==========')
for i in range(len(key_phrase.data.documents)):
        for j in range(len(key_phrase.data.documents[i].key_phrases)):
            print("phrase: ", key_phrase.data.documents[i].key_phrases[j].text +' [' + str(key_phrase.data.documents[i].key_phrases[j].score) + ']')
{
"documents": [
{
"key": "Demo",
"key_phrases": [
{
"score": 0.9998106383818767,
"text": "bad place"
},
{
"score": 0.9998106383818767,
"text": "one helpful member"
},
{
"score": 0.9944029848214838,
"text": "staff"
},
{
"score": 0.9849306609397931,
"text": "hotel"
}
],
"language_code": "en"
}
],
"errors": []
}
==========
phrase: bad place [0.9998106383818767]
phrase: one helpful member [0.9998106383818767]
phrase: staff [0.9944029848214838]
phrase: hotel [0.9849306609397931]The output from the Key Phrase Extraction is presented into two formats about. The first is the JSON object returned from the function, containing the phrases and their confidence score. The second (below the ==========) is a formatted version of the same JSON object but parsed to extract and present the data in a more compact manner.
The next piece of text to be examined is taken from an article on the F1 website about a change of divers.
text_f1 = "Red Bull decided to take swift action after Liam Lawsons difficult start to the 2025 campaign, demoting him to Racing Bulls and promoting Yuki Tsunoda to the senior team alongside reigning world champion Max Verstappen. F1 Correspondent Lawrence Barretto explains why… Sergio Perez had endured a painful campaign that saw him finish a distant eighth in the Drivers Championship for Red Bull last season – while team mate Verstappen won a fourth successive title – and after sticking by him all season, the team opted to end his deal early after Abu Dhabi finale."

t_doc = oci.ai_language.models.TextDocument(
    key="Demo",
    text=text_f1,
    language_code="en")

key_phrase = ai_language_client.batch_detect_language_key_phrases(oci.ai_language.models.BatchDetectLanguageKeyPhrasesDetails(documents=[t_doc]))
print(key_phrase.data)
print('==========')
for i in range(len(key_phrase.data.documents)):
        for j in range(len(key_phrase.data.documents[i].key_phrases)):
            print("phrase: ", key_phrase.data.documents[i].key_phrases[j].text +' [' + str(key_phrase.data.documents[i].key_phrases[j].score) + ']')
I won’t include all the output and the following shows the key phrases in the compact format
phrase:  red bull [0.9991468440416812]
phrase:  swift action [0.9991468440416812]
phrase:  liam lawsons difficult start [0.9991468440416812]
phrase:  2025 campaign [0.9991468440416812]
phrase:  racing bulls [0.9991468440416812]
phrase:  promoting yuki tsunoda [0.9991468440416812]
phrase:  senior team [0.9991468440416812]
phrase:  sergio perez [0.9991468440416812]
phrase:  painful campaign [0.9991468440416812]
phrase:  drivers championship [0.9991468440416812]
phrase:  red bull last season [0.9991468440416812]
phrase:  team mate verstappen [0.9991468440416812]
phrase:  fourth successive title [0.9991468440416812]
phrase:  all season [0.9991468440416812]
phrase:  abu dhabi finale [0.9991468440416812]
phrase:  team [0.9420016064526977]
While some aspects of this is interesting, care is needed to not overly rely upon it. It really depends on the usecase.
Named Entity Recognition
For Named Entity Recognition is a natural language process for finding particular types of entities listed as words or phrases in the text. The named entities are a defined list of items. For OCI Language there is a list available here. Some named entities have a sub entities. The return JSON object from the function has a format like the following.
{
  "documents": [
    {
      "entities": [
        {
          "length": 5,
          "offset": 5,
          "score": 0.969588577747345,
          "sub_type": "FACILITY",
          "text": "hotel",
          "type": "LOCATION"
        },
        {
          "length": 27,
          "offset": 82,
          "score": 0.897526216506958,
          "sub_type": null,
          "text": "one helpful member of staff",
          "type": "QUANTITY"
        }
      ],
      "key": "Demo",
      "language_code": "en"
    }
  ],
  "errors": []
}
For each named entity discovered the returned object will contain the Text identifed, the Entity Type, the Entity Subtype, Confidence Score, offset and length.
Using the text samples used previous, let’s see what gets produced. The first example is for the hotel review.
t_doc = oci.ai_language.models.TextDocument(
    key="Demo",
    text="This hotel is a bad place, I would strongly advise against going there. There was one helpful member of staff",
    language_code="en")

named_entities = ai_language_client.batch_detect_language_entities(
            batch_detect_language_entities_details=oci.ai_language.models.BatchDetectLanguageEntitiesDetails(documents=[t_doc]))

for i in range(len(named_entities.data.documents)):
        for j in range(len(named_entities.data.documents[i].entities)):
            print("Text: ", named_entities.data.documents[i].entities[j].text, ' [' + named_entities.data.documents[i].entities[j].type + ']'
                 + '[' + str(named_entities.data.documents[i].entities[j].sub_type) + ']' + '{offset:'
                 + str(named_entities.data.documents[i].entities[j].offset) + '}')
Text: hotel [LOCATION][FACILITY]{offset:5}
Text: one helpful member of staff [QUANTITY][None]{offset:82}The last two lines above are the formatted output of the JSON object. It contains two named entities. The first one is for the text “hotel” and it has a Entity Type of Location, and a Sub Entitity Type of Location. The second named entity is for a long piece of string and for this it has a Entity Type of Quantity, but has no Sub Entity Type.
Now let’s see what is creates for the F1 text. (the text has been given above and the code is very similar/same as above).
Text:  Red Bull  [ORGANIZATION][None]{offset:0}
Text:  swift  [ORGANIZATION][None]{offset:25}
Text:  Liam Lawsons  [PERSON][None]{offset:44}
Text:  2025  [DATETIME][DATE]{offset:80}
Text:  Yuki Tsunoda  [PERSON][None]{offset:138}
Text:  senior  [QUANTITY][AGE]{offset:158}
Text:  Max Verstappen  [PERSON][None]{offset:204}
Text:  F1  [ORGANIZATION][None]{offset:220}
Text:  Lawrence Barretto  [PERSON][None]{offset:237}
Text:  Sergio Perez  [PERSON][None]{offset:269}
Text:  campaign  [EVENT][None]{offset:304}
Text:  eighth in the  [QUANTITY][None]{offset:343}
Text:  Drivers Championship  [EVENT][None]{offset:357}
Text:  Red Bull  [ORGANIZATION][None]{offset:382}
Text:  Verstappen  [PERSON][None]{offset:421}
Text:  fourth successive title  [QUANTITY][None]{offset:438}
Text:  Abu Dhabi  [LOCATION][GPE]{offset:545}
Detect Private Information and Marking
The ability to perform data masking has been available in SQL for a long time. There are lots of scenarios where masking is needed and you are not using a Database or not at that particular time.
With Detect Private Information or Personal Identifiable Information the OCI AI function search for data that is personal and gives you options on how to present this back to the users. Examples of the types of data or Entity Types it will detect include Person, Adddress, Age, SSN, Passport, Phone Numbers, Bank Accounts, IP Address, Cookie details, Private and Public keys, various OCI related information, etc. The list goes on. Check out the documentation for more details on these. Unfortunately the documentation for how the Python API works is very limited.
The examples below illustrate some of the basic options. But there is lots more you can do with this feature like defining you own rules.
For these examples, I’m going to use the following text which I’ve assigned to a variable called text_demo.
Hi Martin. Thanks for taking my call on 1/04/2025. Here are the details you requested. My Bank Account Number is 1234-5678-9876-5432 and my Bank Branch is Main Street, Dublin. My Date of Birth is 29/02/1993 and I’ve been living at my current address for 15 years. Can you also update my email address to brendan.tierney@email.com. If toy have any problems with this you can contact me on +353-1-493-1111. Thanks for your help. Brendan.
m_mode = {"ALL":{"mode":'MASK'}}

t_doc = oci.ai_language.models.TextDocument(key="Demo", text=text_demo,language_code="en")

pii_entities = ai_language_client.batch_detect_language_pii_entities(oci.ai_language.models.BatchDetectLanguagePiiEntitiesDetails(documents=[t_doc], masking=m_mode))

print(text_demo)
print('--------------------------------------------------------------------------------')
print(pii_entities.data.documents[0].masked_text)
print('--------------------------------------------------------------------------------')
for i in range(len(pii_entities.data.documents)):
        for j in range(len(pii_entities.data.documents[i].entities)):
            print("phrase: ", pii_entities.data.documents[i].entities[j].text +' [' + str(pii_entities.data.documents[i].entities[j].type) + ']')
Hi Martin. Thanks for taking my call on 1/04/2025. Here are the details you requested. My Bank Account Number is 1234-5678-9876-5432 and my Bank Branch is Main Street, Dublin. My Date of Birth is 29/02/1993 and I've been living at my current address for 15 years. Can you also update my email address to brendan.tierney@email.com. If toy have any problems with this you can contact me on +353-1-493-1111. Thanks for your help. Brendan.
--------------------------------------------------------------------------------
Hi ******. Thanks for taking my call on *********. Here are the details you requested. My Bank Account Number is ******************* and my Bank Branch is Main Street, Dublin. My Date of Birth is ********** and I've been living at my current address for ********. Can you also update my email address to *************************. If toy have any problems with this you can contact me on ***************. Thanks for your help. *******.
--------------------------------------------------------------------------------
phrase:  Martin [PERSON]
phrase:  1/04/2025 [DATE_TIME]
phrase:  1234-5678-9876-5432 [CREDIT_DEBIT_NUMBER]
phrase:  29/02/1993 [DATE_TIME]
phrase:  15 years [DATE_TIME]
phrase:  brendan.tierney@email.com [EMAIL]
phrase:  +353-1-493-1111 [TELEPHONE_NUMBER]
phrase:  Brendan [PERSON]
The above this the basic level of masking.
A second option is to use the REMOVE mask. For this, change the mask format to the following.
m_mode = {"ALL":{'mode':'REMOVE'}} For this option the indentified information is removed from the text.
Hi . Thanks for taking my call on . Here are the details you requested. My Bank Account Number is  and my Bank Branch is Main Street, Dublin. My Date of Birth is  and I've been living at my current address for . Can you also update my email address to . If toy have any problems with this you can contact me on . Thanks for your help. .
--------------------------------------------------------------------------------
phrase:  Martin [PERSON]
phrase:  1/04/2025 [DATE_TIME]
phrase:  1234-5678-9876-5432 [CREDIT_DEBIT_NUMBER]
phrase:  29/02/1993 [DATE_TIME]
phrase:  15 years [DATE_TIME]
phrase:  brendan.tierney@email.com [EMAIL]
phrase:  +353-1-493-1111 [TELEPHONE_NUMBER]
phrase:  Brendan [PERSON]
For the REPLACE option we have.
m_mode = {"ALL":{'mode':'REPLACE'}} Which gives us the following, where we can see the key information is removed and replace with the name of Entity Type.
Hi <PERSON>. Thanks for taking my call on <DATE_TIME>. Here are the details you requested. My Bank Account Number is <CREDIT_DEBIT_NUMBER> and my Bank Branch is Main Street, Dublin. My Date of Birth is <DATE_TIME> and I've been living at my current address for <DATE_TIME>. Can you also update my email address to <EMAIL>. If toy have any problems with this you can contact me on <TELEPHONE_NUMBER>. Thanks for your help. <PERSON>.
--------------------------------------------------------------------------------
phrase:  Martin [PERSON]
phrase:  1/04/2025 [DATE_TIME]
phrase:  1234-5678-9876-5432 [CREDIT_DEBIT_NUMBER]
phrase:  29/02/1993 [DATE_TIME]
phrase:  15 years [DATE_TIME]
phrase:  brendan.tierney@email.com [EMAIL]
phrase:  +353-1-493-1111 [TELEPHONE_NUMBER]
phrase:  Brendan [PERSON]
We can also change the character used for the masking. In this example we change the masking character to + symbol.
m_mode = {"ALL":{'mode':'MASK','maskingCharacter':'+'}} Hi ++++++. Thanks for taking my call on +++++++++. Here are the details you requested. My Bank Account Number is +++++++++++++++++++ and my Bank Branch is Main Street, Dublin. My Date of Birth is ++++++++++ and I've been living at my current address for ++++++++. Can you also update my email address to +++++++++++++++++++++++++. If toy have any problems with this you can contact me on +++++++++++++++. Thanks for your help. +++++++.I mentioned at the start of this section there was lots of options available to you, including defining your own rules, using regular expressions, etc. Let me know if you’re interested in exploring some of these and I can share a few more examples.
Unlock Text Analytics with Oracle OCI Python – Part 1
Oracle OCI has a number of features that allows you to perform Text Analytics such as Language Detection, Text Classification, Sentiment Analysis, Key Phrase Extraction, Named Entity Recognition, Private Data detection and masking, and Healthcare NLP.

While some of these have particular (and in some instances limited) use cases, the following examples will illustrate some of the main features using the OCI Python library. Why am I using Python to illustrate these? This is because most developers are using Python to build applications.
In this post, the Python examples below will cover the following:
- Language Detection
- Text Classification
- Sentiment Analysis
In my next post on this topic, I’ll cover:
- Key Phrase
- Named Entity Recognition
- Detect private information and marking
Before you can use any of the OCI AI Services, you need to set up a config file on your computer. This will contain the details necessary to establish a secure connection to your OCI tendency. Check out this blog post about setting this up.
The following Python examples illustrate what is possible for each feature. In the first example, I include what is needed for the config file. This is not repeated in the examples that follow, but it is still needed.
Language Detection
Let’s begin with a simple example where we provide a simple piece of text and as OCI Language Service, using OCI Python, to detect the primary language for the text and display some basic information about this prediction.
import oci
from oci.config import from_file

#Read in config file - this is needed for connecting to the OCI AI Services
CONFIG_PROFILE = "DEFAULT"
config = oci.config.from_file('~/.oci/config', profile_name=CONFIG_PROFILE)
###

ai_language_client = oci.ai_language.AIServiceLanguageClient(config)

# French :
text_fr = "Bonjour et bienvenue dans l'analyse de texte à l'aide de ce service cloud"

response = ai_language_client.detect_dominant_language(
    oci.ai_language.models.DetectLanguageSentimentsDetails(
        text=text_fr
    )
)

print(response.data.languages[0].name)
----------
French
In this example, I’ve a simple piece of French (for any native French speakers, I do apologise). We can see the language was identified as French. Let’s have a closer look at what is returned by the OCI function.
print(response.data)
----------
{
  "languages": [
    {
      "code": "fr",
      "name": "French",
      "score": 1.0
    }
  ]
}
We can see from the above, the object contains the language code, the full name of the language and the score to indicate how strong or how confident the function is with the prediction. When the text contains two or more languages, the function will return the primary language used.
Note: OCI Language can detect at least 113 different languages. Check out the full list here.
Let’s give it a try with a few other languages, including Irish, which localised to certain parts of Ireland. Using the same code as above, I’ve included the same statement (google) translated into other languages. The code loops through each text statement and detects the language.
import oci
from oci.config import from_file

###
CONFIG_PROFILE = "DEFAULT"
config = oci.config.from_file('~/.oci/config', profile_name=CONFIG_PROFILE)
###

ai_language_client = oci.ai_language.AIServiceLanguageClient(config)

# French :
text_fr = "Bonjour et bienvenue dans l'analyse de texte à l'aide de ce service cloud"
# German:
text_ger = "Guten Tag und willkommen zur Textanalyse mit diesem Cloud-Dienst"
# Danish
text_dan = "Goddag, og velkommen til at analysere tekst ved hjælp af denne skytjeneste"
# Italian
text_it = "Buongiorno e benvenuti all'analisi del testo tramite questo servizio cloud"
# English:
text_eng = "Good day, and welcome to analysing text using this cloud service"
# Irish
text_irl = "Lá maith, agus fáilte romhat chuig anailís a dhéanamh ar théacs ag baint úsáide as an tseirbhís scamall seo"

for text in [text_eng, text_ger, text_dan, text_it, text_irl]:
    response = ai_language_client.detect_dominant_language(
        oci.ai_language.models.DetectLanguageSentimentsDetails(
            text=text
        )
    )
    print('[' + response.data.languages[0].name + ' ('+ str(response.data.languages[0].score) +')' + '] '+ text)

----------
[English (1.0)] Good day, and welcome to analysing text using this cloud service
[German (1.0)] Guten Tag und willkommen zur Textanalyse mit diesem Cloud-Dienst
[Danish (1.0)] Goddag, og velkommen til at analysere tekst ved hjælp af denne skytjeneste
[Italian (1.0)] Buongiorno e benvenuti all'analisi del testo tramite questo servizio cloud
[Irish (1.0)] Lá maith, agus fáilte romhat chuig anailís a dhéanamh ar théacs ag baint úsáide as an tseirbhís scamall seo
When you run this code yourself, you’ll notice how quick the response time is for each.
Text Classification
Now that we can perform some simple language detections, we can move on to some more insightful functions. The first of these is Text Classification. With Text Classification, it will analyse the text to identify categories and a confidence score of what is covered in the text. Let’s have a look at an example using the English version of the text used above. This time, we need to perform two steps. The first is to set up and prepare the document to be sent. The second step is to perform the classification.
### Text Classification
text_document = oci.ai_language.models.TextDocument(key="Demo", text=text_eng, language_code="en")
text_class_resp = ai_language_client.batch_detect_language_text_classification(
            batch_detect_language_text_classification_details=oci.ai_language.models.BatchDetectLanguageTextClassificationDetails(
                documents=[text_document]
            )
        )
print(text_class_resp.data)
----------
{
  "documents": [
    {
      "key": "Demo",
      "language_code": "en",
      "text_classification": [
        {
          "label": "Internet and Communications/Web Services",
          "score": 1.0
        }
      ]
    }
  ],
  "errors": []
}
We can see it has correctly identified the text is referring to or is about “Internet and Communications/Web Services”. For a second example, let’s use some text about F1. The following is taken from an article on F1 app and refers to the recent Driver issues, and we’ll use the first two paragraphs.
{
  "documents": [
    {
      "key": "Demo",
      "language_code": "en",
      "text_classification": [
        {
          "label": "Sports and Games/Motor Sports",
          "score": 1.0
        }
      ]
    }
  ],
  "errors": []
}
We can format this response object as follows.
print(text_class_resp.data.documents[0].text_classification[0].label
      + ' [' + str(text_class_resp.data.documents[0].text_classification[0].score) + ']')
----------
Sports and Games/Motor Sports [1.0]
It is possible to get multiple classifications being returned. To handle this we need to use a couple of loops.
for i in range(len(text_class_resp.data.documents)):
        for j in range(len(text_class_resp.data.documents[i].text_classification)):
            print("Label: ", text_class_resp.data.documents[i].text_classification[j].label)
            print("Score: ", text_class_resp.data.documents[i].text_classification[j].score)
----------
Label:  Sports and Games/Motor Sports
Score:  1.0
Yet again, it correctly identified the type of topic area for the text. At this point, you are probably starting to get ideas about how this can be used and in what kinds of scenarios. This list will probably get longer over time.
Sentiement Analysis
For Sentiment Analysis we are looking to gauge the mood or tone of a text. For example, we might be looking to identify opinions, appraisals, emotions, attitudes towards a topic or person or an entity. The function returned an object containing a positive, neutral, mixed and positive sentiments and a confidence score. This feature currently supports English and Spanish.
The Sentiment Analysis function provides two way of analysing the text:
- At a Sentence level
- Looks are certain Aspects of the text. This identifies parts/words/phrase and determines the sentiment for each
Let’s start with the Sentence level Sentiment Analysis with a piece of text containing two sentences with both negative and positive sentiments.
#Sentiment analysis
text = "This hotel was in poor condition and I'd recommend not staying here. There was one helpful member of staff"

text_document = oci.ai_language.models.TextDocument(key="Demo", text=text, language_code="en")
text_doc=oci.ai_language.models.BatchDetectLanguageSentimentsDetails(documents=[text_document])

text_sentiment_resp = ai_language_client.batch_detect_language_sentiments(text_doc, level=["SENTENCE"])

print (text_sentiment_resp.data)
The response object gives us:
{
  "documents": [
    {
      "aspects": [],
      "document_scores": {
        "Mixed": 0.3458947,
        "Negative": 0.41229093,
        "Neutral": 0.0061426135,
        "Positive": 0.23567174
      },
      "document_sentiment": "Negative",
      "key": "Demo",
      "language_code": "en",
      "sentences": [
        {
          "length": 68,
          "offset": 0,
          "scores": {
            "Mixed": 0.17541811,
            "Negative": 0.82458186,
            "Neutral": 0.0,
            "Positive": 0.0
          },
          "sentiment": "Negative",
          "text": "This hotel was in poor condition and I'd recommend not staying here."
        },
        {
          "length": 37,
          "offset": 69,
          "scores": {
            "Mixed": 0.5163713,
            "Negative": 0.0,
            "Neutral": 0.012285227,
            "Positive": 0.4713435
          },
          "sentiment": "Mixed",
          "text": "There was one helpful member of staff"
        }
      ]
    }
  ],
  "errors": []
}
There are two parts to this object. The first part gives us the overall Sentiment for the text, along with the confidence scores for all possible sentiments. The second part of the object breaks the test into individual sentences and gives the Sentiment and confidence scores for the sentence. Overall, the text used in “Negative” with a confidence score of 0.41229093. When we look at the sentences, we can see the first sentence is “Negative” and the second sentence is “Mixed”.
When we switch to using Aspect we can see the difference in the response.
text_sentiment_resp = ai_language_client.batch_detect_language_sentiments(text_doc, level=["ASPECT"])

print (text_sentiment_resp.data)
The response object gives us:
{
  "documents": [
    {
      "aspects": [
        {
          "length": 5,
          "offset": 5,
          "scores": {
            "Mixed": 0.17299445074935532,
            "Negative": 0.8268503302365734,
            "Neutral": 0.0,
            "Positive": 0.0001552190140712097
          },
          "sentiment": "Negative",
          "text": "hotel"
        },
        {
          "length": 9,
          "offset": 23,
          "scores": {
            "Mixed": 0.0020200687053503,
            "Negative": 0.9971282906307877,
            "Neutral": 0.0,
            "Positive": 0.0008516406638620019
          },
          "sentiment": "Negative",
          "text": "condition"
        },
        {
          "length": 6,
          "offset": 91,
          "scores": {
            "Mixed": 0.0,
            "Negative": 0.002300517913679934,
            "Neutral": 0.023815747524769032,
            "Positive": 0.973883734561551
          },
          "sentiment": "Positive",
          "text": "member"
        },
        {
          "length": 5,
          "offset": 101,
          "scores": {
            "Mixed": 0.10319573538533408,
            "Negative": 0.2070680870320537,
            "Neutral": 0.0,
            "Positive": 0.6897361775826122
          },
          "sentiment": "Positive",
          "text": "staff"
        }
      ],
      "document_scores": {},
      "document_sentiment": "",
      "key": "Demo",
      "language_code": "en",
      "sentences": []
    }
  ],
  "errors": []
}
The different aspects are extracted, and the sentiment for each within the text is determined. What you need to look out for are the labels “text” and “sentiment.
Using Python for OCI Vision – Part 1
I’ve written a few blog posts over the past few weeks/months on how to use OCI Vision, which is part of the Oracle OCI AI Services. My blog posts have shown how to get started with OCI Vision, right up to creating your own customer models using this service.
In this post, the first in a series of blog posts, I’ll give you some examples of how to use these custom AI Vision models using Python. Being able to do this, opens the models you create to a larger audience of developers, who can now easily integrate these custom models into their applications.
In a previous post, I covered how to setup and configure your OCI connection. Have a look at that post as you will need to have completed the steps in it before you can follow the steps below.
To inspect the config file we can spool the contents of that file
!cat ~/.oci/config
I’ve hidden some of the details as these are related to my Oracle Cloud accountThis allows us to quickly inspect that we have everything setup correctly.
The next step is to load this config file, and its settings, into our Python environment.
config = oci.config.from_file()

config
We can now list all the projects I’ve created in my compartment for OCI Vision services.
#My Compartment ID
COMPARTMENT_ID = "<compartment-id>"

#List all the AI Vision Projects available in My compartment
response = ai_service_vision_client.list_projects(compartment_id=COMPARTMENT_ID)

#response.data
for item in response.data.items:
    print('- ', item.display_name)
    print('    ProjectId= ', item.id)
    print('')
Which lists the following OCI Vision projects.

We can also list out all the Models in my various projects. When listing these I print out the OCID of each, as this is needed when we want to use one of these models to process an image. I’ve redacted these as there is a minor cost associated with each time these are called.
#List all the AI Vision Models available in My compartment
list_models = ai_service_vision_client.list_models(
    # this is the compartment containing the model
    compartment_id=COMPARTMENT_ID
)

print("Compartment Id=", COMPARTMENT_ID)
print("")
for item in list_models.data.items:
    print('  ', item.display_name, '--', item.model_type)
    print('     OCID= ',item.id)
    print('     ProjectId= ', item.project_id)
    print('')
I’ll have other posts in this series on using the pre-built and custom model to label different image files on my desktop.
OCI Vision – Creating a Custom Model for Cats and Dogs
In this post, I’ll build on the previous work on preparing data, to using this dataset as input to building a Custom AI Vision model. In the previous post, the dataset was labelled into images containing Cats and Dogs. The following steps takes you through creating the Customer AI Vision model and to test this model using some different images of Cats.
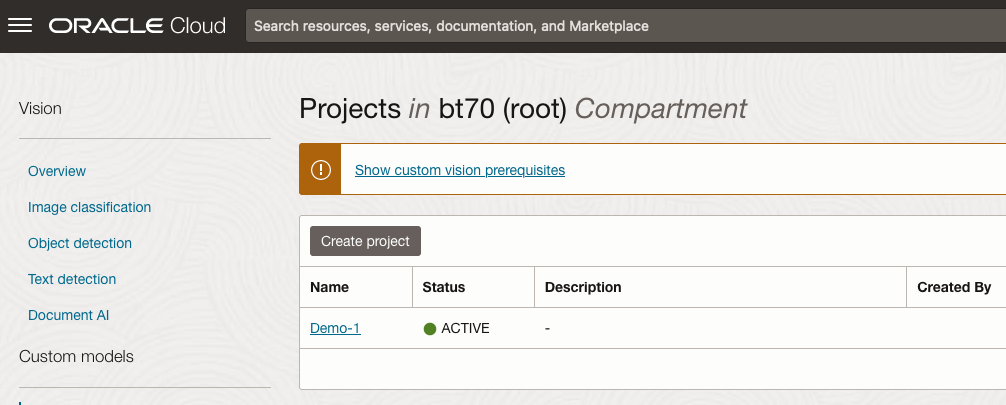
Open the OCI Vision page. On the bottom left-hand side of the menu you will see Projects. Click on this to open the Projects page for creating a Custom AI Vision model.
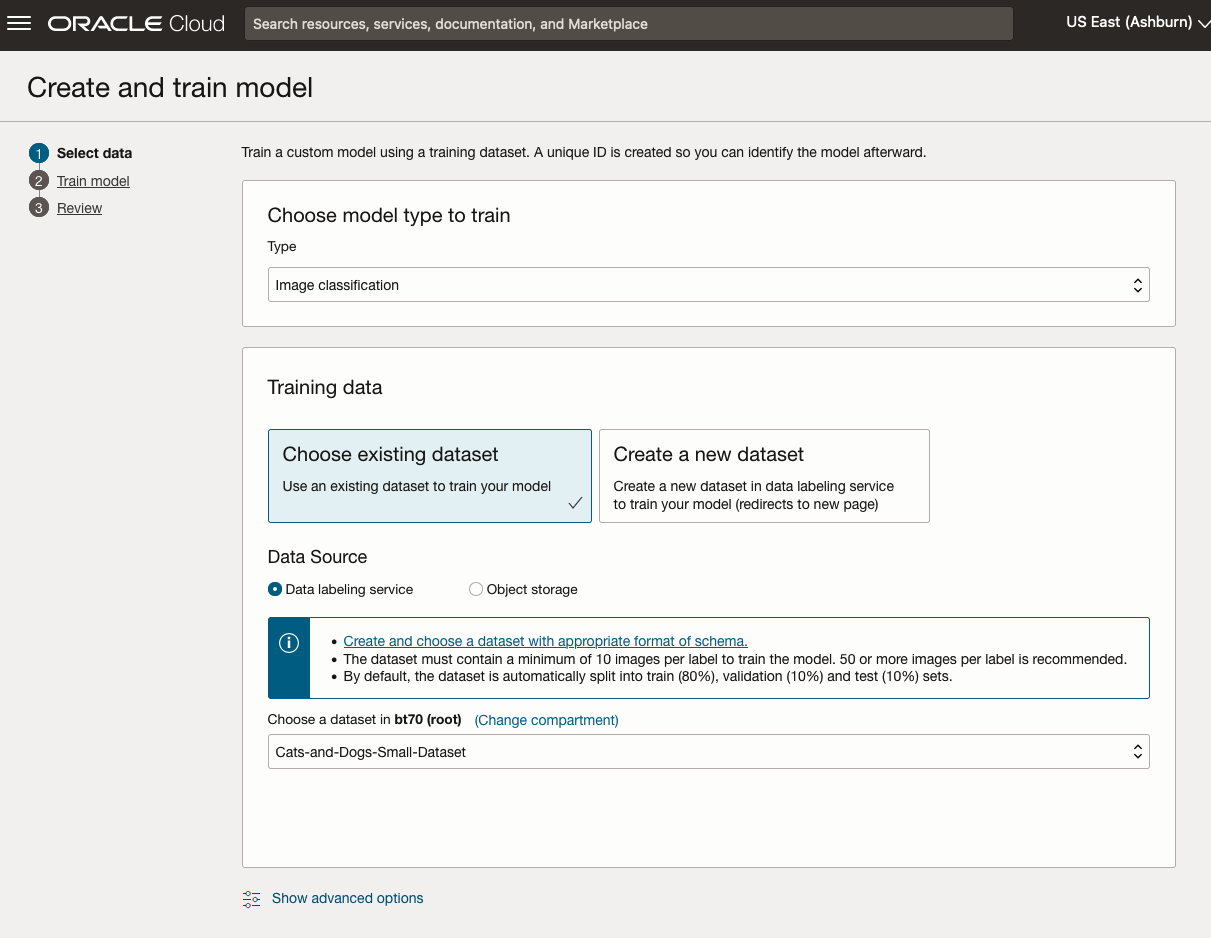
On the Create Projects page, click on the Create Project button. A pop-up window will appear. Enter the name for the model and click on the Create Project bottom at the bottom of the pop-up.

After the Project has been created, click on the project name from the list. This will open the Project specific page. A project can contain multiple models and they will be listed here. For the Cats-and-Dogs project we and to create our model. Click on the Create Model button.
Next, you can define some of the settings for the Model. These include what dataset to use, or upload a new one, define what data labelling to use and the training duration. For this later setting, you can decide how much time you’d like to allocate to creating the custom model. Maybe consider selecting Quick mode, as that will give you a model within a few minutes (or up to an hour), whereas the other options can allow the model process to run for longer and hopefully those will create a more accurate model. As with all machine learning type models, you need to take some time to test which configuration works best for your scenario. In the following, the Quick mode option is selected. When read, click Create Model.

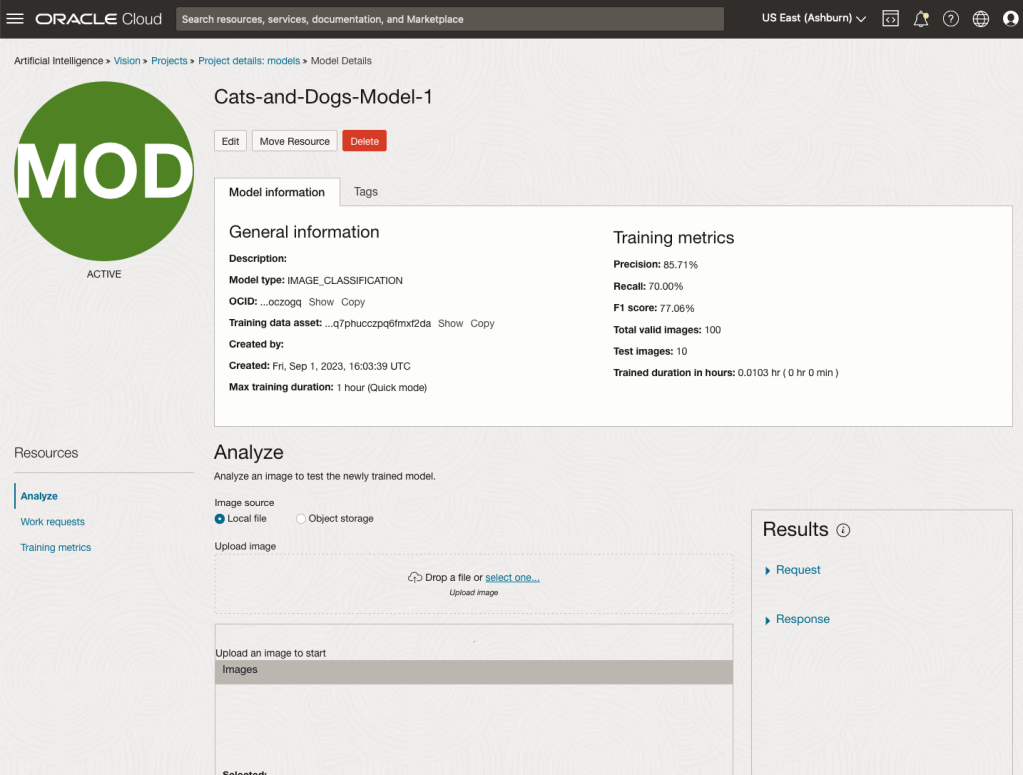
It can take a little bit of time to create the model. We selected the Quick mode, which has a maximum of one hour. In my scenario, the model build process was completed after four minutes. The Precentage Complete is updated during the build allowing you to monitor it’s progress.

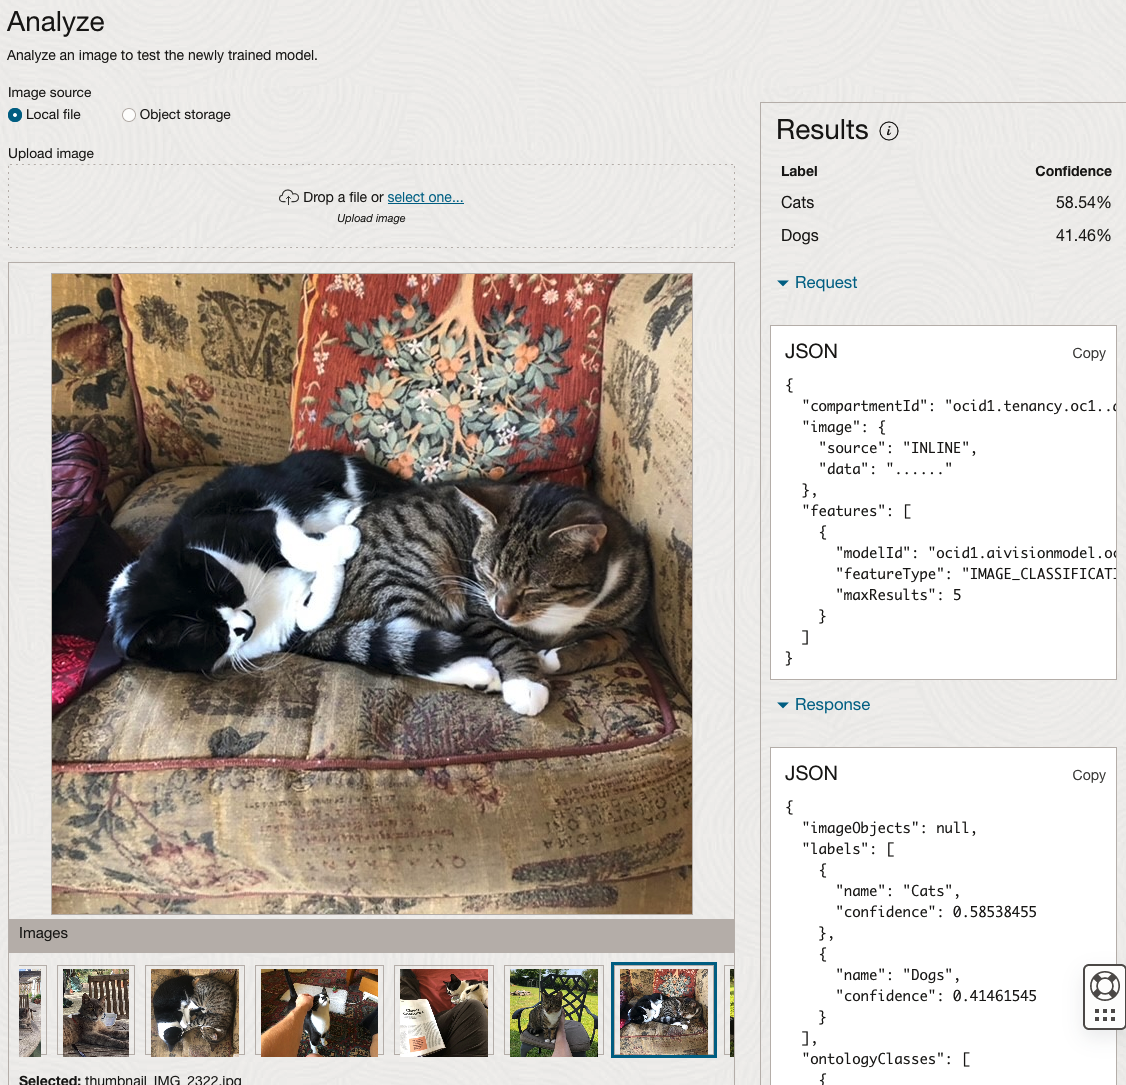
When the model is completed, you can test it using the Model page. Just click on the link for the model and you’ll get a page like the one to the right.
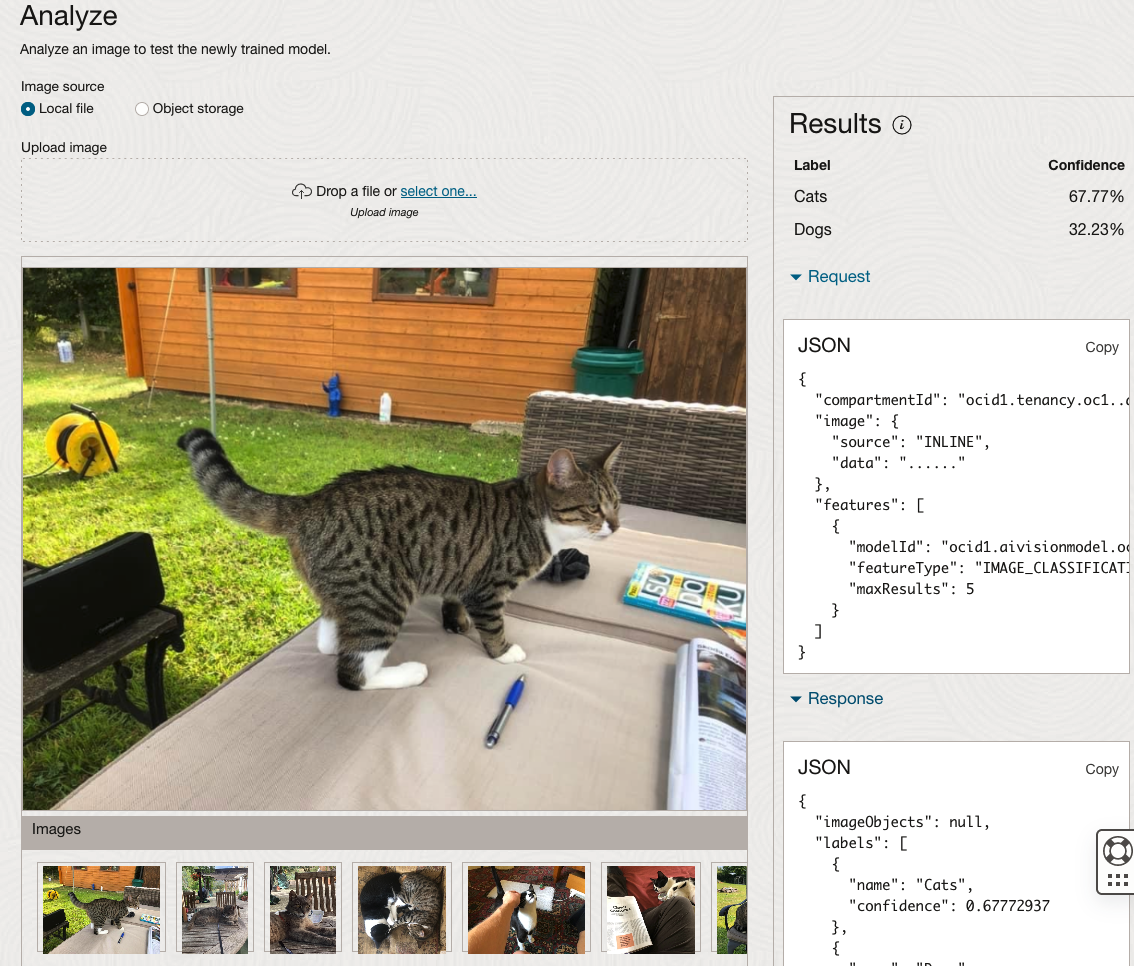
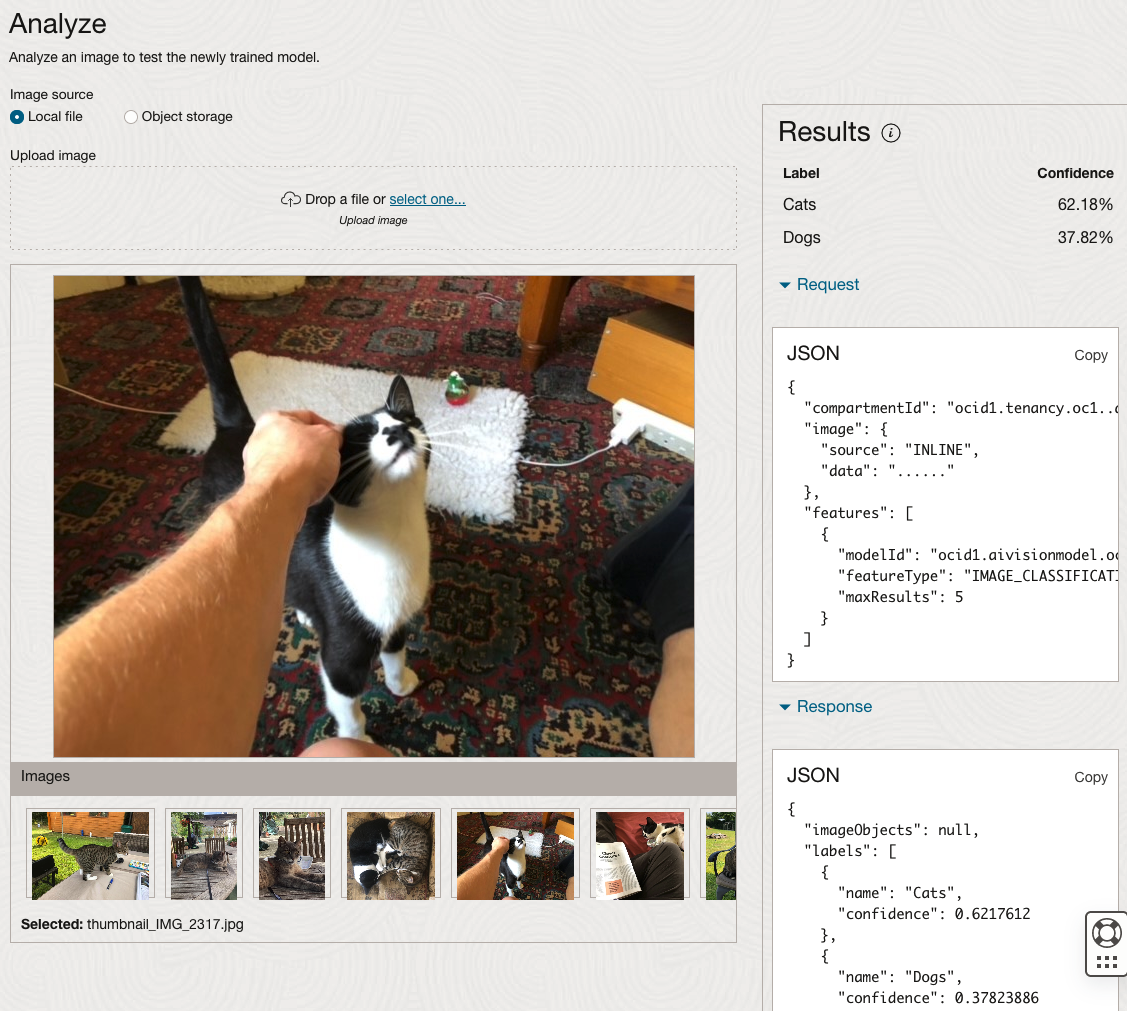
The bottom half of this page allows you to upload and evaluate images. The following images are example images of cats (do you know the owner) and the predictions and information about these are displayed on the screen. Have a look at the following to see which images scored better than others for identifying a Cat.
Oracle OCI AI Services
Oracle Cloud have been introducing new AI Services over the past few months, and we see a few more appearing over the coming few months. When you look at the list you might be a little surprised that these are newly available cloud services from Oracle. You might be surprised for two main reasons. Firstly, AWS and Google have similar cloud services available for some time (many years) now, and secondly, Oracle started talking about having these cloud services many years ago. It has taken some time for these to become publicly available. Although some of these have been included in other applications and offerings from Oracle, so probably they were busy with those before making them available as stand alone services.

These can be located in your Oracle Cloud account from the hamburger menu, as shown below

As you can see most of these AI Services are listed, except for the OCI Forecasting, which is due to be added “soon”. We can also expect to have an OCI Translation services and possibly some additional ones.
- OCI Language: This services can work with over 75 languages and allows you to detect and perform knowledge extraction from the text to include entity identification and labelling, classification of text into more than 600 categories, sentiment analysis and key phrase extraction. This can be used automate knolwedge extraction from customer feedback, product reviews, discussion forums, legal documents, etc
- OCI Speech: Performs Speech to Text, from live streaming of speech, audio and video recordings, etc creating a transcription. It works across English, Spanish and Portuguese, with other languages to be added. A nice little feature includes Profanity filtering, allowing you to tag, remove or mask certain words
- OCI Vision: This has two parts. The first is for processing documents, and is slightly different to OCI Language Service, in that this service looks at processing text documents in jpeg, pdf, png and tiff formats. Text information extraction is performed identifying keep terms, tables, meta-data extraction, table extraction etc. The second part of OCI Vision deals with image analysis and extracting key information from the image such as objects, people, text, image classification, scene detection, etc. You can use either the pretrained models or include your own models.
- OCI Anomaly Detection: Although anomaly detection is available via algorithms in the Database and OCI Data Science offerings, this new services allow for someone with little programming experience to utilise an ensemble of models, including the MSET algorithm, to provide greater accuracy with identifying unusual patterns in the data.
Note: I’ve excluded some services from the above list as these have been available for some time now or have limited AI features included in them. These include OCI Data Labelling, OCI Digital Assistant.
Some of these AI Services, based on the initial release, have limited functionality and resources, but this will change over time.

You must be logged in to post a comment.