
Oracle Always Free
Machine Learning App Migration to Oracle Cloud VM
Over the past few years, I’ve been developing a Stock Market prediction algorithm and made some critical refinements to it earlier this year. As with all analytics, data science, machine learning and AI projects, testing is vital to ensure its performance, accuracy and sustainability. Taking such a project out of a lab environment and putting it into a production setting introduces all sorts of different challenges. Some of these challenges include being able to self-manage its own process, logging, traceability, error and event management, etc. Automation is key and implementing all of these extra requirements tasks way more code and time than developing the actual algorithm. Typically, the machine learning and algorithms code only accounts for less than five percent of the actual code, and in some cases, it can be less than one percent!
I’ve come to the stage of deploying my App to a production-type environment, as I’ve been running it from my laptop and then a desktop for over a year now. It’s now 100% self-managing so it’s time to deploy. The environment I’ve chosen is using one of the Virtual Machines (VM) available on the Oracle Free Tier. This means it won’t cost me a cent (dollar or more) to run my App 24×7.
My App has three different components which use a core underlying machine learning predictions engine. Each is focused on a different set of stock markets. These marks operate in the different timezone of US markets, European Markets and Asian Markets. Each will run on a slightly different schedule than the rest.
The steps outlined below take you through what I had to do to get my App up and running the VM (Oracle Free Tier). It took about 20 minutes to complete everything
The first thing you need to do is create a ssh key file. There are a number of ways of doing this and the following is an example.
ssh-keygen -t rsa -N "" -b 2048 -C "myOracleCloudkey" -f myOracleCloudkey
This key file will be used during the creation of the VM and for logging into the VM.
Log into your Oracle Cloud account and you’ll find the Create Instances Compute i.e. create a virtual machine/

Complete the Create Instance form and upload the ssh file you created earlier. Then click the Create button. This assumes you have networking already created.

It will take a minute or two for the VM to be created and you can monitor the progress.
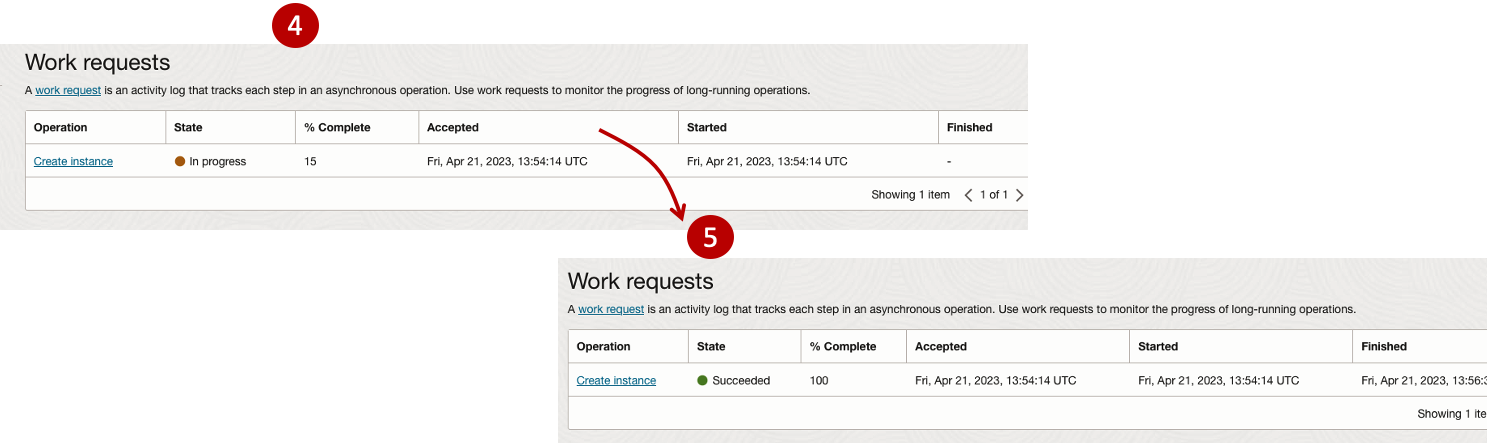
After it has been created you need to click on the start button to start the VM.
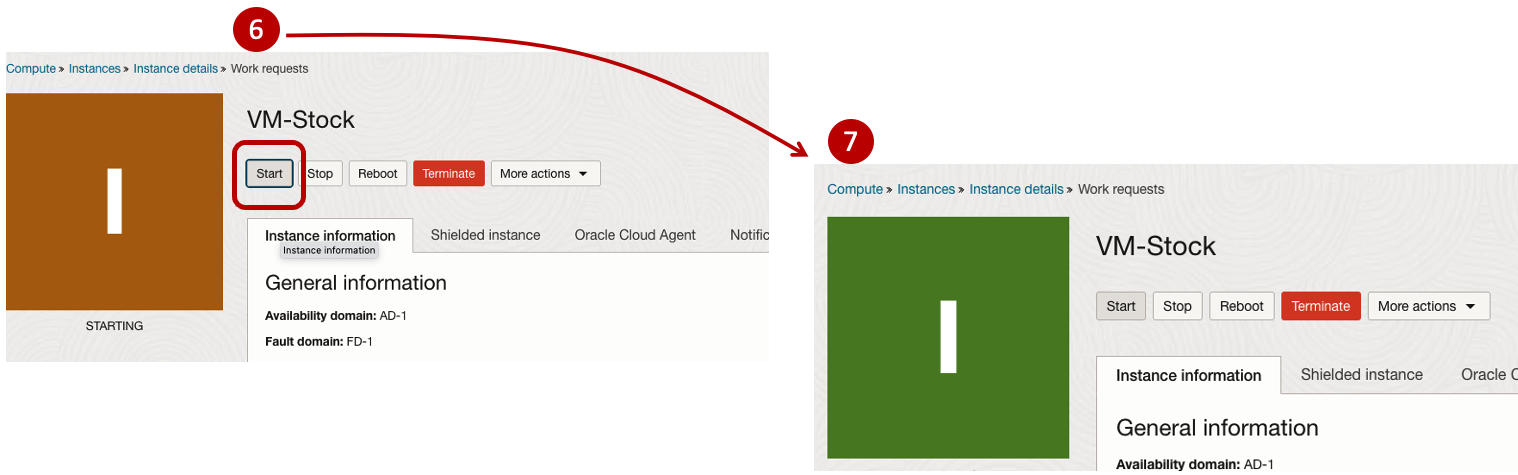
After it has started you can now log into the VM from a terminal window, using the public IP address
ssh -i myOracleCloudKey opc@xxx.xxx.xxx.xxxAfter you’ve logged into the VM it’s a good idea to run an update.
[opc@vm-stocks ~]$ sudo yum -y update
Last metadata expiration check: 0:13:53 ago on Fri 21 Apr 2023 14:39:59 GMT.
Dependencies resolved.
========================================================================================================================
 Package                         Arch       Version                                          Repository            Size
========================================================================================================================
Installing:
 kernel-uek                      aarch64    5.15.0-100.96.32.el8uek                          ol8_UEKR7            1.4 M
 kernel-uek-core                 aarch64    5.15.0-100.96.32.el8uek                          ol8_UEKR7             47 M
 kernel-uek-devel                aarch64    5.15.0-100.96.32.el8uek                          ol8_UEKR7             19 M
 kernel-uek-modules              aarch64    5.15.0-100.96.32.el8uek                          ol8_UEKR7             59 M
Upgrading:
 NetworkManager                  aarch64    1:1.40.0-6.0.1.el8_7                             ol8_baseos_latest    2.1 M
 NetworkManager-config-server    noarch     1:1.40.0-6.0.1.el8_7                             ol8_baseos_latest    141 k
 NetworkManager-libnm            aarch64    1:1.40.0-6.0.1.el8_7                             ol8_baseos_latest    1.9 M
 NetworkManager-team             aarch64    1:1.40.0-6.0.1.el8_7                             ol8_baseos_latest    156 k
 NetworkManager-tui              aarch64    1:1.40.0-6.0.1.el8_7                             ol8_baseos_latest    339 k
...
...
The VM is now ready to setup and install my App. The first step is to install Python, as all my code is written in Python.
[opc@vm-stocks ~]$ sudo yum install -y python39
Last metadata expiration check: 0:20:35 ago on Fri 21 Apr 2023 14:39:59 GMT.
Dependencies resolved.
========================================================================================================================
 Package                         Architecture  Version                                        Repository           Size
========================================================================================================================
Installing:
 python39                        aarch64       3.9.13-2.module+el8.7.0+20879+a85b87b0         ol8_appstream        33 k
Installing dependencies:
 python39-libs                   aarch64       3.9.13-2.module+el8.7.0+20879+a85b87b0         ol8_appstream       8.1 M
 python39-pip-wheel              noarch        20.2.4-7.module+el8.6.0+20625+ee813db2         ol8_appstream       1.1 M
 python39-setuptools-wheel       noarch        50.3.2-4.module+el8.5.0+20364+c7fe1181         ol8_appstream       497 k
Installing weak dependencies:
 python39-pip                    noarch        20.2.4-7.module+el8.6.0+20625+ee813db2         ol8_appstream       1.9 M
 python39-setuptools             noarch        50.3.2-4.module+el8.5.0+20364+c7fe1181         ol8_appstream       871 k
Enabling module streams:
 python39                                      3.9

Transaction Summary
========================================================================================================================
Install  6 Packages

Total download size: 12 M
Installed size: 47 M
Downloading Packages:
(1/6): python39-pip-20.2.4-7.module+el8.6.0+20625+ee813db2.noarch.rpm                    23 MB/s | 1.9 MB     00:00
(2/6): python39-pip-wheel-20.2.4-7.module+el8.6.0+20625+ee813db2.noarch.rpm             5.5 MB/s | 1.1 MB     00:00
...
...
Next copy the code to the VM, setup the environment variables and create any necessary directories required for logging. The final part of this is to download the connection Wallett for the Database. I’m using the Python library oracledb, as this requires no additional setup.
Then install all the necessary Python libraries used in the code, for example, pandas, matplotlib, tabulate, seaborn, telegram, etc (this is just a subset of what I needed). For example here is the command to install pandas.
pip3.9 install pandasAfter all of that, it’s time to test the setup to make sure everything runs correctly.
The final step is to schedule the App/Code to run. Before setting the schedule just do a quick test to see what timezone the VM is running with. Run the date command and you can see what it is. In my case, the VM is running GMT which based on the current time locally, the VM was showing to be one hour off. Allowing for this adjustment and for day-light saving time, the time +/- markets openings can be set. The following example illustrates setting up crontab to run the App, Monday-Friday, between 13:00-22:00 and at 5-minute intervals. Open crontab and edit the schedule and command. The following is an example
> contab -e

*/5 13-22 * * 1-5 python3.9 /home/opc/Stocks.py >Stocks.txt
For some stock market trading apps, you might want it to run more frequently (than every 5 minutes) or less frequently depending on your strategy.
After scheduling the components for each of the Geographic Stock Market areas, the instant messaging of trades started to appear within a couple of minutes. After a little monitoring and validation checking, it was clear everything was running as expected. It was time to sit back and relax and see how this adventure unfolds.
For anyone interested, the App does automated trading with different brokers across the markets, while logging all events and trades to an Oracle Autonomous Database (Free Tier = no cost), and sends instant messages to me notifying me of the automated trades. All I have to do is Nothing, yes Nothing, only to monitor the trade notifications. I mentioned earlier the importance of testing, and with back-testing of the recent changes/improvements (as of the date of post), the App has given a minimum of 84% annual return each year for the past 15 years. Most years the return has been a lot more!
AUTO_PARTITION – Inspecting & Implementing Recommendations
In a previous blog post I gave an overview of the DBMS_AUTO_PARTITION package in Oracle Autonomous Database. This looked at how you can get started and to setup Auto Partitioning and to allow it to automatically implement partitioning.
This might not be something the DBAs will want to happen for lots of different reasons. An alternative is to use DBMS_AUTO_PARTITION to make recommendations for tables where partitioning will have a performance improvement. The DBA can inspect these recommendations and decide which of these to implement.
In the previous post we set the CONFIGURE function to be ‘IMPLEMENT’. We need to change that to report the recommendations.
exec dbms_auto_partition.configure('AUTO_PARTITION_MODE','REPORT ONLY');Just remember, tables will only be considered by AUTO_PARTITION as outlined in my previous post.
Next we can ask for recommendations using the RECOMMEND_PARTITION_METHOD function.
exec  dbms_auto_partition.recommend_partition_method(
   table_owner => 'WHISKEY',
   table_name => 'DIRECTIONS',
   report_type => 'TEXT',
   report_section => 'ALL',
   report_level => 'ALL');
The results from this are stored in DBA_AUTO_PARTITION_RECOMMENDATIONS, which you can query to view the recommendations.
select recommendation_id, partition_method, partition_key
from dba_auto_partition_recommendations;
RECOMMENDATION_ID PARTITION_METHOD PARTITION_KEY
-------------------------------- ------------------------------------------------------------------------------------------------------------- --------------
D28FC3CF09DF1E1DE053D010000ABEA6 Method: LIST(SYS_OP_INTERVAL_HIGH_BOUND("D", INTERVAL '2' MONTH, TIMESTAMP '2019-08-10 00:00:00')) AUTOMATIC D
To apply the recommendation pass the RECOMMENDATION_KEY value to the APPLY_RECOMMENDATION function.
exec dbms_auto_partition.apply_recommendation('D28FC3CF09DF1E1DE053D010000ABEA6');It might takes some minutes for the partitioned table to become available. During this time the original table will remain available as the change will be implemented using a ALTER TABLE MODIFY PARTITION ONLINE command.
Two other functions include REPORT_ACTIVITY and REPORT_LAST_ACTIVITY. These can be used to export a detailed report on the recommendations in text or HTML form. It is probably a good idea to create and download these for your change records.
spool autoPartitionFinding.html
select dbms_auto_partition.report_last_activity(type=>'HTML') from dual;
exit;AUTO_PARTITION – Basic setup
Partitioning is an effective way to improve performance of SQL queries on large volumes of data in a database table. But only so, if a bit of care and attention is taken by both the DBA and Developer (or someone with both of these roles). Care is needed on the database side to ensure the correct partitioning method is deployed and the management of these partitions, as some partitioning methods can create a significantly large number of partitions, which in turn can affect the management of these and possibly performance too, which is not what you want. Care is also needed from the developer side to ensure their code is written in a way that utilises the partitioning method deployed. If doesn’t then you may not see much improvement in performance of your queries, and somethings things can run slower. Which not one wants!
With the Oracle Autonomous Database we have the expectation it will ‘manage’ a lot of the performance features behind the scenes without the need for the DBA and Developing getting involved (‘Autonomous’). This is kind of true up to a point, as the serverless approach can work up to a point. Sometimes a little human input is needed to give a guiding hand to the Autonomous engine to help/guide it towards what data needs particular focus.
In this (blog post) case we will have a look at DBMS_AUTO_PARTITION and how you can do a basic setup, config and enablement. I’ll have another post that will look at the recommendation feature of DBMS_AUTO_PARTITION. Just a quick reminder, DBMS_AUTO_PARTITION is for the Oracle Autonomous Database (ADB) (on the Cloud). You’ll need to run the following as ADMIN user.
The first step is to enable auto partitioning on the ADB using the CONFIGURE function. This function can have three parameters:
- IMPLEMENT : generates a report and implements the recommended partitioning method. (Autonomous!)
- REPORT_ONLY : {default} reports recommendations for partitioning on tables
- OFF : Turns off auto partitioning (reporting and implementing)
For example, to enable auto partitioning and to automatically implement the recommended partitioning method.
exec DBMS_AUTO_PARTITION.CONFIGURE('AUTO_PARTITION_MODE', 'IMPLEMENT');The changes can be inspected in the DBA_AUTO_PARTITION_CONFIG view.
SELECT * FROM DBA_AUTO_PARTITION_CONFIG;When you look at the listed from the above select we can see IMPLEMENT is enabled

The next step with using DBMS_AUTO_PARTITION is to tell the ADB what schemas and/or tables to include for auto partitioning. This first example shows how to turn on auto partitioning for a particular schema, and to allow the auto partitioning (engine) to determine what is needed and to just go and implement that it thinks is the best partitioning methods.
exec DBMS_AUTO_PARTITION.CONFIGURE(
   parameter_name => 'AUTO_PARTITION_SCHEMA',
   parameter_value => 'WHISKEY',
   ALLOW => TRUE);
If you query the DBA view again we now get.

We have not enabled a schema (called WHISKEY) to be included as part of the auto partitioning engine.
Auto Partitioning may not do anything for a little while, with some reports suggesting to wait for 15 minutes for the database to pick up any changes and to make suggestions. But there are some conditions for a table needs to meet before it can be considered, this is referred to as being a ‘Candidate’. These conditions include:
- Table passes inclusion and exclusion tests specified by AUTO_PARTITION_SCHEMA and AUTO_PARTITION_TABLE configuration parameters.
- Table exists and has up-to-date statistics.
- Table is at least 64 GB.
- Table has 5 or more queries in the SQL tuning set that scanned the table.
- Table does not contain a LONG data type column.
- Table is not manually partitioned.
- Table is not an external table, an internal/external hybrid table, a temporary table, an index-organized table, or a clustered table.
- Table does not have a domain index or bitmap join index.
- Table is not an advance queuing, materialized view, or flashback archive storage table.
- Table does not have nested tables, or certain other object features.
If you find Auto Partitioning isn’t partitioning your tables (i.e. not a valid Candidate) it could be because the table isn’t meeting the above list of conditions.
This can be verified using the VALIDATE_CANDIDATE_TABLE function.
select DBMS_AUTO_PARTITION.VALIDATE_CANDIDATE_TABLE(
   table_owner => 'WHISKEY',
   table_name => 'DIRECTIONS')
from dual;
If the table has met the above list of conditions, the above query will return ‘VALID’, otherwise one or more of the above conditions have not been met, and the query will return ‘INVALID:’ followed by one or more reasons
Check out my other blog post on using the AUTO_PARTITION to explore it’s recommendations and how to implement.
Creating a VM on Oracle Always Free
I’m going to create a new Cloud VM to host some of my machine learning work. The first step is to create the VM before installing the machine learning software.
That’s what I’m going to do in this blog post and the next blog post. In this blog post I’ll step through how to setup the VM using the Oracle Always Free cloud offering. In the next I’ll go through the machine learning software install and setup.
Step 1 – Create a ssh key/file
Whatever your preferred platform for your day to day computer there will be software available for you to generate a ssh key file. You will need this when creating the VM and for when you want to login in to VM on the command line. My day-to-day workhorse is a Mac, and I used the following command to create the ssh key file.
ssh-keygen -t rsa -N "" -b 2048 -C "myOracleCloudkey" -f myOracleCloudkey
Step 2 – Login and Select create VM
Log into your Oracle Cloud Always Free account.

Select Create a VM Instance.

Step 3 – Configure the VM
Give the instance a name. I called mine ‘b01-vm-1‘
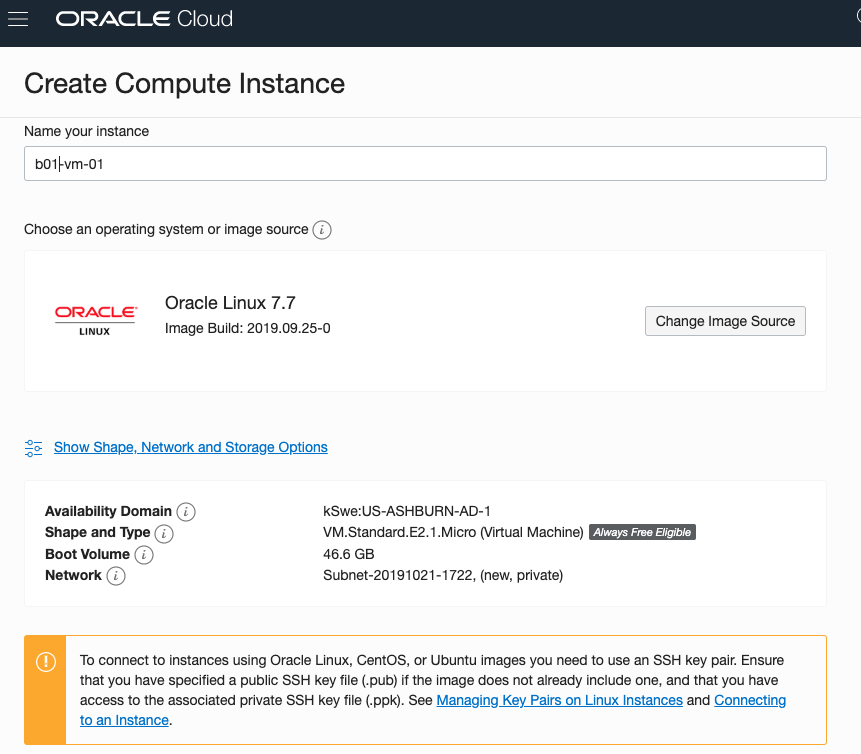
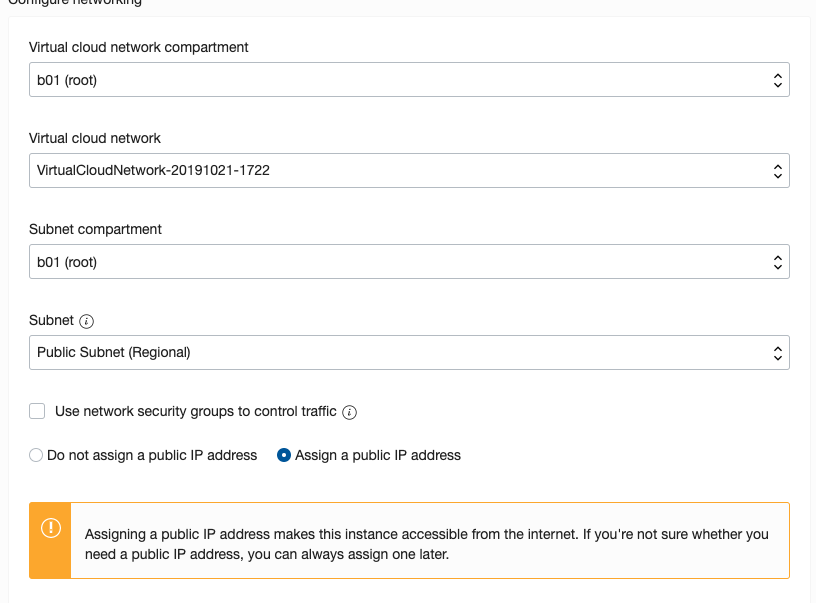
Expand the networks section by clicking on Show Shape, Network and Storage Options. Set the IP address to be public.
Scroll down to the ssh section. Select the ssh file you created earlier.
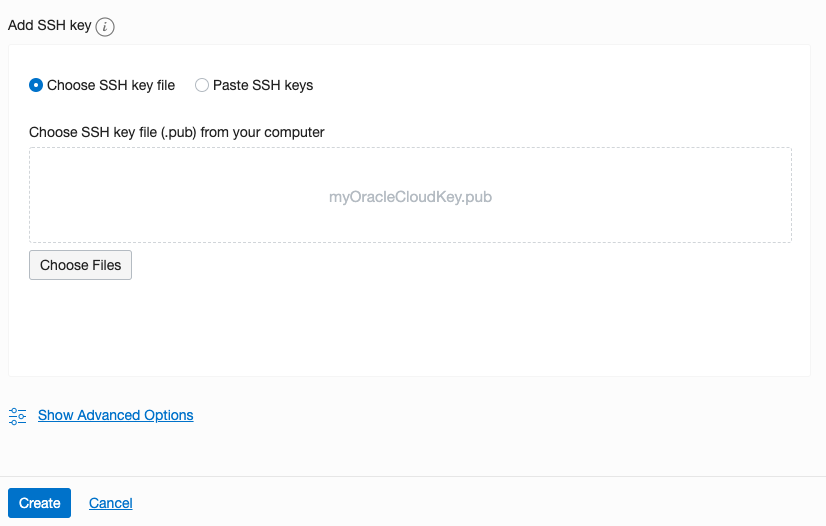
Click on the Create button.
That’s it, all done. Just wait for the VM to be created. This will takes a few seconds.
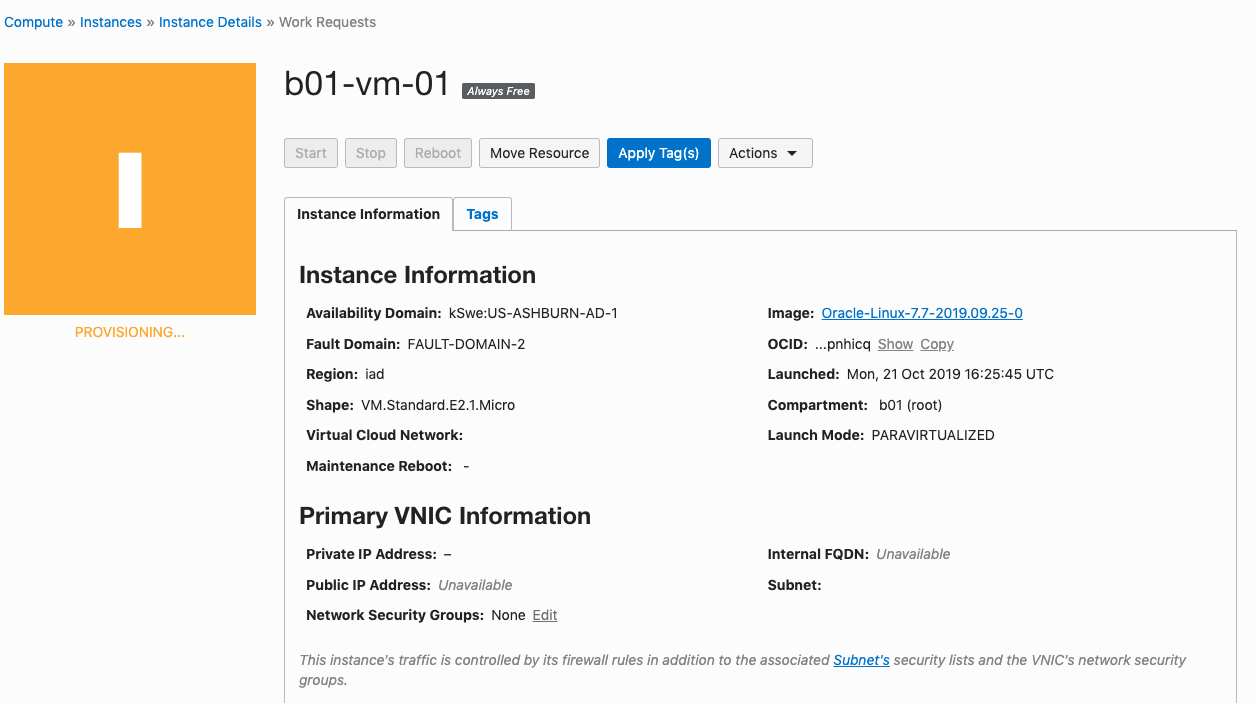
After the VM is created the IP address will be listed on this screen. Take note of it.
Step 4 – Connect and log into the VM
We can not log into the VM using ssh, to prove that it exists, using the command
ssh -i <name of ssh file> opc@<ip address of VM>
When I use this command I get the following:
ssh -i XXXXXXXXXX opc@XXX.XXX.XXX.XXX
The authenticity of host 'XXX.XXX.XXX.XXX (XXX.XXX.XXX.XXX)' can't be established.
ECDSA key fingerprint is SHA256:fX417Z1yFoQufm7SYfxNi/RnMH5BvpvlOb2gOgnlSCs.
Are you sure you want to continue connecting (yes/no)? yes
Warning: Permanently added 'XXX.XXX.XXX.XXX' (ECDSA) to the list of known hosts.
Enter passphrase for key 'XXXXXXXXXX':
[opc@b1-vm-01 ~]$ pwd
/home/opc

[opc@b1-vm-01 ~]$ df
Filesystem   1K-blocks     Used Available Use%  Mounted on
devtmpfs        469092        0    469092   0%  /dev
tmpfs           497256        0    497256   0%  /dev/shm
tmpfs           497256     6784    490472   2%  /run
tmpfs           497256        0    497256   0%  /sys/fs/cgroup
/dev/sda3     40223552  1959816  38263736   5%  /
/dev/sda1       204580     9864    194716   5%  /boot/efi
tmpfs            99452        0     99452   0%  /run/user/1000
And there we have it. A VM setup on Oracle Always Free.
Next step is to install some Machine Learning software.

You must be logged in to post a comment.