
OCI
Oracle Object Storage – Downloading and Deleting
In my previous posts on using Object Storage I illustrated what you needed to do to setup your connect, explore Object Storage, create Buckets and how to add files. In this post, I’ll show you how to download files from a Bucket, and to delete Buckets.
- Oracle Object Storage – Setup and Explore
- Oracle Object Storage – Buckets & Loading files
- Oracle Object Storage – Downloading and Deleting
- Oracle Object Storage – Parallel Uploading
Let’s start with downloading the files in a Bucket. In my previous post, I gave some Python code and functions to perform these steps for you. The Python function below will perform this for you. A Bucket needs to be empty before it can be deleted. The function checks for files and if any exist, will delete these files before proceeding with deleting the Bucket.
Namespace needs to be defined, and you can see how that is defined by looking at my early posts on this topic.
def download_bucket(b, d):
    if os.path.exists(d) == True:
        print(f'{d} already exists.')
    else:
        print(f'Creating {d}')
        os.makedirs(d)

    print('Downloading Bucket:',b)
    object_list = object_storage_client.list_objects(NAMESPACE, b).data
    count = 0
    for i in object_list.objects:
        count+=1

    print(f'... {count} files')

    for o in object_list.objects:
        print(f'Downloading object {o.name}')
        get_obj = object_storage_client.get_object(NAMESPACE, b, o.name)
        with open(os.path.join(d,o.name), 'wb') as f:
            for chunk in get_obj.data.raw.stream(1024 * 1024, decode_content=False):
                f.write(chunk)

    print('Download Finished.')
Here’s an example of this working.
download_dir = '/Users/brendan.tierney/DEMO_BUCKET'
download_bucket(BUCKET_NAME, download_dir)

/Users/brendan.tierney/DEMO_BUCKET already exists.
Downloading Bucket: DEMO_Bucket
... 14 files
Downloading object .DS_Store
Downloading object 2017-08-31 19.46.42.jpg
Downloading object 2017-10-16 13.13.20.jpg
Downloading object 2017-11-22 20.18.58.jpg
Downloading object 2018-12-03 11.04.57.jpg
Downloading object 347397087_620984963239631_2131524631626484429_n.jpg
Downloading object IMG_2347.jpg
Downloading object IMG_6779.jpg
Downloading object oug_ire18_1.jpg
Downloading object thumbnail_IMG_1710.jpg
Downloading object thumbnail_IMG_1711.jpg
Downloading object thumbnail_IMG_1712.jpg
Downloading object thumbnail_IMG_2333.jpg
Downloading object thumbnail_IMG_2336.jpg
Download Finished.
We can also download individual files. Here’s a function to do that. It’s a simplified version of the previous function
def download_bucket_file(b, d, f):
    print('Downloading File:',f, ' from Bucket', b)

    try:
        get_obj = object_storage_client.get_object(NAMESPACE, b, f)
        with open(os.path.join(d, f), 'wb') as f:
            for chunk in get_obj.data.raw.stream(1024 * 1024, decode_content=False):
                f.write(chunk)
        print('Download Finished.')
    except:
        print('Error trying to download file. Check parameters and try again')
download_dir = '/Users/brendan.tierney/DEMO_BUCKET'
file_download = 'oug_ire18_1.jpg'
download_bucket_file(BUCKET_NAME, download_dir, file_download)

Downloading File: oug_ire18_1.jpg  from Bucket DEMO_Bucket
Download Finished.
The final function is to delete a Bucket from your OCI account.
def delete_bucket(b_name):
    bucket_exists = check_bucket_exists(b_name)
    objects_exist = False
    if bucket_exists == True:
        print('Starting - Deleting Bucket '+b_name)
        print('... checking if objects exist in Bucket (bucket needs to be empty)')
        try:
            object_list = object_storage_client.list_objects(NAMESPACE, b_name).data
            objects_exist = True
        except Exception as e:
            objects_exist = False

        if objects_exist == True:
            print('... ... Objects exists in Bucket. Deleting these objects.')
            count = 0
            for o in object_list.objects:
                count+=1
                object_storage_client.delete_object(NAMESPACE, b_name, o.name)

            if count > 0:
                print(f'... ... Deleted {count} objects in {b_name}')
            else:
                print(f'... ... Bucket is empty. No objects to delete.')

        else:
            print(f'... No objects to delete, Bucket {b_name} is empty')


        print(f'... Deleting bucket {b_name}')
        response = object_storage_client.delete_bucket(NAMESPACE, b_name)
        print(f'Deleted bucket {b_name}')
Before running this function, lets do a quick check to see what Buckets I have in my OCI account.
list_bucket_counts()

Bucket name:  ADW_Bucket
... num of objects : 2
Bucket name:  Cats-and-Dogs-Small-Dataset
... num of objects : 100
Bucket name:  DEMO_Bucket
... num of objects : 14
Bucket name:  Demo
... num of objects : 210
Bucket name:  Finding-Widlake-Bucket
... num of objects : 424
Bucket name:  Planes-in-Satellites
... num of objects : 89
Bucket name:  Vision-Demo-1
... num of objects : 10
Bucket name:  root-bucket
... num of objects : 2
I’ve been using DEMO_Bucket in my previous examples and posts. We’ll use this to demonstrate the deleting of a Bucket.
delete_bucket(BUCKET_NAME)

Bucket DEMO_Bucket exists.
Starting - Deleting Bucket DEMO_Bucket
... checking if objects exist in Bucket (bucket needs to be empty)
... ... Objects exists in Bucket. Deleting these objects.
... ... Deleted 14 objects in DEMO_Bucket
... Deleting bucket DEMO_Bucket
Deleted bucket DEMO_Bucket
Oracle Object Storage – Buckets & Loading files
In a previous post, I showed what you need to do to setup your local PC/laptop to be able to connect to OCI. I also showed how to perform some simple queries on your Object Storage environment. Go check out that post before proceeding with the examples in this blog.
- Oracle Object Storage – Setup and Explore
- Oracle Object Storage – Buckets & Loading files
- Oracle Object Storage – Downloading and Deleting
- Oracle Object Storage – Parallel Uploading
In this post, I’ll build upon my previous post by giving some Python functions to:
- Check if Bucket exists
- Create a Buckets
- Delete a Bucket
- Upload an individual file
- Upload an entire directory
Let’s start with a function to see if a Bucket already exists.
def check_bucket_exists(b_name):
    #check if Bucket exists
    is_there = False
    l_b = object_storage_client.list_buckets(NAMESPACE, COMPARTMENT_ID).data
    for bucket in l_b:
        if bucket.name == b_name:
            is_there = True

    if is_there == True:
        print(f'Bucket {b_name} exists.')
    else:
        print(f'Bucket {b_name} does not exist.')

    return is_there
A simple test for a bucket called ‘DEMO_bucket’. This was defined in a variable previously (see previous post). I’ll use this ‘DEMO_bucket’ throughout these examples.
b_exists = check_bucket_exists(BUCKET_NAME)
print(b_exists)

---
Bucket DEMO_Bucket does not exist.
False
Next we can more onto a function for creating a Bucket.
def create_bucket(b):
    #create Bucket if it does not exist
    bucket_exists = check_bucket_exists(b)
    if bucket_exists == False:
        try:
            create_bucket_response = object_storage_client.create_bucket(
                NAMESPACE,
                oci.object_storage.models.CreateBucketDetails(
                    name=demo_bucket_name,
                    compartment_id=COMPARTMENT_ID
                )
            )
            bucket_exists = True
            # Get the data from response
            print(f'Created Bucket {create_bucket_response.data.name}')
        except Exception as e:
            print(e.message)
    else:
        bucket_exists = True
        print(f'... nothing to create.')

    return bucket_exists
A simple test for a bucket called ‘DEMO_bucket’. This was defined in a variable previously (see previous post).
b_exists = create_bucket(BUCKET_NAME)
---
Bucket DEMO_Bucket does not exist.
Created Bucket DEMO_Bucket
Next, let’s delete a Bucket and any files stored in it.
def delete_bucket(b_name):
    bucket_exists = check_bucket_exists(b_name)
    objects_exist = False
    if bucket_exists == True:
        print('Starting - Deleting Bucket '+b_name)
        print('... checking if objects exist in Bucket (bucket needs to be empty)')
        try:
            object_list = object_storage_client.list_objects(NAMESPACE, b_name).data
            objects_exist = True
        except Exception as e:
            objects_exist = False

        if objects_exist == True:
            print('... ... Objects exists in Bucket. Deleting these objects.')
            count = 0
            for o in object_list.objects:
                count+=1
                object_storage_client.delete_object(NAMESPACE, b_name, o.name)

            if count > 0:
                print(f'... ... Deleted {count} objects in {b_name}')
            else:
                print(f'... ... Bucket is empty. No objects to delete.')

        else:
            print(f'... No objects to delete, Bucket {b_name} is empty')


        print(f'... Deleting bucket {b_name}')
        response = object_storage_client.delete_bucket(NAMESPACE, b_name)
        print(f'Deleted bucket {b_name}')
The example output below shows what happens when I’ve already loaded data into the Bucket (which I haven’t shown in the examples so far – but I will soon).
delete_bucket(BUCKET_NAME)

---
Bucket DEMO_Bucket exists.
Starting - Deleting Bucket DEMO_Bucket
... checking if objects exist in Bucket (bucket needs to be empty)
... ... Objects exists in Bucket. Deleting these objects.
... ... Bucket is empty. No objects to delete.
... Deleting bucket DEMO_Bucket
Deleted bucket DEMO_Bucket
Now that we have our functions for managing Buckets, we can now have a function for uploading a file to a bucket.
def upload_file(b, f):
    file_exists = os.path.isfile(f)
    if file_exists == True:
        #check to see if Bucket exists
        b_exists = check_bucket_exists(b)
        if b_exists == True:
            print(f'... uploading {f}')
            try:
                object_storage_client.put_object(NAMESPACE, b, os.path.basename(f), io.open(f,'rb'))
                print(f'. finished uploading {f}')
            except Exception as e:
                print(f'Error uploading file. Try again.')
                print(e)
        else:
            print('... Create Bucket before uploading file.')

    else:
        print(f'... File {f} does not exist or cannot be found. Check file name and full path')
Just select a file from your computer and give the full path to that file and the Bucket name.
up_file = '/Users/brendan.tierney/Dropbox/bill.xls'
upload_file(BUCKET_NAME, up_file)

---
Bucket DEMO_Bucket does not exist.
... Create Bucket before uploading file.
Our final function is an extended version of the previous one. This function takes a Directory path and uploads all the files to the Bucket.
def upload_directory(b, d):
    count = 0

    #check to see if Bucket exists
    b_exists = check_bucket_exists(b)
    if b_exists == True:
        #loop files
        for filename in os.listdir(d):
            print(f'... uploading {filename}')
            try:
                object_storage_client.put_object(NAMESPACE, b, filename, io.open(os.path.join(d,filename),'rb'))
                count += 1
            except Exception as e:
                print(f'... ... Error uploading file. Try again.')
                print(e)

    else:
        print('... Create Bucket before uploading files.')

    if count == 0:
        print('... Empty directory. No files uploaded.')
    else:
        print(f'Finished uploading Directory : {count} files into {b} bucket')
and to call it …
up_directory = '/Users/brendan.tierney/Dropbox/OCI-Vision-Images/Blue-Peter/'
upload_directory(BUCKET_NAME, up_directory)

---
Bucket DEMO_Bucket exists.
... uploading thumbnail_IMG_2336.jpg
... uploading .DS_Store
... uploading 2017-08-31 19.46.42.jpg
... uploading thumbnail_IMG_2333.jpg
... uploading 347397087_620984963239631_2131524631626484429_n.jpg
... uploading thumbnail_IMG_1712.jpg
... uploading thumbnail_IMG_1711.jpg
... uploading 2017-11-22 20.18.58.jpg
... uploading thumbnail_IMG_1710.jpg
... uploading 2018-12-03 11.04.57.jpg
... uploading IMG_6779.jpg
... uploading oug_ire18_1.jpg
... uploading 2017-10-16 13.13.20.jpg
... uploading IMG_2347.jpg
Finished uploading Directory : 14 files into DEMO_Bucket bucket
Oracle Object Storage – Setup and Explore
This blog post will walk you through how to access Oracle OCI Object Storage and explore what buckets and files you have there, using Python and the OCI Python library. There will be additional posts which will walk through some of the other typical tasks you’ll need to perform with moving files into and out of OCI Object Storage.
- Oracle Object Storage – Buckets & Loading files
- Oracle Object Storage – Downloading and Deleting
- Oracle Object Storage – Parallel Uploading
The first thing you’ll need to do is to install the OCI Python library. You can do this by running pip command or if using Anaconda using their GUI for doing this. For example,
pip3 install ociCheck out the OCI Python documentation for more details.
Next, you’ll need to get and setup the configuration settings and download the pem file.
We need to create the config file that will contain the required credentials and information for working with OCI. By default, this file is stored in : ~/.oci/config
mkdir ~/oci
cd oci
Now create the config file, using vi or something similar.
vi config
Edit the file to contain the following, but look out for the parts that need to be changed/updated to match your OCI account details.
[ADMIN_USER]user=ocid1.user.oc1..<unique_ID>
fingerprint=<your_fingerprint>
tenancy = ocid1.tenancy.oc1..<unique_ID>
region = us-phoenix-1key_file=
<path to key .pem file>
The above details can be generated by creating an API key for your OCI user. Copy and paste the default details to the config file.
- [ADMIN_USER] > you can name this anything you want, but it will referenced in Python.
- user > enter the user ocid. OCID is the unique resource identifier that OCI provides for each resource.
- fingerprint > refers to the fingerprint of the public key you configured for the user.
- tenancy > your tenancy OCID.
- region > the region that you are subscribed to.
- key_file > the path to the .pem file you generated.

Just download the .pem file and the config file details. Add them to the config file, and give the full path to the .epm file, including its name.
You are now ready to use the OCI Python library to access and use your OCI cloud environment. Let’s run some tests to see if everything works and connects ok.
#import libraries
import oci
import json
import os
import io

#load the config file
config = oci.config.from_file("~/.oci/config")
config

#only part of the output is displayed due to security reasons
{'log_requests': False, 'additional_user_agent': '', 'pass_phrase': None, 'user': 'oci...........
We can now define some core variables.
#My Compartment ID
COMPARTMENT_ID = "ocid1.tenancy.oc1..............

#Object storage Namespace
object_storage_client = oci.object_storage.ObjectStorageClient(config)
NAMESPACE = object_storage_client.get_namespace().data

#Name of Bucket for this demo
BUCKET_NAME = 'DEMO_Bucket'
We can now define some functions to:
- List the Buckets in my OCI account
- List the number of files in each Bucket
- Number of files in a particular Bucket
- Check for Bucket Existence
def list_buckets():
    l_buckets = object_storage_client.list_buckets(NAMESPACE, COMPARTMENT_ID).data
    # Get the data from response
    for bucket in l_buckets:
        print(bucket.name)

def list_bucket_counts():
    l_buckets = object_storage_client.list_buckets(NAMESPACE, COMPARTMENT_ID).data
    for bucket in l_buckets:
        print("Bucket name: ",bucket.name)
        buck_name = bucket.name
        objects = object_storage_client.list_objects(NAMESPACE, buck_name).data
        count = 0
        for i in objects.objects:
            count+=1

        print('... num of objects :', count)

def check_bucket_exists(b_name):
    #check if Bucket exists
    is_there = False
    l_b = object_storage_client.list_buckets(NAMESPACE, COMPARTMENT_ID).data
    for bucket in l_b:
        if bucket.name == b_name:
            is_there = True

    if is_there == True:
        print(f'Bucket {b_name} exists.')
    else:
        print(f'Bucket {b_name} does not exist.')

    return is_there

def list_bucket_details(b):
    bucket_exists = check_bucket_exists(b)
    if bucket_exists == True:
        objects = object_storage_client.list_objects(NAMESPACE, b).data
        count = 0
        for i in objects.objects:
            count+=1

        print(f'Bucket {b} has objects :', count)
Now we can run these functions to test them. Before running these make sure you can create a connection to OCI.

Using Python for OCI Vision – Part 1
I’ve written a few blog posts over the past few weeks/months on how to use OCI Vision, which is part of the Oracle OCI AI Services. My blog posts have shown how to get started with OCI Vision, right up to creating your own customer models using this service.
In this post, the first in a series of blog posts, I’ll give you some examples of how to use these custom AI Vision models using Python. Being able to do this, opens the models you create to a larger audience of developers, who can now easily integrate these custom models into their applications.
In a previous post, I covered how to setup and configure your OCI connection. Have a look at that post as you will need to have completed the steps in it before you can follow the steps below.
To inspect the config file we can spool the contents of that file
!cat ~/.oci/config
I’ve hidden some of the details as these are related to my Oracle Cloud accountThis allows us to quickly inspect that we have everything setup correctly.
The next step is to load this config file, and its settings, into our Python environment.
config = oci.config.from_file()

config
We can now list all the projects I’ve created in my compartment for OCI Vision services.
#My Compartment ID
COMPARTMENT_ID = "<compartment-id>"

#List all the AI Vision Projects available in My compartment
response = ai_service_vision_client.list_projects(compartment_id=COMPARTMENT_ID)

#response.data
for item in response.data.items:
    print('- ', item.display_name)
    print('    ProjectId= ', item.id)
    print('')
Which lists the following OCI Vision projects.

We can also list out all the Models in my various projects. When listing these I print out the OCID of each, as this is needed when we want to use one of these models to process an image. I’ve redacted these as there is a minor cost associated with each time these are called.
#List all the AI Vision Models available in My compartment
list_models = ai_service_vision_client.list_models(
    # this is the compartment containing the model
    compartment_id=COMPARTMENT_ID
)

print("Compartment Id=", COMPARTMENT_ID)
print("")
for item in list_models.data.items:
    print('  ', item.display_name, '--', item.model_type)
    print('     OCID= ',item.id)
    print('     ProjectId= ', item.project_id)
    print('')
I’ll have other posts in this series on using the pre-built and custom model to label different image files on my desktop.
OCI Data Labeling using Bounding Box
In a previous post, I gave examples of how to label data using OCI Data Labeling. It was a simple approach to data labeling images for input to AI Vision. In that post, we just gave a label for the image to indicate if the image contained a Cat or a Dog. Yes, that’s a very simple approach, and we can build image classification models, and use the resulting model to predict a label for new images. These would be labeled as a Cat or a Dog with a degree of certainty. Although this simple approach can give OK-ish results, we typically want a more detailed model and predictions. For a more detailed approach, we can use Object Detection. For this, we need to prepare our data set in a slightly different way and Yes it does take a bit more time to prepare. Or perhaps it takes a lot more time to prepare the data. But this extra time in preparing the data should (in theory) give us a more accurate model.
This post will focus on creating a new labeled dataset using bounding boxes, and in a later post, we’ll examine the resulting model to see if it gives better or more accurate results.
I’ve mentioned the phrase ‘bounding box’ a few times and this approach does exactly as the phrase indicates. Draw a box around the object and assign a label to it. In our example, we have used a Cats and Dogs dataset. We’ll use that same dataset (50 images of each animal). This approach to labelling the images takes much longer to complete, as we have to draw a box around each animal. But it is worth the effort, as the models can focus on what is inside the box and ignore anything outside the box.
The first task is to define the dataset that will contain our newly labelled data based on the bound box method.
From the OCI menu, go to the Analytics & AI section and select Data Labeling.
Select the Dataset menu items(on the left hand side of the screen, and then click on the Create dataset button.
The Add Dataset screen allows us to enter the details of the dataset we want to use.
Our dataset is based on a dataset in Object storage, and we can define it as the basis of creating a newly labelled dataset. This does not affect the underlying original dataset.
In this case, we want to select Object Detection in the section called Annotation Class.


On the next screen, you can define the Bucket containing the images we want to label.
In our case, we will be using the Cats and Dogs dataset previously loaded into Object Storage.
In the next section, it will tell you how many files are part of the underlying dataset. By default, it will use all of them.
Add the labels you want to use, although you can add more during the labelling process.
Click Next to move to the next screen and then Click Finish to complete this setup.

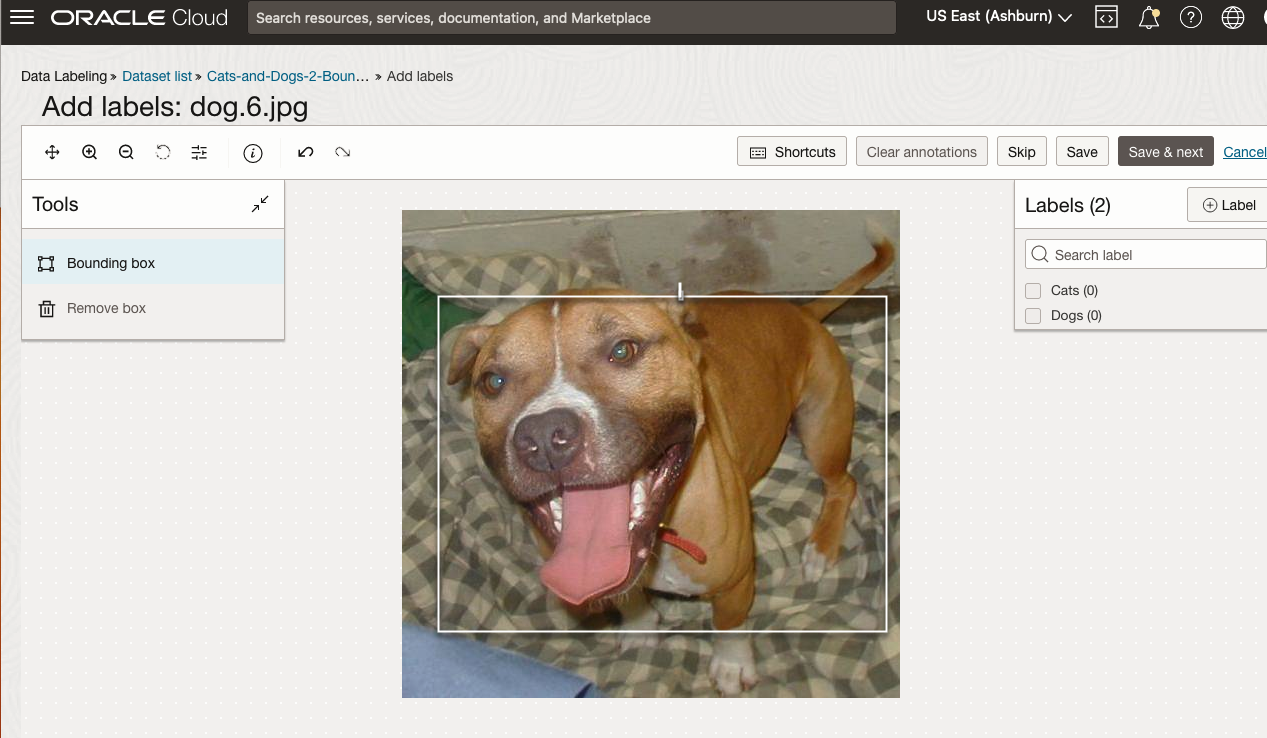
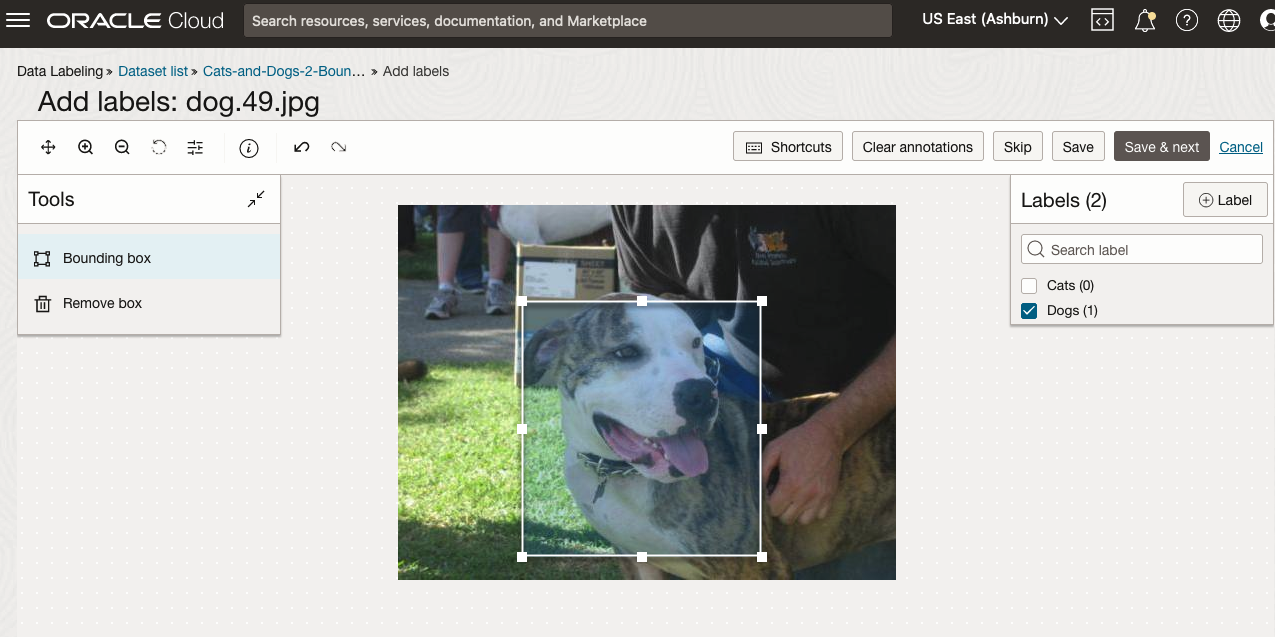
After a moments, depending on the number of images in the underlying dataset, the version of the dataset for labelling can now be processed.
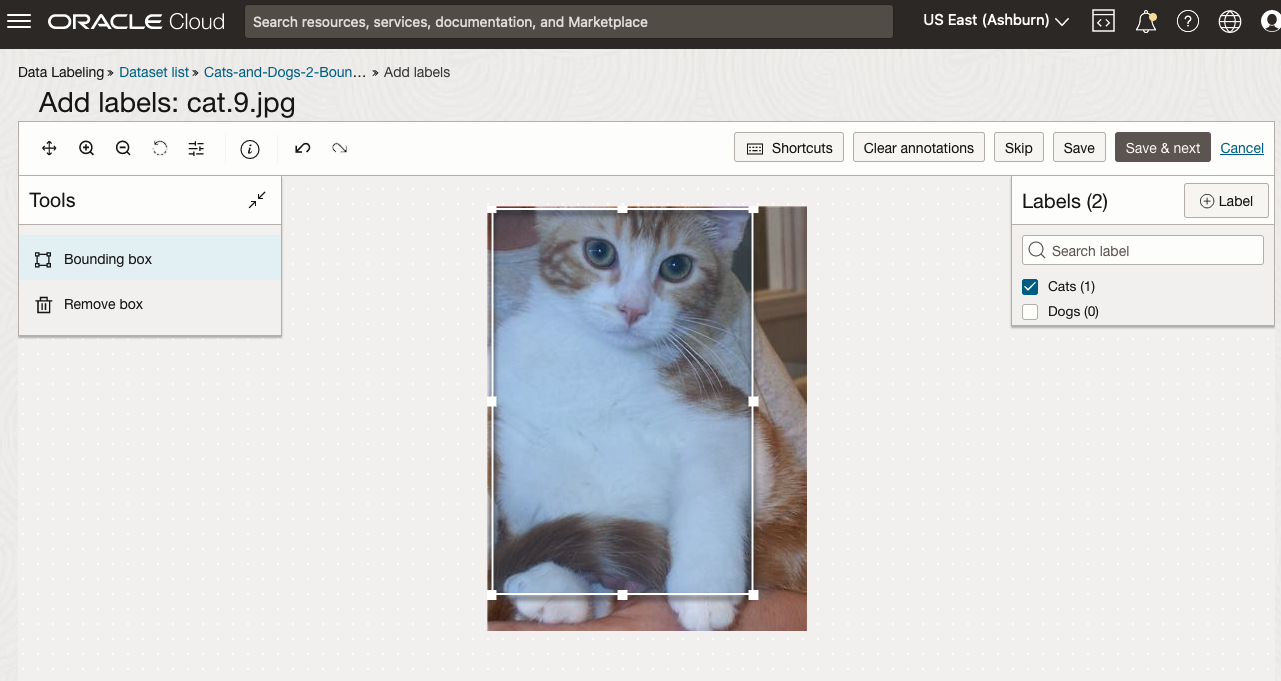
To stat the labelling process, click on the first on the first image. Using your mouse drag a box over the main item you want to label. In my example, I’m drawing a box around the animals while trying to exclude as much of the surrounding and background parts of the image. After drawing the box, you can then select the label, from the list on the right-hand side of the screen and then click the Save & Next button. Continue doing this until you complete all images. Yes this can take some time, but it should help OCI Vision create a better-informed model for these animals

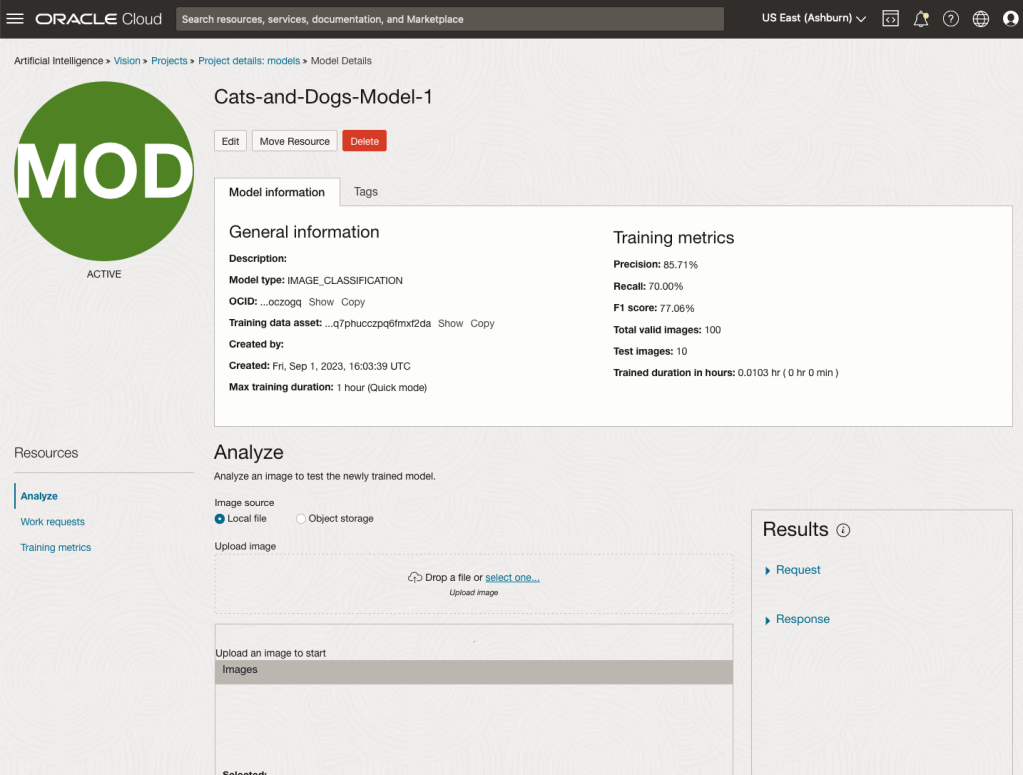
OCI Vision – Creating a Custom Model for Cats and Dogs
In this post, I’ll build on the previous work on preparing data, to using this dataset as input to building a Custom AI Vision model. In the previous post, the dataset was labelled into images containing Cats and Dogs. The following steps takes you through creating the Customer AI Vision model and to test this model using some different images of Cats.
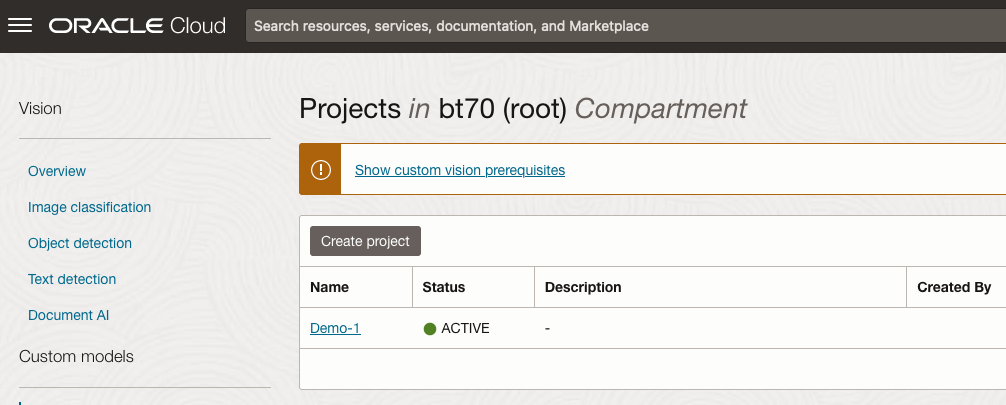
Open the OCI Vision page. On the bottom left-hand side of the menu you will see Projects. Click on this to open the Projects page for creating a Custom AI Vision model.
On the Create Projects page, click on the Create Project button. A pop-up window will appear. Enter the name for the model and click on the Create Project bottom at the bottom of the pop-up.

After the Project has been created, click on the project name from the list. This will open the Project specific page. A project can contain multiple models and they will be listed here. For the Cats-and-Dogs project we and to create our model. Click on the Create Model button.
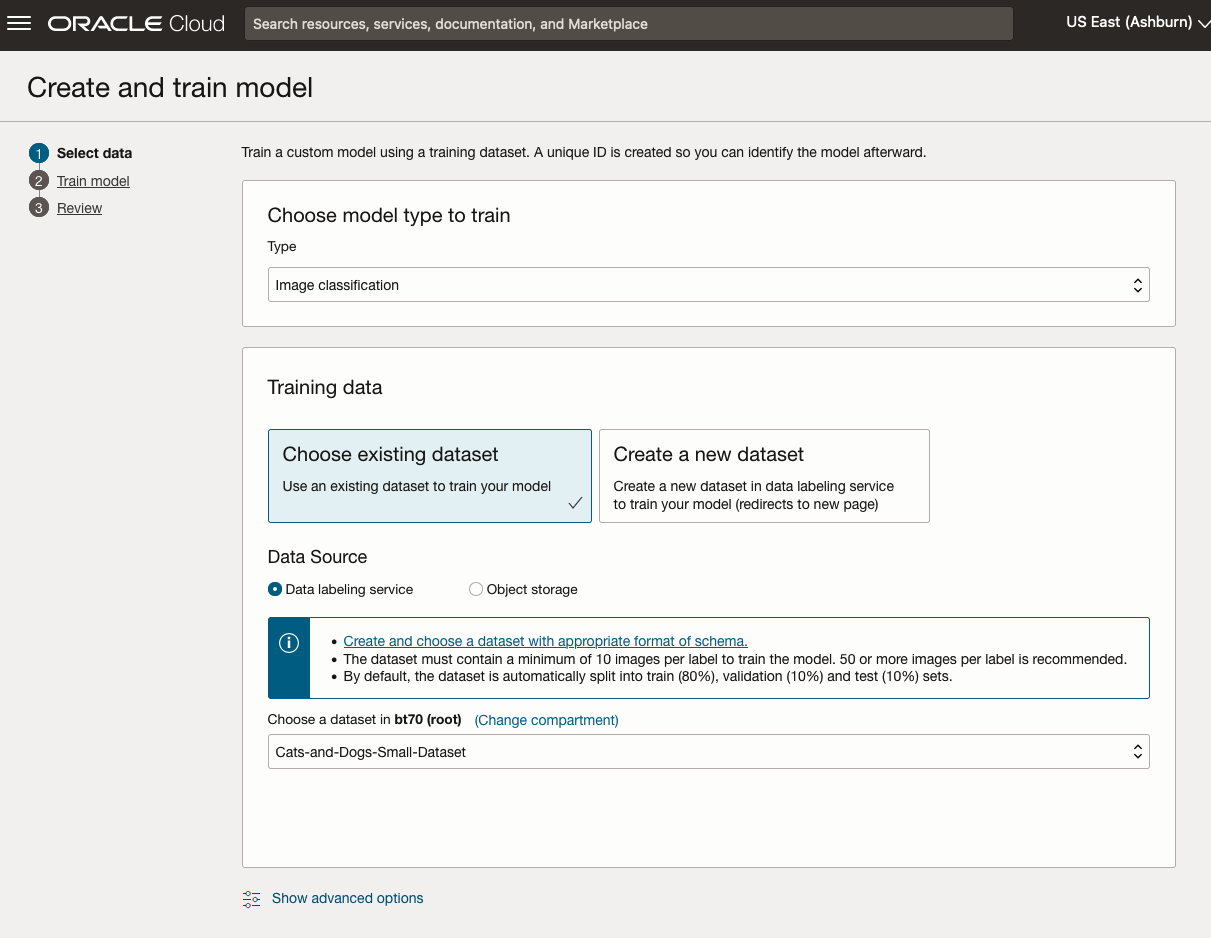
Next, you can define some of the settings for the Model. These include what dataset to use, or upload a new one, define what data labelling to use and the training duration. For this later setting, you can decide how much time you’d like to allocate to creating the custom model. Maybe consider selecting Quick mode, as that will give you a model within a few minutes (or up to an hour), whereas the other options can allow the model process to run for longer and hopefully those will create a more accurate model. As with all machine learning type models, you need to take some time to test which configuration works best for your scenario. In the following, the Quick mode option is selected. When read, click Create Model.

It can take a little bit of time to create the model. We selected the Quick mode, which has a maximum of one hour. In my scenario, the model build process was completed after four minutes. The Precentage Complete is updated during the build allowing you to monitor it’s progress.

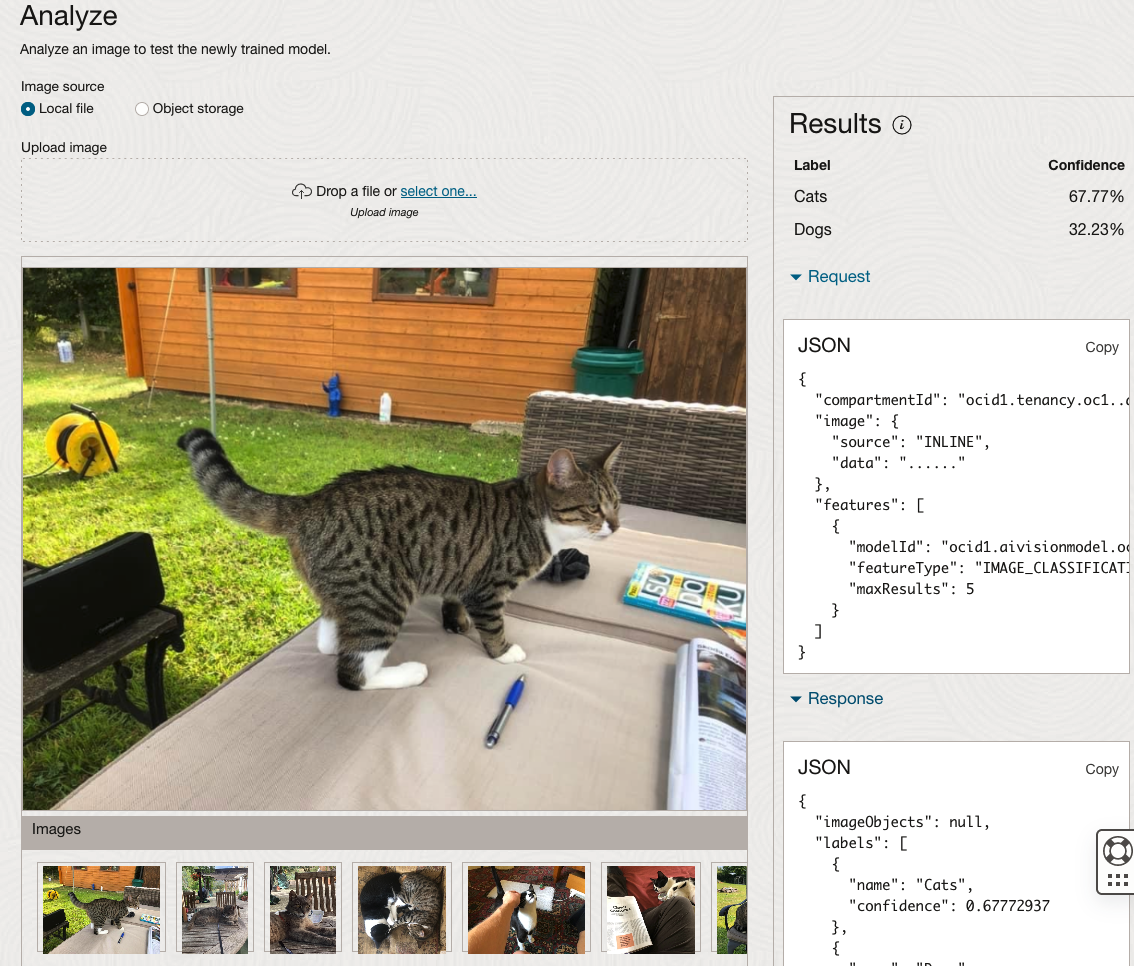
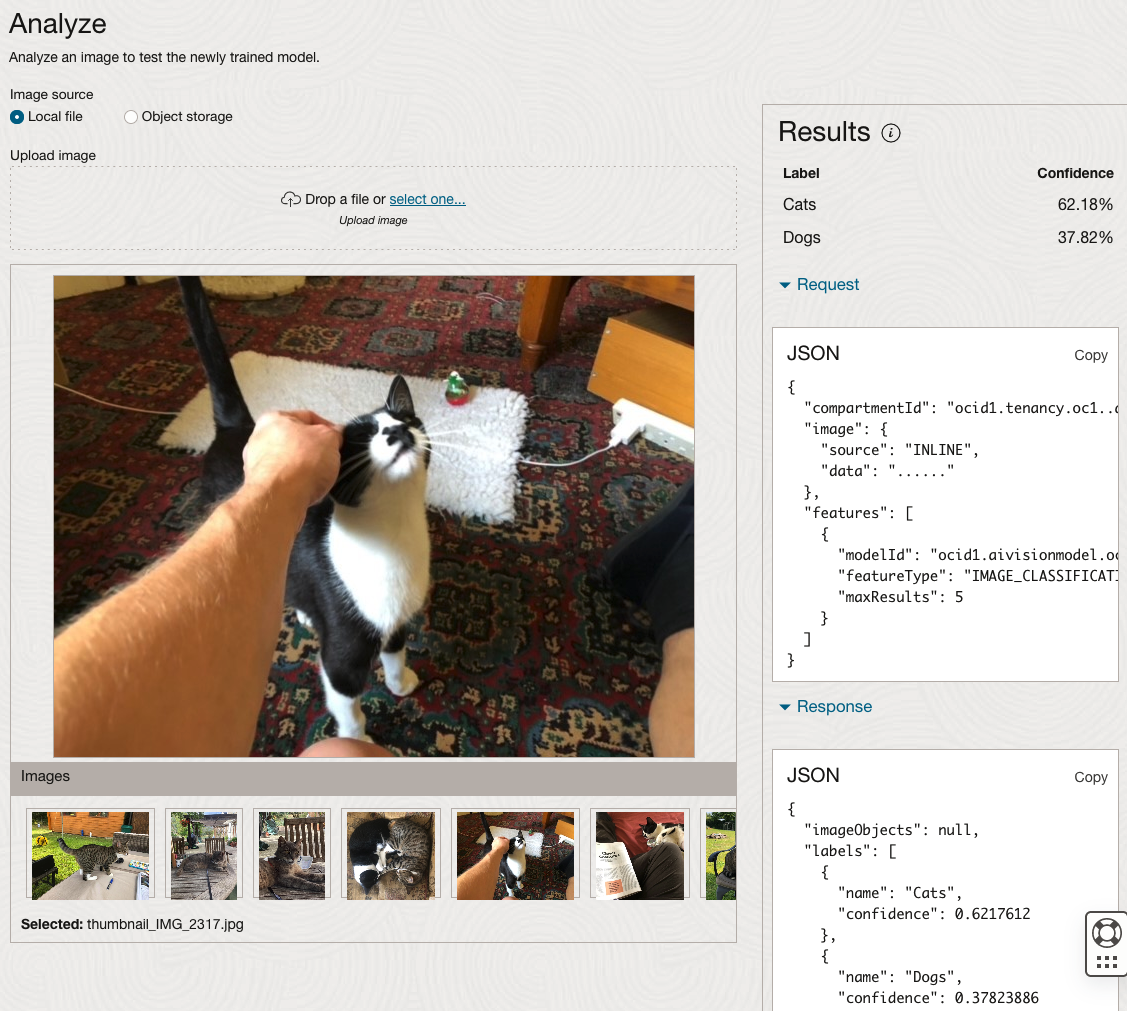
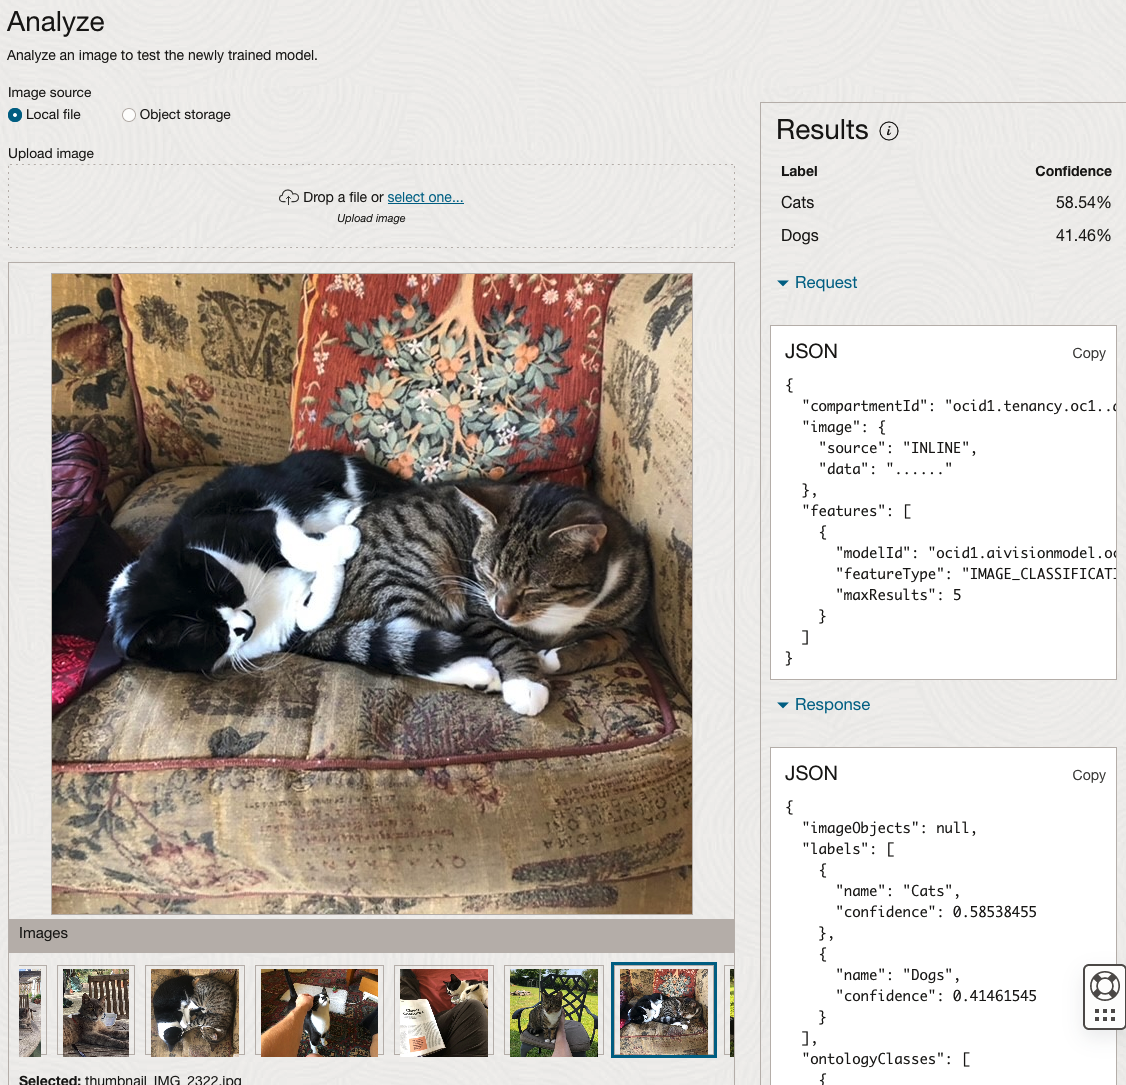
When the model is completed, you can test it using the Model page. Just click on the link for the model and you’ll get a page like the one to the right.
The bottom half of this page allows you to upload and evaluate images. The following images are example images of cats (do you know the owner) and the predictions and information about these are displayed on the screen. Have a look at the following to see which images scored better than others for identifying a Cat.
OCI Data Labeling for Machine Learning
OCI Data Labeling is a service that enables developers and data scientists to construct labelled datasets for training AI and machine learning models. By utilizing OCI Data Labeling, users can easily gather data, generate datasets, and assign labels to individual data records through user-friendly interfaces and public APIs. The labelled datasets can then be utilised to facilitate model development across a wide range of Oracle’s AI and data science services, ensuring a seamless and efficient model-building experience.
OCI Data Labeling allows developers and data scientists to label different types of data for training AI and machine learning models. Here are some examples of how OCI Data Labeling can be used for different types of data:
- Document Labeling
- Image Labeling
- Text Labeling
Typically the labelling of data is a manual task but there are also options to programmicly do this if the necessary label data is available.

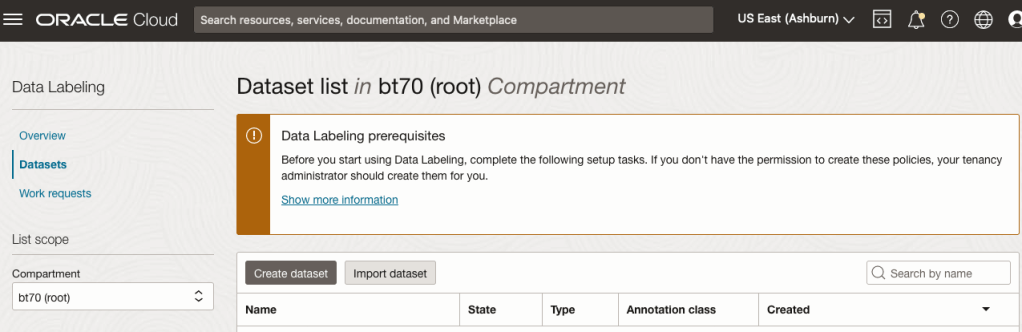
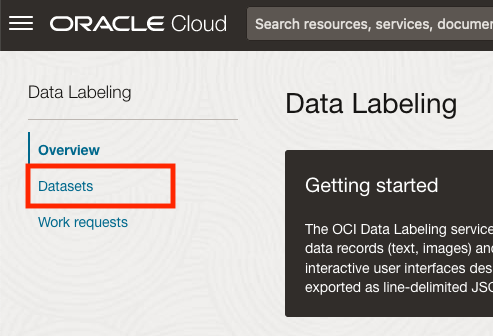
The OCI Data Labeling service can be located under the Analytics & AI menu. See the image.
As we want to label a dataset, we need to first define the Dataset we want to use.
Select Datasets from the menu.
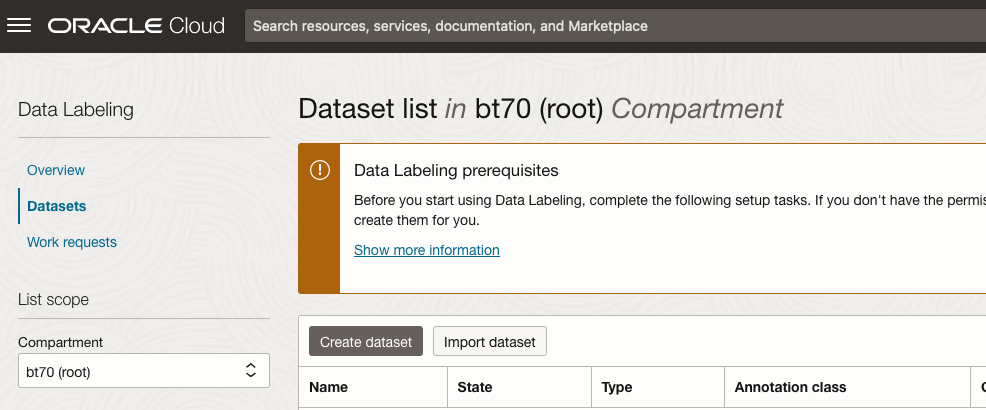
There are two options for creating the data set for labeling. The first is to use the Create Dataset option and the second is to Import Dataset.
If you already have your data in a Bucket, you can use both approaches. If you have a new dataset to import then use the Create Dataset option.
In this post, I’ll use the Create Dataset option and step through it.
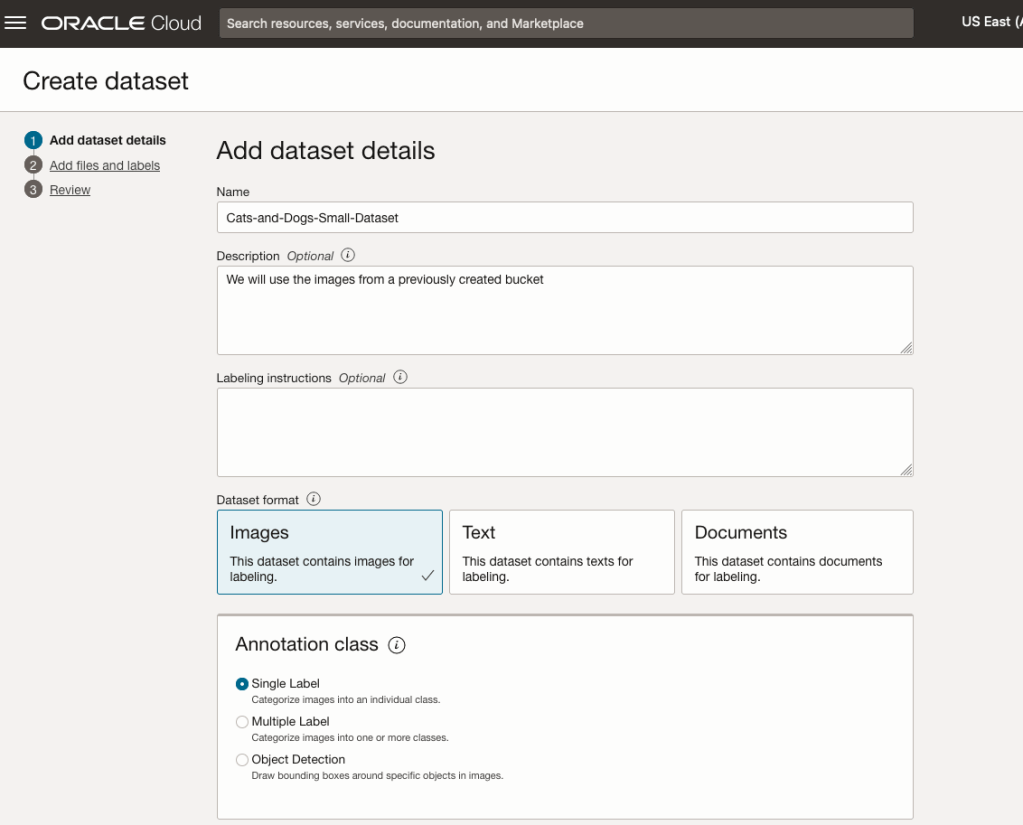
Start by giving a name to the Dataset, then specify the type of data (Images, Text or Documents). In this example, we will work with image data.
Then select if the dataset (or each image) has one or multiple labels, or if you are going to draw bounding boxes for Object Detection.
For our example, select Single Label.
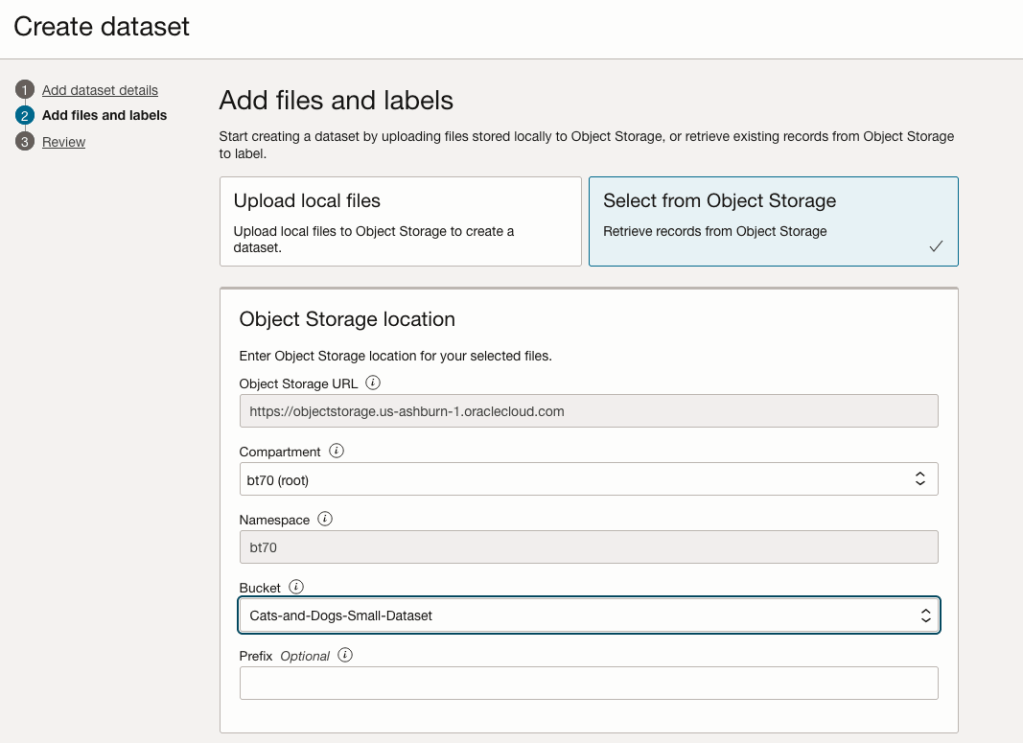
You can upload files from your computer or use files in an Object Bucket. As the dataset has already been loaded into a Bucket, we’ll select that option.
The Object Storage URL, Compartment and Namespace will be automatically populated for you.
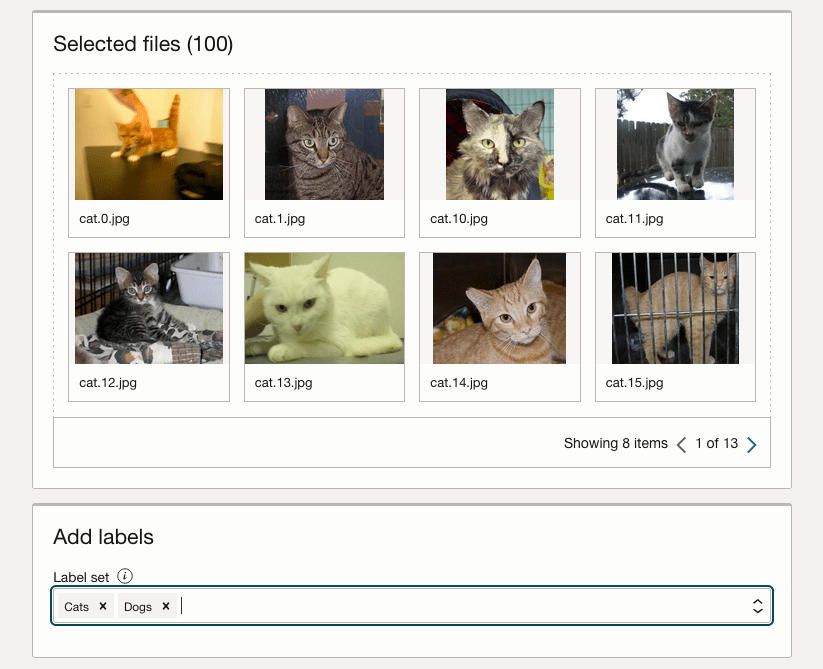
Select the Bucket you want to use from the drop-down list. This dataset has 50 images each of Cats and Dogs.
The page will display the first eight or so, of the images in the Bucket. You can scroll through the others and this gives you a visual opportunity to make sure you are using the correct dataset.

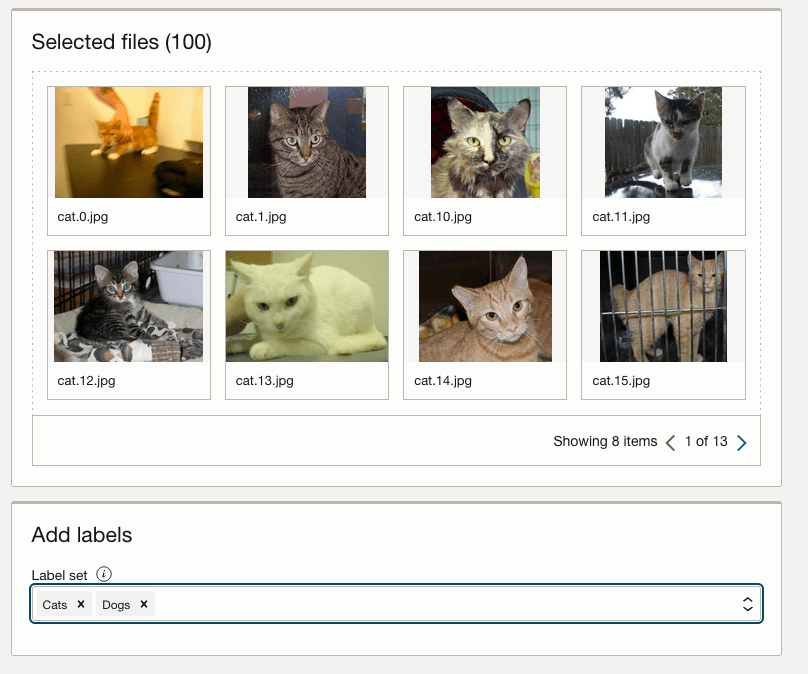
Now you can define the Labels to use for the dataset. In our sample dataset we only have two possible labels. If your dataset has more than this just enter the name and present enter. The Lable will be created.
You can add and remove labels.
When finished click the Next button at the bottom of the screen.
The final part of this initial setup is to create the dataset by clicking on the Create button

When everything has been processed you will get a screen that looks like this.
You are now ready to move on to labelling the dataset.
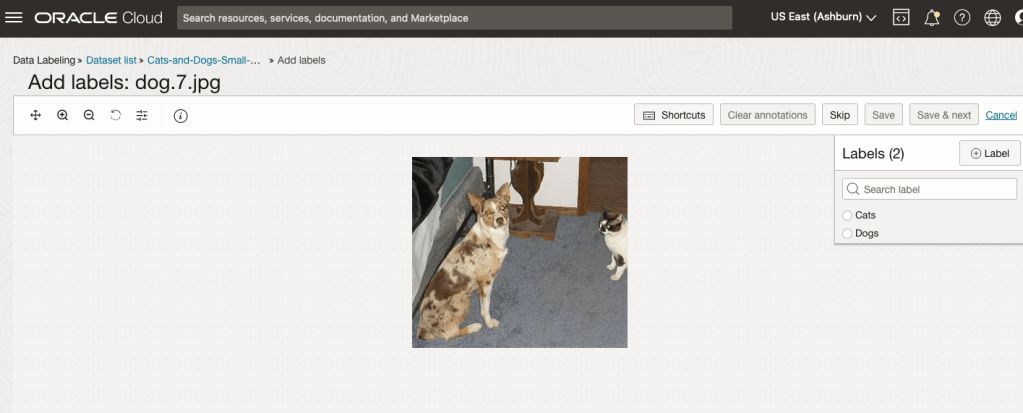
To label each image, start by clicking on the first image. This will open a screen like what is shown (to the right).
Click on the radio group item for the label that best represents the image. In some scenarios maybe both labels are suitable, and in such cases just pick the most suitable one. In this example, I’ve selected Dog. An alternative approach is to use the bounding box labelling. I’ll have a different post illustrating that.
Select the most suitable label and then click ‘Save & next’ button.
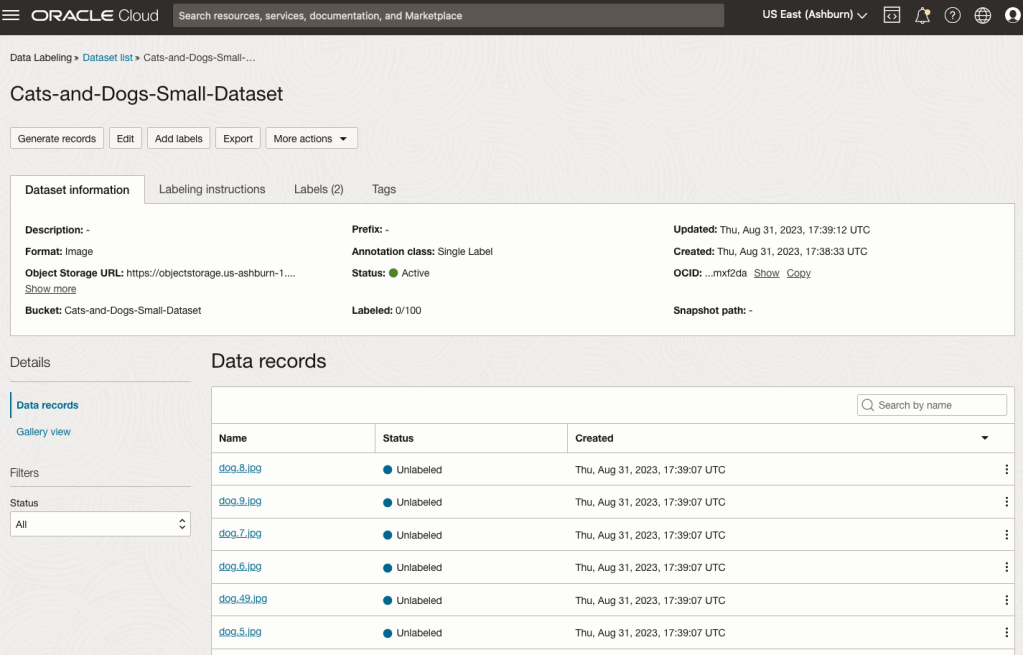
Yes, you’ll need to do this for all the images in the dataset. Yes, this can take a lot of time, particularly if you have 100s, or 1000s of images. The Datasets screen has details of how many images have been labelled and or not, and you can easily search for unlabelled files and continue labelling, if you need to take a break.
OCI Object Storage Buckets
We can upload and store data in Object Storage on OCI. This allows us to load and store data in a variety of different formats and sizes. With this data/files in object storage, it can be easily accessed from an Oracle Database (e.g. Autonomous Database) and any other service on OCI. This allows building more complete business solutions in a more integrated way.
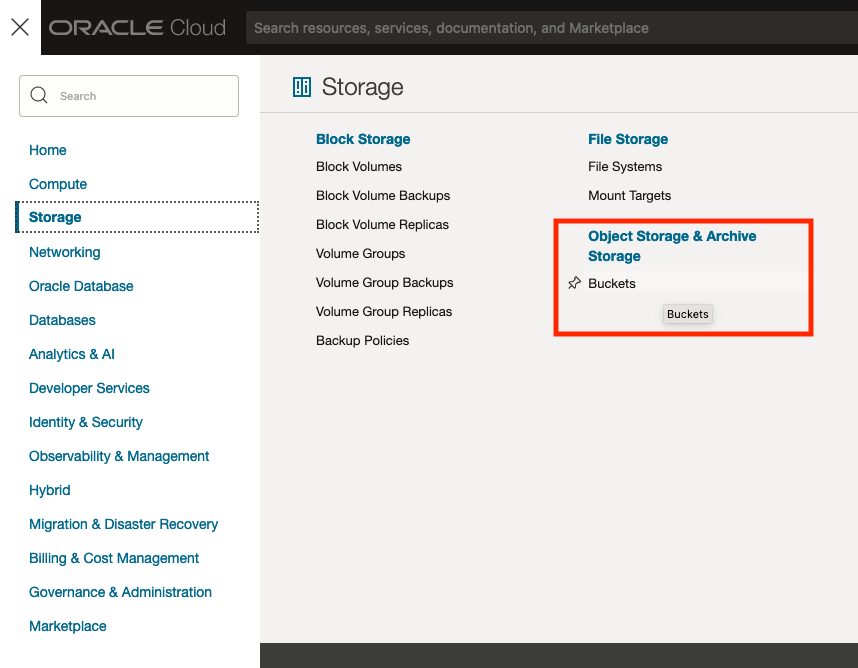
The Buckets feature can be found under the Storage option in the main Menu. From the popup screen look under Object Storage & Archive Storage and click on Buckets.
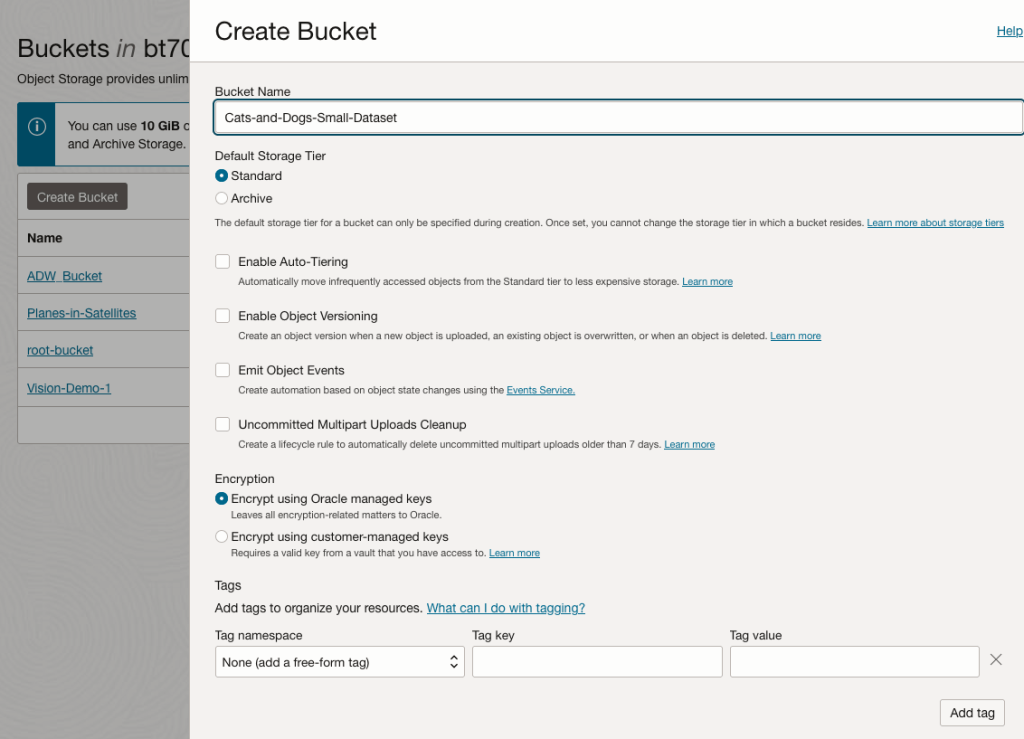
In the Objects Storage screen click on Create Bucket button.
In the Create Bucket screen, change the name of the Bucket. In this example, I’ve called it ‘Cats-and-Dogs-Small-Dataset’. No spaces are allowed. You can leave the defaults for the other settings. Then click the Create button.
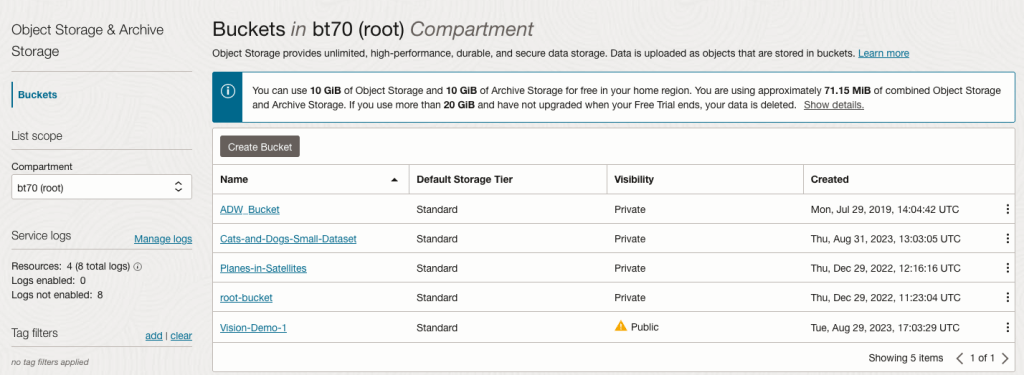
It will then be displayed along with any other buckets you have. I’ve a few other buckets.
Click on the Bucket name to open the bucket and add files to it.
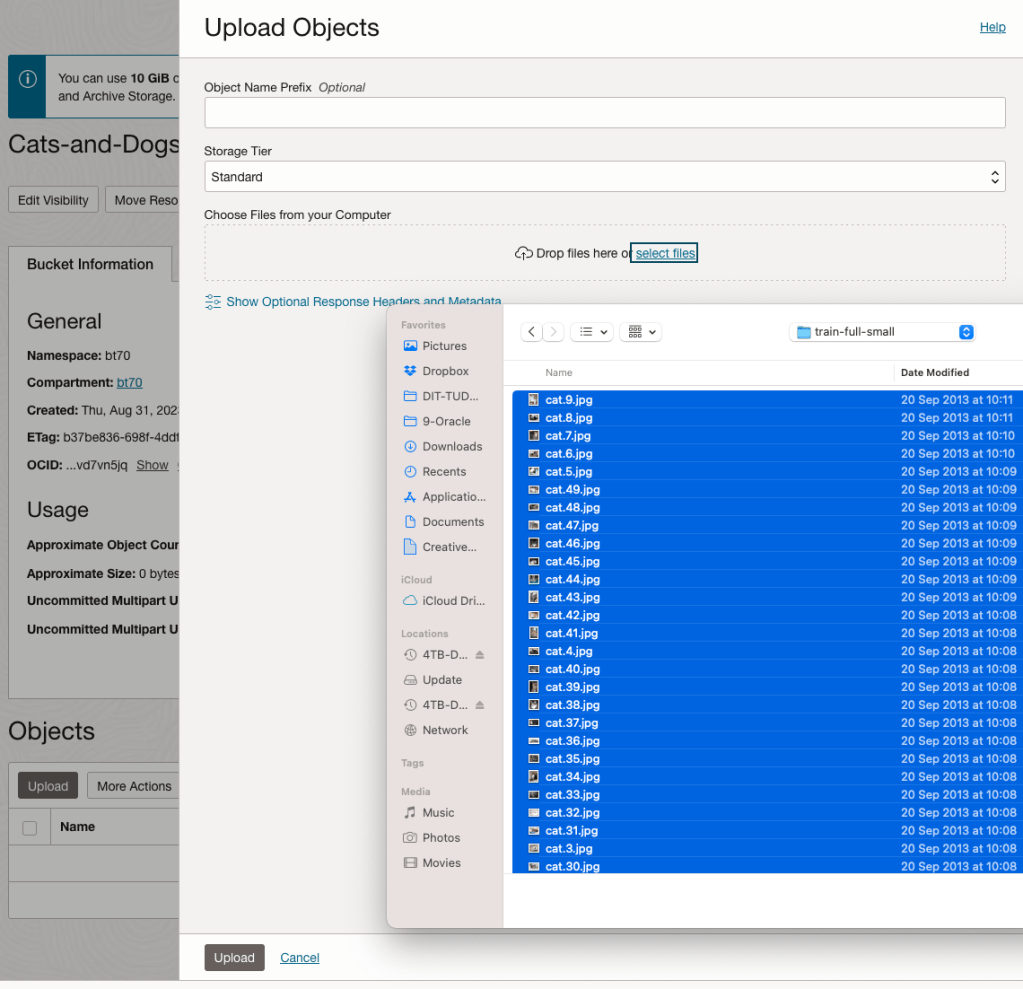
Click on the Upload button. Locate the files on your computer, select the files you want to upload.
The files will be listed in the Upload Object window. Click the Upload button to start transferring them to OCI.
If you wish you can set a prefix for all the files being uploaded.
When the files have been uploaded, click the Close button.
Note: The larger the dateset, in files and file size, it can take some time (depending on interest connection speed) for all the files to load into the Bucket.
To view the details of an image, click on the three dots to the right of the image files. This will open a menu for the image, where you can select to view image Details, download, copy, rename, delete, etc. the image.
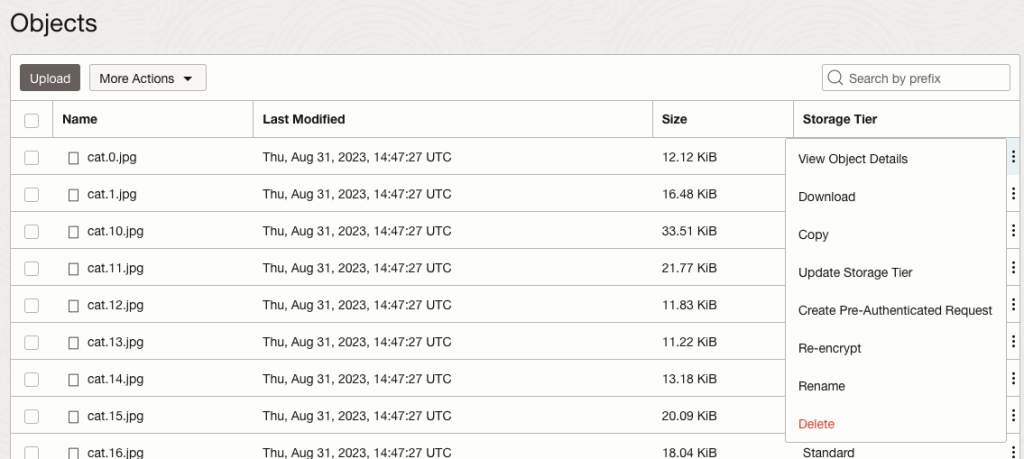

Click on View Object Details to get the details of the image.
This will display details about the object and the URI for the image.
OCI:Vision – AI for image processing – the Basics
Every cloud service provides some form of AI offering. Some of these can range from very basic features right up to a mediocre level. Only a few are delivering advanced AI services in a useful way.
Oracle AI Services have been around for about a year now, and with all new products or cloud services, a little time is needed to let it develop from an MVP (minimum viable produce) to something that’s more mature, feature-rich, stable and reliable. Oracle’s OCI AI Services come with some pre-training models and to create your own custom models based on your own training datasets.
Oracle’s OCI AI Services include:
- Digital Assistant
- Language
- Speech
- Vision
- Document Understand
- Anomaly Detection
- Forecasting
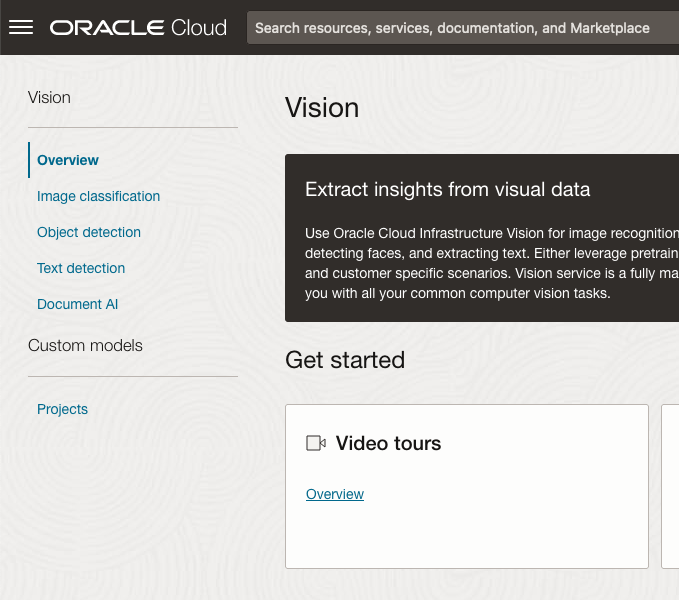
In this post, we’ll explore OCI Vision, and what the capabilities are available with their pre-trained models. To demonstrate this their online/webpage application will be used to demonstrate what it does and what it creates and identifies. You can access the Vision AI Services from the menu as shown in the following image.
From the main AI Vision webpage, we can see on the menu (on left-hand side of the page), we have three main Vision related options. These are Image Classification, Object Detection and Document AI. These are pre-trained models that perform slightly different tasks.
Let’s start with Image Classification and explore what is possible. Just Click on the link.
Note: The Document AI feature will be moving to its own cloud Service in 2024, so it will disappear from them many but will appear as a new service on the main Analytics & AI webpage (shown above).
The webpage for each Vision feature comes with a couple of images for you to examine to see how it works. But a better way to explore the capabilities of each feature is to use your own images or images you have downloaded. Here are examples.
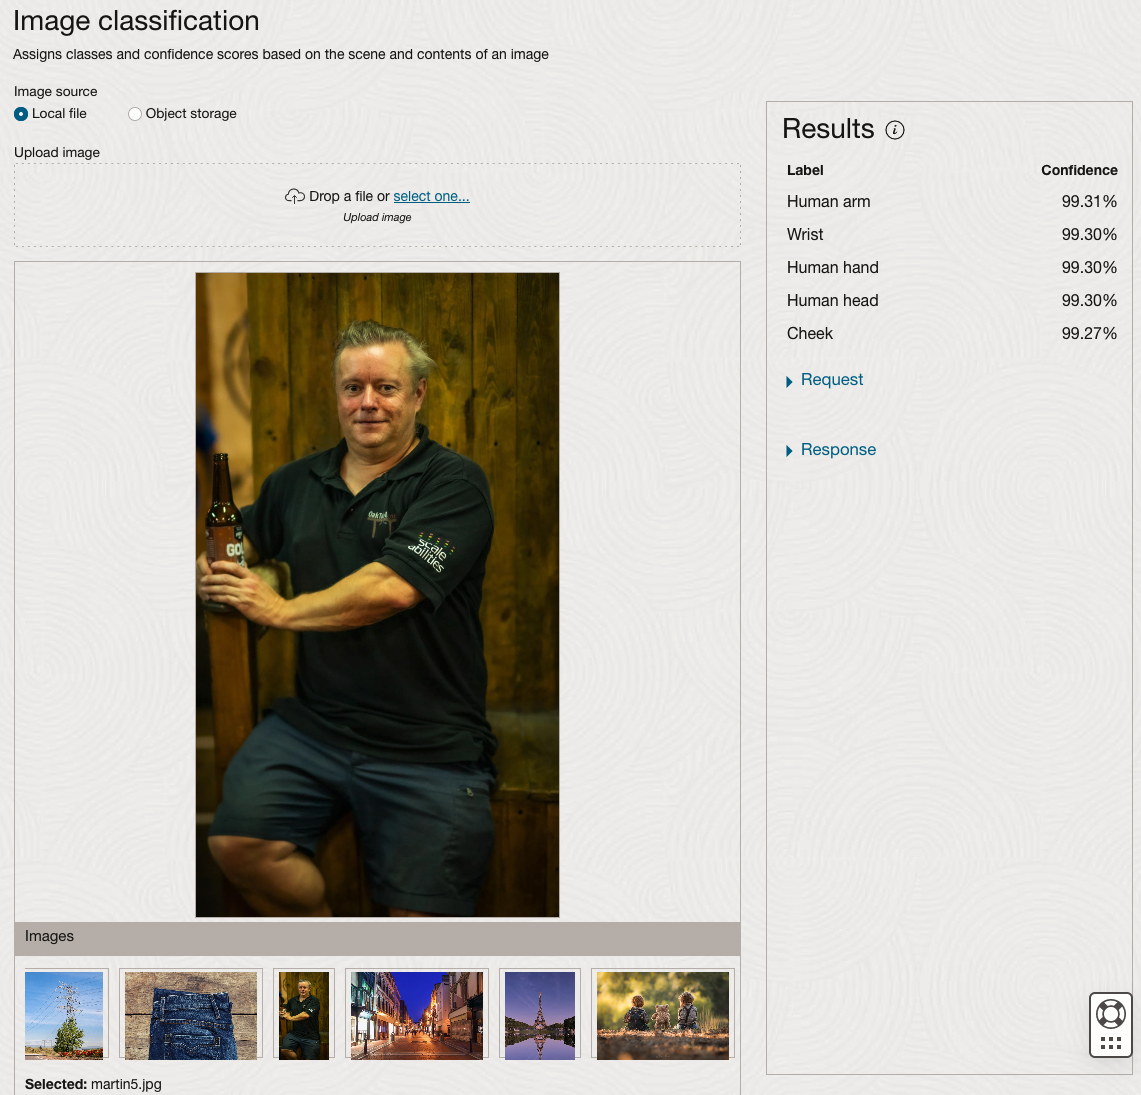
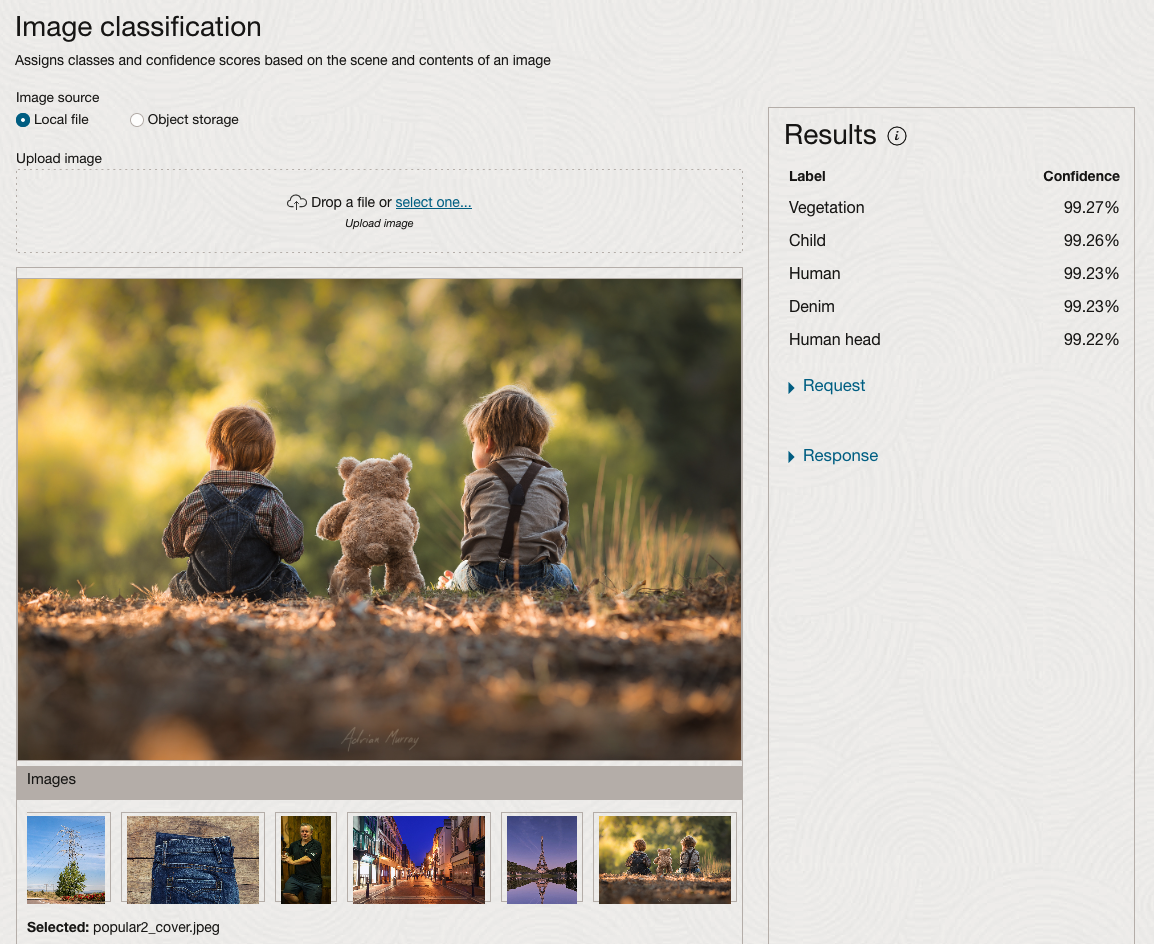
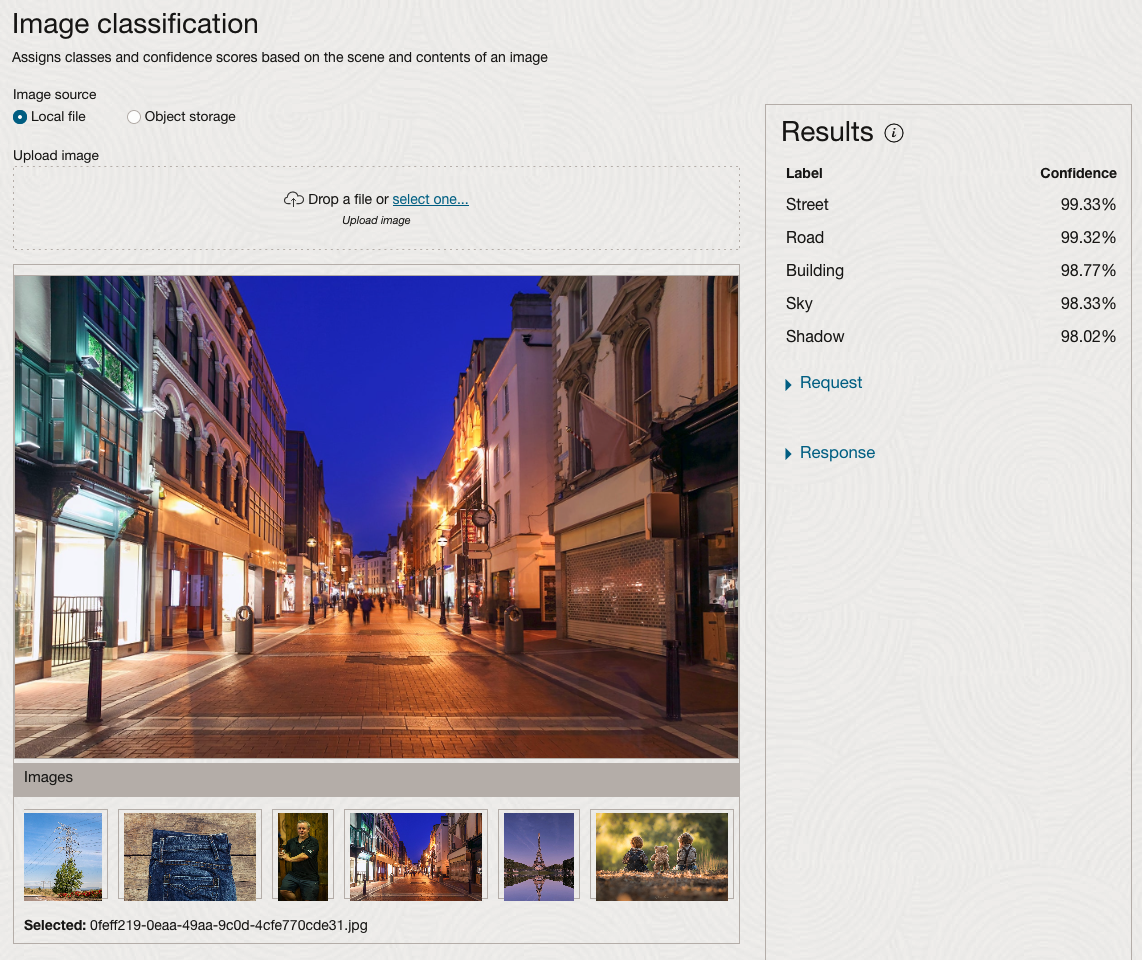
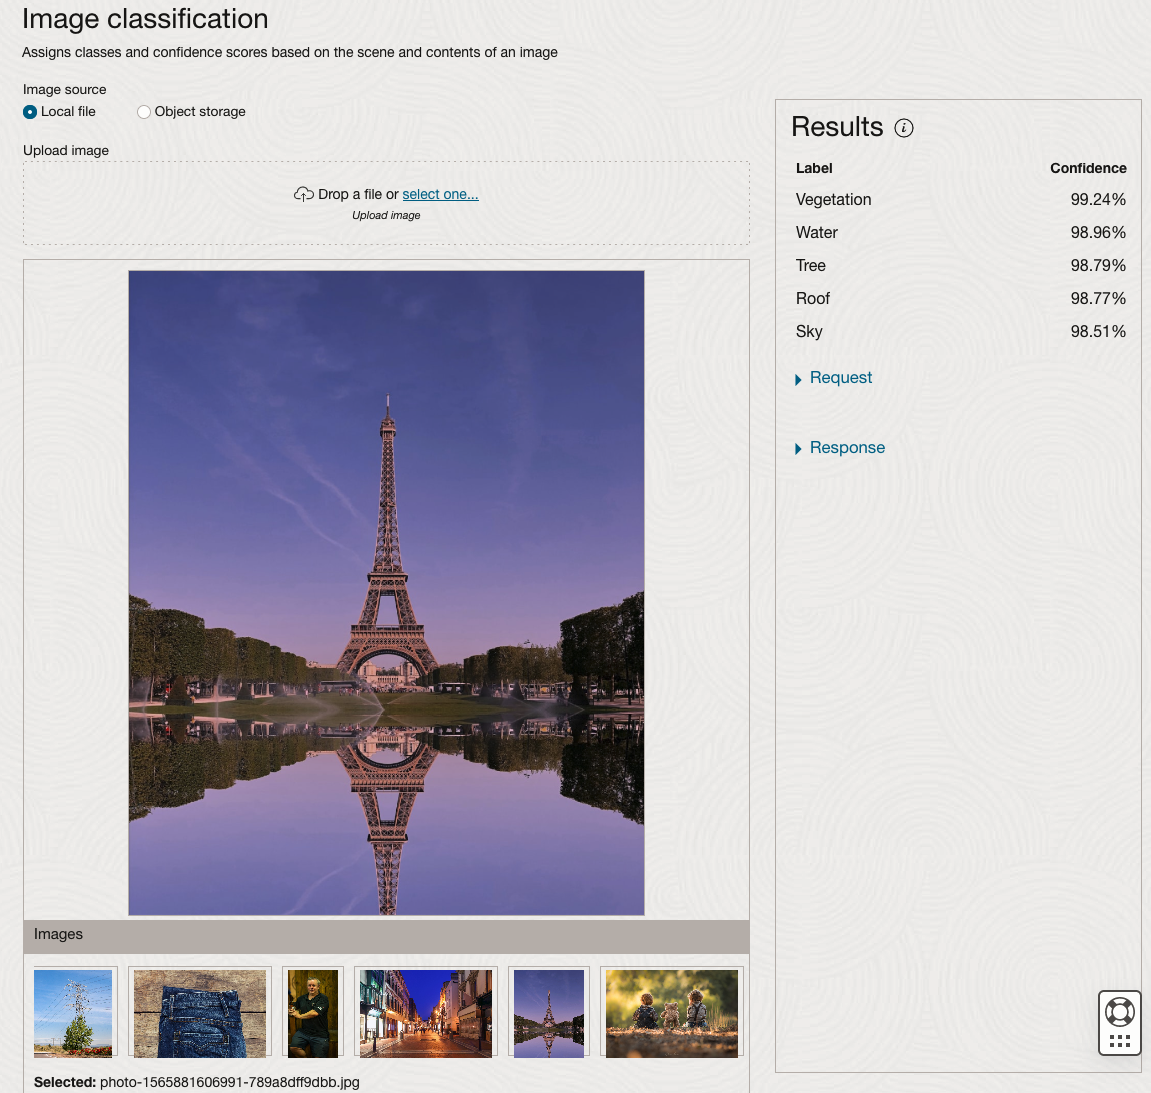
We can see the pre-trained model assigns classes and confidence for each image based on the main components it has identified in the image. For example with the Eiffel Tower image, the model has identified Water, Trees, Sky, Vegetation and Roof (of build). But it didn’t do so well with identifying the main object in the image as being a tower, or building of some form. Where with the streetscape image it was able to identify Street, Road, Building, Sky and Shadow.
Just under the Result section, we see two labels that can be expanded. One of these is the Response which contains JSON structure containing the labels, and confidences it has identified. This is what the pre-trained model returns and if you were to use Python to call this pre-trained model, it is this JSON object that you will get returned. You can then use the information contained in the JSON object to perform additional tasks for the image.
As you can see the webpage for OCI Vision and other AI services gives you a very simple introduction to what is possible, but it over simplifies the task and a lot of work is needed outside of this page to make the use of these pre-trained models useful.
Moving onto the Object Detection feature (left-hand menu) and using the pre-trained model on the same images, we get slightly different results.
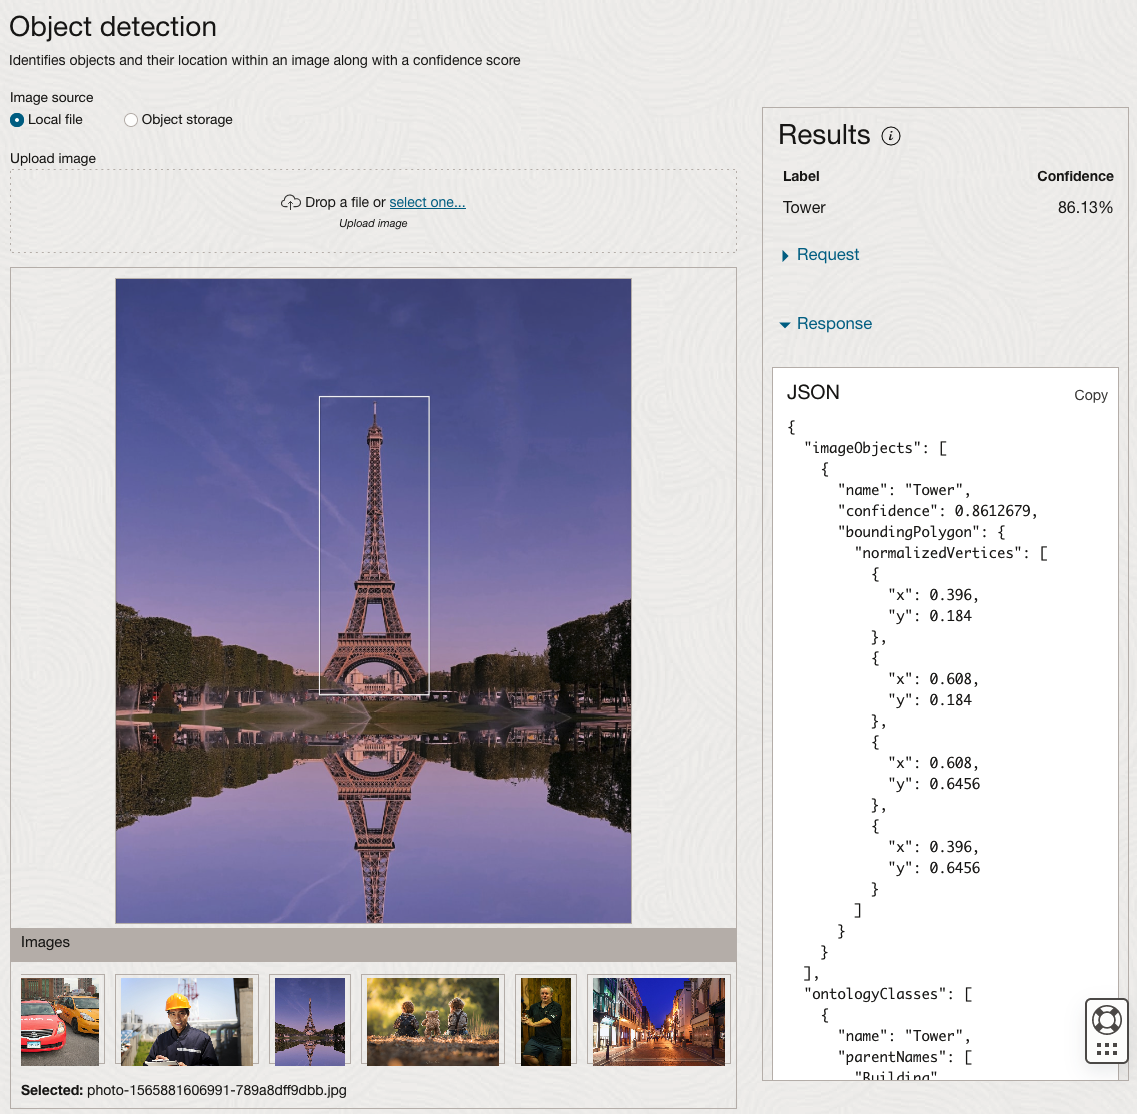
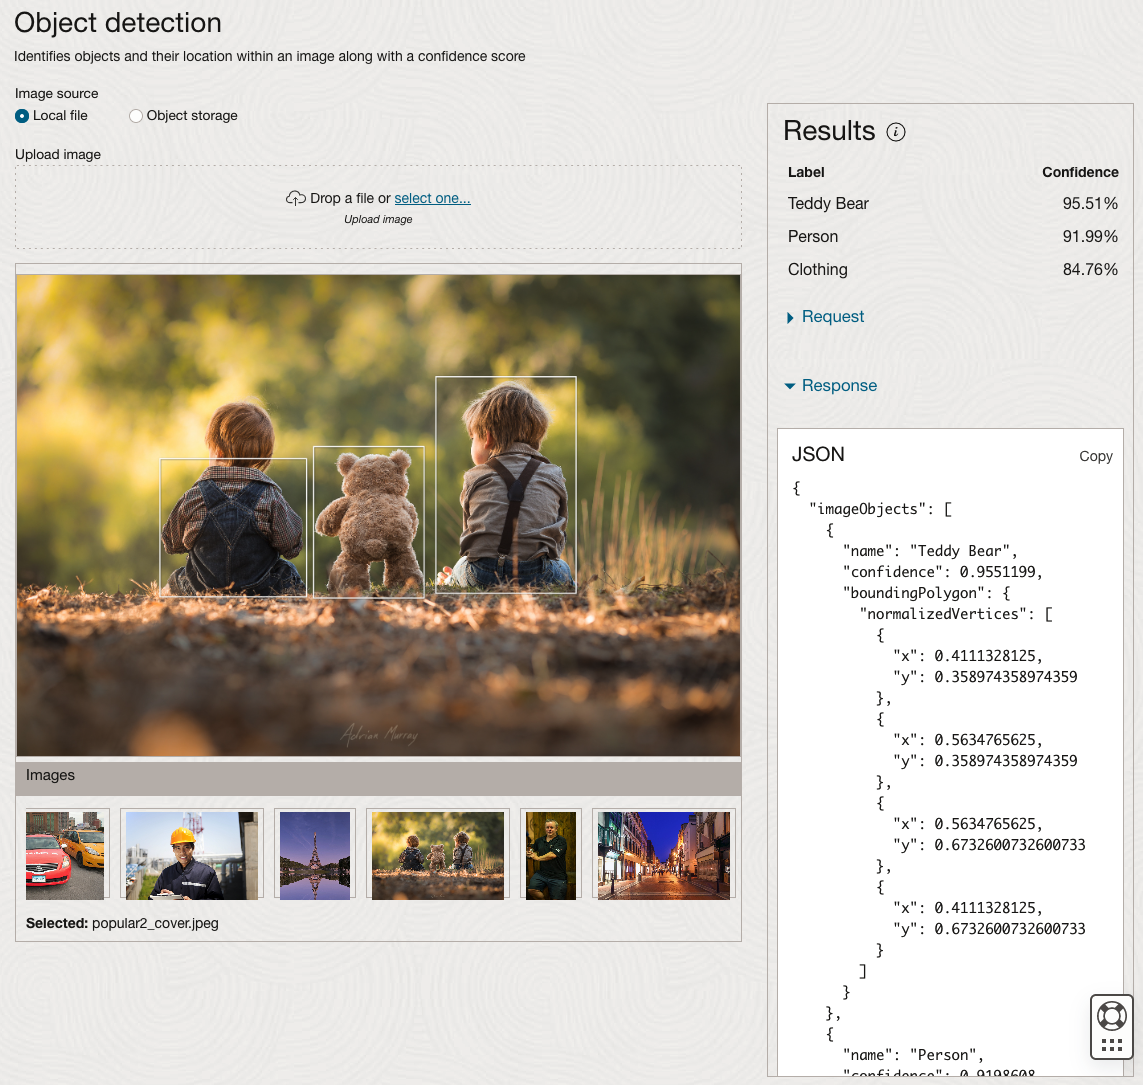
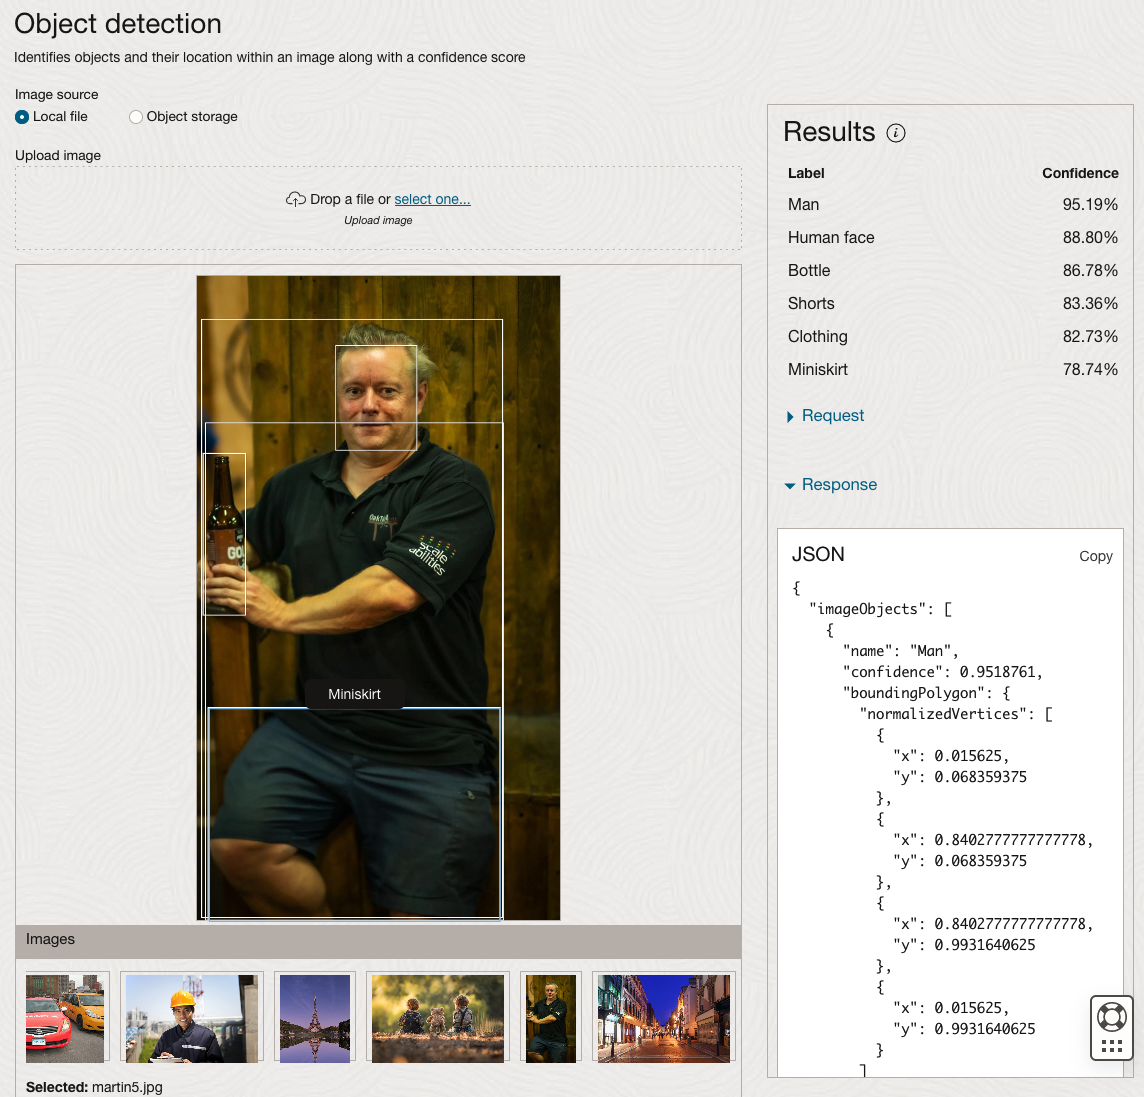
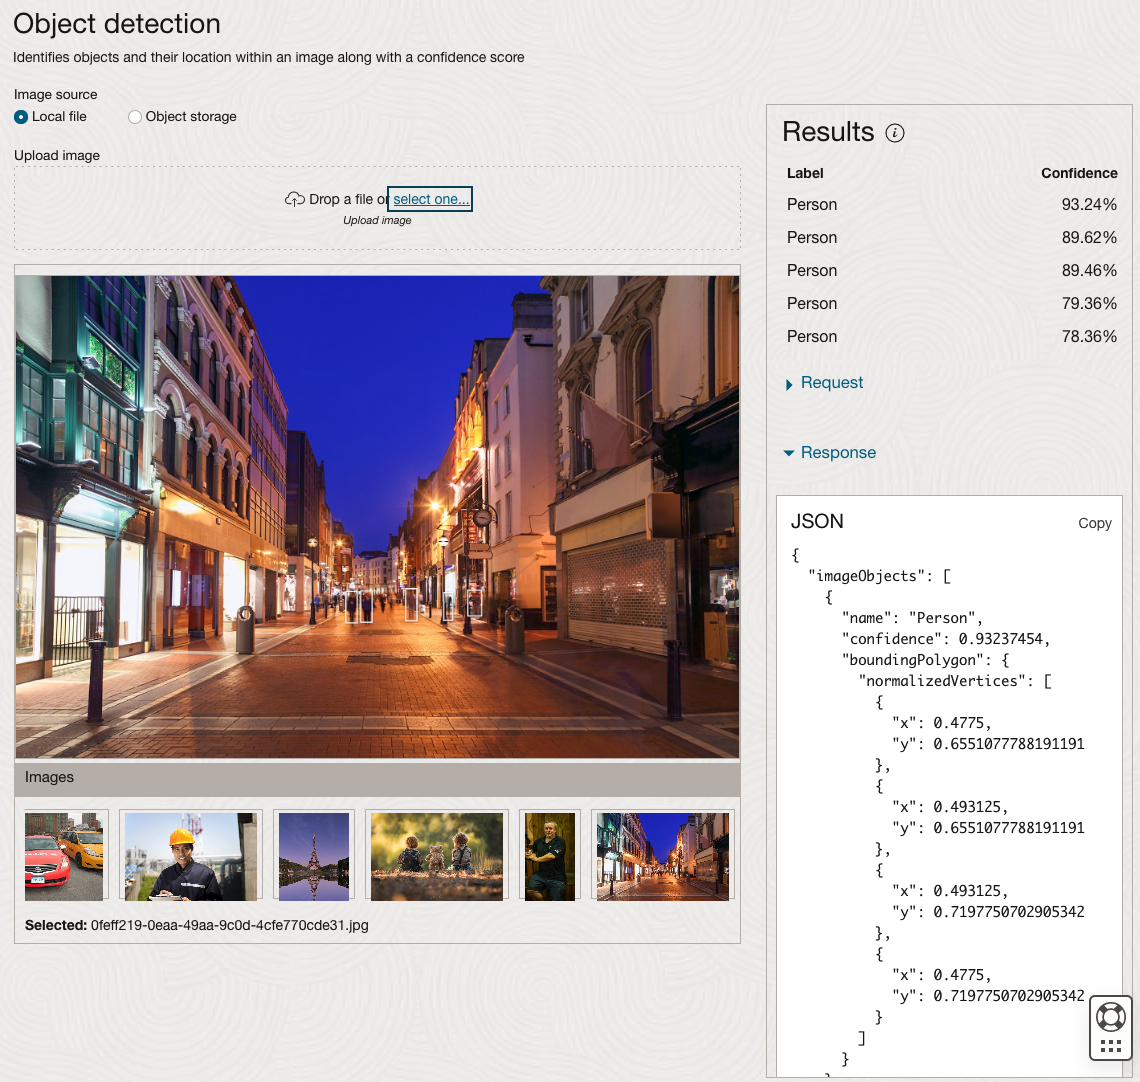
The object detection pre-trained model works differently as it can identify different things in the image. For example, with the Eiffel Tower image, it identifies a Tower in the image. In a similar way to the previous example, the model returns a JSON object with the label and also provides the coordinates for a bounding box for the objects detected. In the street scape image, it has identified five people. You’ll probably identify many more but the model identified five. Have a look at the other images and see what it has identified for each.
As I mentioned above, using these pre-trained models are kind of interesting, but are of limited use and do not really demonstrate the full capabilities of what is possible. Look out of additional post which will demonstrate this and steps needed to create and use your own custom model.
OCI:Vision Template for Policies
When using OCI you’ll need to configure your account and other users to have the necessary privileges and permissions to run the various offerings. OCI Vision is no different. You have two options for doing this. The first is to manually configure these. There isn’t a lot to do but some issues can arise. The other option is to use a template. The OCI Vision team have created a template of what is required and I’ll walk through the steps of setting this up along with some additional steps you’ll need.
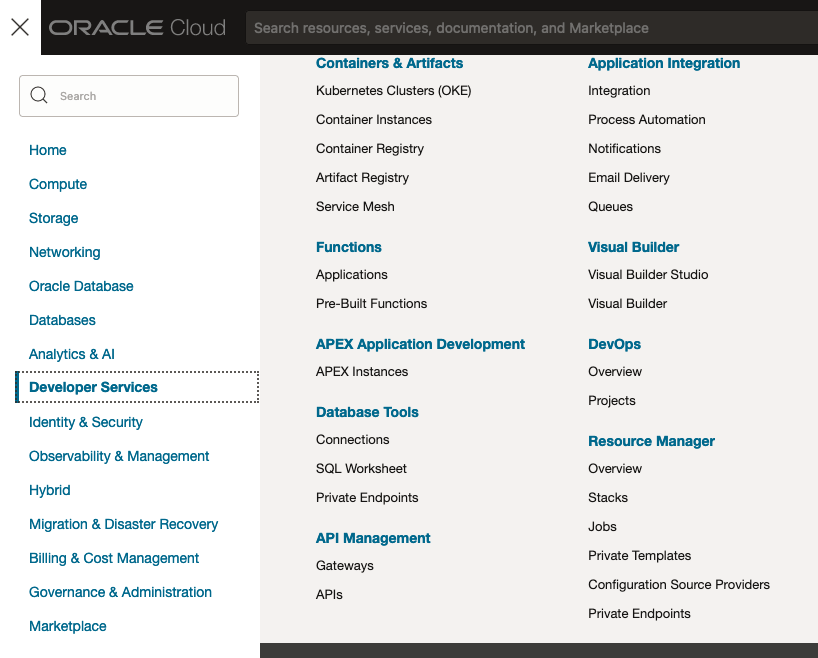
You’ll need to go to the Resource Manager page. This can be found under the menu by going to the Developer Services and then selecting Resource Manager.
First, you’ll need to go to the Resource Manager page. This can be found under the menu by going to the Developer Services and then selecting Resource Manager.
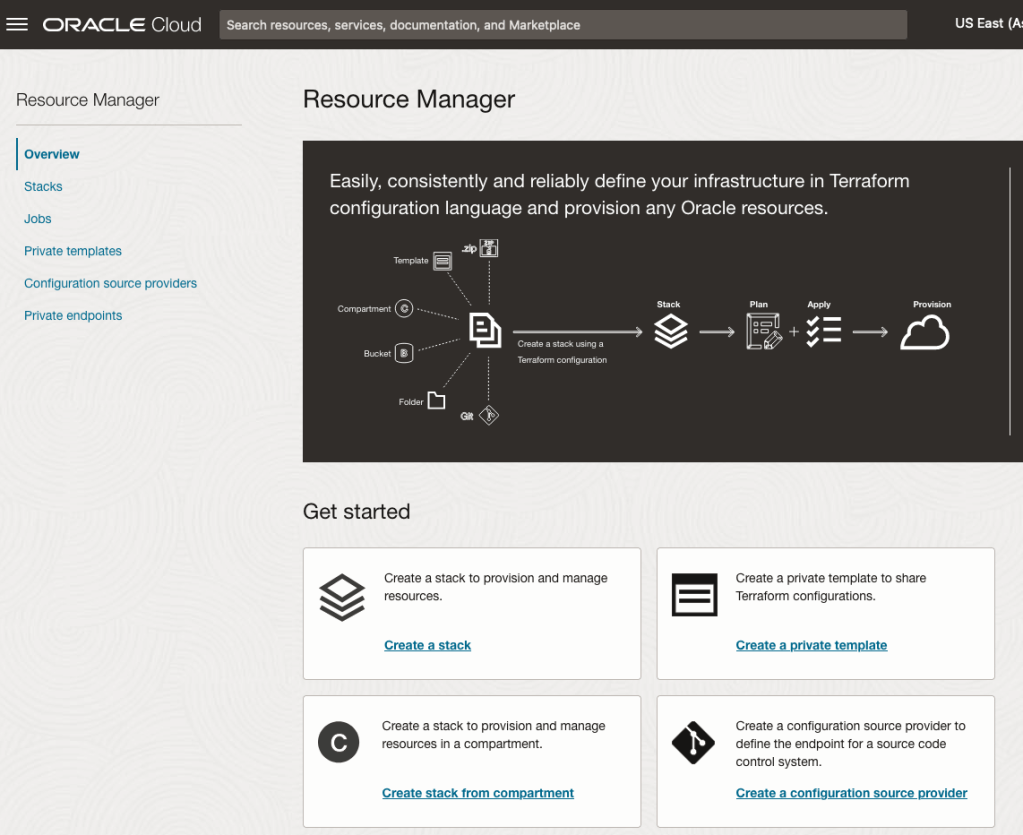
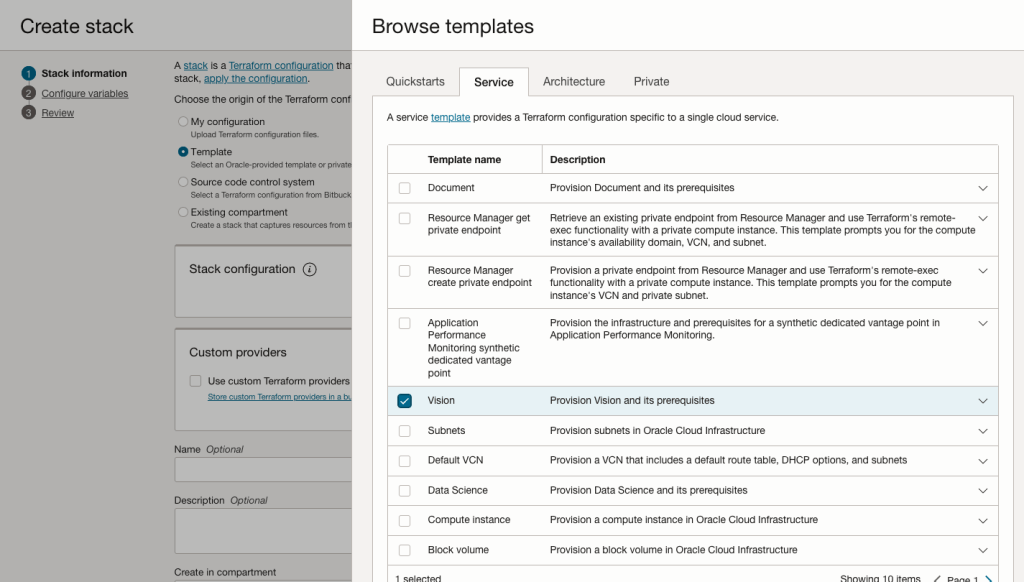
Located just under the main banner image you’ll see a section labelled ‘Create a stack’. Click on this link.
In the Create stack screen select Template from the radio group at the top of the page. Then in the Browse template pop-up screen, select the Service tab (across the top) and locate Vision. Once selected click the Select Template button.
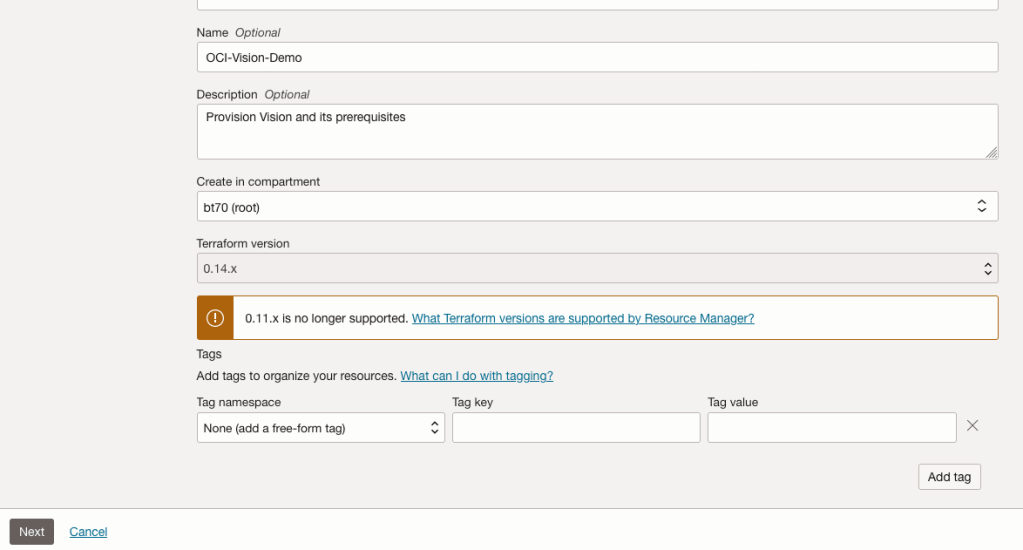
The page will load the necessary configuration. The only other thing you need to change on this page is the Name of the Service. Make it meaningful for you and your project. Click the Next button to continue to the next screen.
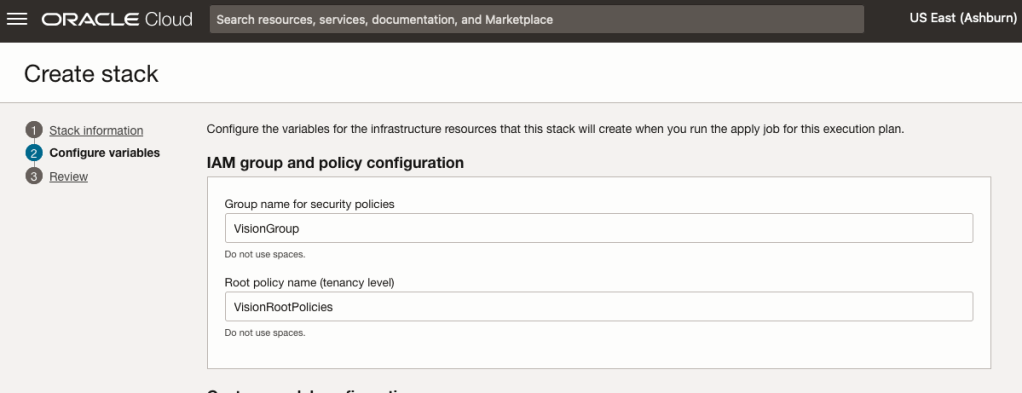
The top section relates to IAM Group name and policy configuration. You take the defaults or if you have specific groups already configured you can change it to it.
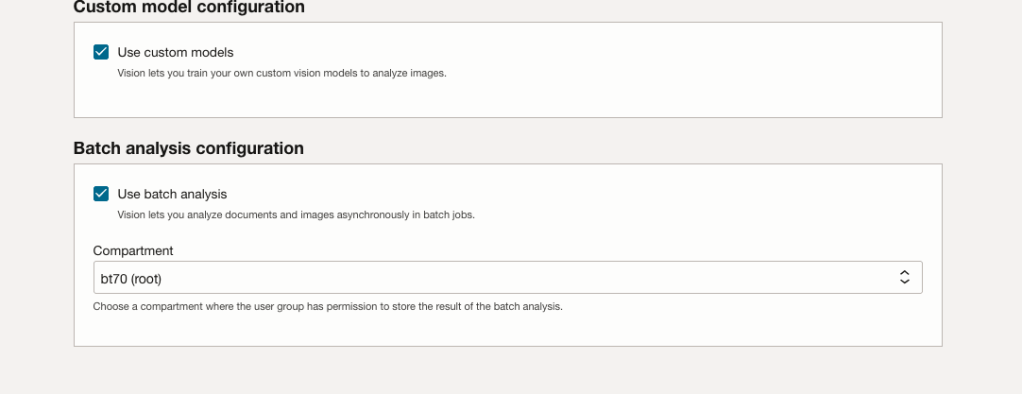
Most people will want to create their own customer models, as the supplied pre-built models are a bit basic. To enable Custom Built models, just tick the checkbox in the Custom Model Configuration section.
The second checkbox enables the batch processing of documents/images. If you check this box, you’ll need to specify the compartment you want the workload to be assigned to. Then click the Next button.
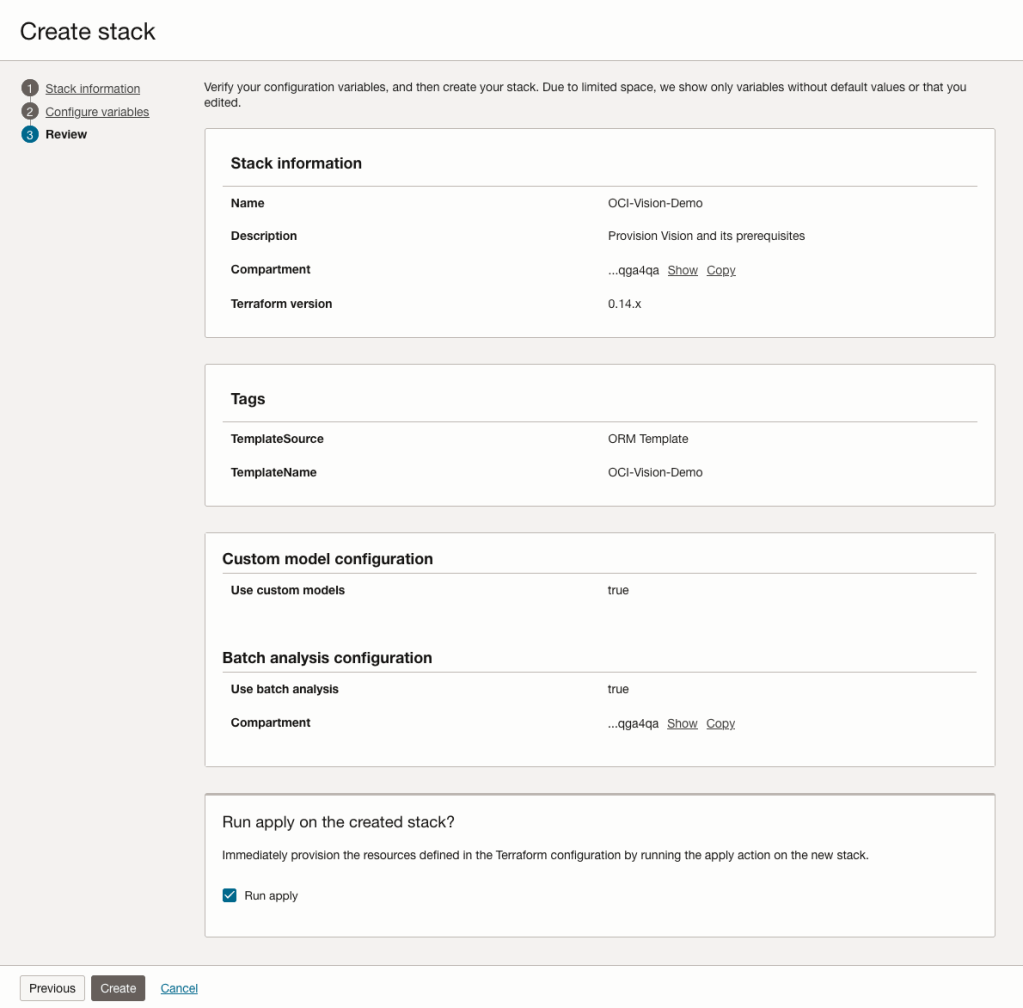
The final part displays a verification page of what was selected in the previous steps.
When ready click on the Run Apply check box and then click on the Create button.
It can take anything from a few seconds or a couple of minutes for the scripts to run.
When completed you’ll a Green box at the top of the screen and the message ‘SUCCEEDED’ under it.

When OCI doesn’t know who you are
When you are logged into your Oracle Cloud account and they give you a link to follow, which should bring you to another page in your account, but it doesn’t. The link (which is automatically generated by OCI) is formed incorrectly and gives you something like the following.

Have a look at the address bar. You will see a part saying /users/undefined. That’s the problem, the link was not defined or created correctly. Although you are logged into your account, in theory, things like this should work correctly and from talking to other people about their OCI accounts, they don’t have the same problem, as it just works as expected.
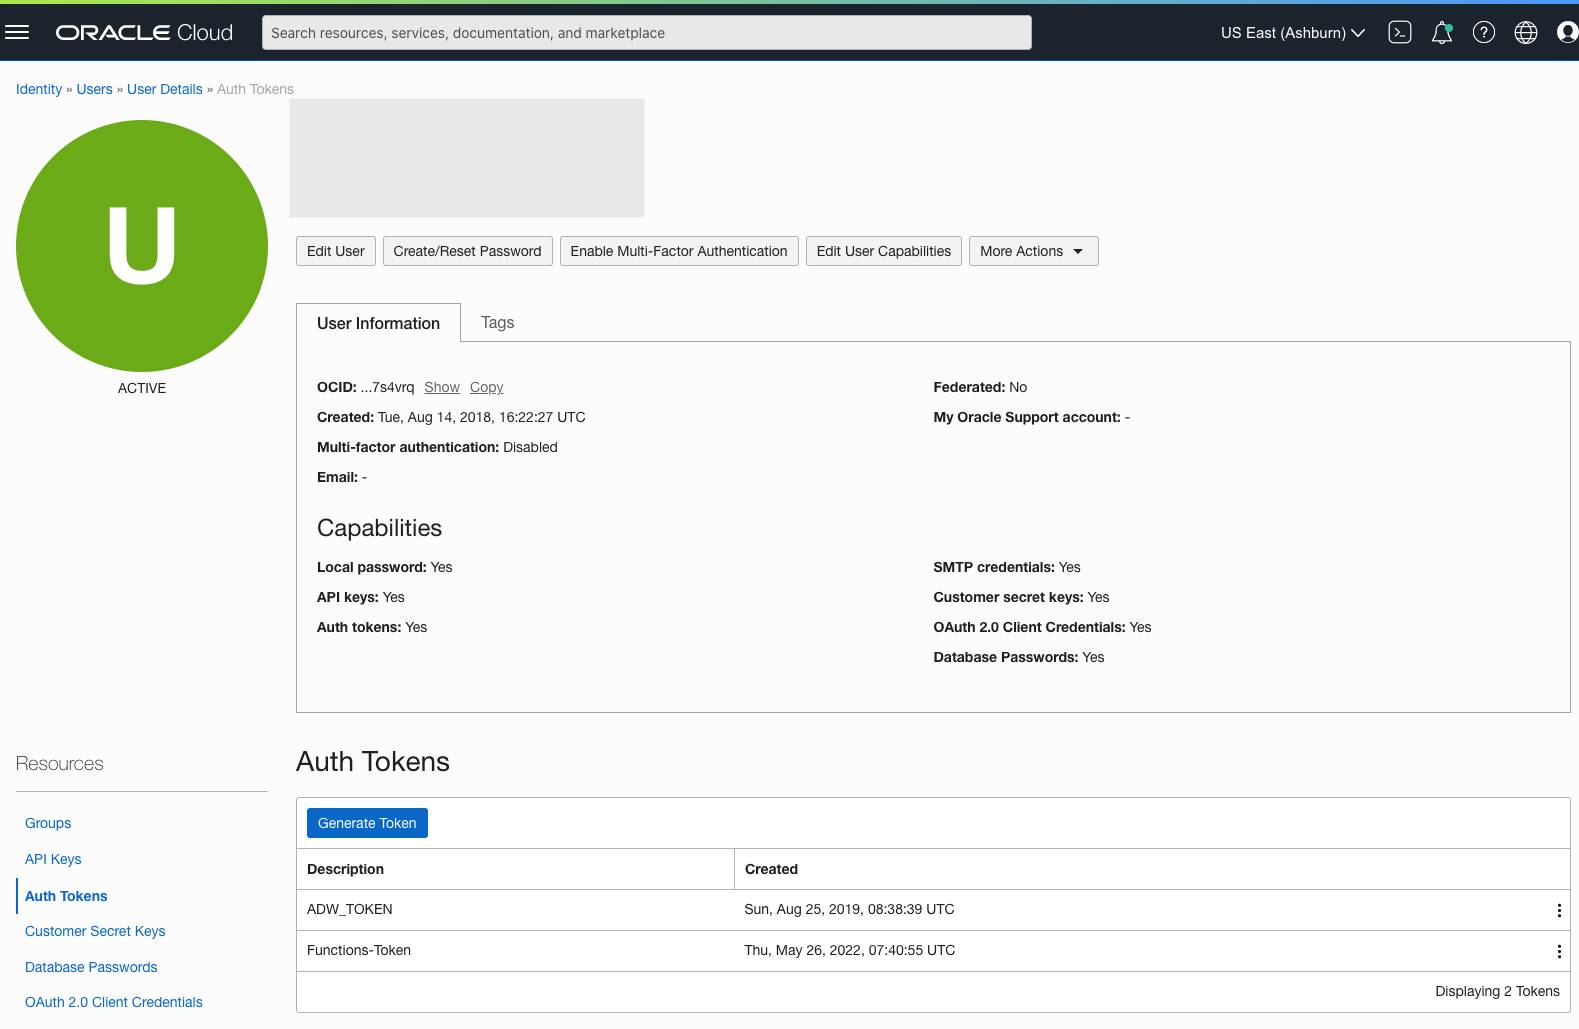
What can you do to work around this? The first thing you need to do is locate your user OCID. This is located on some Services pages in OCI. Alternatively, go to Users in the Identity & Security menu section.

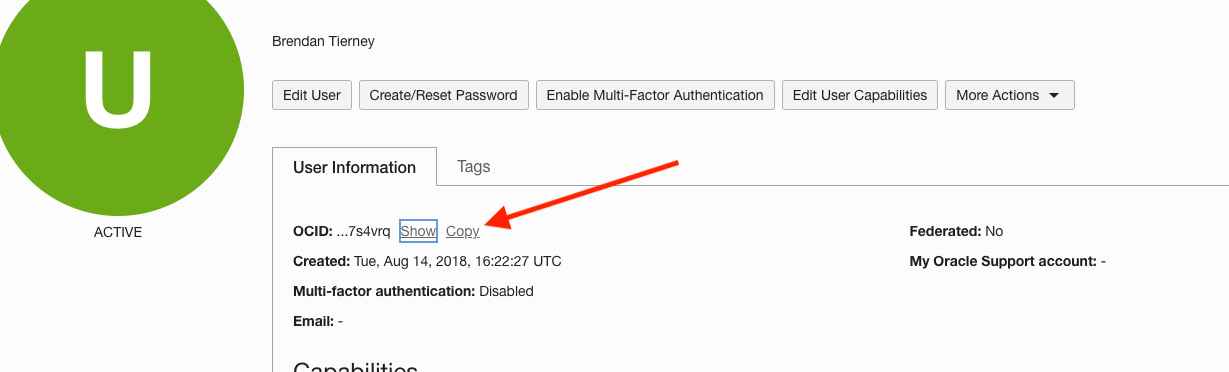
Now go back to the page/link which gives the error, as shown in the first image, locate the undefined work in the address bar, and replace it with the OCID for the user. The link will look something like this (only a subset of link is shown.
https://cloud.oracle.com/identity/users/ocid1.user.oc1..a
The page should now load without any errors.
What’s causing this error? That’s a good question and the true answer to it is unknown (at this point in time). But from some investigation and comparing my OCI account with other people there does seem to be some anomalies with my OCI user accounts and syncing of these between OCI classic and the current version. My OCI account is missing a federated account. I’m not sure if this is the exact difference but it does seem to be a missing element when compared to other people’s accounts. Why has this happened to me? Well that is something for the OCI teams who looks after setting up accounts to look into. Maybe there are others out there.
In the mean time, if you have encountered the same problem as me, the fix/solution outlined above should work for you.
Oracle OCI AI Services
Oracle Cloud have been introducing new AI Services over the past few months, and we see a few more appearing over the coming few months. When you look at the list you might be a little surprised that these are newly available cloud services from Oracle. You might be surprised for two main reasons. Firstly, AWS and Google have similar cloud services available for some time (many years) now, and secondly, Oracle started talking about having these cloud services many years ago. It has taken some time for these to become publicly available. Although some of these have been included in other applications and offerings from Oracle, so probably they were busy with those before making them available as stand alone services.

These can be located in your Oracle Cloud account from the hamburger menu, as shown below

As you can see most of these AI Services are listed, except for the OCI Forecasting, which is due to be added “soon”. We can also expect to have an OCI Translation services and possibly some additional ones.
- OCI Language: This services can work with over 75 languages and allows you to detect and perform knowledge extraction from the text to include entity identification and labelling, classification of text into more than 600 categories, sentiment analysis and key phrase extraction. This can be used automate knolwedge extraction from customer feedback, product reviews, discussion forums, legal documents, etc
- OCI Speech: Performs Speech to Text, from live streaming of speech, audio and video recordings, etc creating a transcription. It works across English, Spanish and Portuguese, with other languages to be added. A nice little feature includes Profanity filtering, allowing you to tag, remove or mask certain words
- OCI Vision: This has two parts. The first is for processing documents, and is slightly different to OCI Language Service, in that this service looks at processing text documents in jpeg, pdf, png and tiff formats. Text information extraction is performed identifying keep terms, tables, meta-data extraction, table extraction etc. The second part of OCI Vision deals with image analysis and extracting key information from the image such as objects, people, text, image classification, scene detection, etc. You can use either the pretrained models or include your own models.
- OCI Anomaly Detection: Although anomaly detection is available via algorithms in the Database and OCI Data Science offerings, this new services allow for someone with little programming experience to utilise an ensemble of models, including the MSET algorithm, to provide greater accuracy with identifying unusual patterns in the data.
Note: I’ve excluded some services from the above list as these have been available for some time now or have limited AI features included in them. These include OCI Data Labelling, OCI Digital Assistant.
Some of these AI Services, based on the initial release, have limited functionality and resources, but this will change over time.
- ← Previous
- 1
- 2
- 3
- Next →

You must be logged in to post a comment.