
ATP
oracledb Python Library – Connect to DB & a few other changes
Oracle have released a new Python library for connecting to Oracle Databases on-premises and on the Cloud. It’s called (very imaginatively, yet very clearly) oracledb. This new Python library replaces the previous library called cx_Oracle. Just consider cx_oracle as obsolete, and use oracledb going forward, as all development work on new features and enhancements will be done to oracledb.
cx_oracle has been around a long time, and it’s about time we have a new and enhanced library that is more flexible and will suit many different deployment scenarios. The previous library (cx_Oracle) was great, but it did require additional software installation with Oracle Client, and some OS environment settings, which at times took a bit of debugging. This makes it difficult/challenging to deploy in different environments, for example IOTs, CI/CD, containers, etc. Deployment environments have changed and the new oracledb library makes it simpler.
To check out the following links for a full list of new features and other details.
Home page: oracle.github.io/python-oracledb
Installation instructions: python-oracledb.readthedocs.io/en/latest/installation.html
Documentation: python-oracledb.readthedocs.io
One of the main differences between the two libraries is how you connect to the Database. With oracledb you need to use named the parameters, and the new library uses a thin connection. If you need the thick connection you can switch to that easily enough.
The following examples will illustrate how to connect to Oracle Database (local and cloud ADW/ATP) and how these are different to using the cx_Oracle library (which needed Oracle Client software installed). Remember the new oracledb library does not need Oracle Client.
To get started, install oracledb.
pip3 install oracledbLocal Database (running in Docker)
To test connection to a local Database I’m using a Docker image of 21c (hence localhost in this example, replace with IP address for your database). Using the previous library (cx_Oracle) you could concatenate the connection details to form a string and pass that to the connection. With oracledb, you need to use named parameters and specify each part of the connection separately.
This example illustrates this simple connection and prints out some useful information about the connection, do we have a healthy connection, are we using thing database connection and what version is the connection library.
p_username = "..."
p_password = "..."
p_dns = "localhost/XEPDB1"
p_port = "1521"

con = oracledb.connect(user=p_username, password=p_password, dsn=p_dns, port=p_port)

print(con.is_healthy())
print(con.thin)
print(con.version)
---

True
True
21.3.0.0.0
Having created the connection we can now query the Database and close the connection.
cur = con.cursor()
cur.execute('select table_name from user_tables')

for row in cur:
      print(row)

---
('WHISKIES_DATASET',)
('HOLIDAY',)
('STAGE',)
('DIRECTIONS',)
---

cur.close()
con.close()
The code I’ve given above is simple and straight forward. And if you are converting from cx_Oracle, you will probably have minimal changes as you probably had your parameter keywords defined in your code. If not, some simple editing is needed.
To simplify the above code even more, the following does all the same steps without the explicit open and close statements, as these are implicit in this example.
import oracledb

con = oracledb.connect(user=p_username, password=p_password, dsn=p_dns, port=p_port)
with con.cursor() as cursor:
  for row in cursor.execute('select table_name from user_tables'):
      print(row)
(Basic) Oracle Cloud – Autonomous Database, ATP/ADW
Everyone is using the Cloud, Right? If you believe the marketing they are, but in reality most will be working in some hybrid world using a mixture of on-premises and cloud storage. The example given in the previous section illustrated connecting to a local/on-premises database. Let’s now look at connecting to a database on Oracle Cloud (Autonomous Database, ATP/ADW).
With the oracledb library things have been simplified a little. In this section I’ll illustrate a simple connection to a ATP/ADW using a thin connection.
What you need is the location of the directory containing the unzipped wallet file. No Oracle client is needed. If you haven’t downloaded a Wallet file in a while, you should go download a new version of it. The Wallet will contain a pem file which is needed to securely connect to the DB. You’ll also need the password for the Wallet, so talk nicely with your DBA. When setting up the connection you need to provide the directory for the tnsnames.ora file and the ewallet.pem file. If you have downloaded and unzipped the Wallet, these will be in the same directory
import oracledb

p_username = "..."
p_password = "..."

p_walletpass = '...'

#This time we specify the location of the wallet
con = oracledb.connect(user=p_username, password=p_password, dsn="student_high",
                       config_dir="/Users/brendan.tierney/Dropbox/5-Database-Wallets/Wallet_student-Full",
                       wallet_location="/Users/brendan.tierney/Dropbox/5-Database-Wallets/Wallet_student-Full",
                       wallet_password=p_walletpass)

print(con)
con.close()
This method allows you to easily connect to any Oracle Cloud Database.
(Thick Connection) Oracle Cloud – Autonomous Database, ATP/ADW
If you have Oracle Client already installed and set up, and you want to use a thick connection, you will need to initialize the function init_oracle_client.
import oracledb

p_username = "..."
p_password = "..."

#point to directory containing tnsnames.ora
oracledb.init_oracle_client(config_dir="/Applications/instantclient_19_8/network/admin")

con = oracledb.connect(user=p_username, password=p_password, dsn="student_high")

print(con)

con.close()
Warning: Some care is needed with using init_oracle_client. If you use it once in your Python code or App then all connections will use it. You might need to do a code review to look at when this is needed and if not remove all occurrences of it from your Python code.
(Additional Security) Oracle Cloud – Autonomous Database, ATP/ADW
There are a few other additional ways of connecting to a database, but one of my favorite ways to connect involves some additional security, particularly when working with IOT devices, or in scenarios that additional security is needed. Two of these involve using One-way TLS and Mututal TLS connections. The following gives an example of setting up One-Way TLS. This involves setting up the Database to only received data and connections from one particular device via an IP address. This requires you to know the IP address of the device you are using and running the code to connect to the ATP/ADW Database.
To set this up, go to the ATP/ADW details in Oracle Cloud, edit the Access Control List, add the IP address of the client device, disable mutual TLS and download the DB Connection. The following code gives and example of setting up a connection
import oracledb

p_username = "..."
p_password = "..."

adw_dsn = '''(description= (retry_count=20)(retry_delay=3)(address=(protocol=tcps)(port=1522)
             (host=adb.us-ashburn-1.oraclecloud.com))(connect_data=(service_name=a8rk428ojzuffy_student_high.adb.oraclecloud.com))
             (security=(ssl_server_cert_dn="CN=adwc.uscom-east-1.oraclecloud.com,OU=Oracle BMCS US,O=Oracle Corporation,L=Redwood City,ST=California,C=US")))'''

con4 = oracledb.connect(user=p_username, password=p_password, dsn=adw_dsn)
This sets up a secure connection between the client device and the Database.
From my initial testing of existing code/applications (although no formal test cases) it does appear the new oracledb library is processing the queries and data quicker than cx_Oracle. This is good and hopefully we will see more improvements with speed in later releases.
Also don’t forget the impact of changing the buffer size for your database connection. This can have a dramatic effect on speeding up your database interactions. Check out this post which illustrates this.
Loading and Reading Binary files in Oracle Database using Python
Most Python example show how to load data into a database table. In this blog post I’ll show you how to load a binary file, for example a picture, into a table in an Oracle Autonomous Database (ATP or ADW) and how to read that same image back using Python.
Before we can do this, we need to setup a few things. These include,
Let’s use the following table
CREATE TABLE demo_blob (
   id     NUMBER PRIMARY KEY,
   image_txt   VARCHAR2(100),
   image   BLOB);
Now let’s get onto the fun bit of loading a image file into this table. The image I’m going to use is the cover of my Data Science book published by MIT Press.

I have this file saved in ‘…/MyBooks/DataScience/BookCover.jpg’.
#Read the binary file
with open (".../MyBooks/DataScience/BookCover.jpg", 'rb') as file:
    blob_file = file.read()

#Display some details of file
print('Length =', len(blob_file))
print('Printing first part of file')
print(blob_file[:50])
Now define the insert statement and setup a cursor to process the insert statement;
#define prepared statement
inst_blob = 'insert into demo_blob (id, image_txt, image) values (:1, :2, :3)'

#connection created using cx_Oracle - see links earlier in post
cur = con.cursor()
Now insert the data and the binary file.
#setup values for attributes
idNum = 1
imageText = 'Demo inserting Blob file'
#insert data into table
cur.execute(inst_blob, (idNum, imageText, blob_file))

#close and finish
cur.close() #close the cursor
con.close() #close the database connection
The image is now saved in the database table. You can use Python to retrieve it or use other tools to view the image.
For example using SQL Developer, query the table and in the results window double click on the blob value. A window pops open and you can view on the image from there by clicking on the check box.
Now that we have the image loads into an Oracle Database the next step is the Python code to read and display the image.
#define prepared statement
qry_blog = 'select id, image_txt, image from demo_blob where id = :1'

#connection created using cx_Oracle - see links earlier in post
cur = con.cursor()
#setup values for attributes
idNum = 1
#execute the query
#query the data and blob data
connection.outputtypehandler = OutputTypeHandler
cur.execute(qry_blob, (idNum))
id, desc, blob_data = cur.fetchone()

#write the blob data to file
newFileName = '.../MyBooks/DataScience/DummyImage.jpg'
with open(newFileName, 'wb') as file:
   file.write(blob_data)
#close and finish
cur.close() #close the cursor
con.close() #close the database connection
GoLang – Consuming Oracle REST API from an Oracle Cloud Database)
Does anyone write code to access data in a database anymore, and by code I mean SQL? The answer to this question is ‘It Depends’, just like everything in IT.
Using REST APIs is very common for accessing processing data with a Database. From using an API to retrieve data, to using a slightly different API to insert data, and using other typical REST functions to perform your typical CRUD operations. Using REST APIs allows developers to focus on write efficient applications in a particular application, instead of having to swap between their programming language and SQL. In later cases most developers are not expert SQL developer or know how to work efficiently with the data. Therefore leave the SQL and procedural coding to those who are good at that, and then expose the data and their code via REST APIs. The end result is efficient SQL and Database coding, and efficient application coding. This is a win-win for everyone.
I’ve written before about creating REST APIs in an Oracle Cloud Database (DBaaS and Autonomous). In these writings I’ve shown how to use the in-database machine learning features and to use REST APIs to create an interface to the Machine Learning models. These models can be used to to score new data, making a machine learning prediction. The data being used for the prediction doesn’t have to exist in the database, instead the database is being used as a machine learning scoring engine, accessed using a REST API.
In that article I showed how easy it was to use the in-database machine model using Python.
Python has a huge fan and user base, but some of the challenges with Python is with performance, as it is an interrupted language. Don’t get be wrong on this, as lots of work has gone into making Python more efficient. But in some scenarios it just isn’t fast enough. In does scenarios people will switch into using other quicker to execute languages such as C, C++, Java and GoLang.
Here is the GoLang code to call the in-database machine learning model and process the returned data.
import (
    "bytes"
    "encoding/json"
    "fmt"
    "io/ioutil"
    "net/http"
    "os"
)

func main() {
    fmt.Println("---------------------------------------------------")
    fmt.Println("Starting Demo - Calling Oracle in-database ML Model")
    fmt.Println("")

    // Define variables for REST API and parameter for first prediction
    rest_api = "<full REST API>"

    // This wine is Bad
    a_country := "Portugal"
    a_province := "Douro"
    a_variety := "Portuguese Red"
    a_price := "30"

    // call the REST API adding in the parameters
    response, err := http.Get(rest_api +"/"+ a_country +"/"+ a_province +"/"+ a_variety +"/"+ a_price)
    if err != nil {
        // an error has occurred. Exit
        fmt.Printf("The HTTP request failed with error :: %s\n", err)
        os.Exit(1)
    } else {
        // we got data! Now extract it and print to screen
        responseData, _ := ioutil.ReadAll(response.Body)
        fmt.Println(string(responseData))
    }
    response.Body.Close()

    // Lets do call it again with a different set of parameters

    // This wine is Good - same details except the price is different
    a_price := "31"

    // call the REST API adding in the parameters
    response, err := http.Get(rest_api +"/"+ a_country +"/"+ a_province +"/"+ a_variety +"/"+ a_price)
    if err != nil {
        // an error has occurred. Exit
        fmt.Printf("The HTTP request failed with error :: %s\n", err)
        os.Exit(1)
    } else {
        responseData, _ := ioutil.ReadAll(response.Body)
        fmt.Println(string(responseData))
    }
    defer response.Body.Close()

    // All done!
    fmt.Println("")
    fmt.Println("...Finished Demo ...")
    fmt.Println("---------------------------------------------------")
}
Python-Connecting to multiple Oracle Autonomous DBs in one program
More and more people are using the FREE Oracle Autonomous Database for building new new applications, or are migrating to it.
I’ve previously written about connecting to an Oracle Database using Python. Check out that post for details of how to setup Oracle Client and the Oracle Python library cx_Oracle.
In thatblog post I gave examples of connecting to an Oracle Database using the HostName (or IP address), the Service Name or the SID.
But with the Autonomous Oracle Database things are a little bit different. With the Autonomous Oracle Database (ADW or ATP) you will need to use an Oracle Wallet file. This file contains some of the connection details, but you don’t have access to ServiceName/SID, HostName, etc. Instead you have the name of the Autonomous Database. The Wallet is used to create a secure connection to the Autonomous Database.
You can download the Wallet file from the Database console on Oracle Cloud.

Most people end up working with multiple database. Sometimes these can be combined into one TNSNAMES file. This can make things simple and easy. To use the download TNSNAME file you will need to set the TNS_ADMIN environment variable. This will allow Python and cx_Oracle library to automatically pick up this file and you can connect to the ATP/ADW Database.
But most people don’t work with just a single database or use a single TNSNAMES file. In most cases you need to switch between different database connections and hence need to use multiple TNSNAMES files.
The question is how can you switch between ATP/ADW Database using different TNSNAMES files while inside one Python program?
Use the os.environ setting in Python. This allows you to reassign the TNS_ADMIN environment variable to point to a new directory containing the TNSNAMES file. This is a temporary assignment and over rides the TNS_ADMIN environment variable.
For example,
import cx_Oracle
import os

os.environ['TNS_ADMIN'] = "/Users/brendan.tierney/Dropbox/wallet_ATP"

p_username = ''p_password = ''p_service = 'atp_high'
con = cx_Oracle.connect(p_username, p_password, p_service)

print(con)
print(con.version)
con.close()
I can now easily switch to another ATP/ADW Database, in the same Python program, by changing the value of os.environ and opening a new connection.
import cx_Oracle
import os

os.environ['TNS_ADMIN'] = "/Users/brendan.tierney/Dropbox/wallet_ATP"
p_username = ''
p_password = ''
p_service = 'atp_high'
con1 = cx_Oracle.connect(p_username, p_password, p_service)
...
con1.close()

...
os.environ['TNS_ADMIN'] = "/Users/brendan.tierney/Dropbox/wallet_ADW2"
p_username = ''
p_password = ''
p_service = 'ADW2_high'
con2 = cx_Oracle.connect(p_username, p_password, p_service)
...
con2.close()
As mentioned previously the setting and resetting of TNS_ADMIN using os.environ, is only temporary, and when your Python program exists or completes the original value for this environment variable will remain.
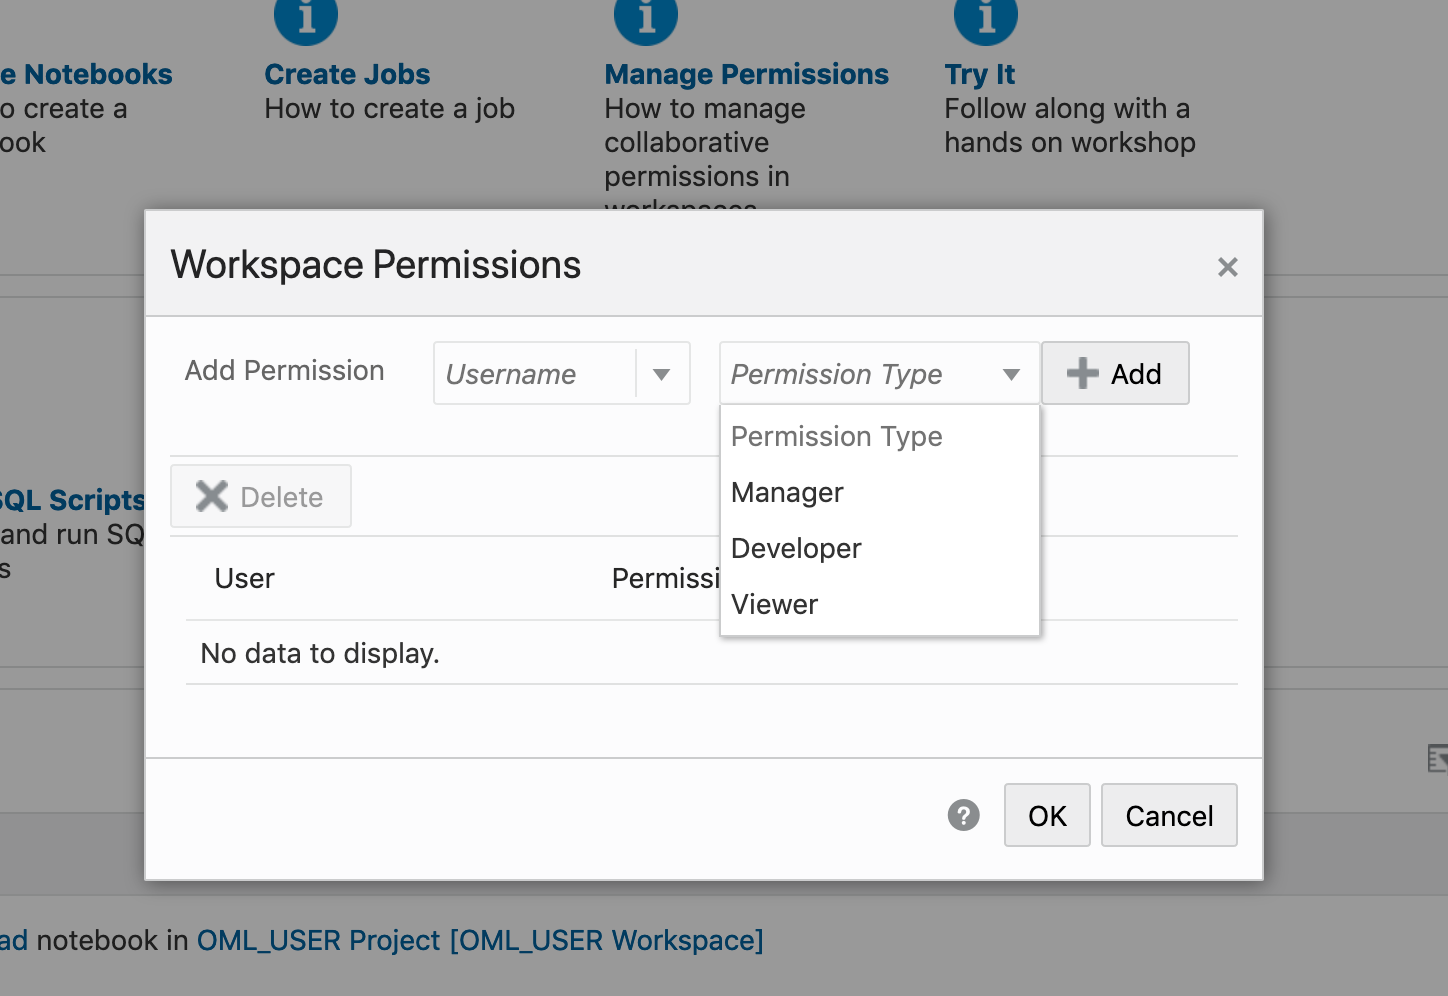
OML Workspace Permissions
When working with Oracle Machine Learning (OML) you are creating notebooks which focus on a particular data exploration and possibly some machine learning. Despite it’s name, OML is used extensively for data discovery and data exploration.
One of the aims of using OML, or notebooks in general, is that these can be easily shared with other people either within the same team or beyond. Something to consider when sharing notebooks is what you are allowing other people do with your notebook. Without any permissions you are allowing people to inspect, run and modify the notebooks. This can be a problem because those people you are sharing with may or may not be allowed to make modification. Some people should be able to just view the notebook, and others should be able to more advanced tasks.
With OML Notebooks there are four primary types of people who can access Notebooks and these can have different privileges. These are defined as
- Developer : Can create new notebooks withing a project and workspace but cannot create a workspace or a project. Can create and run a notebook as a scheduled job.
- Viewer : They can just view projects, Workspaces and notebooks. They are not allowed to create or run anything.
- Manager : can create new notebooks and projects. But only view Workspaces. Additionally they can schedule notebook jobs.
- Administrators : Administrators of the OML environment do not have any edit capabilities on notebooks. But they can view them.

OML Notebooks Interpreter Bindings
When using Oracle Machine Learning notebooks, you can export and import these between different projects and different environments (from ADW to ATP).
But something to watch out for when you import a notebook into your ADW or ATP environment is to reset the Interpreter Bindings.
When you create a new OML Notebook and build it up, the various Interpreter Bindings are automatically set or turned on. But for Imported OML Notebooks they are not turned on.
I’m assuming this will be fixed at some future point.
If you import an OML Notebook and turn on the Interpreter Bindings you may find the code in your notebook cells running very slowly
To turn on these binding, click on the options icon as indicated by the red box in the following image.

You will get something like the following being displayed. None of the bindings are highlighted.
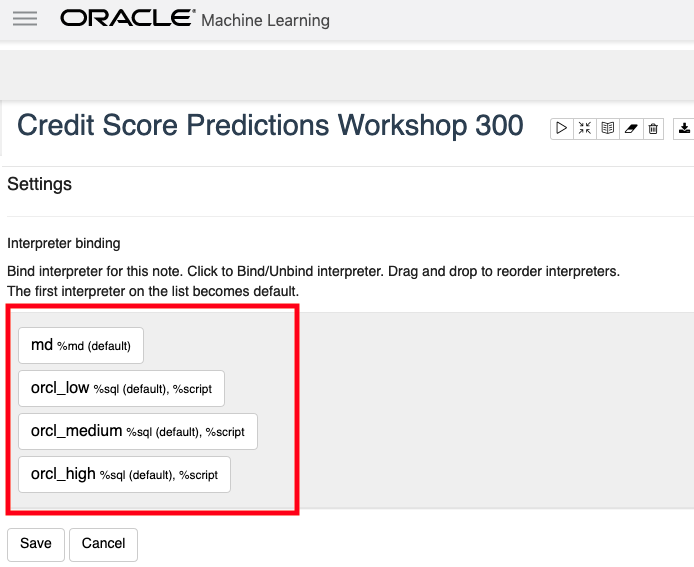
To enable the Interpreter Bindings just click on each of these boxes. When you do this each one will be highlighted and will turn a blue color.
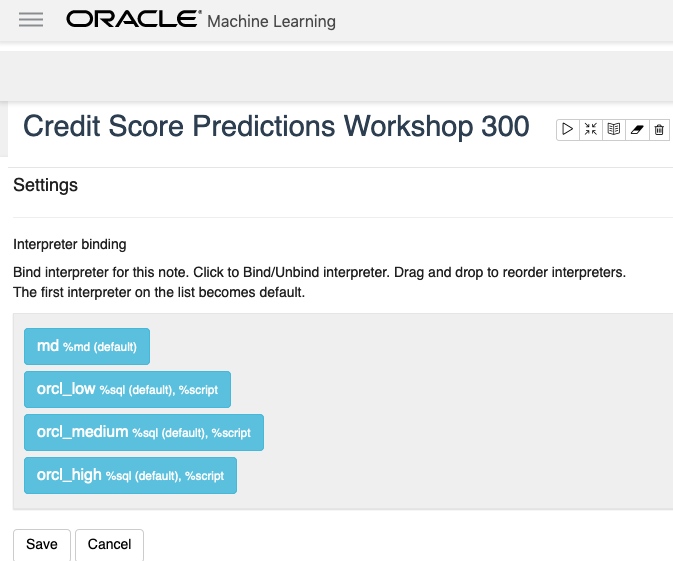
All done! You can now run your OML Notebooks without any problems or delays.

You must be logged in to post a comment.