
cloud
Why Choose Apache Iceberg for Data Interoperability?
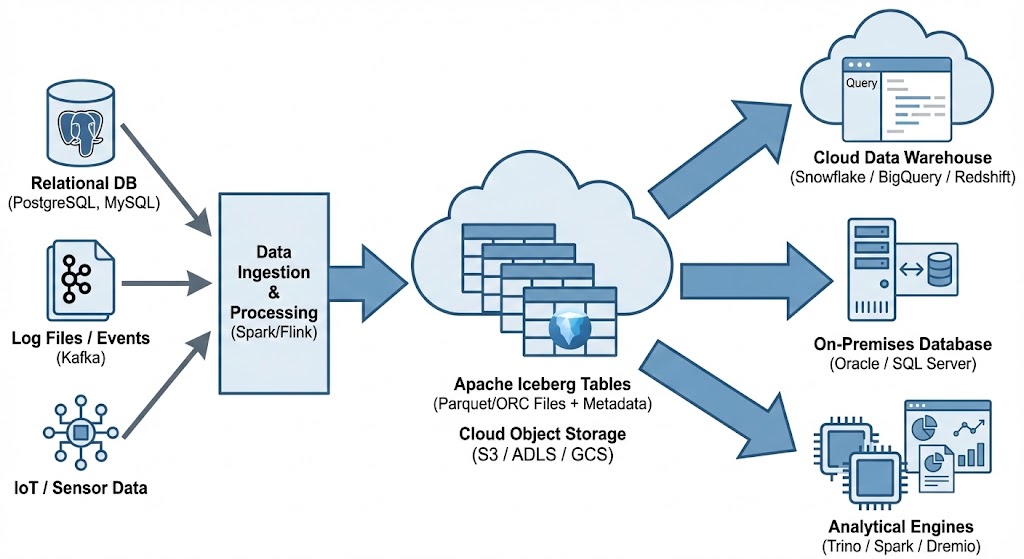
Modern data platforms increasingly separate compute from storage, using object stores as durable data lakes while scaling processing engines. Traditional “data lakes” built on Parquet files and Hive-style partitioning have limitations around atomicity, schema evolution, metadata scalability, and multi-engine interoperability. Apache Iceberg addresses these challenges by defining a high-performance table format with transactional guarantees, scalable metadata structures, and engine-agnostic semantics.
Apache Iceberg, an open-source table format that has become the industry standard for data sharing in modern data architectures. Let’s have a look at some of the key features, some of its limitations and a brief look at some of the alternatives.
What is Apache Iceberg and Why Do We Need It? Apache Iceberg is not a storage engine or a compute engine; it’s a table format. It acts as a metadata layer that sits between your physical data files (Parquet, ORC, Avro) and your compute engines.
Before Iceberg, data lakes managed tables as directories of files. To find data, an engine had to list all files in a directory—a slow operation on cloud storage. There was no guarantee of data consistency; a reader might see a partially written file from a running job. Iceberg solves this by tracking individual data files in a persistent tree of metadata. This effectively brings semi-database level reliability, with ACID transactions and snapshot isolation, together with the flexible, low-cost world of object storage.
Iceberg has several important features that bridge the gap between data lakes and traditional warehouses like Oracle:
- ACID Transactions: Iceberg ensures that readers never see partial or uncommitted data. Every write operation creates a new, immutable snapshot. Commits are atomic, meaning they either fully succeed or fully fail. This is the same level of integrity that database administrators have come to expect from Oracle Database for decades.
- Reliable Schema Evolution: In the past, adding or renaming a column in a data lake could require a complete rewrite of your data. Iceberg supports full schema evolution—adding, dropping, updating, or renaming columns—as a metadata operation. It ensures that “zombie” data or schema mismatches never crash your production pipelines.
- Hidden Partitioning: This is a massive usability improvement. Instead of forcing users to know the physical directory structure (e.g.,
WHERE year=2026), Iceberg handles partitioning transparently. You can partition by a timestamp, and Iceberg handles the logic. This makes the data lake feel more like a standard SQL table in a relational Database, where the physical storage details are abstracted away from the analyst. - Time Travel and Rollback: Because Iceberg maintains a history of table snapshots, you can query the data as it existed at any point in history. This is invaluable for auditing, reproducing machine learning models, or quickly rolling back accidental bad writes without needing to restore from a massive tape backup.
While the benefits of Apache Iceberg Tables are critical for its adaption, there are also some limitations:
- Metadata Overhead: The metadata layer adds complexity. For extremely small, high-frequency “single-row” writes, the overhead of managing metadata files can be significant compared to a highly tuned RDBMS.
- Tooling Maturity: While major players like AWS, Snowflake, Oracle, etc have adopted it, support across the entire data ecosystem is still evolving. You may occasionally encounter older tools that don’t natively understand Iceberg tables.
- Write Latency: Every commit involves writing new manifest and metadata files. While this is fine for batch and micro-batch processing, it may not replace the sub-second latency required for OLTP (Online Transactional Processing) workloads where relational Database still reign supreme.
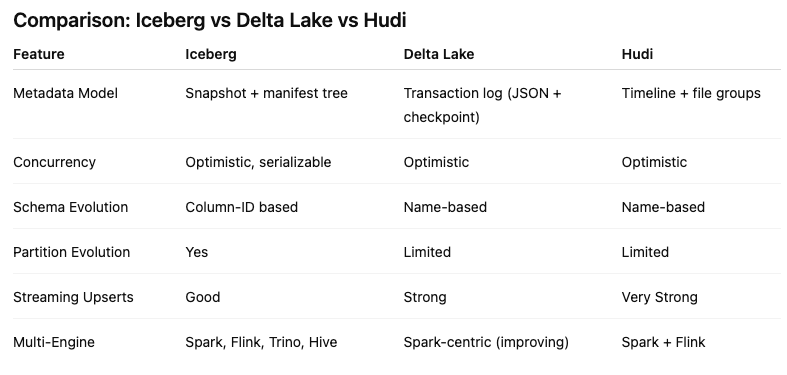
Alternatives to Apache Iceberg tables include Delta Lake (from Databricks) and Apache Hudi. While Delta Lake is highly optimized for the Spark ecosystem and offers a rich feature set, its governance has historically been closely tied to Databricks. Apache Hudi is optimized in streaming ingestion and near-real-time upsert use cases due to its unique indexing and log-merge capabilities. etc it can take some time to consolidate the data change logs. Apache Iceberg is often the choice for organizations seeking maximum interoperability. Its design allows diverse engines, from Spark and Trino to Snowflake and Oracle, to interact with the same data without vendor lock-in and with minimum data copying.
One of Apache Iceberg’s greatest strengths is its ability to act as a central, interoperable layer for data sharing across different platforms. By standardizing on Iceberg, you break down silos. Data ingested once into your data lake becomes immediately available to multiple consuming systems without complex ETL pipelines. Data from various sources is ingested and stored as Apache Iceberg tables in cloud object storage. From there, it can be seamlessly queried by cloud data warehouses like Snowflake and Oracle, etc, and synced to on-premises databases, like Oracle and others, or accessed by various analytical engines for BI and data science.
OCI Gen AI – How to call using Python
Oracle OCI has some Generative AI features, one of which is a Playground allowing you to play or experiment with using several of the Cohere models. The Playground includes Chat, Generation, Summarization and Embedding.
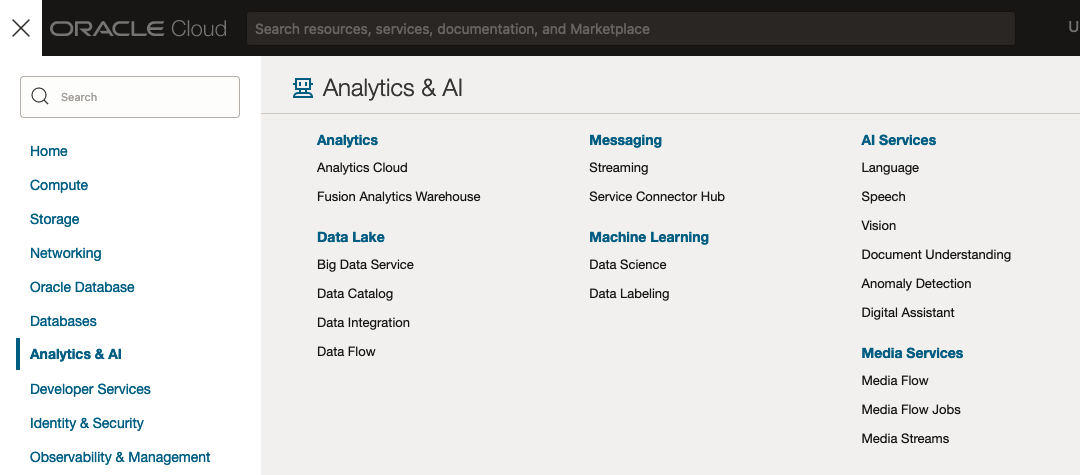
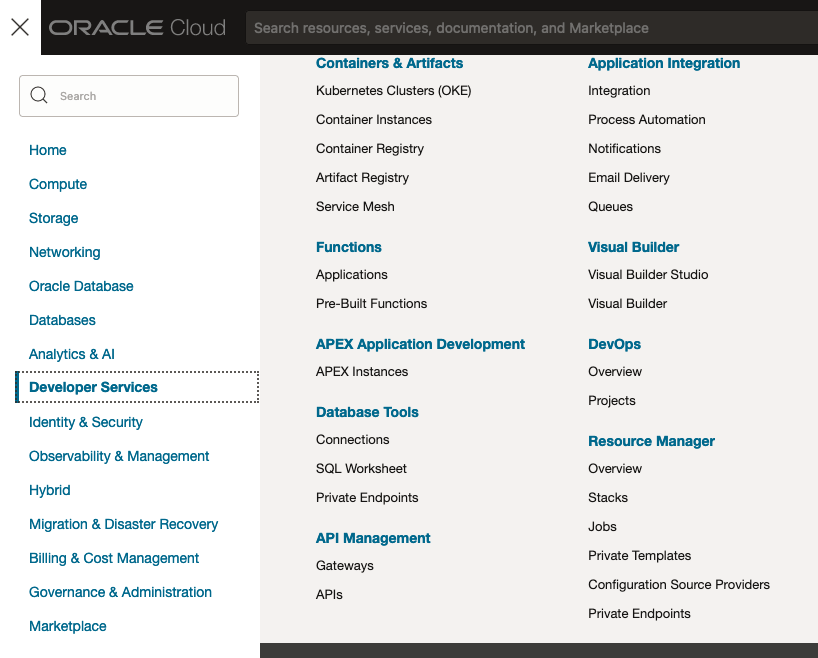
OCI Generative AI services are only available in a few Cloud Regions. You can check the available regions in the documentation. A simple way to check if it is available in your cloud account is to go to the menu and see if it is listed in the Analytics & AI section.

When the webpage opens you can select the Playground from the main page or select one of the options from the menu on the right-hand-side of the page. The following image shows this menu and in this image, I’ve selected the Chat option.

You can enter your questions into the chat box at the bottom of the screen. In the image, I’ve used the following text to generate a Retirement email.
A university professor has decided to retire early. write and email to faculty management and HR of his decision. The job has become very stressful and without proper supports I cannot continue in the role. write me an email for this
Using this playground is useful for trying things out and to see what works and doesn’t work for you. When you are ready to use or deploy such a Generative AI solution, you’ll need to do so using some other coding environment. If you look toward the top right hand corner of this playground page, you’ll see a ‘View code’ button. When you click on this Code will be generated for you in Java and Python. You can copy and paste this to any environment and quickly have a Chatbot up and running in few minutes. I was going to say a few second but you do need to setup a .config file to setup a secure connection to your OCI account. Here is a blog post I wrote about setting this up.
Here is a copy of that Python code with some minor edits, 1) to remove my Compartment ID, 2) I’ve added some message requests. You can comment/uncomment as you like or add something new.
import oci

# Setup basic variables
# Auth Config
# TODO: Please update config profile name and use the compartmentId that has policies grant permissions for using Generative AI Service
compartment_id =  <add your Compartment ID>
CONFIG_PROFILE = "DEFAULT"
config = oci.config.from_file('~/.oci/config', CONFIG_PROFILE)

# Service endpoint
endpoint = "https://inference.generativeai.us-chicago-1.oci.oraclecloud.com"

generative_ai_inference_client = oci.generative_ai_inference.GenerativeAiInferenceClient(config=config, service_endpoint=endpoint, retry_strategy=oci.retry.NoneRetryStrategy(), timeout=(10,240))
chat_detail = oci.generative_ai_inference.models.ChatDetails()

chat_request = oci.generative_ai_inference.models.CohereChatRequest()
#chat_request.message = "Tell me what you can do?"
#chat_request.message = "How does GenAI work?"
chat_request.message = "What's the weather like today where I live?"
chat_request.message = "Could you look it up for me?"
chat_request.message = "Will Elon Musk buy OpenAI?"
chat_request.message = "Tell me about Stargate Project and how it will work?"
chat_request.message = "What is the most recent date your model is built on?"


chat_request.max_tokens = 600
chat_request.temperature = 1
chat_request.frequency_penalty = 0
chat_request.top_p = 0.75
chat_request.top_k = 0
chat_request.seed = None


chat_detail.serving_mode = oci.generative_ai_inference.models.OnDemandServingMode(model_id="ocid1.generativeaimodel.oc1.us-chicago-1.amaaaaaask7dceyanrlpnq5ybfu5hnzarg7jomak3q6kyhkzjsl4qj24fyoq")
chat_detail.chat_request = chat_request
chat_detail.compartment_id = compartment_id
chat_response = generative_ai_inference_client.chat(chat_detail)
# Print result
print("**************************Chat Result**************************")
print(vars(chat_response))
When I run the above code I get the following output.
NB: If you have the OCI Python package already installed you might need to update it to the most recent version
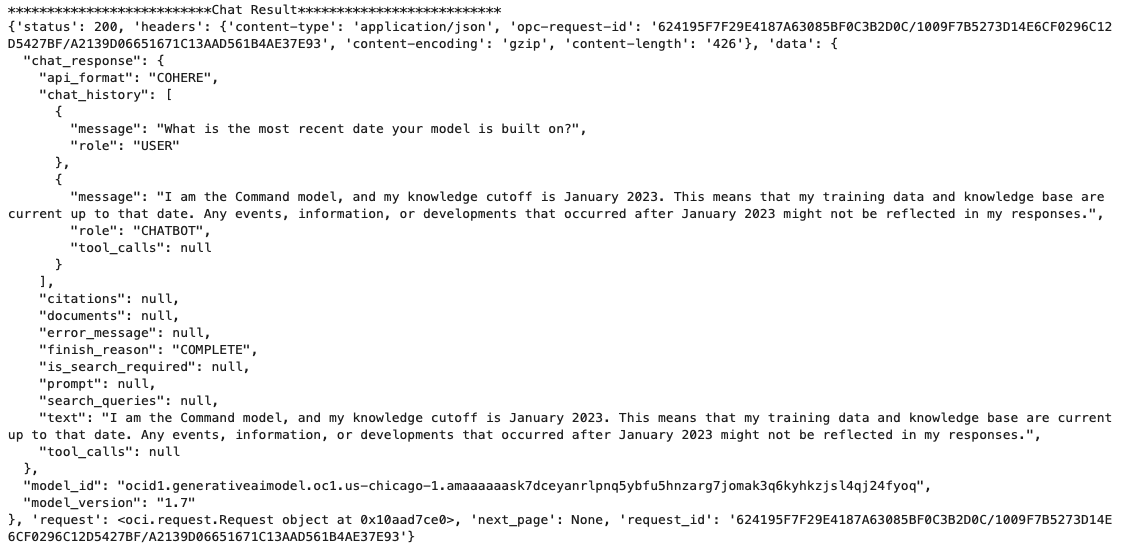
You can see there is a lot generated and returned in the response. We can tidy this up a little using the following and only display the response message.
import json
# Convert JSON output to a dictionary
data = chat_response.__dict__["data"]
output = json.loads(str(data))

# Print the output
print("---Message Returned by LLM---")
print(output["chat_response"]["chat_history"][1]["message"])
That’s it. Give it a try and see how you can build it into your applications.
Moving Out of the Cloud – or something hybrid – The Key is Managing your Costs Carefully
Over the past decade, we have been hearing the call of the Cloud, from various vendors. The Cloud has provided a wonderful technology shift in the wider IT industry and accelerated the introduction of new technologies and more efficient ways of doing things. There were a lot of promises made or implied in migrating to the Cloud, and these are still being made.
In February 2023, Andy Jassy (CEO of AWS) highlighted: “I think it’s also useful to remember that 90% to 95% of the global IT spend remains on-premises.”. Despite all the talk, pushing customers and customers deciding for themselves to go to the Cloud, there is still a very significant percentage of IT spending remaining on-premises. If you look at the revenue growth of these Cloud providers (Microsoft, Google, AWS and yes even Oracle), if all that revenue equates to just 5-10% of IT spend, just think of the potential revenues if they can convert 1-2% of that spend. It would be Huge!
We have seen lots of competition between the Cloud vendors with multiple price reductions over the last few years. Get the customers to sign up for their Cloud services. They will sign up when things look cheap, but will it remain that way.
In more recent years, say from 2022 onwards, we have seen some questioning the value of going to the Cloud. It seems to get more expensive as time progresses and in some cases receiving surprisingly large Bills. What at first appears to be cheap and quick to spin up new services, turns out to hit the credit card hard at a later time. We have seen many articles by some well-known companies that were early adopters of the Cloud, and have migrated back to being fully on-premises.
The following are some related articles and documentary about the Cloud and exit from the Cloud.
Why companies are leaving the cloud
90-95% of Global IT spend remains on-premises – says Amazon CEO
And check out this documentary from clouded.tv.
OCI:Vision – AI for image processing – the Basics
Every cloud service provides some form of AI offering. Some of these can range from very basic features right up to a mediocre level. Only a few are delivering advanced AI services in a useful way.
Oracle AI Services have been around for about a year now, and with all new products or cloud services, a little time is needed to let it develop from an MVP (minimum viable produce) to something that’s more mature, feature-rich, stable and reliable. Oracle’s OCI AI Services come with some pre-training models and to create your own custom models based on your own training datasets.
Oracle’s OCI AI Services include:
- Digital Assistant
- Language
- Speech
- Vision
- Document Understand
- Anomaly Detection
- Forecasting
In this post, we’ll explore OCI Vision, and what the capabilities are available with their pre-trained models. To demonstrate this their online/webpage application will be used to demonstrate what it does and what it creates and identifies. You can access the Vision AI Services from the menu as shown in the following image.
From the main AI Vision webpage, we can see on the menu (on left-hand side of the page), we have three main Vision related options. These are Image Classification, Object Detection and Document AI. These are pre-trained models that perform slightly different tasks.
Let’s start with Image Classification and explore what is possible. Just Click on the link.
Note: The Document AI feature will be moving to its own cloud Service in 2024, so it will disappear from them many but will appear as a new service on the main Analytics & AI webpage (shown above).
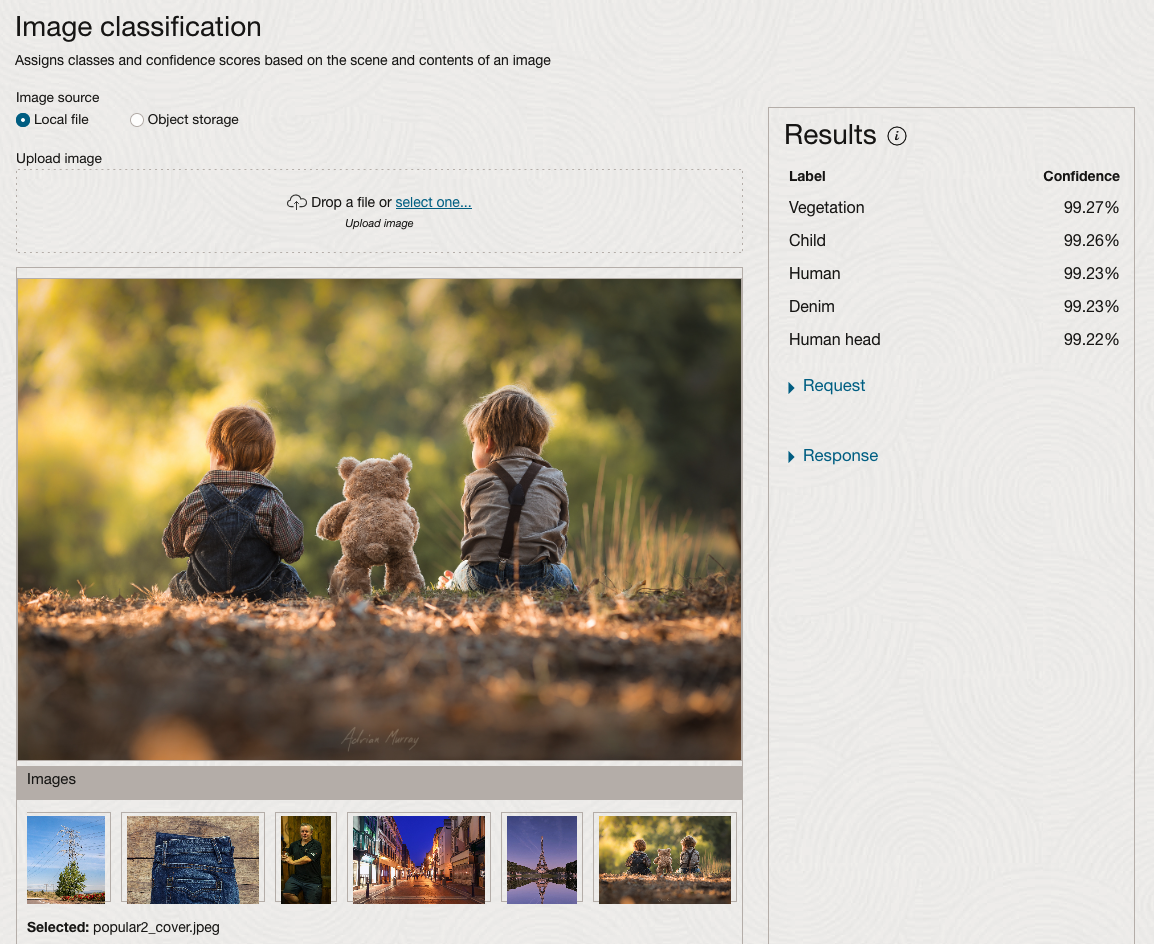
The webpage for each Vision feature comes with a couple of images for you to examine to see how it works. But a better way to explore the capabilities of each feature is to use your own images or images you have downloaded. Here are examples.
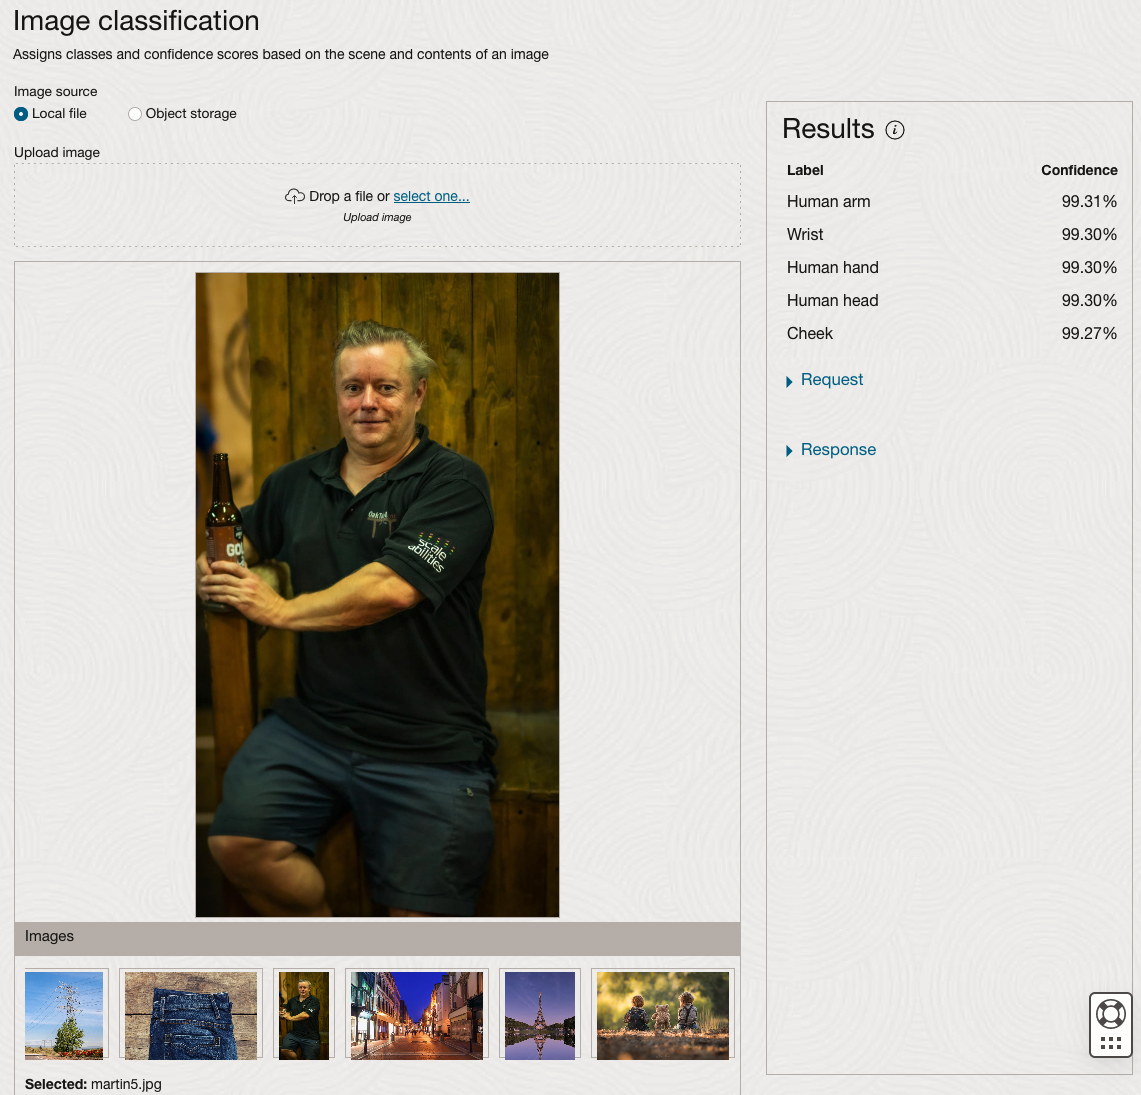
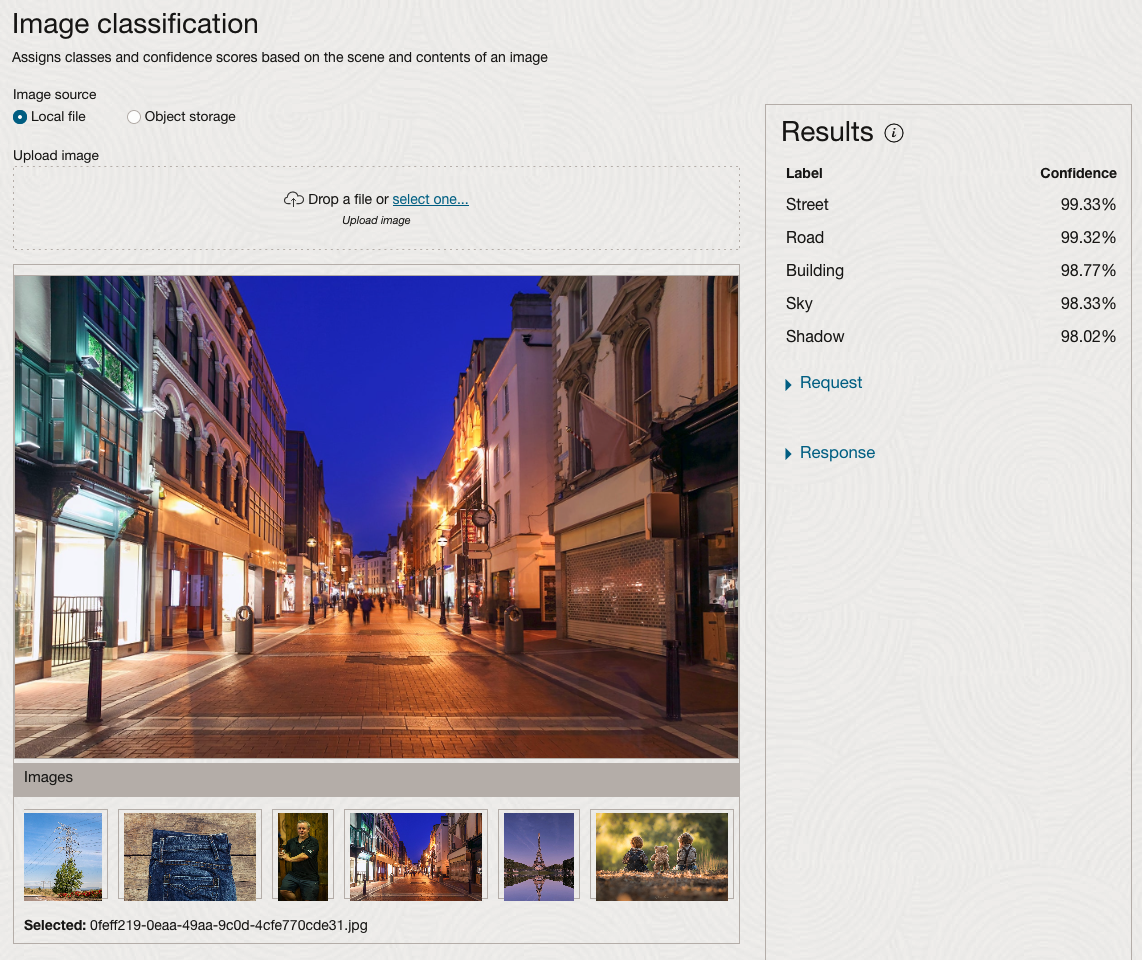
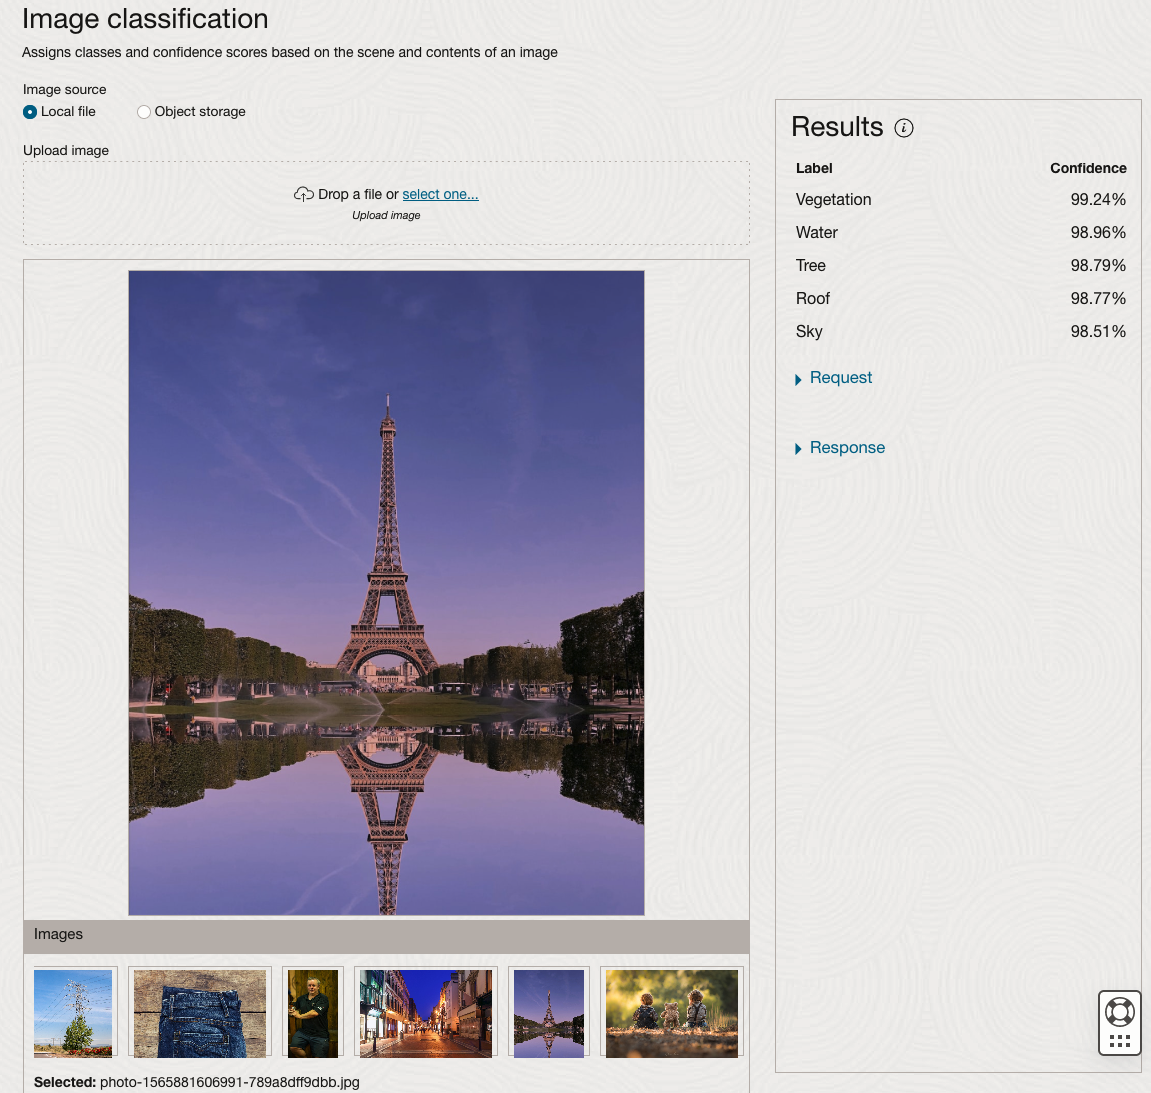
We can see the pre-trained model assigns classes and confidence for each image based on the main components it has identified in the image. For example with the Eiffel Tower image, the model has identified Water, Trees, Sky, Vegetation and Roof (of build). But it didn’t do so well with identifying the main object in the image as being a tower, or building of some form. Where with the streetscape image it was able to identify Street, Road, Building, Sky and Shadow.
Just under the Result section, we see two labels that can be expanded. One of these is the Response which contains JSON structure containing the labels, and confidences it has identified. This is what the pre-trained model returns and if you were to use Python to call this pre-trained model, it is this JSON object that you will get returned. You can then use the information contained in the JSON object to perform additional tasks for the image.
As you can see the webpage for OCI Vision and other AI services gives you a very simple introduction to what is possible, but it over simplifies the task and a lot of work is needed outside of this page to make the use of these pre-trained models useful.
Moving onto the Object Detection feature (left-hand menu) and using the pre-trained model on the same images, we get slightly different results.
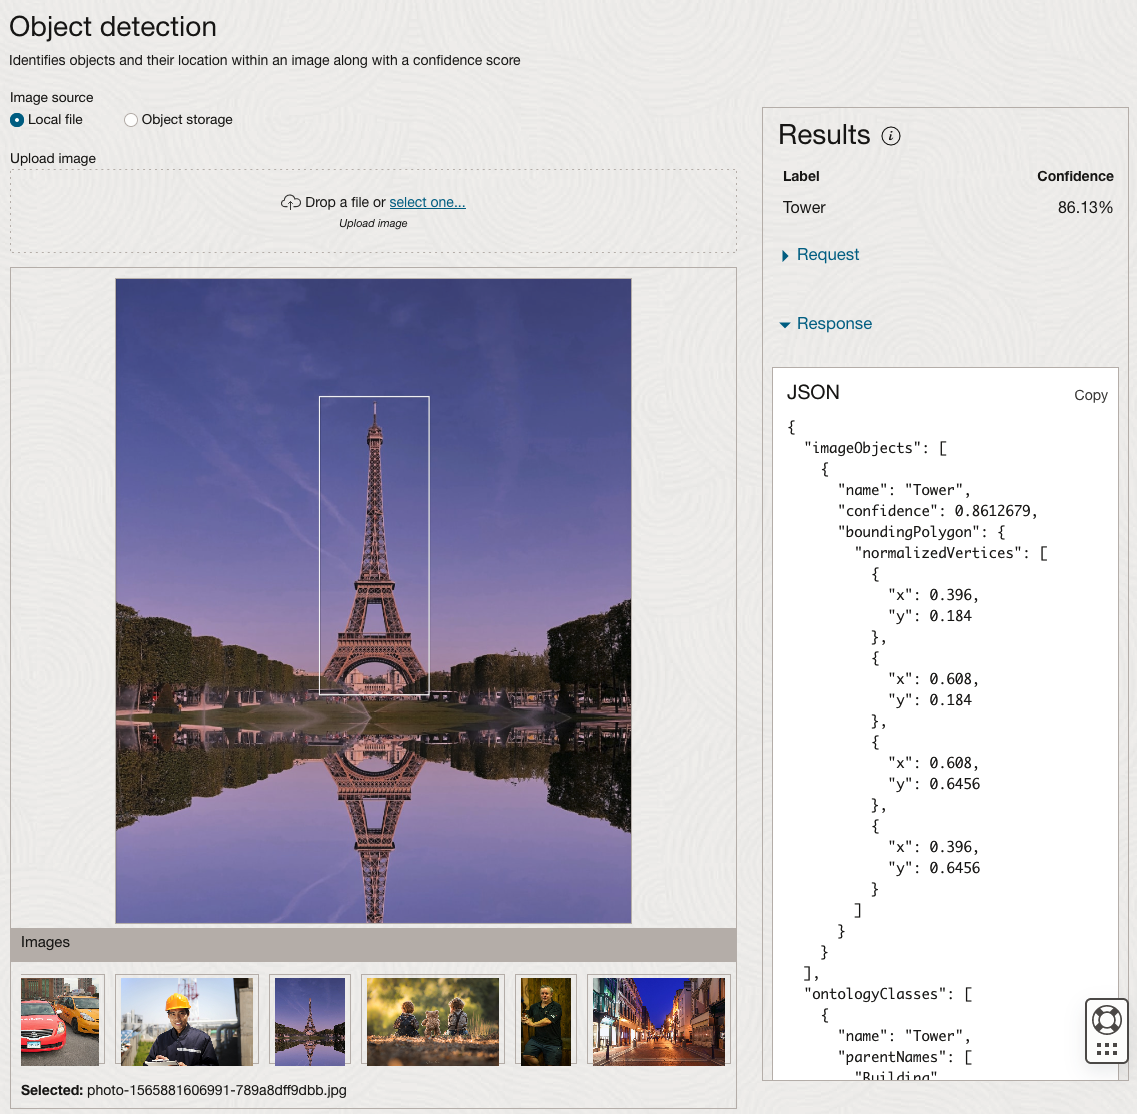
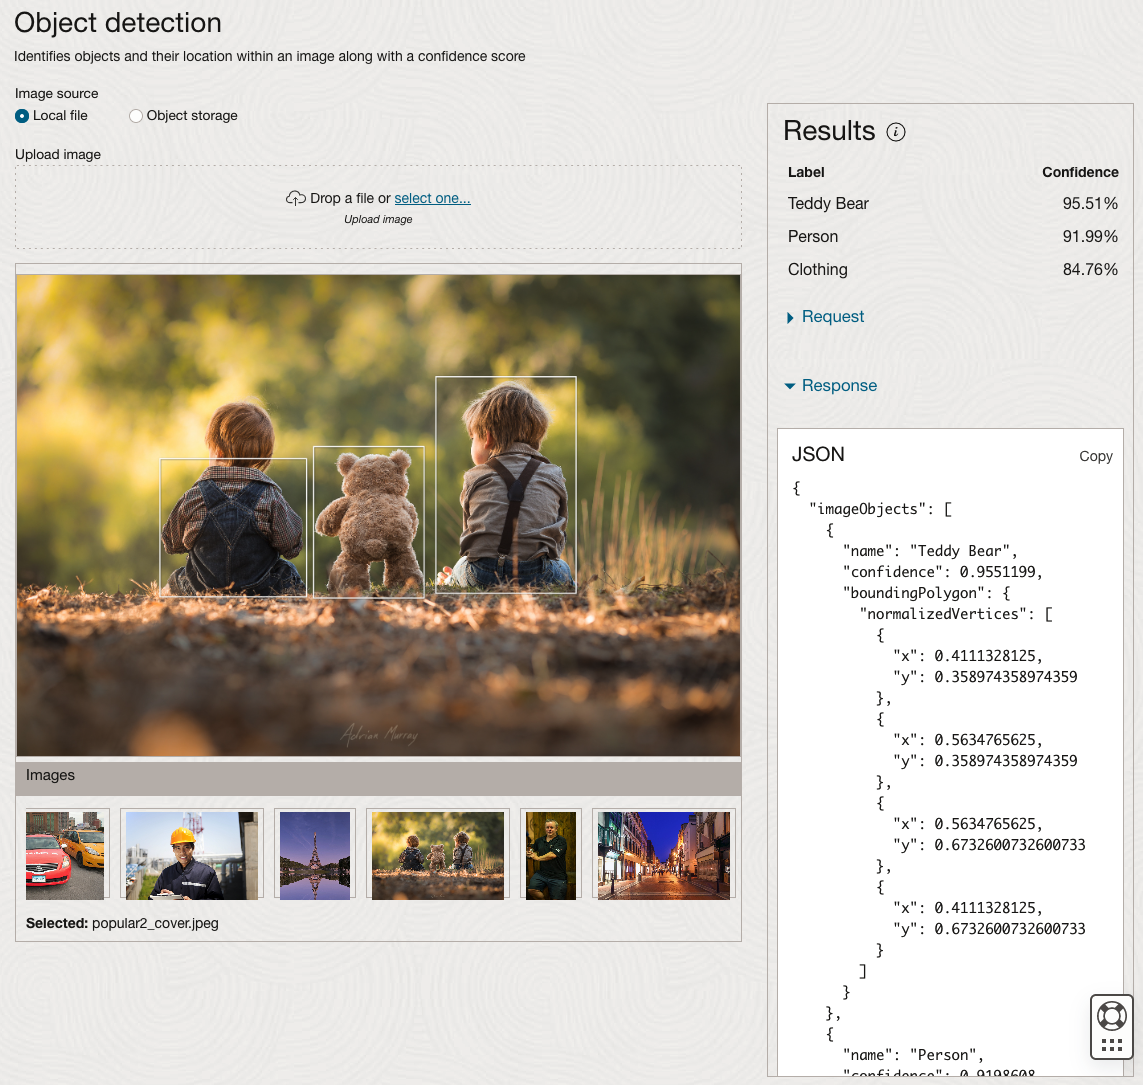
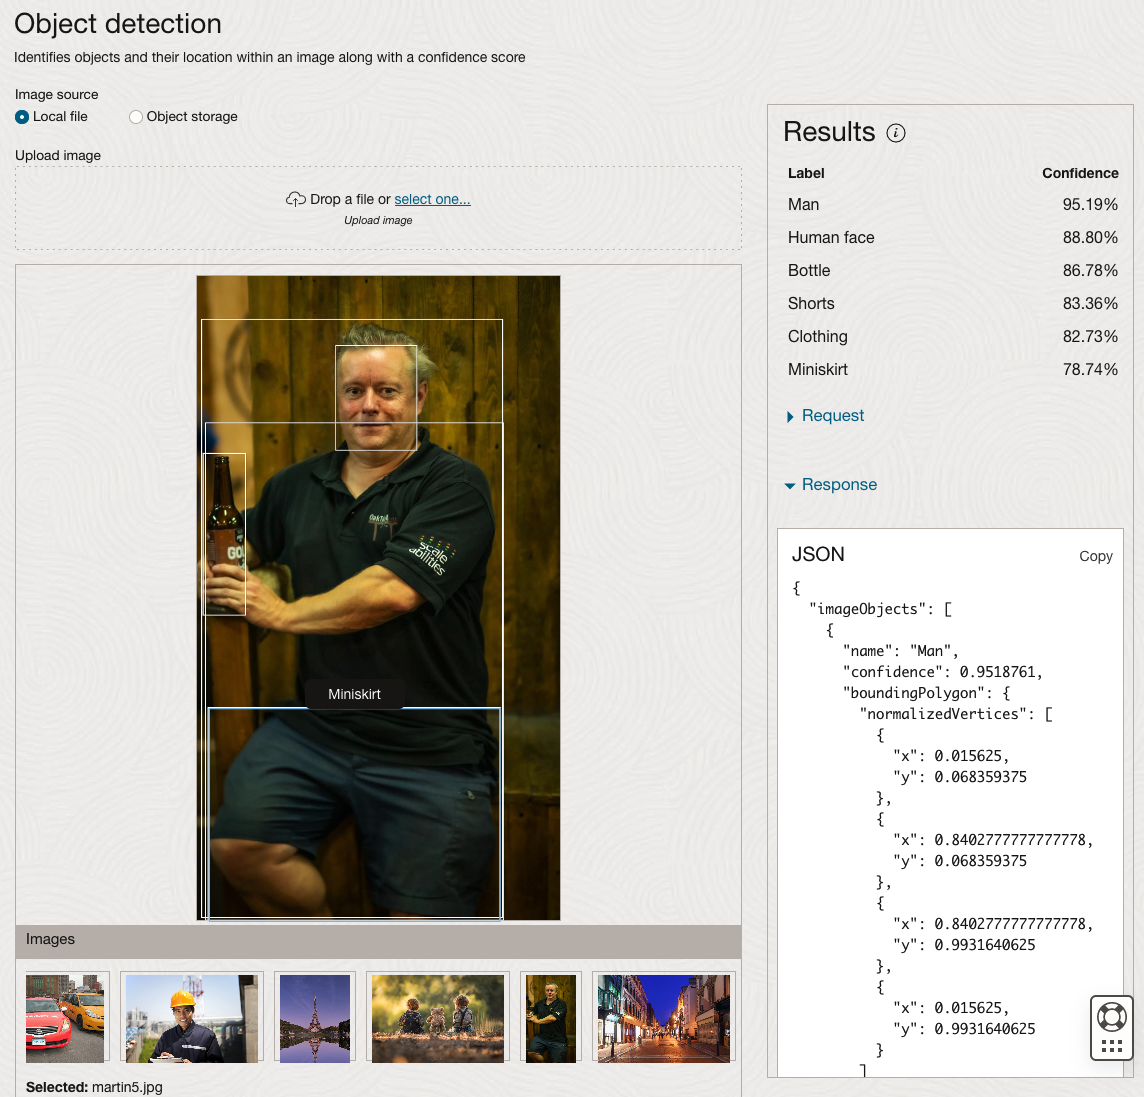
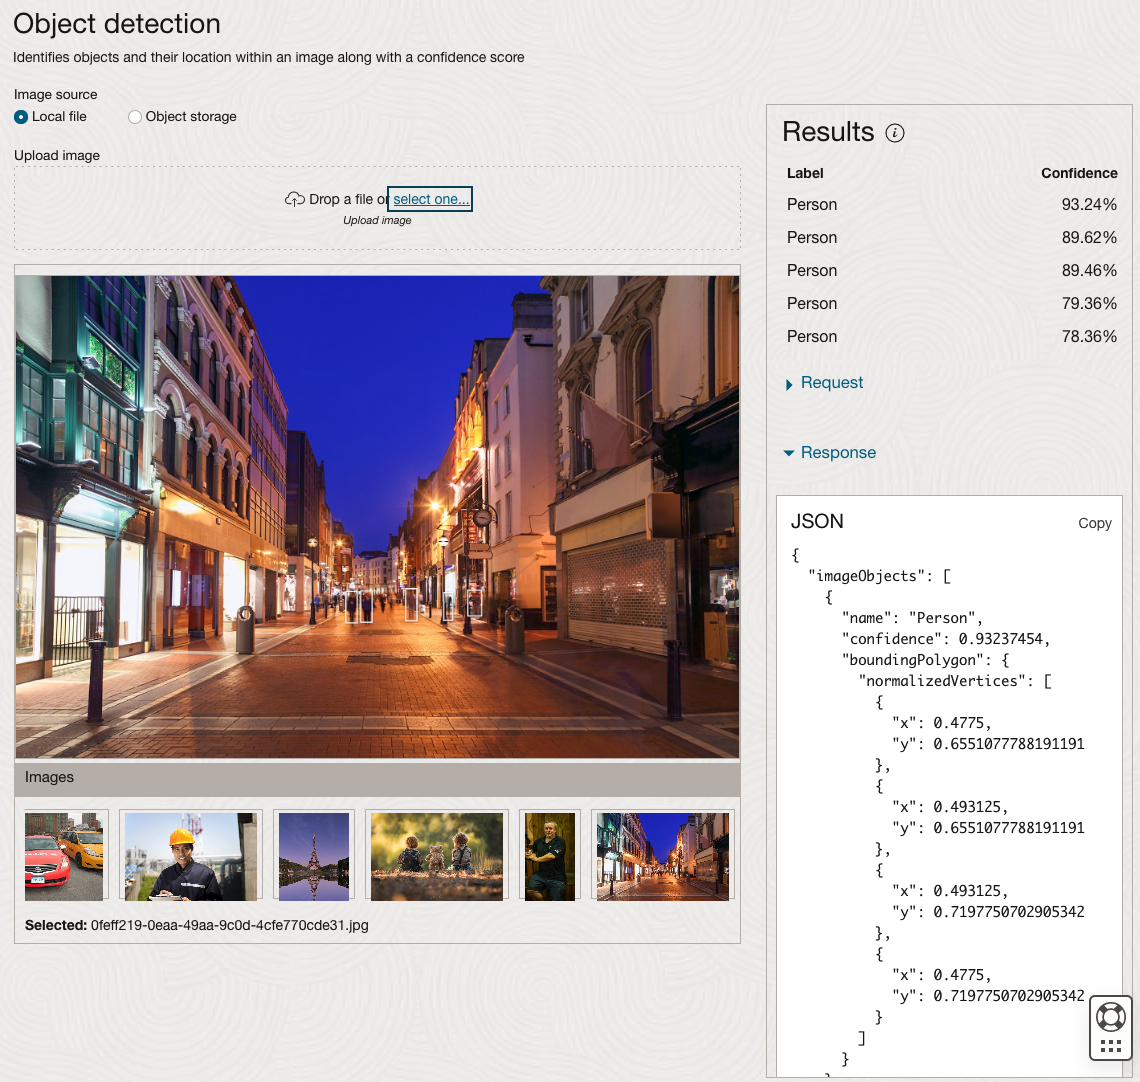
The object detection pre-trained model works differently as it can identify different things in the image. For example, with the Eiffel Tower image, it identifies a Tower in the image. In a similar way to the previous example, the model returns a JSON object with the label and also provides the coordinates for a bounding box for the objects detected. In the street scape image, it has identified five people. You’ll probably identify many more but the model identified five. Have a look at the other images and see what it has identified for each.
As I mentioned above, using these pre-trained models are kind of interesting, but are of limited use and do not really demonstrate the full capabilities of what is possible. Look out of additional post which will demonstrate this and steps needed to create and use your own custom model.
OCI:Vision Template for Policies
When using OCI you’ll need to configure your account and other users to have the necessary privileges and permissions to run the various offerings. OCI Vision is no different. You have two options for doing this. The first is to manually configure these. There isn’t a lot to do but some issues can arise. The other option is to use a template. The OCI Vision team have created a template of what is required and I’ll walk through the steps of setting this up along with some additional steps you’ll need.
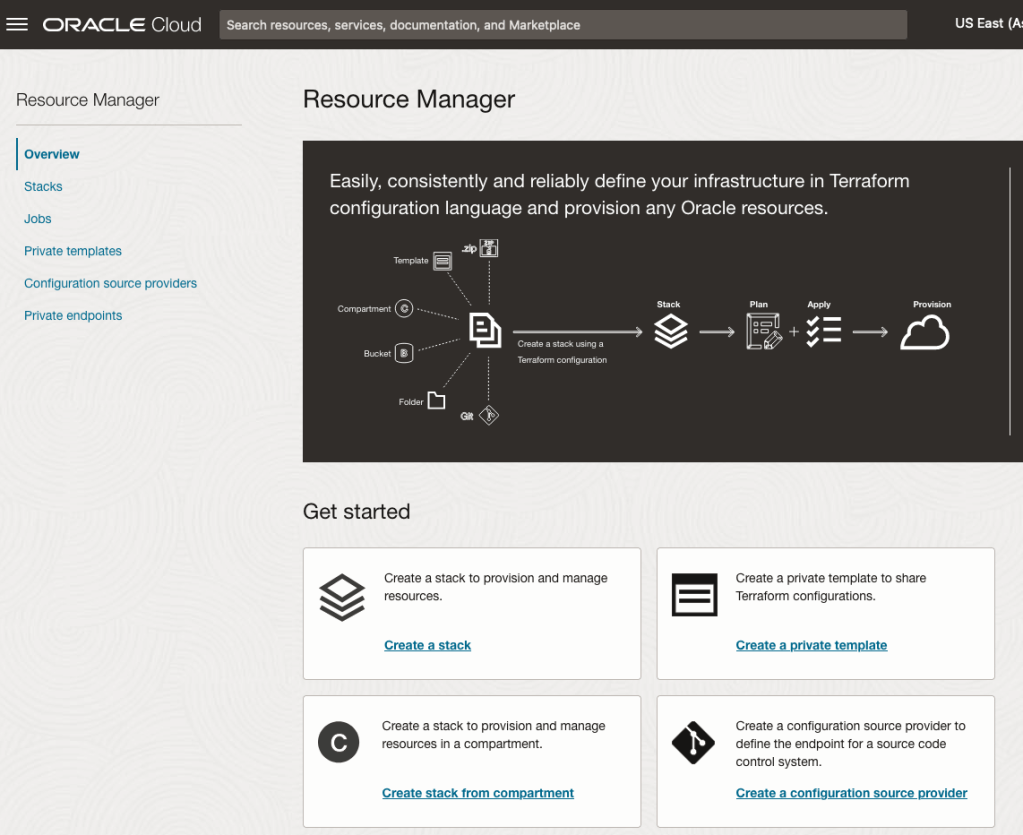
You’ll need to go to the Resource Manager page. This can be found under the menu by going to the Developer Services and then selecting Resource Manager.
First, you’ll need to go to the Resource Manager page. This can be found under the menu by going to the Developer Services and then selecting Resource Manager.
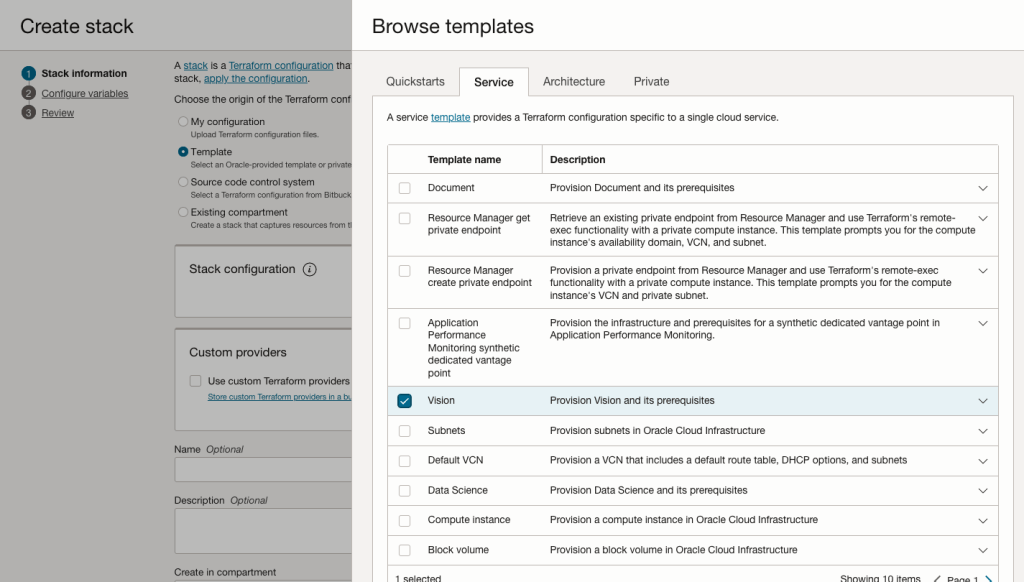
Located just under the main banner image you’ll see a section labelled ‘Create a stack’. Click on this link.
In the Create stack screen select Template from the radio group at the top of the page. Then in the Browse template pop-up screen, select the Service tab (across the top) and locate Vision. Once selected click the Select Template button.
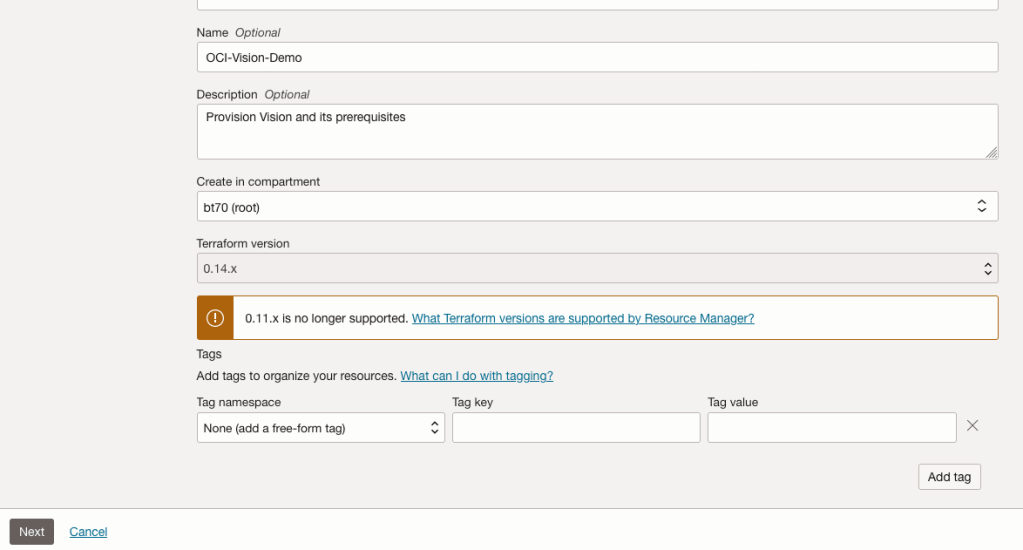
The page will load the necessary configuration. The only other thing you need to change on this page is the Name of the Service. Make it meaningful for you and your project. Click the Next button to continue to the next screen.
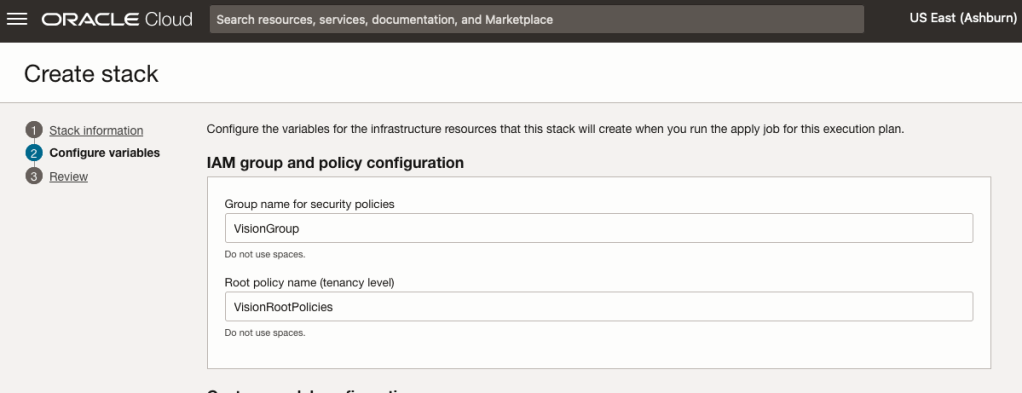
The top section relates to IAM Group name and policy configuration. You take the defaults or if you have specific groups already configured you can change it to it.
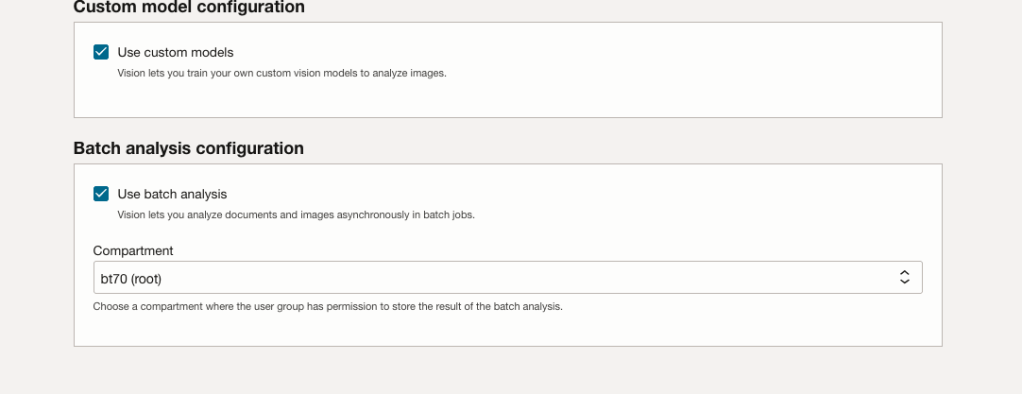
Most people will want to create their own customer models, as the supplied pre-built models are a bit basic. To enable Custom Built models, just tick the checkbox in the Custom Model Configuration section.
The second checkbox enables the batch processing of documents/images. If you check this box, you’ll need to specify the compartment you want the workload to be assigned to. Then click the Next button.
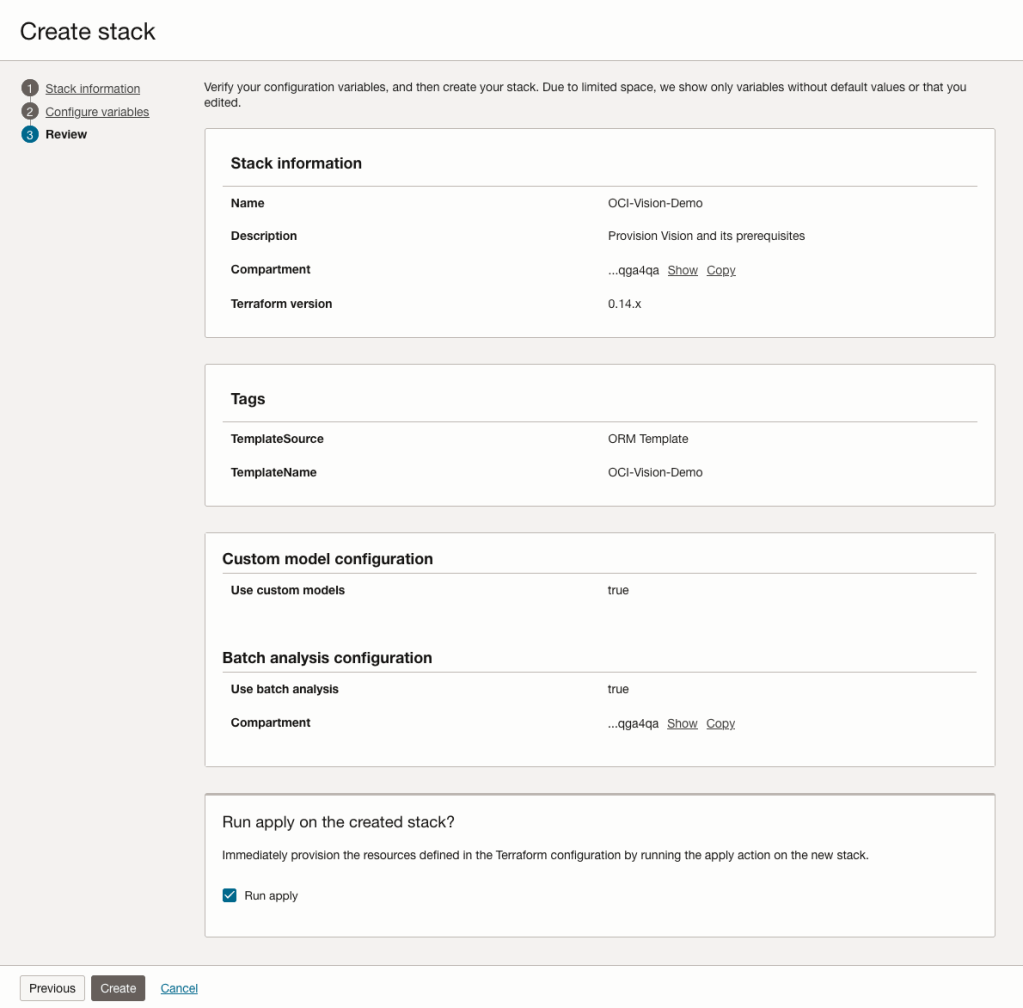
The final part displays a verification page of what was selected in the previous steps.
When ready click on the Run Apply check box and then click on the Create button.
It can take anything from a few seconds or a couple of minutes for the scripts to run.
When completed you’ll a Green box at the top of the screen and the message ‘SUCCEEDED’ under it.

AUTO_PARTITION – Inspecting & Implementing Recommendations
In a previous blog post I gave an overview of the DBMS_AUTO_PARTITION package in Oracle Autonomous Database. This looked at how you can get started and to setup Auto Partitioning and to allow it to automatically implement partitioning.
This might not be something the DBAs will want to happen for lots of different reasons. An alternative is to use DBMS_AUTO_PARTITION to make recommendations for tables where partitioning will have a performance improvement. The DBA can inspect these recommendations and decide which of these to implement.
In the previous post we set the CONFIGURE function to be ‘IMPLEMENT’. We need to change that to report the recommendations.
exec dbms_auto_partition.configure('AUTO_PARTITION_MODE','REPORT ONLY');Just remember, tables will only be considered by AUTO_PARTITION as outlined in my previous post.
Next we can ask for recommendations using the RECOMMEND_PARTITION_METHOD function.
exec  dbms_auto_partition.recommend_partition_method(
   table_owner => 'WHISKEY',
   table_name => 'DIRECTIONS',
   report_type => 'TEXT',
   report_section => 'ALL',
   report_level => 'ALL');
The results from this are stored in DBA_AUTO_PARTITION_RECOMMENDATIONS, which you can query to view the recommendations.
select recommendation_id, partition_method, partition_key
from dba_auto_partition_recommendations;
RECOMMENDATION_ID PARTITION_METHOD PARTITION_KEY
-------------------------------- ------------------------------------------------------------------------------------------------------------- --------------
D28FC3CF09DF1E1DE053D010000ABEA6 Method: LIST(SYS_OP_INTERVAL_HIGH_BOUND("D", INTERVAL '2' MONTH, TIMESTAMP '2019-08-10 00:00:00')) AUTOMATIC D
To apply the recommendation pass the RECOMMENDATION_KEY value to the APPLY_RECOMMENDATION function.
exec dbms_auto_partition.apply_recommendation('D28FC3CF09DF1E1DE053D010000ABEA6');It might takes some minutes for the partitioned table to become available. During this time the original table will remain available as the change will be implemented using a ALTER TABLE MODIFY PARTITION ONLINE command.
Two other functions include REPORT_ACTIVITY and REPORT_LAST_ACTIVITY. These can be used to export a detailed report on the recommendations in text or HTML form. It is probably a good idea to create and download these for your change records.
spool autoPartitionFinding.html
select dbms_auto_partition.report_last_activity(type=>'HTML') from dual;
exit;AUTO_PARTITION – Basic setup
Partitioning is an effective way to improve performance of SQL queries on large volumes of data in a database table. But only so, if a bit of care and attention is taken by both the DBA and Developer (or someone with both of these roles). Care is needed on the database side to ensure the correct partitioning method is deployed and the management of these partitions, as some partitioning methods can create a significantly large number of partitions, which in turn can affect the management of these and possibly performance too, which is not what you want. Care is also needed from the developer side to ensure their code is written in a way that utilises the partitioning method deployed. If doesn’t then you may not see much improvement in performance of your queries, and somethings things can run slower. Which not one wants!
With the Oracle Autonomous Database we have the expectation it will ‘manage’ a lot of the performance features behind the scenes without the need for the DBA and Developing getting involved (‘Autonomous’). This is kind of true up to a point, as the serverless approach can work up to a point. Sometimes a little human input is needed to give a guiding hand to the Autonomous engine to help/guide it towards what data needs particular focus.
In this (blog post) case we will have a look at DBMS_AUTO_PARTITION and how you can do a basic setup, config and enablement. I’ll have another post that will look at the recommendation feature of DBMS_AUTO_PARTITION. Just a quick reminder, DBMS_AUTO_PARTITION is for the Oracle Autonomous Database (ADB) (on the Cloud). You’ll need to run the following as ADMIN user.
The first step is to enable auto partitioning on the ADB using the CONFIGURE function. This function can have three parameters:
- IMPLEMENT : generates a report and implements the recommended partitioning method. (Autonomous!)
- REPORT_ONLY : {default} reports recommendations for partitioning on tables
- OFF : Turns off auto partitioning (reporting and implementing)
For example, to enable auto partitioning and to automatically implement the recommended partitioning method.
exec DBMS_AUTO_PARTITION.CONFIGURE('AUTO_PARTITION_MODE', 'IMPLEMENT');The changes can be inspected in the DBA_AUTO_PARTITION_CONFIG view.
SELECT * FROM DBA_AUTO_PARTITION_CONFIG;When you look at the listed from the above select we can see IMPLEMENT is enabled

The next step with using DBMS_AUTO_PARTITION is to tell the ADB what schemas and/or tables to include for auto partitioning. This first example shows how to turn on auto partitioning for a particular schema, and to allow the auto partitioning (engine) to determine what is needed and to just go and implement that it thinks is the best partitioning methods.
exec DBMS_AUTO_PARTITION.CONFIGURE(
   parameter_name => 'AUTO_PARTITION_SCHEMA',
   parameter_value => 'WHISKEY',
   ALLOW => TRUE);
If you query the DBA view again we now get.

We have not enabled a schema (called WHISKEY) to be included as part of the auto partitioning engine.
Auto Partitioning may not do anything for a little while, with some reports suggesting to wait for 15 minutes for the database to pick up any changes and to make suggestions. But there are some conditions for a table needs to meet before it can be considered, this is referred to as being a ‘Candidate’. These conditions include:
- Table passes inclusion and exclusion tests specified by AUTO_PARTITION_SCHEMA and AUTO_PARTITION_TABLE configuration parameters.
- Table exists and has up-to-date statistics.
- Table is at least 64 GB.
- Table has 5 or more queries in the SQL tuning set that scanned the table.
- Table does not contain a LONG data type column.
- Table is not manually partitioned.
- Table is not an external table, an internal/external hybrid table, a temporary table, an index-organized table, or a clustered table.
- Table does not have a domain index or bitmap join index.
- Table is not an advance queuing, materialized view, or flashback archive storage table.
- Table does not have nested tables, or certain other object features.
If you find Auto Partitioning isn’t partitioning your tables (i.e. not a valid Candidate) it could be because the table isn’t meeting the above list of conditions.
This can be verified using the VALIDATE_CANDIDATE_TABLE function.
select DBMS_AUTO_PARTITION.VALIDATE_CANDIDATE_TABLE(
   table_owner => 'WHISKEY',
   table_name => 'DIRECTIONS')
from dual;
If the table has met the above list of conditions, the above query will return ‘VALID’, otherwise one or more of the above conditions have not been met, and the query will return ‘INVALID:’ followed by one or more reasons
Check out my other blog post on using the AUTO_PARTITION to explore it’s recommendations and how to implement.
How many Data Center Regions by Vendor?
There has been some discussions over the past weeks, months, years on which Cloud provider is the best, or the biggest, or provides the most services, or [insert some other topic]? The old answer to everything related to IT is ‘It Depends’. A recent article by CloudWars (and updated numbers by them) and some of the comments to it, and elsewhere prompted me to have a look at ‘How Many Data Center Regions do each Cloud Vendor have?’ I didn’t go looking at all possible cloud vendors, but instead kept to the main vendors consisting of Microsoft Azure, Google Cloud Platform (GCP), Oracle Cloud and Amazon Web Services (AWS). We know AWS has been around for a long long time, and seems to gather most of the attention and focus within the developer community, etc, you’d expect them to be the biggest. Well, the results from my investigation does not support this.
Now, it is important to remember when reading the results presented below that these are from a particular point in time, and that is the date of this blog post. If you are reading this some time later, the actual number of data centers will be different and will be larger.
When looking at the data, as presented on each vendors website (see link to each vendor below), most list some locations coming in the future. It’s really impressive to see the number of “coming soon” locations. These “coming soon” locations are not included below (as of blog post date).
Before showing a breakdown for each vendor the following table gives the total number of data center regions for each vendor.
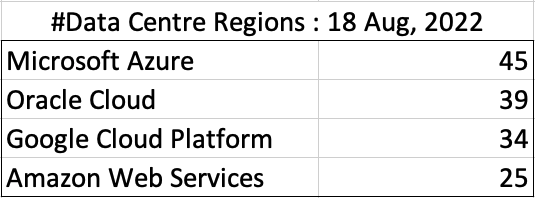
The numbers presented in the above table are different to does presented in the original CloudWars article or their updated numbers. If you look at the comments on that article and the comments on LinkedIn, you will see there was some disagreement of on their numbers. The problem is a data quality one, and vendors presenting their list of data centers in different parts of their website and documentation. Data quality and consistency is always a challenge, and particularly so when publishing data on vendor blogs, documentation and various websites. Indeed, the data I present in this post will be out of date within a few days/weeks. I’ve also excluded locations marked as ‘coming soon’ (see Azure listing).
Looking at the numbers in the above table can be a little surprising, particularly if you look at AWS, and then look at the difference in numbers between AWS and Azure and even Oracle. Very soon Azure will have double the number of data center regions when compared to AWS.
What do these numbers tell you? Based on just these numbers it would appear that Azure and Oracle Cloud are BIG cloud providers, and are much bigger than AWS. But maybe AWS has data centers that are way way bigger than those two vendors. It can be a little challenging to know the size and scale of each data center. Maybe they are going after different types of customers? With the roll out of Cloud over the past few years, there has been numerous challenges from legal and sovereign related issues requiring data to be geographically located within a country or geographic region. Most of these restrictions apply to larger organizations in the financial, insurance, and government related, etc. Given the historical customer base of Microsoft and Oracle, maybe this is driving their number of data center regions.
In more recent times there has been a growing interest, and in some sectors a growing need for organizations to be multi-cloud. Given the number of data center regions, for Azure and Oracle, and commonality in their geographic locations, it isn’t surprising to see the recent announcement from Azure and Oracle of their interconnect agreement and making the Oracle Database Service available (via interconnect) from Azure. I’m sure we will see more services being shared between these two vendors, and other might join in doing something similar.
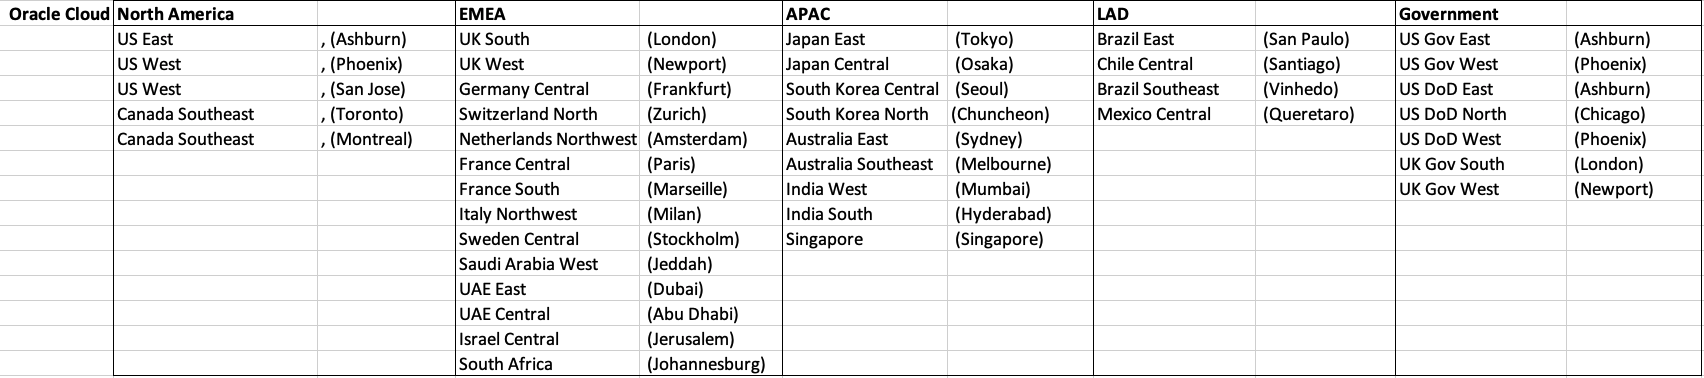
Let’s get back to the numbers and data for each Vendor. I’ve also included a link to the Vendor website where these data was obtained. (just remember these are based on date of blog post)
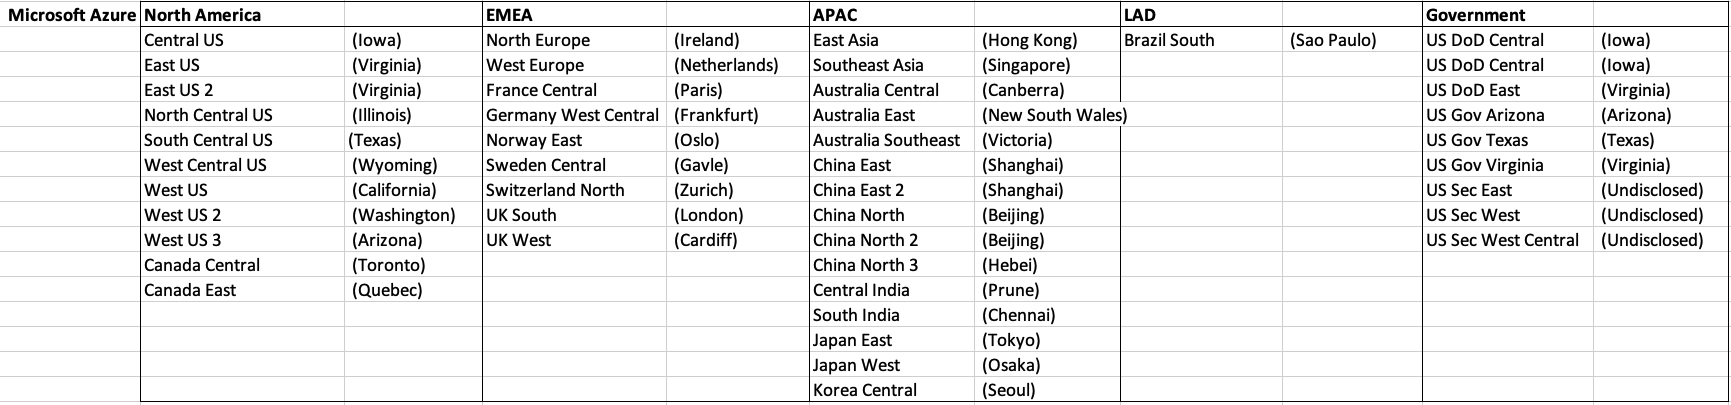
When you look at the Azure website listing the location, at first look it might appear they have many more locations. When you look closer at these, some/many of them are listed as ‘coming soon’. These ‘coming soon’ locations are not included in the above and below tables.
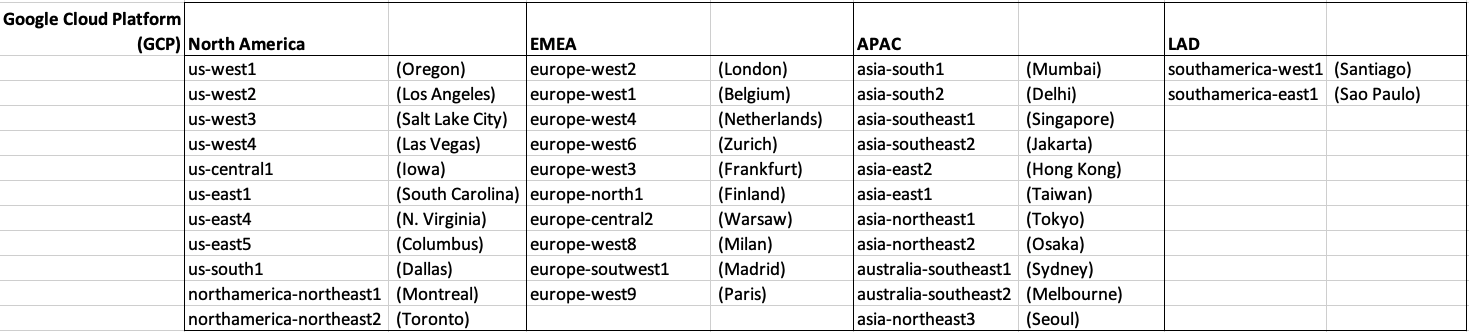
GCP doesn’t list and Government data center regions.

Oracle on AWS costs
In a previous post I walked through the steps of setting up an Oracle Database on AWS RDS. It was a very simple and straight forward process. The only thing to watch out for was to open the network to allow traffic in and out. I also showed how to connect SQL Developer to that database.
I’ve been using it for a few days and needed to move onto other things for a few days. I could leave the Database up and running during this period or I could shut down the Database to save a few dollars/euro. It also gave me a chance to see how much this database cloud instance is costing me. In my previous post, it was estimated to cost about 0.89c per day.
Before we look at the Actual/Real costs, let’s walk through the steps of shutting down the database.
To stop the database, click on the Actions button on the top right hand side of the screen, just above the database summary details. You will get a confirmation window/box appearing, see image below, asking you to confirm by clicking ‘Yes, Stop Now’.
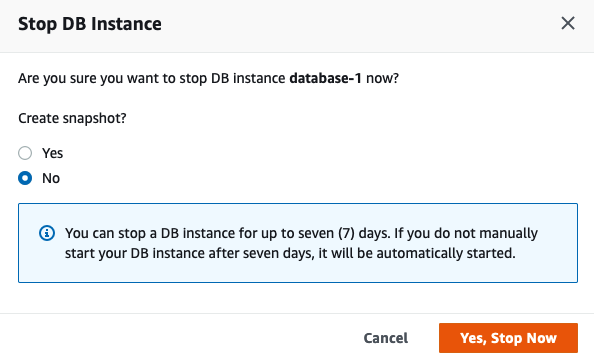
It will take a few minutes for this shutdown to complete and in my case it took approx. 8 minutes, which was a little surprising as no one was using it at the time. You might need to refresh the webpage to see this change.

That’s all very simple, but it does give you a warning about the stopped database instance. It will be restarted in 7 days time! So if this is a database you will occasionally use, then you will need to carefully manage this particular feature, otherwise you will end up with the database automatically starting and you will be paying for this.
What about the Costs?
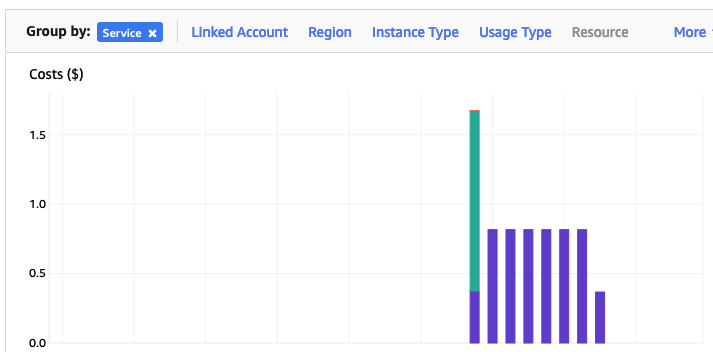
The costs for running this service can be found in the AWS Cost Management page. Here we can see the database was running for 7 and a bit days before I shut it down, and we can see the daily cost was 0.82c. Two things note about these costs. There was larger cost for the first day. Most of this cost was associated with the setup and configuration of the database service. The second thing to note is the costs listed in this console do not include taxes.
A got the bill for this usage, and it came to $6.94, consisting of $5.64 for usage (approx. 75c per day) and $1.30 in taxes/vat. Not a lot considering some cloud services, but comes out at approx 92.5c per day, which is a little more than the estimated cost when the service was being created. A small example of what can happen between the “in theory” cost of cloud versus the actual costs.
AWS RDS Oracle setup
There are lots of options available to you for creating and using an Oracle Database.
One of these options is to use AWS RDS services to create and host a Database.
Warning: Using AWS is a paid service and the RDS options are available based on the size of the server you pick. The example show in below will cost approx 89c per day or $27 per month. For this the database will be running 24×7. You could reduce this cost significantly by only starting/stopping the Database when you need it, or alternatively create an AWS lamda function service to start/stop.
First thing you need to do is go create an AWS account, and yes you will need to hand over your credit card number.
After creating your account and you have logged in, search for RDS and you will get the following display. Click on the orange button at the top of the page to Create Database.

Then select
- Standard create
- Oracle
- Architecture settings -> Use multitenant architecture
- Oracle Enterprise Edition
- Version -> use the drop down and select latest version (in my case 21)
- Templates -> Dev/Test
- Instance Identifier -> database-1
- Master Username -> admin
- Master password -> <set password> and confirm it
- DB Instance Class – as we only want a DB for playing with, go with the cheapest -> db.t3.small (Hint: Scroll to bottom of page to see the estimated monthly costs)
- Storage type -> General Purpose SSD. If you change this to Magnetic, you will see the cost drop by approx $2 per month. I selected General Purpose SSD
- Allocated Storage -> I set this to 20G (it’s just a small play DB)
- Disable/un-tick – Entable Storage Autoscaling
- Select defaults for VPC (Virtual Private Cloud) – see notes later on opening this to allow connection from your computer.
- Public Access – Set to Yes
- Defaults for remaining options.
[Note: You might be prompted to enter a DB Name. Keep this short, with no special characters.]
Click on ‘Create Database’ button at bottom of screen to create the database. It can take anything from a couple of minutes to 30 minutes to create the Database.
When everything is create, and you try to connect to the Database using SQL Developer, you will not be able to connect. The VPC needs to be opened to outside traffic. Click on the VPC Security Groups link, then click on the Security Group link on the next page
Then click on the ‘Edit Inbound rules’ button, and then on the ‘Add Rule’ button (bottom left) to add a new rule. Then select ‘All Traffic’ from drop down, and 0.0.0.0/0 in the Source field. Then save the rules.

You are now ready to create a connection using SQL Developer. To do this you will need database Endpoint from the RDS dashboard. You will also need the DB Name. This can be found by clicking on the ‘Configuration’ tab, and is listed on left-hand side under DB Name
Now in SQL Developer enter those details and click Test button to see if the connection works. It should! but if it doesn’t then double check the username and password, the other details entered, and the network changes made above are correct.

You can now connect and start using the Database.
Warning: You will be connecting as the ADMIN for the Database. You should never use this account for any development work. So go create a new database user/schema and use it for all your work.
OCI Data Science – Initial Setup and Configuration
After a very, very, very long wait (18+ months) Oracle OCI Data Science platform is now available.
But before you jump straight into using OCI Data Science, there is a little bit of setup required for your Cloud Tenancy. There is the easy simple approach and then there is the slightly more involved approach. These are
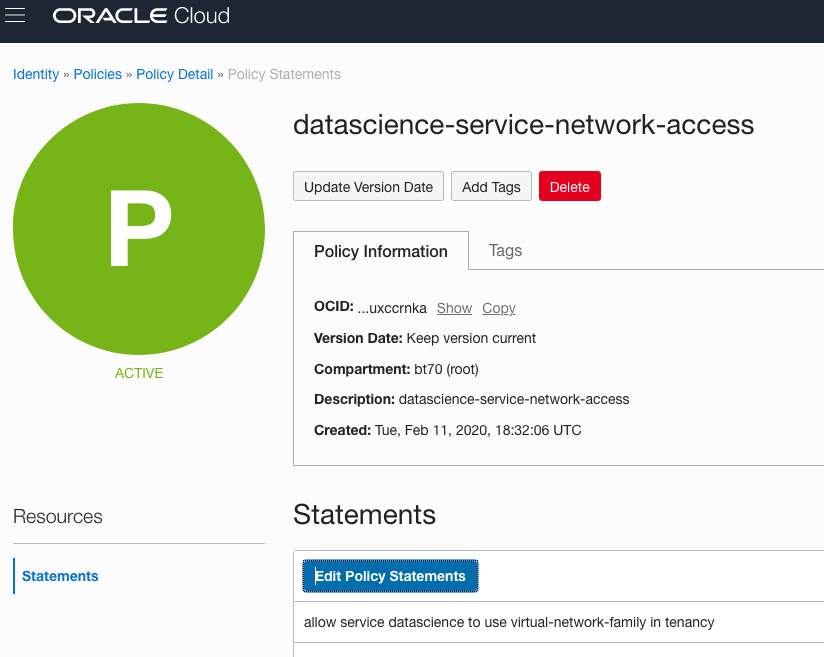
- Simple approach. Assuming you are just going to use the root tenancy and compartment, you just need to setup a new policy to enable the use of the OCI Data Science services. This assuming you have your VNC configuration complete with NAT etc. This can be done by creating a policy with the following policy statement. After creating this you can proceed with creating your first notebook in OCI Data Science.
allow service datascience to use virtual-network-family in tenancy
- Slightly more complicated approach. When you get into having a team based approach you will need to create some additional Oracle Cloud components to manage them and what resources are allocated to them. This involved creating Compartments, allocating users, VNCs, Policies etc. The following instructions brings you through these steps
IMPORTANT: After creating a Compartment or some of the other things listed below, and they are not displayed in the expected drop-down lists etc, then either refresh your screen or log-out and log back in again!
1. Create a Group for your Data Science Team & Add Users
The first step involves creating a Group to ‘group’ the various users who will be using the OCI Data Science services.
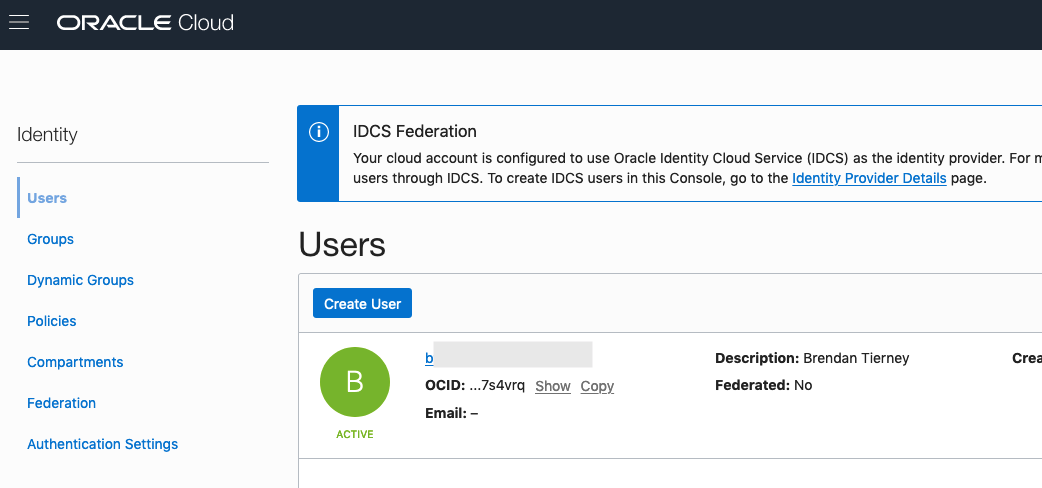
Go to Governance and Administration ->Identity and click on Groups.
Enter some basic descriptive information. I called my Group, ‘my-data-scientists’.


Now click on your Group in the list of Groups and add the users to the group.
You may need to create the accounts for the various users.
2. Create a Compartment for your Data Science work
Now create a new Compartment to own the network resources and the Data Science resources.
Go to Governance and Administration ->Identity and click on Compartments.
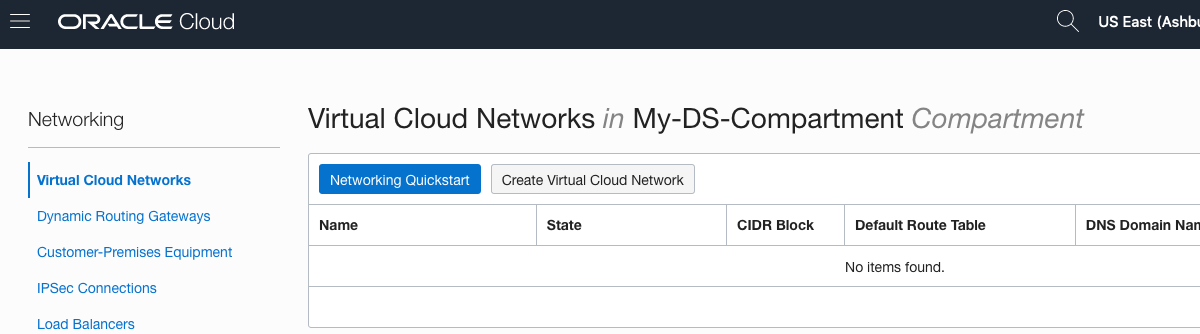
Enter some basic descriptive information. I’ve called my compartment, ‘My-DS-Compartment’.


3. Create Network for your Data Science work
Creating and setting up the VNC can be a little bit of fun. You can do it the manual way whereby you setup and configure everything. Or you can use the wizard to do this. I;m going to show the wizard approach below.
But the first thing you need to do is to select the Compartment the VNC will belong to. Select this from the drop-down list on the left hand side of the Virtual Cloud Network page. If your compartment is not listed, then log-out and log-in!


To use the wizard approach click the Networking QuickStart button.
Select the option ‘VCN with Internet Connectivity and click Start Workflow, as you will want to connect to it and to allow the service to connect to other cloud services.
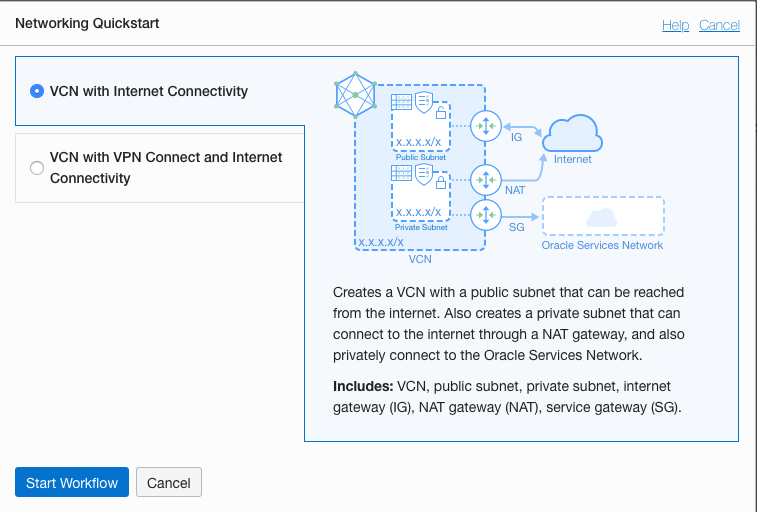
I called my VNC ‘My-DS-vnc’ and took the default settings. Then click the Next button.

The next screen shows a summary of what will be done. Click the Create button, and all of these networking components will be created.
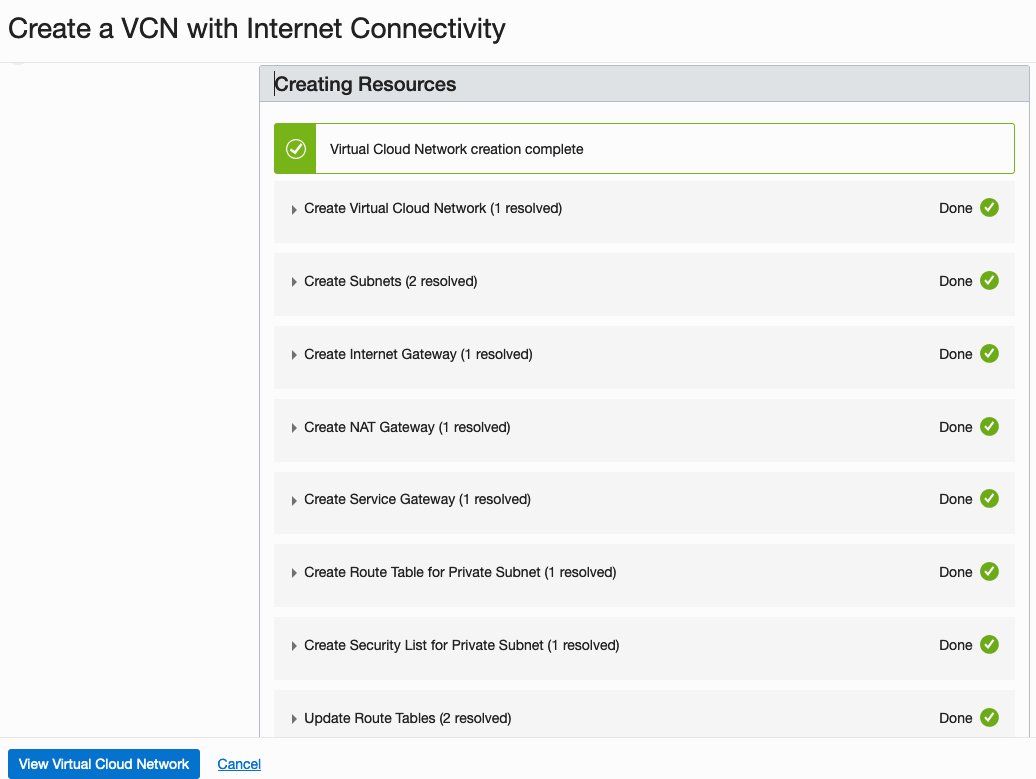
All done with creating the VNC.
4. Create required Policies enable OCI Data Science for your Compartment
There are three policies needed to allocated the necessary resources to the various components we have just created. To create these go to Governance and Administration ->Identity and click on Policies.
Select your Compartment from the drop-down list. This should be ‘My-DS-Compartment’, then click on Create Policy.
The first policy allocates a group to a compartment for the Data Science services. I called this policy, ‘DS-Manage-Access’.
allow group My-data-scientists to manage data-science-family in compartment My-DS-Compartment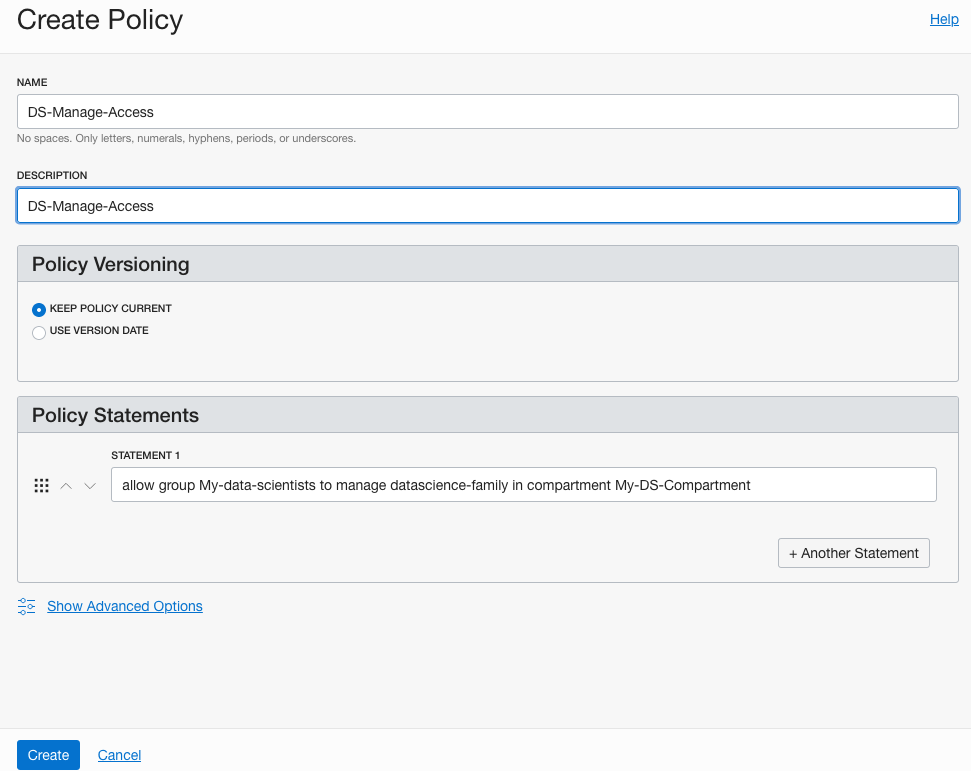
The next policy is to give the Data Science users access to the network resources. I called this policy, ‘DS-Manage-Network’.
allow group My-data-scientists to use virtual-network-family in compartment My-DS-Compartment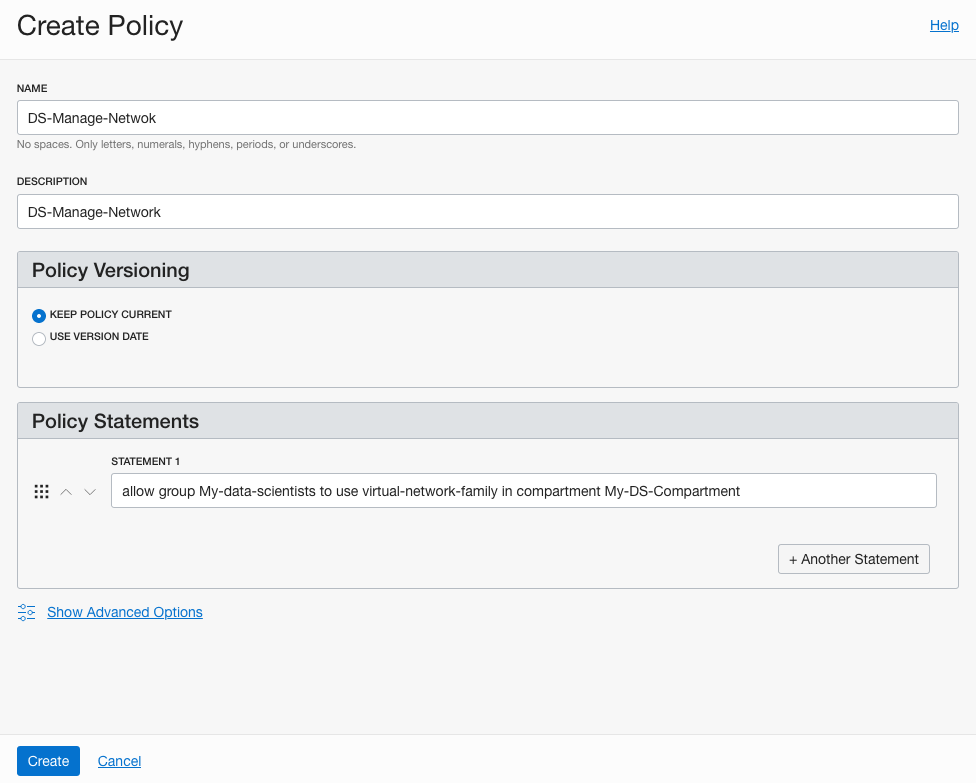
And the third policy is to give Data Science service access to the network resources. I called this policy, ‘DS-Network-Access’.
allow service datascience to use virtual-network-family in compartment My-DS-Compartment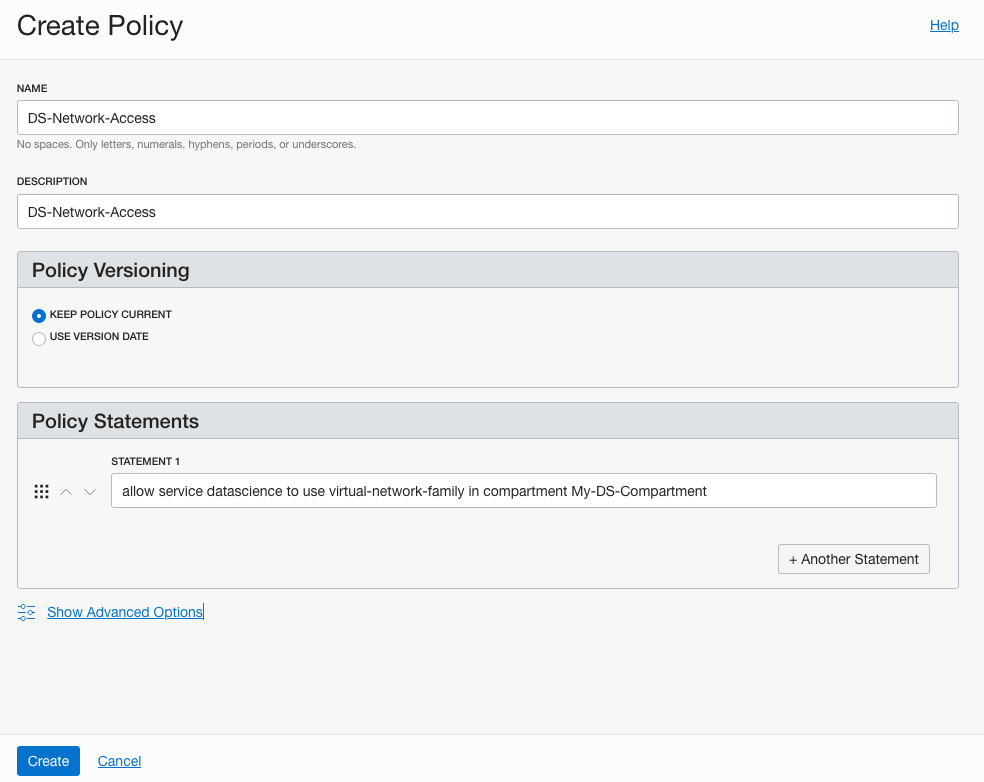
Job Done 🙂
You are now setup to run the OCI Data Science service. Check out my Blog Post on creating your first OCI Data Science Notebook and exploring what is available in this Notebook.
OCI – Making DBaaS Accessible using port 1521
When setting up a Database on Oracle Cloud Infrastructure (OCI) for the first time there are a few pre and post steps to complete before you can access the database using a JDBC type of connect, just like what you have in SQL Developer, or using Python or other similar tools and/or languages.
1. Setup Virtual Cloud Network (VCN)
The first step, when starting off with OCI, is to create a Virtual Cloud Network.
Create a VCN and take all the defaults. But change the radio button shown in the following image.
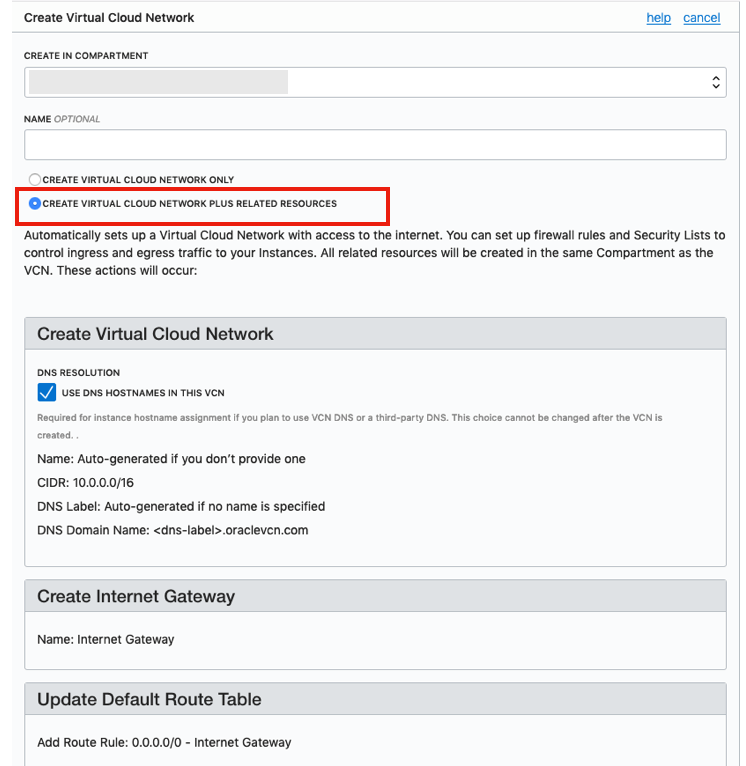
That’s it. We will come back to this later.
2. Create the Oracle Database
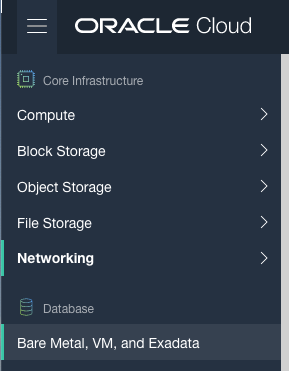
To create the database select ‘Bare Metal, VM and Exadata’ from the menu.
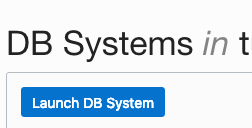
Click on the ‘Launch DB System’ button.
Fill in the details of the Database you want to create and select from the various options from the drop-downs.
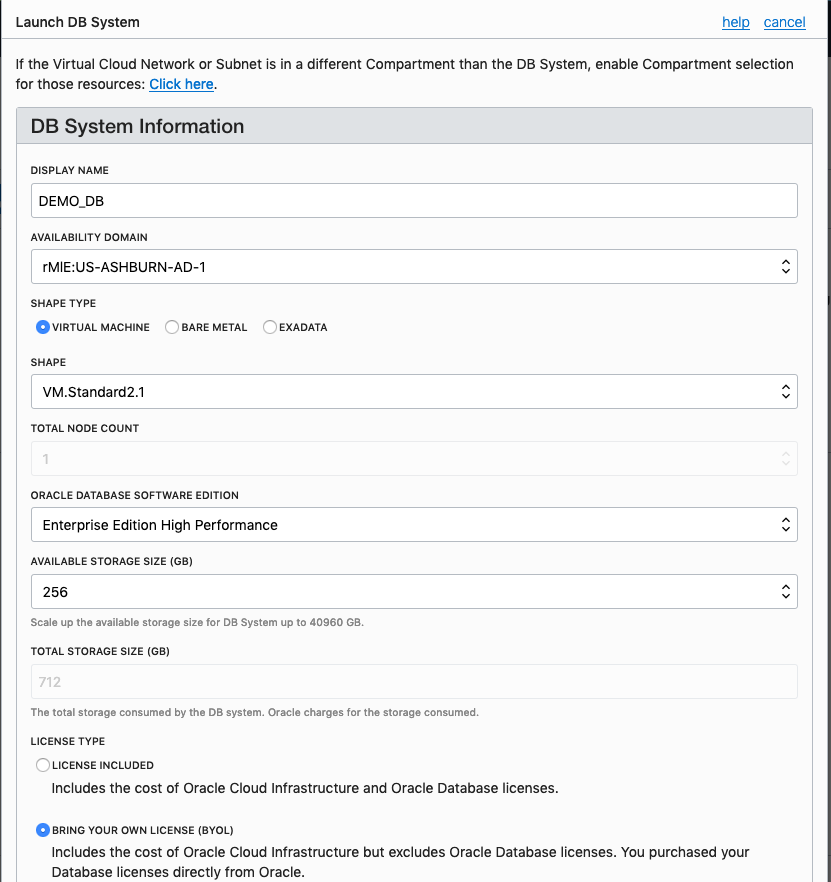
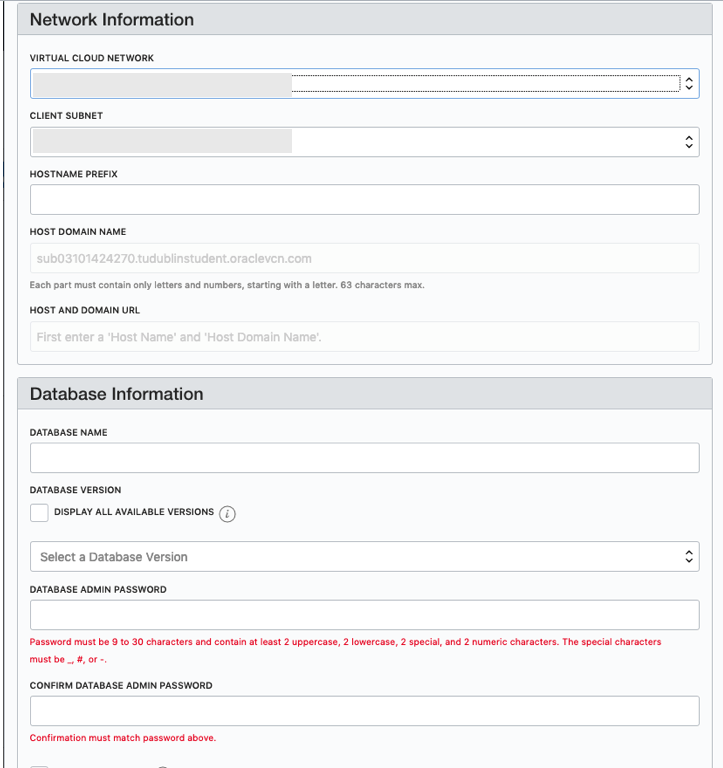
Fill in the details of the VCN you created in the previous set, and give the name of the DB and the Admin password.
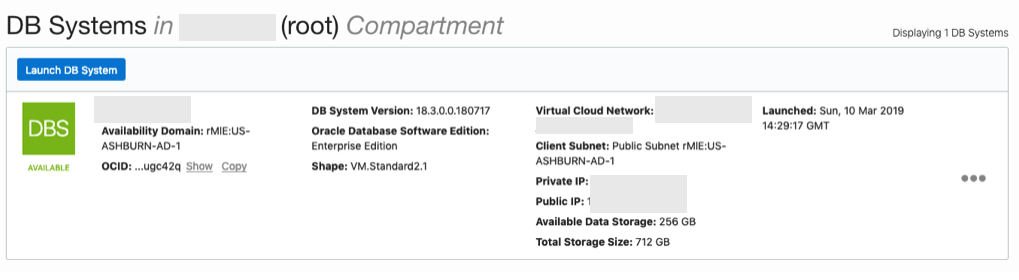
When you are finished everything that is needed, the ‘Launch DB System’ at the bottom of the page will be enabled. After clicking on this botton, the VM will be built and should be ready in a few minutes. When finished you should see something like this.
3. SSH to the Database server
When the DB VM has been created you can now SSH to it. You will need to use the SSH key file used when creating the DB VM. You will need to connect to the opc (operating system user), and from there sudo to the oracle user. For example
ssh -i <ssh file> opc@<public IP address>
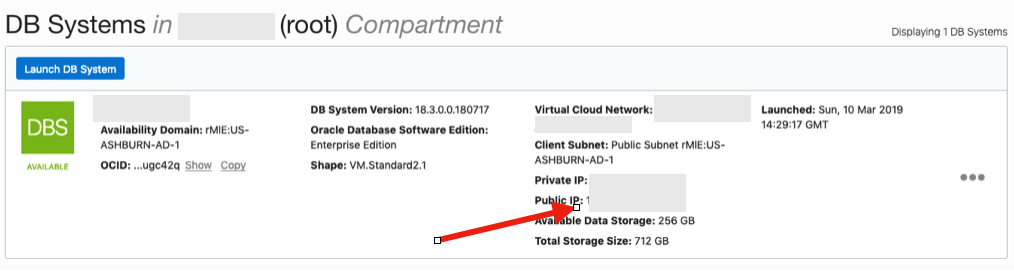
The public IP address can be found with the Database VM details
[opc@tudublins1 ~]$ sudo su - oracle
[oracle@tudublins1 ~]$ . oraenv
ORACLE_SID = [cdb1] ?
The Oracle base has been set to /u01/app/oracle
[oracle@tudublins1 ~]$
[oracle@tudublins1 ~]$ sqlplus / as sysdba

SQL*Plus: Release 18.0.0.0.0 - Production on Wed Mar 13 11:28:05 2019
Version 18.3.0.0.0

Copyright (c) 1982, 2018, Oracle. All rights reserved.


Connected to:
Oracle Database 18c Enterprise Edition Release 18.0.0.0.0 - Production
Version 18.3.0.0.0

SQL> alter session set container = pdb1;

Session altered.

SQL> create user demo_user identified by DEMO_user123##;

User created.

SQL> grant create session to demo_user;

Grant succeeded.

SQL>
4. Open port 1521
To be able to access this with a Basic connection in SQL Developer and most programming languages, we will need to open port 1521 to allow these tools and languages to connect to the database.
To do this go back to the Virtual Cloud Networks section from the menu.
Click into your VCN, that you created earlier. You should see something like the following.

Click on the Security Lists, menu option on the left hand side.
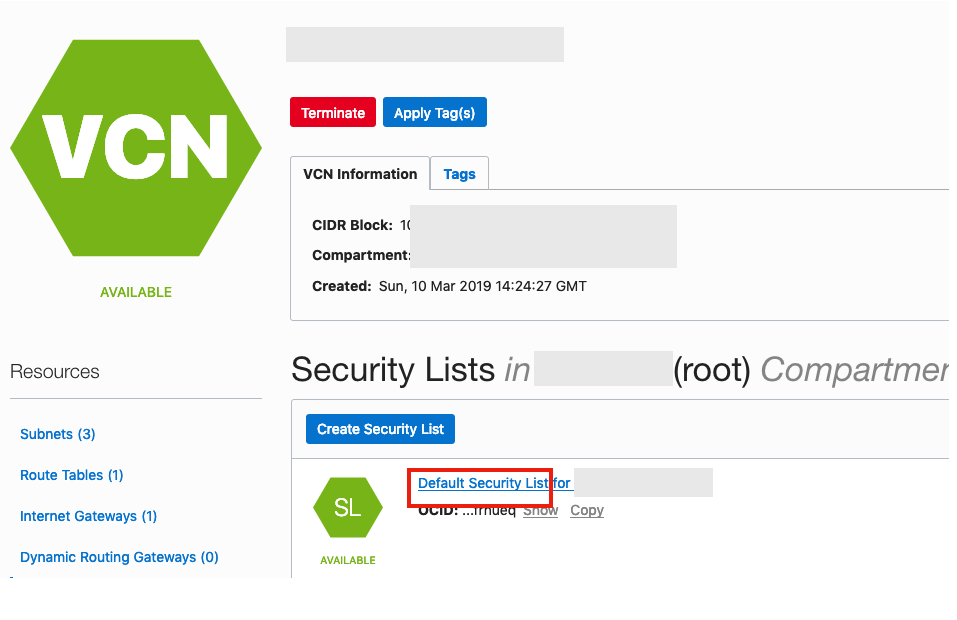 From that screen, click on Default Security List, and then click on the ‘Edit All Rules’ button at the top of the next screen.
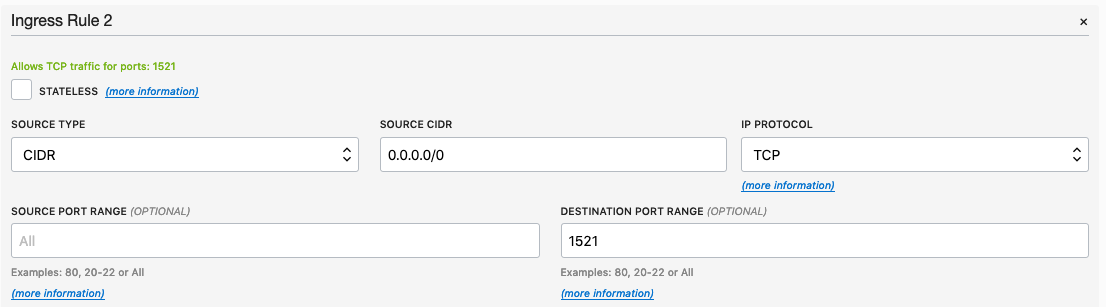
Add a new rule to have a ‘Destination Port Range’ set for 1521
That’s it.
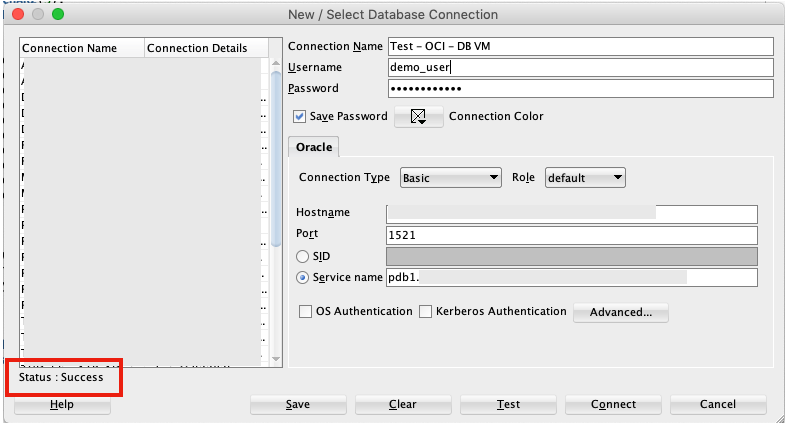
5. Connect to the Database from anywhere
Now you can connect to the OCI Database using a basic SQL Developer Connection.

You must be logged in to post a comment.