
oracle cloud
OCI Gen AI – How to call using Python
Oracle OCI has some Generative AI features, one of which is a Playground allowing you to play or experiment with using several of the Cohere models. The Playground includes Chat, Generation, Summarization and Embedding.
OCI Generative AI services are only available in a few Cloud Regions. You can check the available regions in the documentation. A simple way to check if it is available in your cloud account is to go to the menu and see if it is listed in the Analytics & AI section.

When the webpage opens you can select the Playground from the main page or select one of the options from the menu on the right-hand-side of the page. The following image shows this menu and in this image, I’ve selected the Chat option.

You can enter your questions into the chat box at the bottom of the screen. In the image, I’ve used the following text to generate a Retirement email.
A university professor has decided to retire early. write and email to faculty management and HR of his decision. The job has become very stressful and without proper supports I cannot continue in the role. write me an email for this
Using this playground is useful for trying things out and to see what works and doesn’t work for you. When you are ready to use or deploy such a Generative AI solution, you’ll need to do so using some other coding environment. If you look toward the top right hand corner of this playground page, you’ll see a ‘View code’ button. When you click on this Code will be generated for you in Java and Python. You can copy and paste this to any environment and quickly have a Chatbot up and running in few minutes. I was going to say a few second but you do need to setup a .config file to setup a secure connection to your OCI account. Here is a blog post I wrote about setting this up.
Here is a copy of that Python code with some minor edits, 1) to remove my Compartment ID, 2) I’ve added some message requests. You can comment/uncomment as you like or add something new.
import oci

# Setup basic variables
# Auth Config
# TODO: Please update config profile name and use the compartmentId that has policies grant permissions for using Generative AI Service
compartment_id =  <add your Compartment ID>
CONFIG_PROFILE = "DEFAULT"
config = oci.config.from_file('~/.oci/config', CONFIG_PROFILE)

# Service endpoint
endpoint = "https://inference.generativeai.us-chicago-1.oci.oraclecloud.com"

generative_ai_inference_client = oci.generative_ai_inference.GenerativeAiInferenceClient(config=config, service_endpoint=endpoint, retry_strategy=oci.retry.NoneRetryStrategy(), timeout=(10,240))
chat_detail = oci.generative_ai_inference.models.ChatDetails()

chat_request = oci.generative_ai_inference.models.CohereChatRequest()
#chat_request.message = "Tell me what you can do?"
#chat_request.message = "How does GenAI work?"
chat_request.message = "What's the weather like today where I live?"
chat_request.message = "Could you look it up for me?"
chat_request.message = "Will Elon Musk buy OpenAI?"
chat_request.message = "Tell me about Stargate Project and how it will work?"
chat_request.message = "What is the most recent date your model is built on?"


chat_request.max_tokens = 600
chat_request.temperature = 1
chat_request.frequency_penalty = 0
chat_request.top_p = 0.75
chat_request.top_k = 0
chat_request.seed = None


chat_detail.serving_mode = oci.generative_ai_inference.models.OnDemandServingMode(model_id="ocid1.generativeaimodel.oc1.us-chicago-1.amaaaaaask7dceyanrlpnq5ybfu5hnzarg7jomak3q6kyhkzjsl4qj24fyoq")
chat_detail.chat_request = chat_request
chat_detail.compartment_id = compartment_id
chat_response = generative_ai_inference_client.chat(chat_detail)
# Print result
print("**************************Chat Result**************************")
print(vars(chat_response))
When I run the above code I get the following output.
NB: If you have the OCI Python package already installed you might need to update it to the most recent version
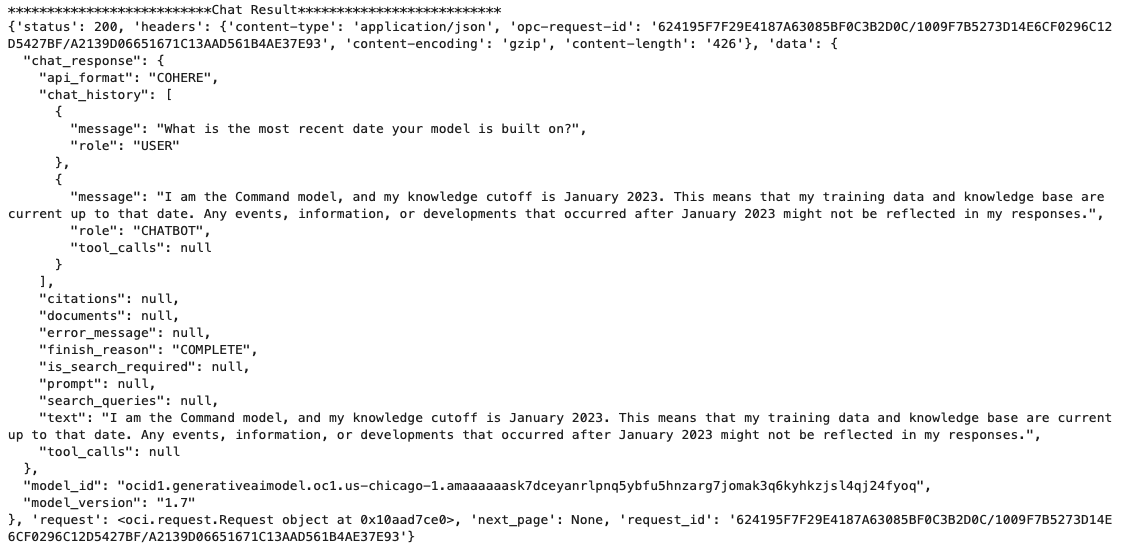
You can see there is a lot generated and returned in the response. We can tidy this up a little using the following and only display the response message.
import json
# Convert JSON output to a dictionary
data = chat_response.__dict__["data"]
output = json.loads(str(data))

# Print the output
print("---Message Returned by LLM---")
print(output["chat_response"]["chat_history"][1]["message"])
That’s it. Give it a try and see how you can build it into your applications.
How to Create an Oracle Gen AI Agent
In this post, I’ll walk you through the steps needed to create a Gen AI Agent on Oracle Cloud. We have seen lots of solutions offered by my different providers for Gen AI Agents. This post focuses on just what is available on Oracle Cloud. You can create a Gen AI Agent manually. However, testing and fine-tuning based on various chunking strategies can take some time. With the automated options available on Oracle Cloud, you don’t have to worry about chunking. It handles all the steps automatically for you. This means you need to be careful when using it. Allocate some time for testing to ensure it meets your requirements. The steps below point out some checkboxes. You need to check them to ensure you generate a more complete knowledge base and outcome.
For my example scenario, I’m going to build a Gen AI Agent for some of the works by Shakespeare. I got the text of several plays from the Gutenberg Project website. The process for creating the Gen AI Agent is:

Step-1 Load Files to a Bucket on OCI
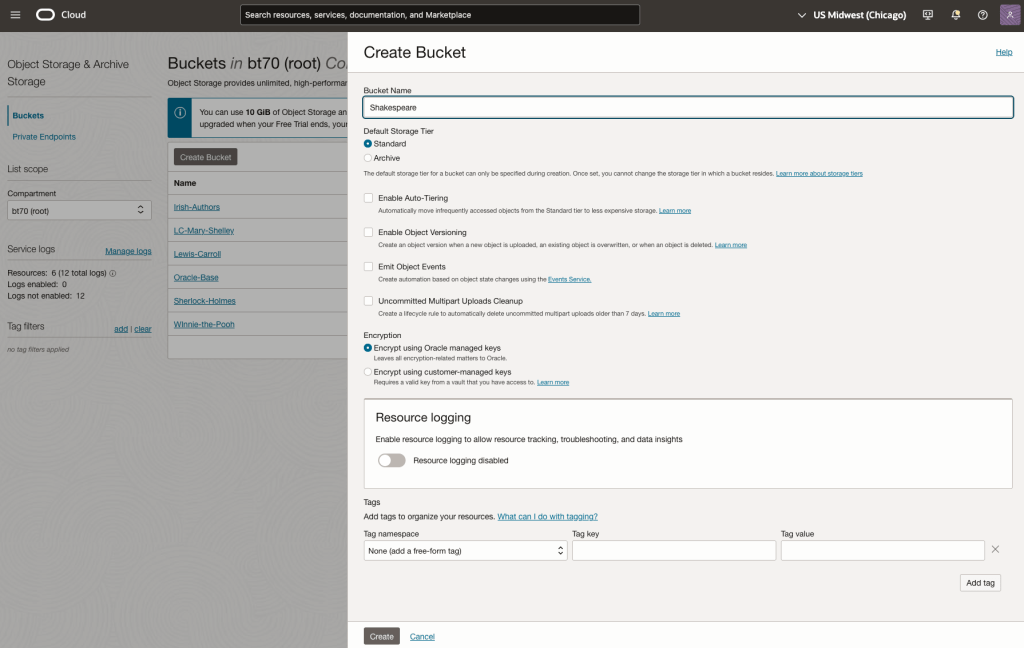
Create a bucket called Shakespeare.
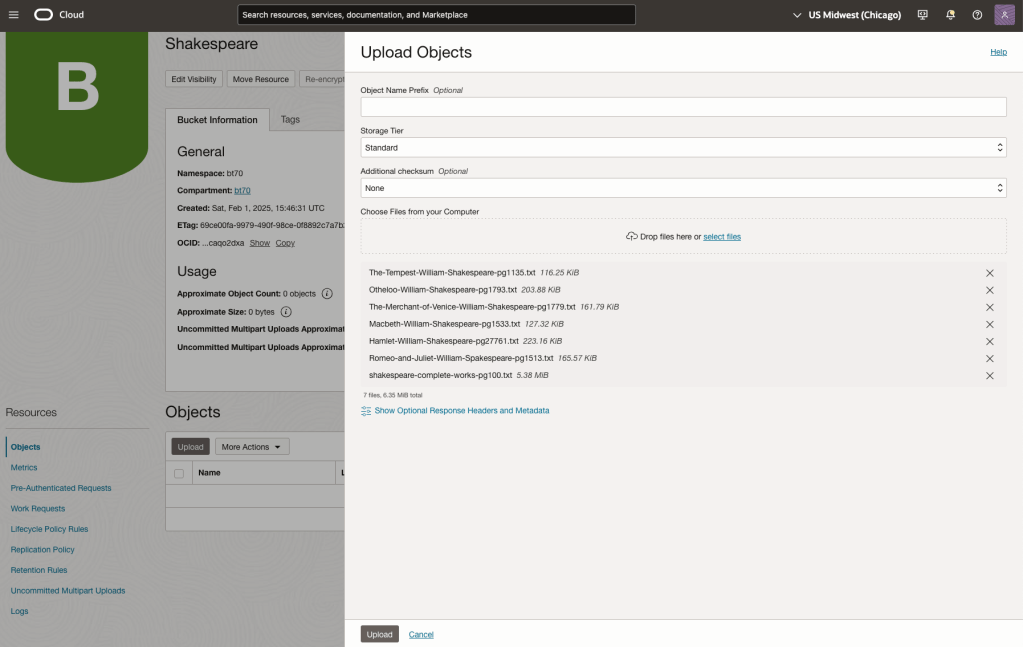
Load the files from your computer into the Bucket. These files were obtained from the Gutenberg Project site.
Step-2 Define a Data Source (documents you want to use) & Create a Knowledge Base
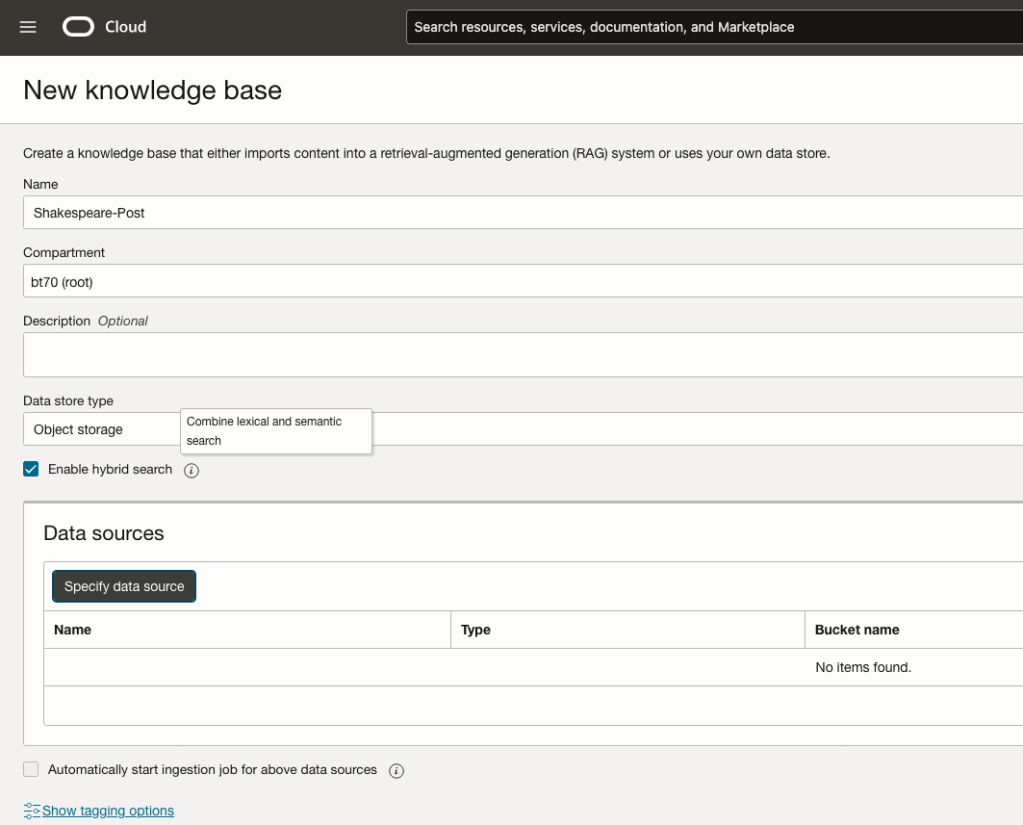
Click on Create Knowledge Base and give it a name ‘Shakespeare’.
Check the ‘Enable Hybrid Search’. checkbox. This will enable both lexical and semantic search. [this is Important]
Click on ‘Specify Data Source’
Select the Bucket from the drop-down list (Shakespeare bucket).
Check the ‘Enable multi-modal parsing’ checkbox.
Select the files to use or check the ‘Select all in bucket’
Click Create.

The Knowledge Base will be created. The files in the bucket will be parsed, and structured for search by the AI Agent. This step can take a few minutes as it needs to process all the files. This depends on the number of files to process, their format and the size of the contents in each file.
Step-3 Create Agent
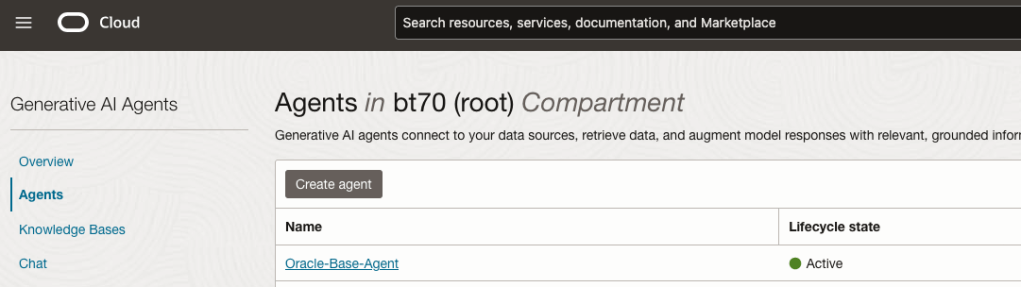
Go back to the main Gen AI menu and select Agent and then Create Agent.
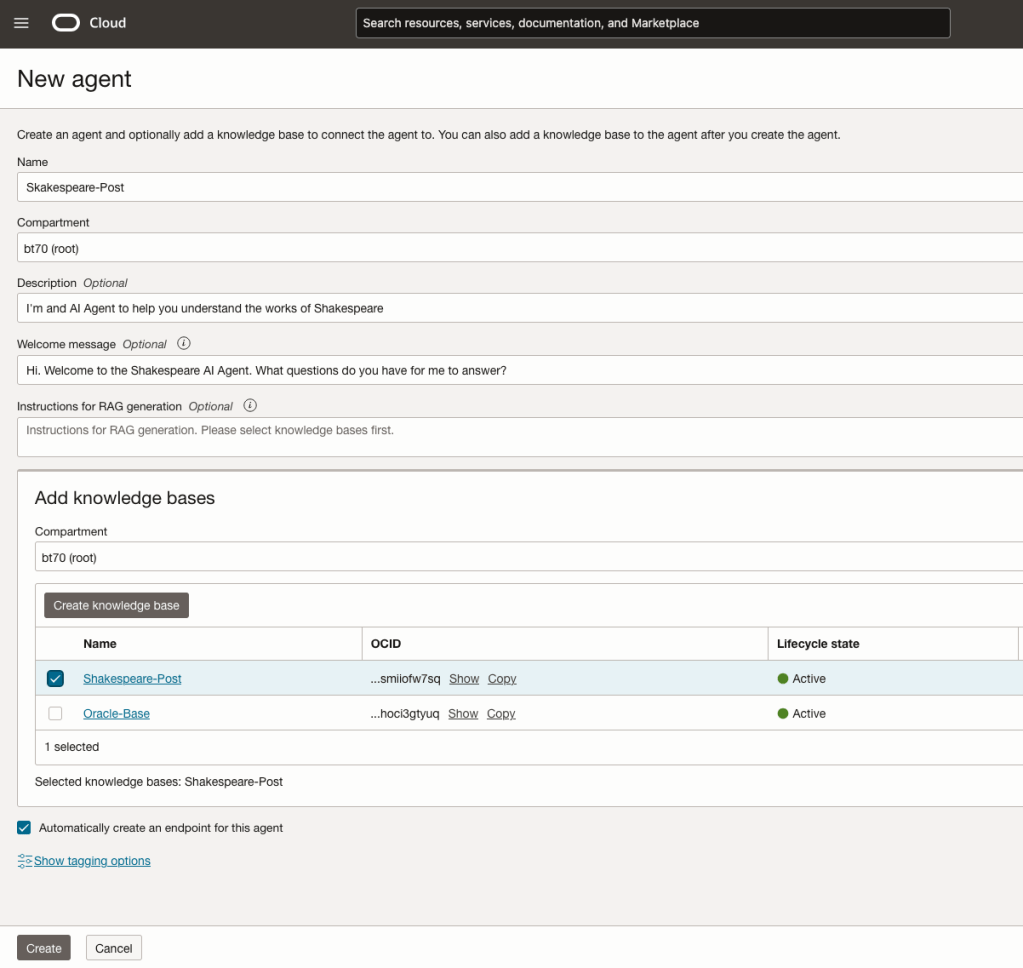
You can enter the following details:
- Name of the Agent
- Some descriptive information
- A Welcome message for people using the Agent
- Select the Knowledge Base from the list.
The checkbox for creating Endpoints should be checked.
Click Create.
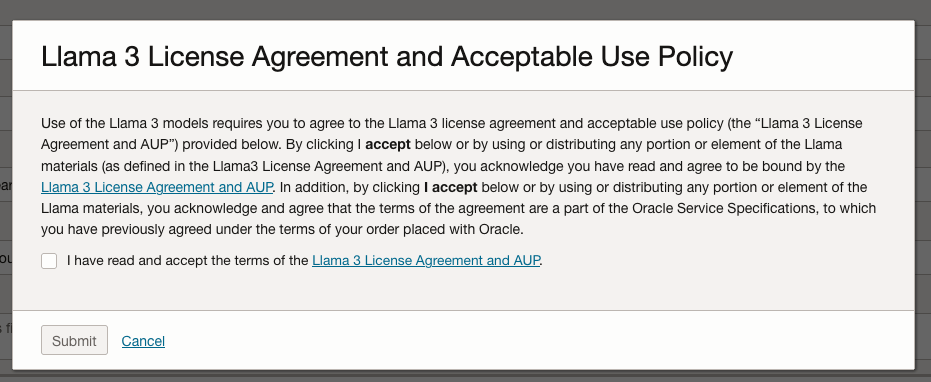
A pop-up window will appear asking you to agree to the Llama 3 License. Check this checkbox and click Submit.
After the agent has been created, check the status of the endpoints. These generally take a little longer to create, and you need these before you can test the Agent using the Chatbot.
Step-4 Test using Chatbot
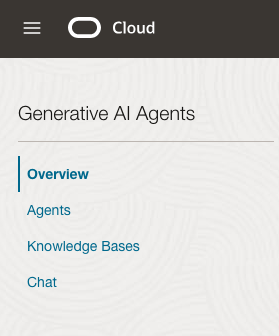
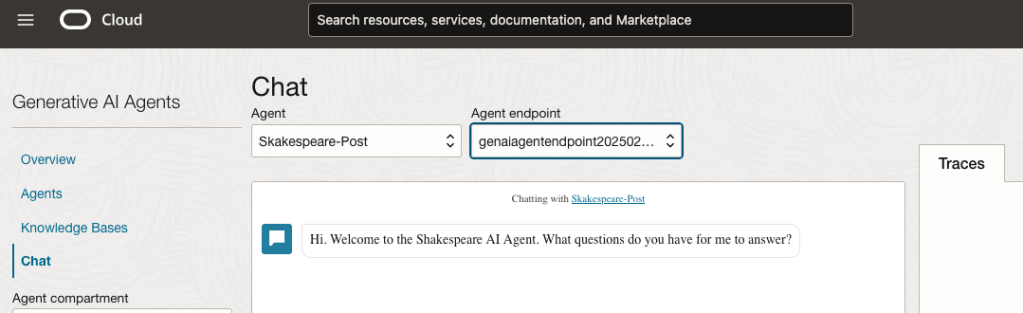
After verifying the endpoints have been created, you can open a Chatbot by clicking on ‘Chat’ from the menu on the left-hand side of the screen.
Select the name of the ‘Agent’ from the drop-down list e.g. Shakespeare-Post.
Select an end-point for the Agent.
After these have been selected you will see the ‘Welcome’ message. This was defined when creating the Agent.
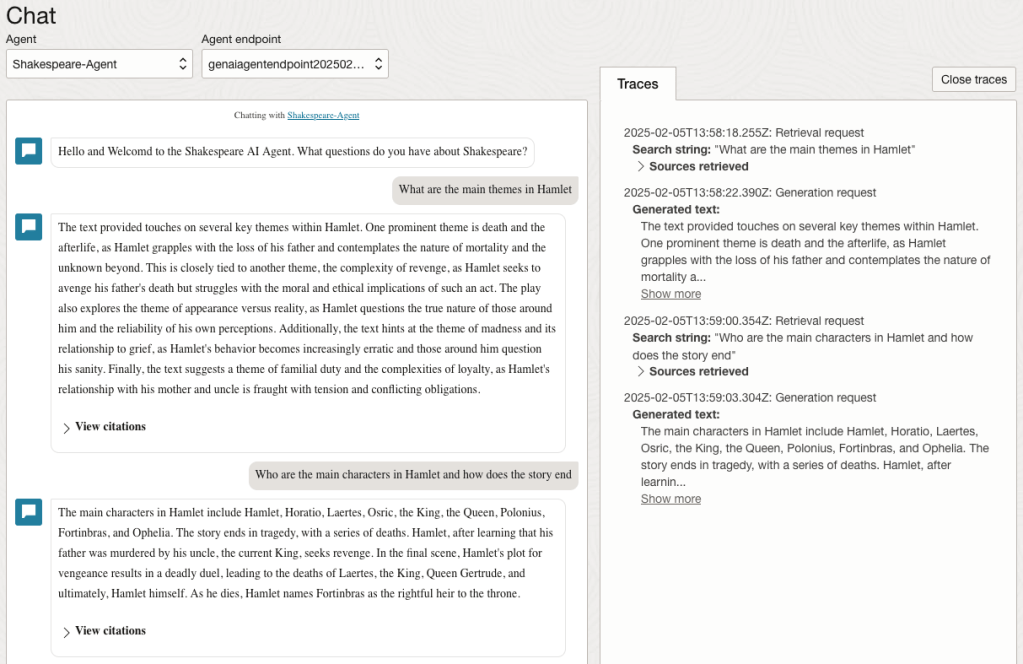
Here are a couple of examples of querying the works by Shakespeare.
In addition to giving a response to the questions, the Chatbot also lists the sections of the underlying documents and passages from those documents used to form the response/answer.
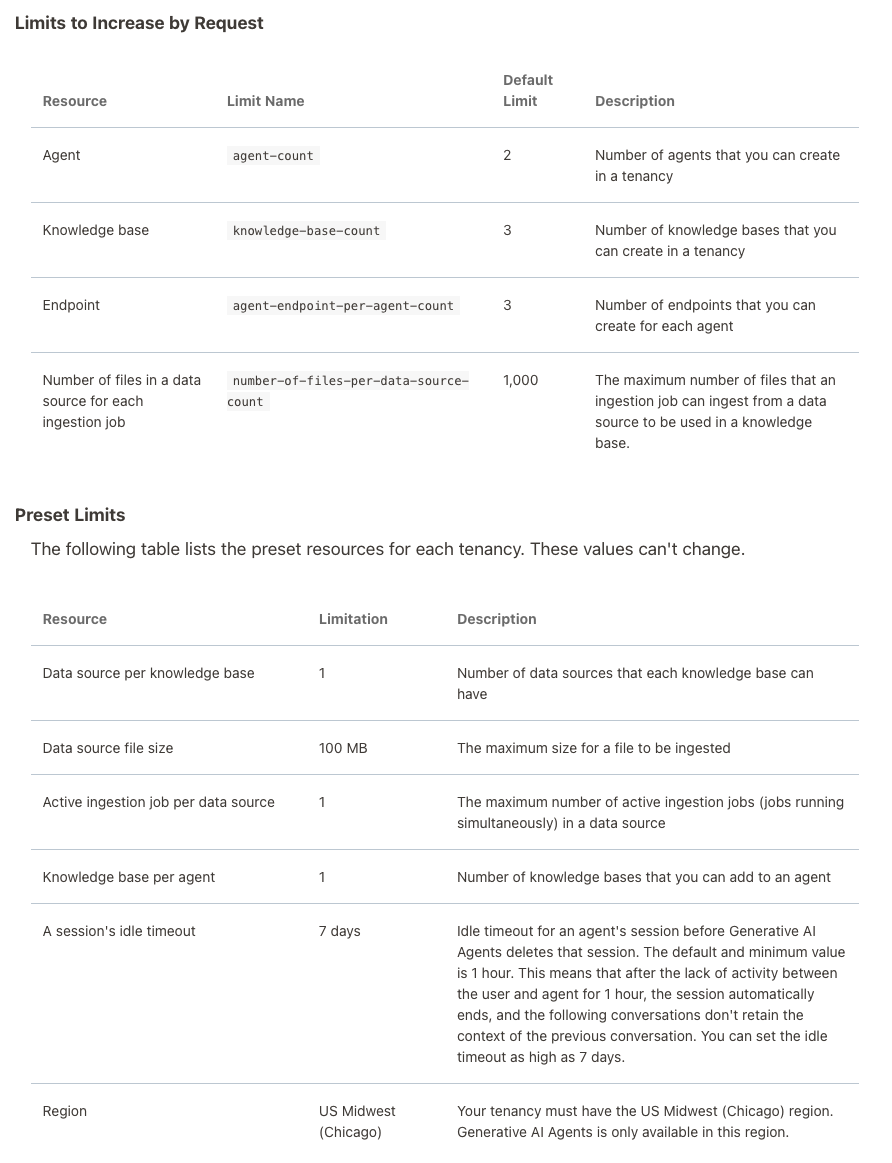
When creating Gen AI Agents, you need to be careful of two things. The first is the Cloud Region. Gen AI Agents are only available in certain Cloud Regions. If they aren’t available in your Region, you’ll need to request access to one of those or setup a new OCI account based in one of those regions. The second thing is the Resource Limits. At the time of writing this post, the following was allowed. Check out the documentation for more details. You might need to request that these limits be increased.
I’ll have another post showing how you can run the Chatbot on your computer or VM as a webpage.
Oracle Object Storage – Setup and Explore
This blog post will walk you through how to access Oracle OCI Object Storage and explore what buckets and files you have there, using Python and the OCI Python library. There will be additional posts which will walk through some of the other typical tasks you’ll need to perform with moving files into and out of OCI Object Storage.
- Oracle Object Storage – Buckets & Loading files
- Oracle Object Storage – Downloading and Deleting
- Oracle Object Storage – Parallel Uploading
The first thing you’ll need to do is to install the OCI Python library. You can do this by running pip command or if using Anaconda using their GUI for doing this. For example,
pip3 install ociCheck out the OCI Python documentation for more details.
Next, you’ll need to get and setup the configuration settings and download the pem file.
We need to create the config file that will contain the required credentials and information for working with OCI. By default, this file is stored in : ~/.oci/config
mkdir ~/oci
cd oci
Now create the config file, using vi or something similar.
vi config
Edit the file to contain the following, but look out for the parts that need to be changed/updated to match your OCI account details.
[ADMIN_USER]user=ocid1.user.oc1..<unique_ID>
fingerprint=<your_fingerprint>
tenancy = ocid1.tenancy.oc1..<unique_ID>
region = us-phoenix-1key_file=
<path to key .pem file>
The above details can be generated by creating an API key for your OCI user. Copy and paste the default details to the config file.
- [ADMIN_USER] > you can name this anything you want, but it will referenced in Python.
- user > enter the user ocid. OCID is the unique resource identifier that OCI provides for each resource.
- fingerprint > refers to the fingerprint of the public key you configured for the user.
- tenancy > your tenancy OCID.
- region > the region that you are subscribed to.
- key_file > the path to the .pem file you generated.

Just download the .pem file and the config file details. Add them to the config file, and give the full path to the .epm file, including its name.
You are now ready to use the OCI Python library to access and use your OCI cloud environment. Let’s run some tests to see if everything works and connects ok.
#import libraries
import oci
import json
import os
import io

#load the config file
config = oci.config.from_file("~/.oci/config")
config

#only part of the output is displayed due to security reasons
{'log_requests': False, 'additional_user_agent': '', 'pass_phrase': None, 'user': 'oci...........
We can now define some core variables.
#My Compartment ID
COMPARTMENT_ID = "ocid1.tenancy.oc1..............

#Object storage Namespace
object_storage_client = oci.object_storage.ObjectStorageClient(config)
NAMESPACE = object_storage_client.get_namespace().data

#Name of Bucket for this demo
BUCKET_NAME = 'DEMO_Bucket'
We can now define some functions to:
- List the Buckets in my OCI account
- List the number of files in each Bucket
- Number of files in a particular Bucket
- Check for Bucket Existence
def list_buckets():
    l_buckets = object_storage_client.list_buckets(NAMESPACE, COMPARTMENT_ID).data
    # Get the data from response
    for bucket in l_buckets:
        print(bucket.name)

def list_bucket_counts():
    l_buckets = object_storage_client.list_buckets(NAMESPACE, COMPARTMENT_ID).data
    for bucket in l_buckets:
        print("Bucket name: ",bucket.name)
        buck_name = bucket.name
        objects = object_storage_client.list_objects(NAMESPACE, buck_name).data
        count = 0
        for i in objects.objects:
            count+=1

        print('... num of objects :', count)

def check_bucket_exists(b_name):
    #check if Bucket exists
    is_there = False
    l_b = object_storage_client.list_buckets(NAMESPACE, COMPARTMENT_ID).data
    for bucket in l_b:
        if bucket.name == b_name:
            is_there = True

    if is_there == True:
        print(f'Bucket {b_name} exists.')
    else:
        print(f'Bucket {b_name} does not exist.')

    return is_there

def list_bucket_details(b):
    bucket_exists = check_bucket_exists(b)
    if bucket_exists == True:
        objects = object_storage_client.list_objects(NAMESPACE, b).data
        count = 0
        for i in objects.objects:
            count+=1

        print(f'Bucket {b} has objects :', count)
Now we can run these functions to test them. Before running these make sure you can create a connection to OCI.

OCI Data Labeling for Machine Learning
OCI Data Labeling is a service that enables developers and data scientists to construct labelled datasets for training AI and machine learning models. By utilizing OCI Data Labeling, users can easily gather data, generate datasets, and assign labels to individual data records through user-friendly interfaces and public APIs. The labelled datasets can then be utilised to facilitate model development across a wide range of Oracle’s AI and data science services, ensuring a seamless and efficient model-building experience.
OCI Data Labeling allows developers and data scientists to label different types of data for training AI and machine learning models. Here are some examples of how OCI Data Labeling can be used for different types of data:
- Document Labeling
- Image Labeling
- Text Labeling
Typically the labelling of data is a manual task but there are also options to programmicly do this if the necessary label data is available.

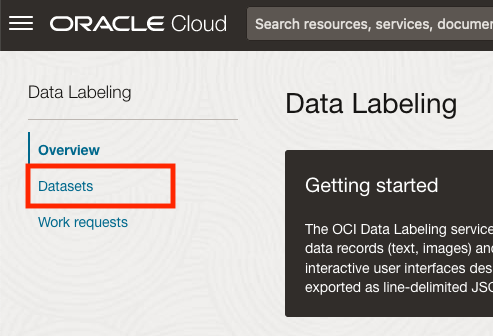
The OCI Data Labeling service can be located under the Analytics & AI menu. See the image.
As we want to label a dataset, we need to first define the Dataset we want to use.
Select Datasets from the menu.
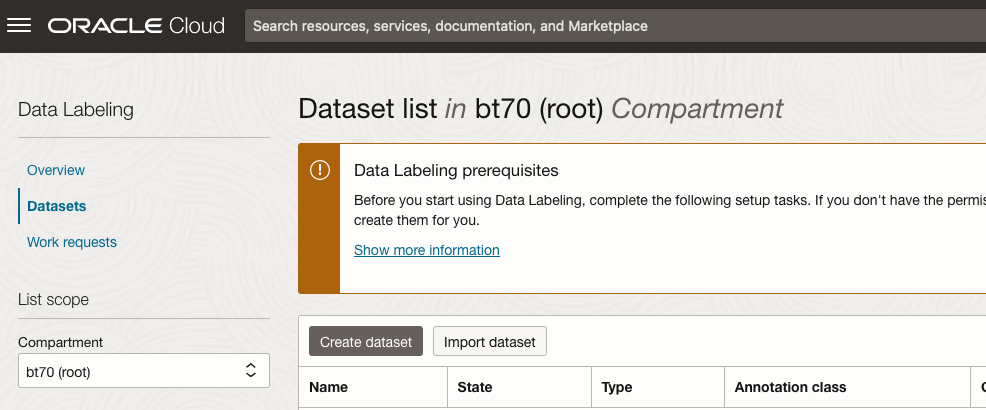
There are two options for creating the data set for labeling. The first is to use the Create Dataset option and the second is to Import Dataset.
If you already have your data in a Bucket, you can use both approaches. If you have a new dataset to import then use the Create Dataset option.
In this post, I’ll use the Create Dataset option and step through it.
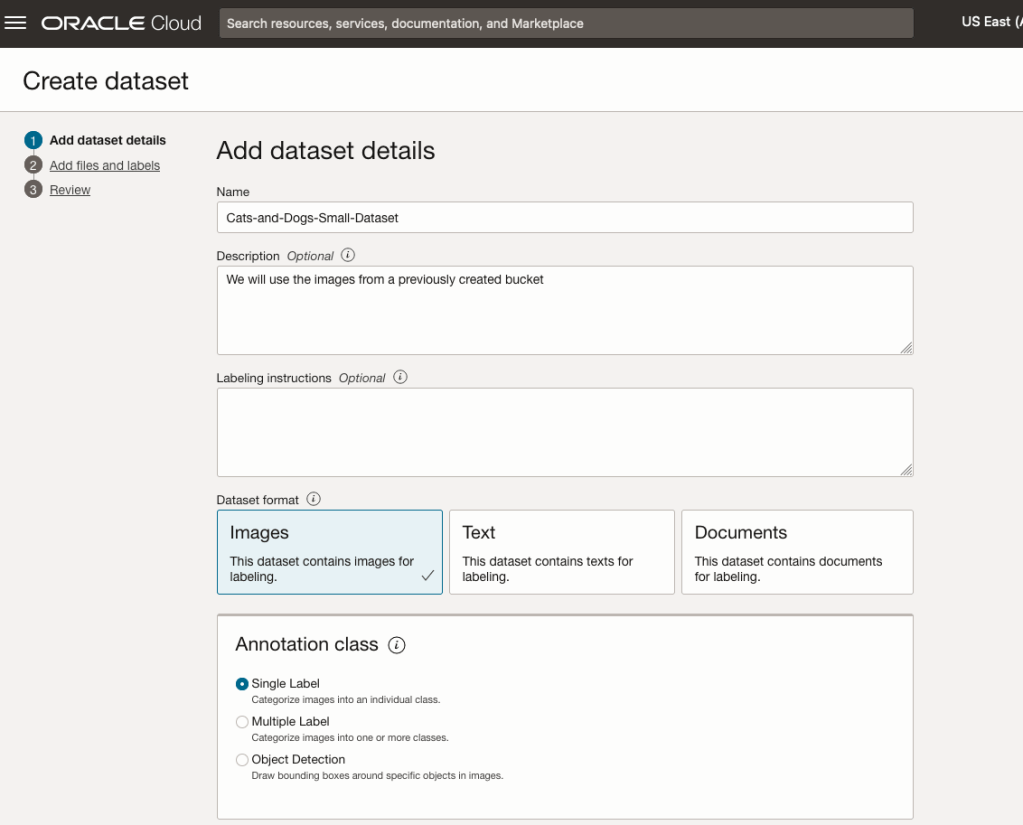
Start by giving a name to the Dataset, then specify the type of data (Images, Text or Documents). In this example, we will work with image data.
Then select if the dataset (or each image) has one or multiple labels, or if you are going to draw bounding boxes for Object Detection.
For our example, select Single Label.
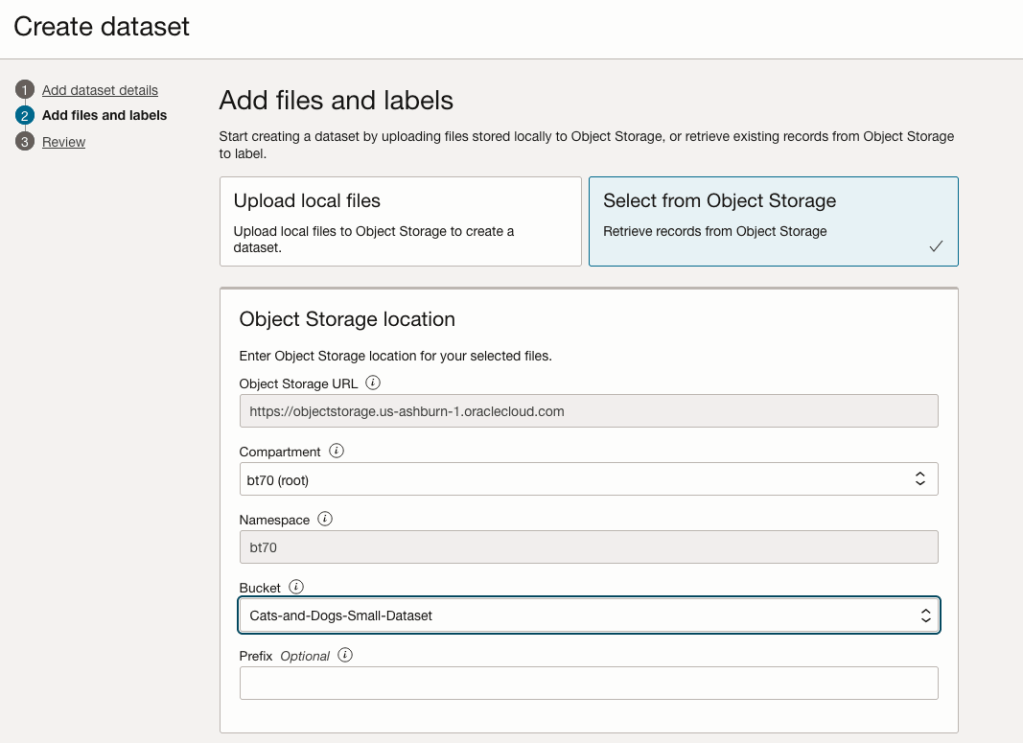
You can upload files from your computer or use files in an Object Bucket. As the dataset has already been loaded into a Bucket, we’ll select that option.
The Object Storage URL, Compartment and Namespace will be automatically populated for you.
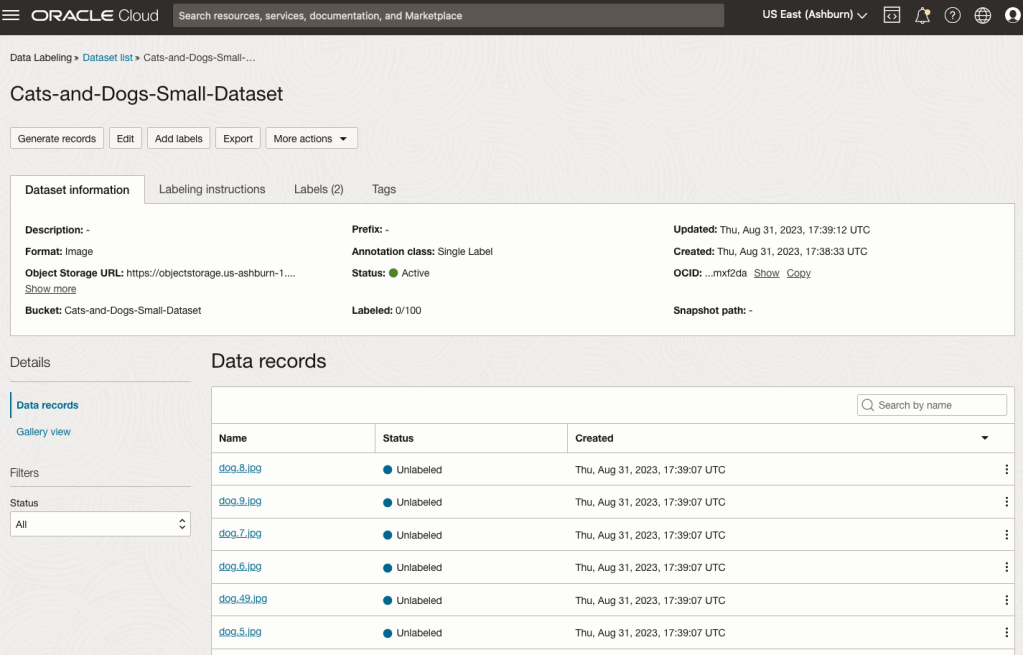
Select the Bucket you want to use from the drop-down list. This dataset has 50 images each of Cats and Dogs.
The page will display the first eight or so, of the images in the Bucket. You can scroll through the others and this gives you a visual opportunity to make sure you are using the correct dataset.

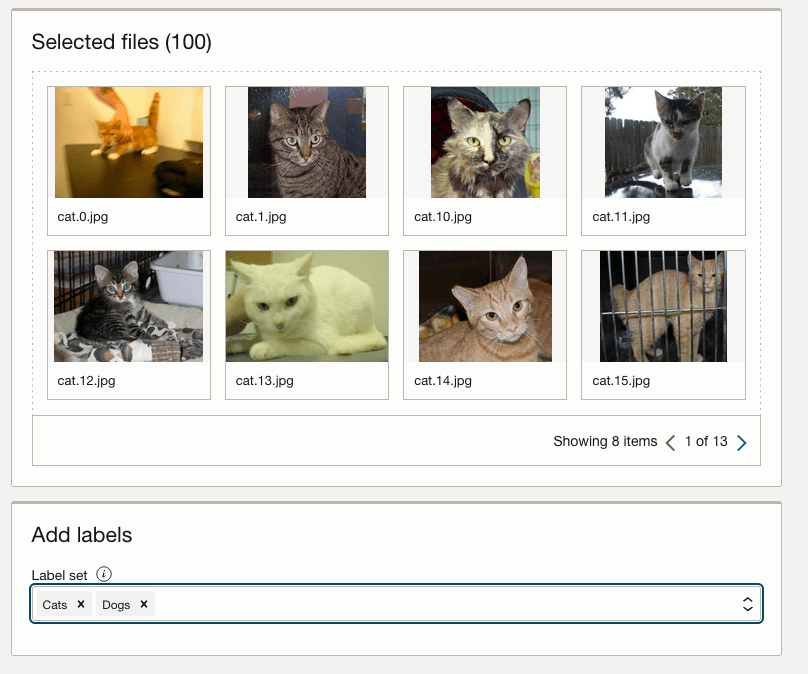
Now you can define the Labels to use for the dataset. In our sample dataset we only have two possible labels. If your dataset has more than this just enter the name and present enter. The Lable will be created.
You can add and remove labels.
When finished click the Next button at the bottom of the screen.
The final part of this initial setup is to create the dataset by clicking on the Create button

When everything has been processed you will get a screen that looks like this.
You are now ready to move on to labelling the dataset.
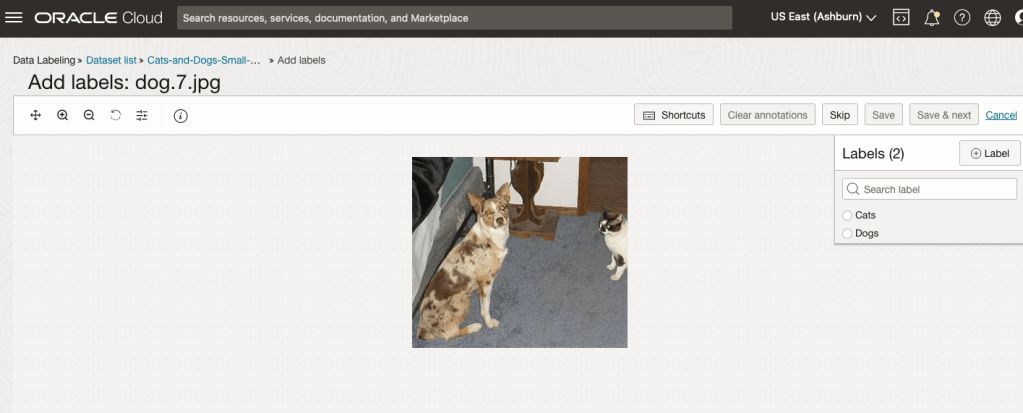
To label each image, start by clicking on the first image. This will open a screen like what is shown (to the right).
Click on the radio group item for the label that best represents the image. In some scenarios maybe both labels are suitable, and in such cases just pick the most suitable one. In this example, I’ve selected Dog. An alternative approach is to use the bounding box labelling. I’ll have a different post illustrating that.
Select the most suitable label and then click ‘Save & next’ button.
Yes, you’ll need to do this for all the images in the dataset. Yes, this can take a lot of time, particularly if you have 100s, or 1000s of images. The Datasets screen has details of how many images have been labelled and or not, and you can easily search for unlabelled files and continue labelling, if you need to take a break.
When OCI doesn’t know who you are
When you are logged into your Oracle Cloud account and they give you a link to follow, which should bring you to another page in your account, but it doesn’t. The link (which is automatically generated by OCI) is formed incorrectly and gives you something like the following.

Have a look at the address bar. You will see a part saying /users/undefined. That’s the problem, the link was not defined or created correctly. Although you are logged into your account, in theory, things like this should work correctly and from talking to other people about their OCI accounts, they don’t have the same problem, as it just works as expected.
What can you do to work around this? The first thing you need to do is locate your user OCID. This is located on some Services pages in OCI. Alternatively, go to Users in the Identity & Security menu section.

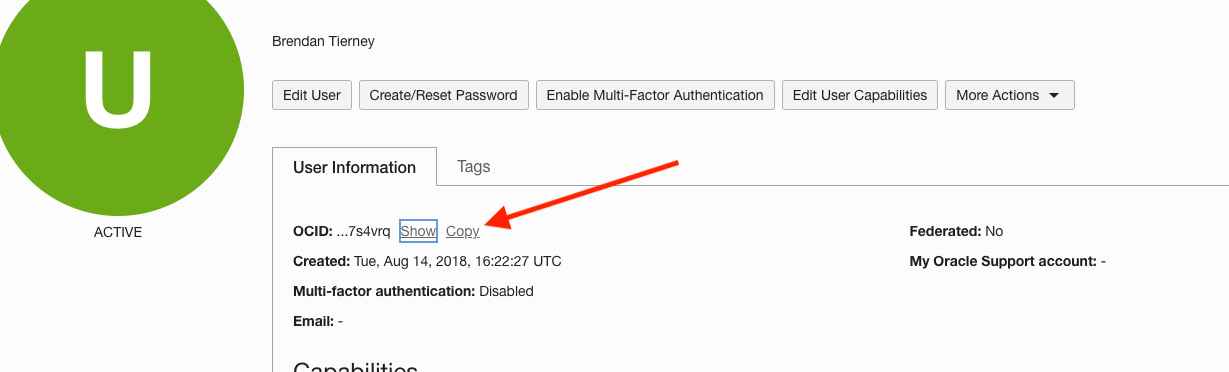
Now go back to the page/link which gives the error, as shown in the first image, locate the undefined work in the address bar, and replace it with the OCID for the user. The link will look something like this (only a subset of link is shown.
https://cloud.oracle.com/identity/users/ocid1.user.oc1..a
The page should now load without any errors.
What’s causing this error? That’s a good question and the true answer to it is unknown (at this point in time). But from some investigation and comparing my OCI account with other people there does seem to be some anomalies with my OCI user accounts and syncing of these between OCI classic and the current version. My OCI account is missing a federated account. I’m not sure if this is the exact difference but it does seem to be a missing element when compared to other people’s accounts. Why has this happened to me? Well that is something for the OCI teams who looks after setting up accounts to look into. Maybe there are others out there.
In the mean time, if you have encountered the same problem as me, the fix/solution outlined above should work for you.
Oracle OCI AI Services
Oracle Cloud have been introducing new AI Services over the past few months, and we see a few more appearing over the coming few months. When you look at the list you might be a little surprised that these are newly available cloud services from Oracle. You might be surprised for two main reasons. Firstly, AWS and Google have similar cloud services available for some time (many years) now, and secondly, Oracle started talking about having these cloud services many years ago. It has taken some time for these to become publicly available. Although some of these have been included in other applications and offerings from Oracle, so probably they were busy with those before making them available as stand alone services.

These can be located in your Oracle Cloud account from the hamburger menu, as shown below

As you can see most of these AI Services are listed, except for the OCI Forecasting, which is due to be added “soon”. We can also expect to have an OCI Translation services and possibly some additional ones.
- OCI Language: This services can work with over 75 languages and allows you to detect and perform knowledge extraction from the text to include entity identification and labelling, classification of text into more than 600 categories, sentiment analysis and key phrase extraction. This can be used automate knolwedge extraction from customer feedback, product reviews, discussion forums, legal documents, etc
- OCI Speech: Performs Speech to Text, from live streaming of speech, audio and video recordings, etc creating a transcription. It works across English, Spanish and Portuguese, with other languages to be added. A nice little feature includes Profanity filtering, allowing you to tag, remove or mask certain words
- OCI Vision: This has two parts. The first is for processing documents, and is slightly different to OCI Language Service, in that this service looks at processing text documents in jpeg, pdf, png and tiff formats. Text information extraction is performed identifying keep terms, tables, meta-data extraction, table extraction etc. The second part of OCI Vision deals with image analysis and extracting key information from the image such as objects, people, text, image classification, scene detection, etc. You can use either the pretrained models or include your own models.
- OCI Anomaly Detection: Although anomaly detection is available via algorithms in the Database and OCI Data Science offerings, this new services allow for someone with little programming experience to utilise an ensemble of models, including the MSET algorithm, to provide greater accuracy with identifying unusual patterns in the data.
Note: I’ve excluded some services from the above list as these have been available for some time now or have limited AI features included in them. These include OCI Data Labelling, OCI Digital Assistant.
Some of these AI Services, based on the initial release, have limited functionality and resources, but this will change over time.
OCI Data Science – Create a Project & Notebook, and Explore the Interface
In my previous blog post I went through the steps of setting up OCI to allow you to access OCI Data Science. Those steps showed the setup and configuration for your Data Science Team.

In this post I will walk through the steps necessary to create an OCI Data Science Project and Notebook, and will then Explore the basic Notebook environment.
1 – Create a Project
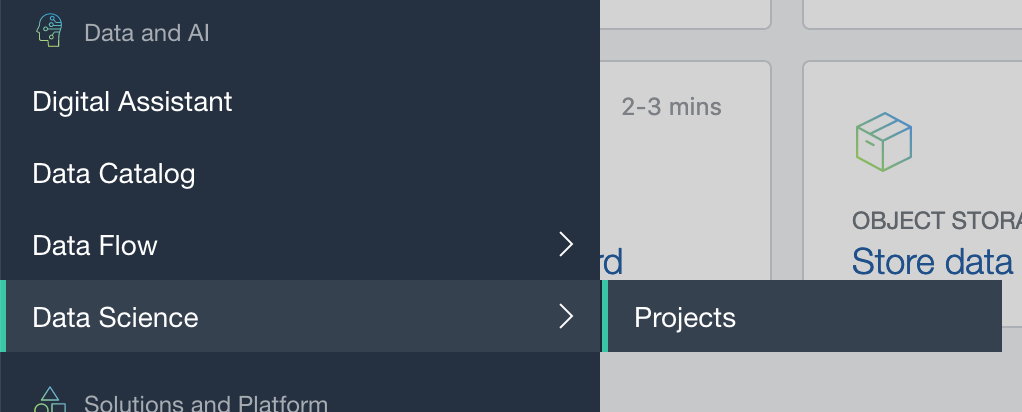
From the main menu on the Oracle Cloud home page select Data Science -> Projects from the menu.
Select the appropriate Compartment in the drop-down list on the left hand side of the screen. In my previous blog post I created a separate Compartment for my Data Science work and team. Then click on the Create Projects button.
 Enter a name for your project. I called this project, ‘DS-Demo-Project’. Click Create button.


That’s the Project created.
2 – Create a Notebook
After creating a project (see above) you can not create one or many Notebook Sessions.
To create a Notebook Session click on the Create Notebook Session button (see the above image). This will create a VM to contain your notebook and associated work. Just like all VM in Oracle Cloud, they come in various different shapes. These can be adjusted at a later time to scale up and then back down based on the work you will be performing.
The following example creates a Notebook Session using the basic VM shape. I call the Notebook ‘DS-Demo-Notebook’. I also set the Block Storage size to 50G, which is the minimum value. The VNC details have been defaulted to those assigned to the Compartment. Click Create button at the bottom of the page.

The Notebook Session VM will be created. This might take a few minutes. When created you will see a screen like the following.

3 – Open the Notebook
After completing the above steps you can now open the Notebook Session in your browser. Either click on the Open button (see above image), or copy the link and share with your data science team.
Important: There are a few important considerations when using the Notebooks. While the session is running you will be paying for it, even if the session got terminated at the browser or you lost connect. To manage costs, you may need to stop the Notebook session. More details on this in a later post.
After clicking on the Open button, a new browser tab will open and will ask you to log-in.

After logging in you will see your Notebook.
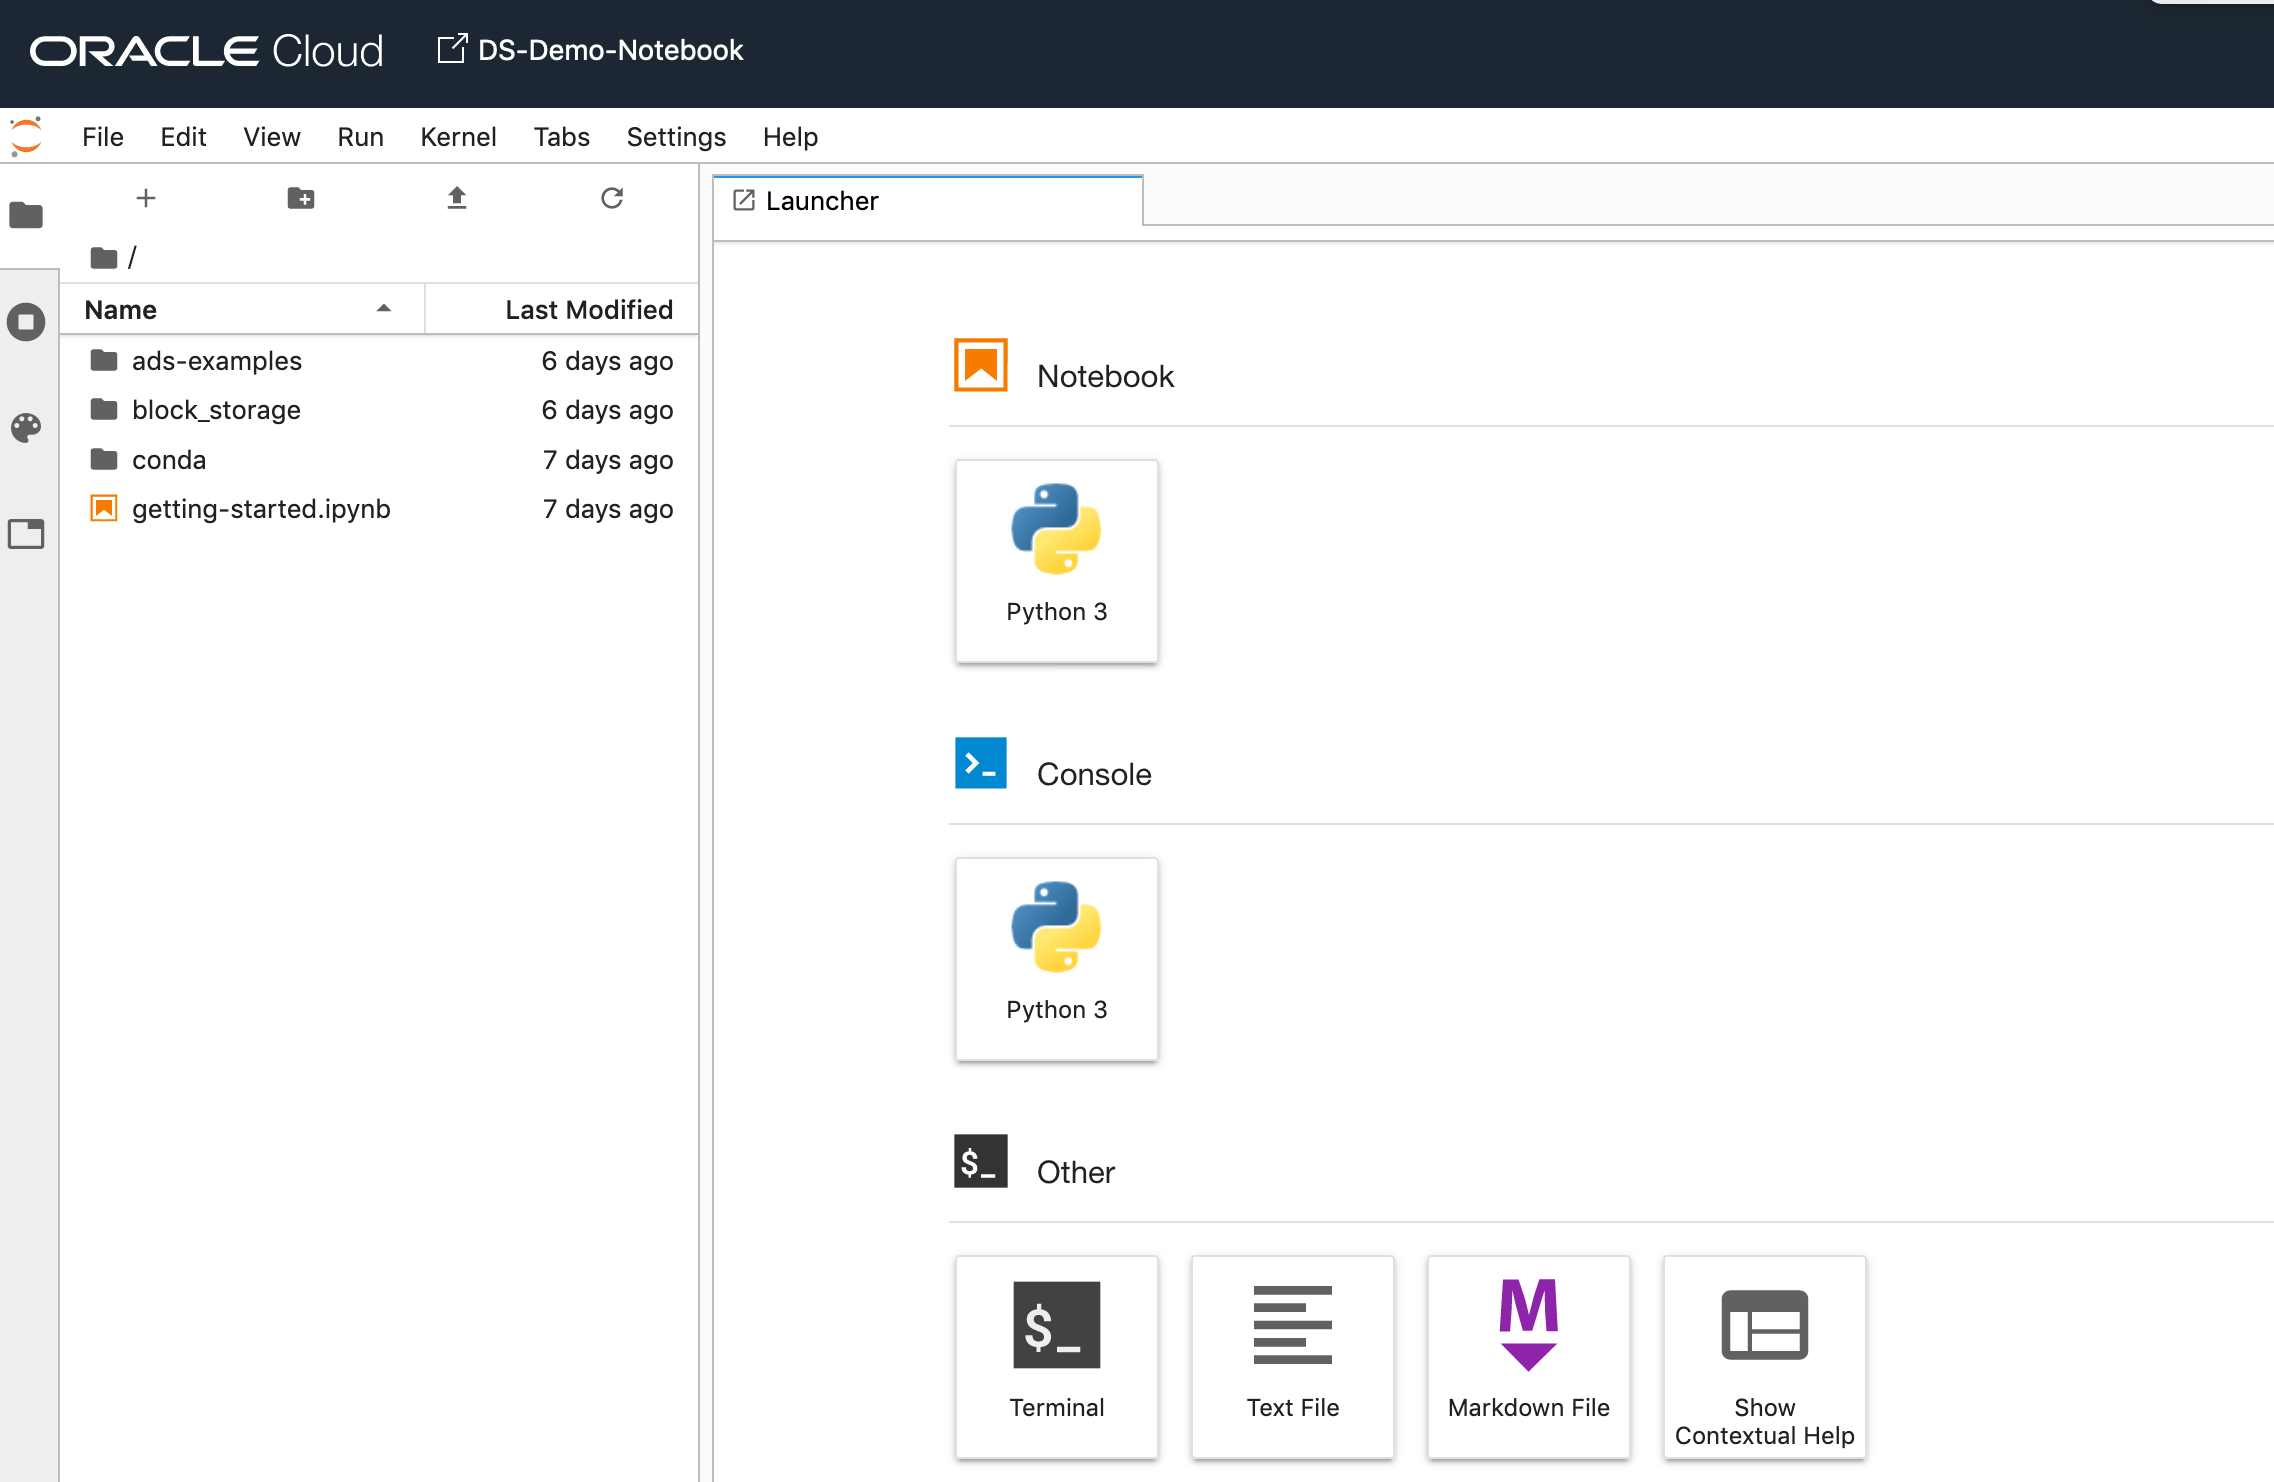
4 – Explore the Notebook Environment
The Notebook comes pre-loaded with lots of goodies.
The menu on the left-hand side provides a directory with lots of sample Notebooks, access to the block storage and a sample getting started Notebook.

When you are ready to create your own Notebook you can click on the icon for that.

Or if you already have a Notebook, created elsewhere, you can load that into your OCI Data Science environment.

The uploaded Notebook will appear in the list on the left-hand side of the screen.
ADW – Loading data using Object Storage
There are a number of different ways to load data into your Autonomous Data Warehouse (ADW) environment. I’ll have posts about these alternatives.
In this blog post I’ll go through the steps needed to load data using Object Storage. This might appear to have a large-ish number of steps, but once you have gone through it and have some of the parts already setup and configuration from your first time, then the second and subsequent times will be easier.
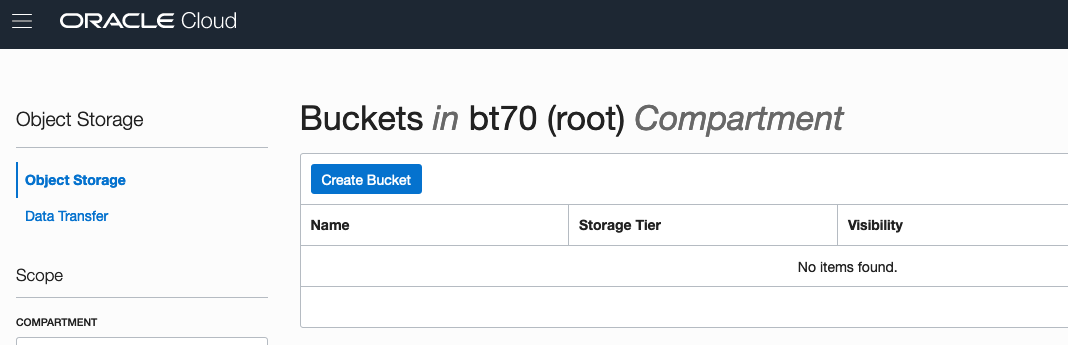
After logging into your Oracle Cloud dashboard, select Object Storage from the side menu.

Then click on the Create Bucket button.
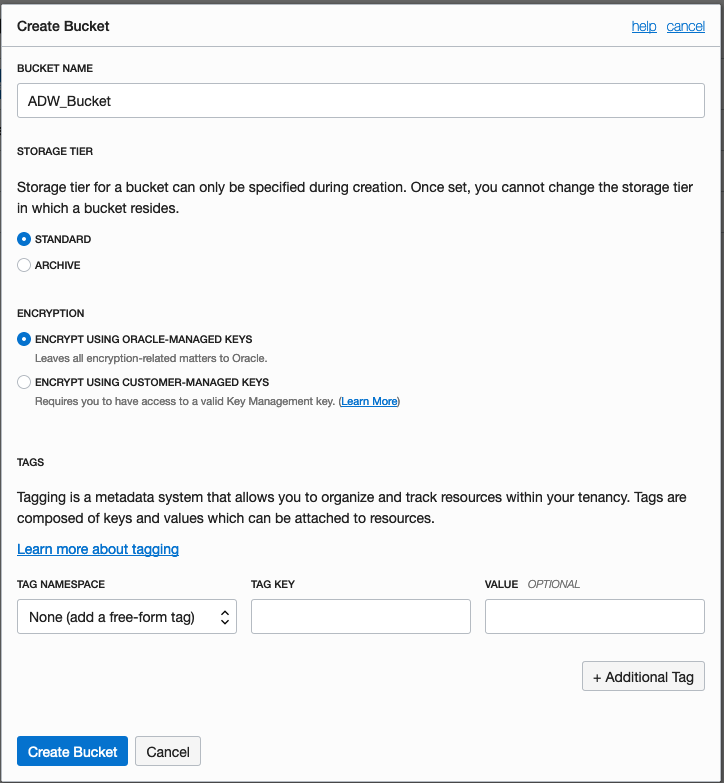
Enter a name for the Object Storage bucket, take the defaults for the for the rest, and click on the Create Bucket button at the bottom. In my example, I’ve called the bucket ‘ADW_Bucket’.
Click on the name of the bucket in the list.

And then click Upload Objects button.

In the Upload Objects window, browse for the file(s) you want to upload.


Then click on the Upload Objects button on the Upload Objects window. After a few moments you will see a message saying the file(s) have been uploaded. Click on the Close window.

Click into the Object details and take a note/copy of the URL Path. You will need this later
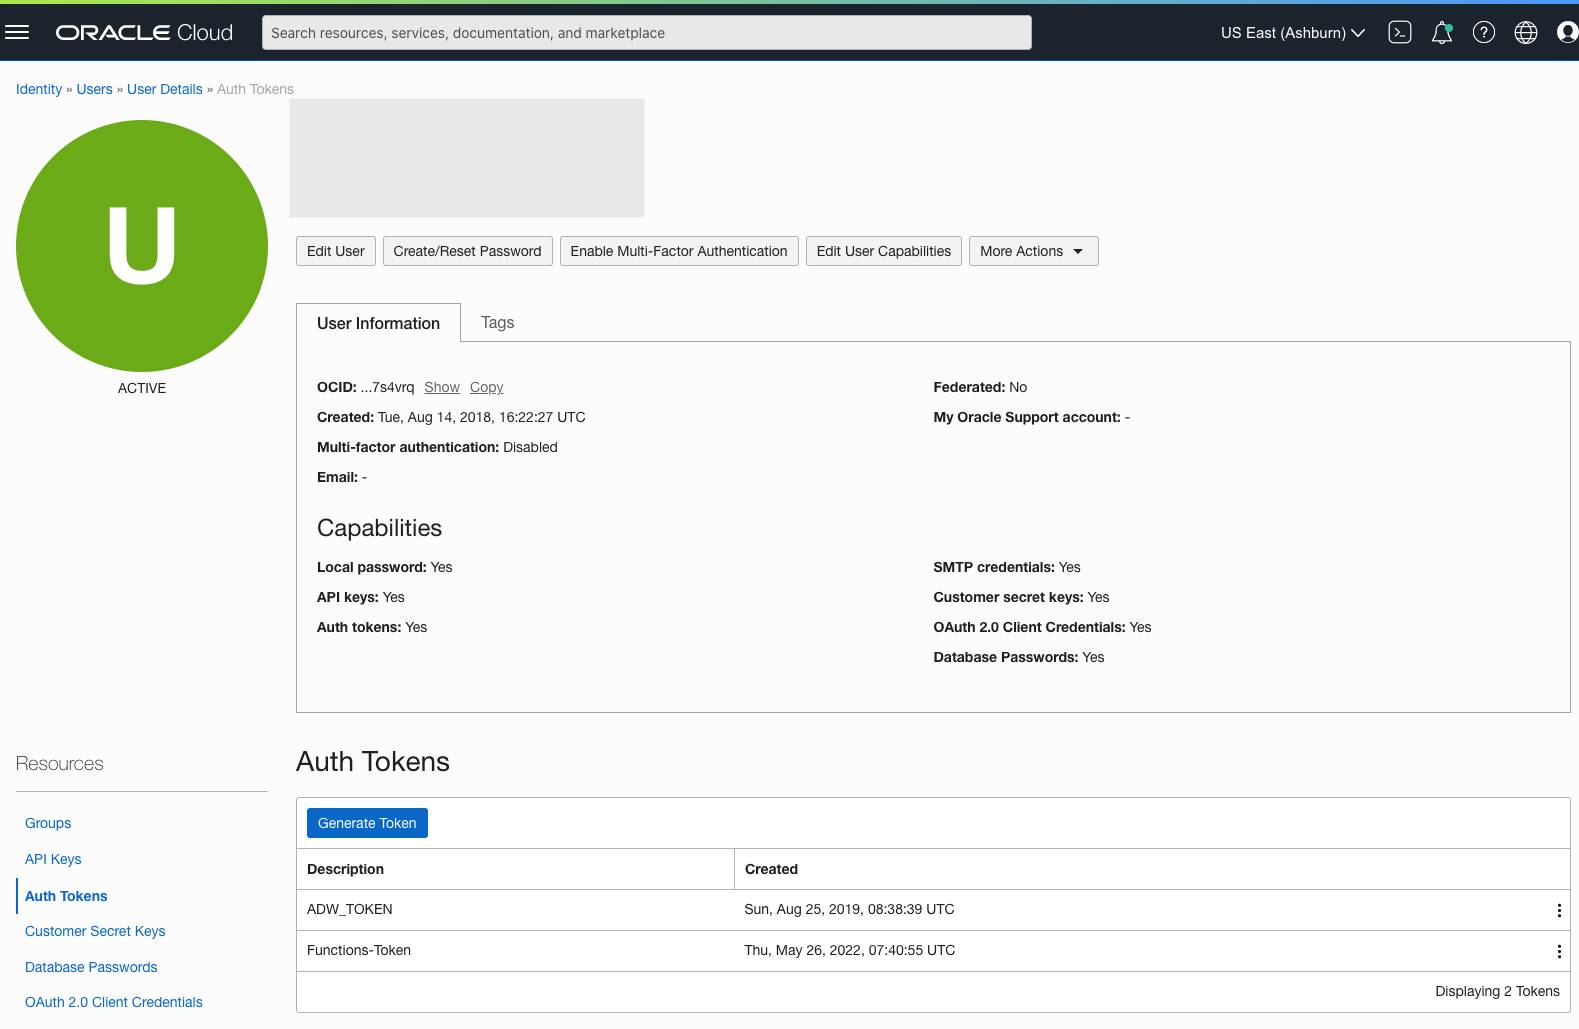
To load data from the Oracle Cloud Infrastructure(OCI) Object Storage you will need an OCI user with the appropriate privileges to read data (or upload) data to the Object Store. The communication between the database and the object store relies on the Swift protocol and the OCI user Auth Token. Go back to the menu in the upper left and select users.


Then click on the user name to view the details. This is probably your OCI username.
On the left hand side of the page click Auth Tokens, and then click on Generate Token button. Give a name for the token e.g ADW_TOKEN, and then generate token.

Save the generated token to use later.

Open SQL Developer and setup a connection to your OML User/schema. When connected the next steps is to authenticate with the Object storage using your OCI username and the Auth Token, generated above.
BEGIN
  DBMS_CLOUD.CREATE_CREDENTIAL(
    credential_name => 'ADW_TOKEN',
    username => '<your cloud username>',
    password => '<generated auth token>'
  );
END;
If successful you should get the following message. If not then you probably entered something incorrectly. Go back and review the previous steps
PL/SQL procedure successfully completed.
Next, create a table to store the data you want to import. For my table the create table is the following. [It is one of the sample data sets for OML, and I’ve made the create table statement compact to save space in this post]
create table credit_scoring_100k
( customer_id number(38,0), age number(4,0), income number(38,0), marital_status varchar2(26 byte),
number_of_liables number(3,0), wealth varchar2(4000 byte), education_level varchar2(26 byte),
tenure number(4,0), loan_type varchar2(26 byte), loan_amount number(38,0),
loan_length number(5,0), gender varchar2(26 byte), region varchar2(26 byte),
current_address_duration number(5,0), residental_status varchar2(26 byte),
number_of_prior_loans number(3,0), number_of_current_accounts number(3,0),
number_of_saving_accounts number(3,0), occupation varchar2(26 byte),
has_checking_account varchar2(26 byte), credit_history varchar2(26 byte),
present_employment_since varchar2(26 byte), fixed_income_rate number(4,1),
debtor_guarantors varchar2(26 byte), has_own_phone_no varchar2(26 byte),
has_same_phone_no_since number(4,0), is_foreign_worker varchar2(26 byte),
number_of_open_accounts number(3,0), number_of_closed_accounts number(3,0),
number_of_inactive_accounts number(3,0), number_of_inquiries number(3,0),
highest_credit_card_limit number(7,0), credit_card_utilization_rate number(4,1),
delinquency_status varchar2(26 byte), new_bankruptcy varchar2(26 byte),
number_of_collections number(3,0), max_cc_spent_amount number(7,0),
max_cc_spent_amount_prev number(7,0), has_collateral varchar2(26 byte),
family_size number(3,0), city_size varchar2(26 byte), fathers_job varchar2(26 byte),
mothers_job varchar2(26 byte), most_spending_type varchar2(26 byte),
second_most_spending_type varchar2(26 byte), third_most_spending_type varchar2(26 byte),
school_friends_percentage number(3,1), job_friends_percentage number(3,1),
number_of_protestor_likes number(4,0), no_of_protestor_comments number(3,0),
no_of_linkedin_contacts number(5,0), average_job_changing_period number(4,0),
no_of_debtors_on_fb number(3,0), no_of_recruiters_on_linkedin number(4,0),
no_of_total_endorsements number(4,0), no_of_followers_on_twitter number(5,0),
mode_job_of_contacts varchar2(26 byte), average_no_of_retweets number(4,0),
facebook_influence_score number(3,1), percentage_phd_on_linkedin number(4,0),
percentage_masters number(4,0), percentage_ug number(4,0),
percentage_high_school number(4,0), percentage_other number(4,0),
is_posted_sth_within_a_month varchar2(26 byte), most_popular_post_category varchar2(26 byte),
interest_rate number(4,1), earnings number(4,1), unemployment_index number(5,1),
production_index number(6,1), housing_index number(7,2), consumer_confidence_index number(4,2),
inflation_rate number(5,2), customer_value_segment varchar2(26 byte),
customer_dmg_segment varchar2(26 byte), customer_lifetime_value number(8,0),
churn_rate_of_cc1 number(4,1), churn_rate_of_cc2 number(4,1),
churn_rate_of_ccn number(5,2), churn_rate_of_account_no1 number(4,1),
churn_rate__of_account_no2 number(4,1), churn_rate_of_account_non number(4,2),
health_score number(3,0), customer_depth number(3,0),
lifecycle_stage number(38,0), credit_score_bin varchar2(100 byte));
After creating the table, you are ready to import the data from Object storage. To do this you will need to use the DBMS_COULD PL/SQL package.
begin
   dbms_cloud.copy_data(
   table_name =>'credit_scoring_100k',
   credential_name =>'ADW_TOKEN',
   file_uri_list => '<url of file in your Object Store bucket, see comment earlier in post>',
   format => json_object('ignoremissingcolumns' value 'true', 'removequotes' value 'true', 'dateformat' value 'YYYY-MM-DD HH24:MI:SS', 'blankasnull' value 'true', 'delimiter' value ',', 'skipheaders' value '1')
);
end;
All done.
You can now query the data and use with Oracle Machine Learning, etc.
[I said at the top of the post there are other methods available. More on this in other posts]
Oracle ADW how to load new OML notebooks
Oracle Autonomous Database (ADW) has been out a while now and have had several, behind the scenes, improvements and new/additional features added.
If you have used the Oracle Machine Learning (OML) component of ADW you will have seen the various sample OML Notebooks that come pre-loaded. These are easy to open, use and to try out the various OML features.

The above image shows the top part of the login screen for OML. To see the available sample notebooks click on the Examples icon. When you do, you will get the following sample OML Notebooks.
But what if you have a notebook you have used elsewhere. These can be exported in json format and loaded as a new notebook in OML.
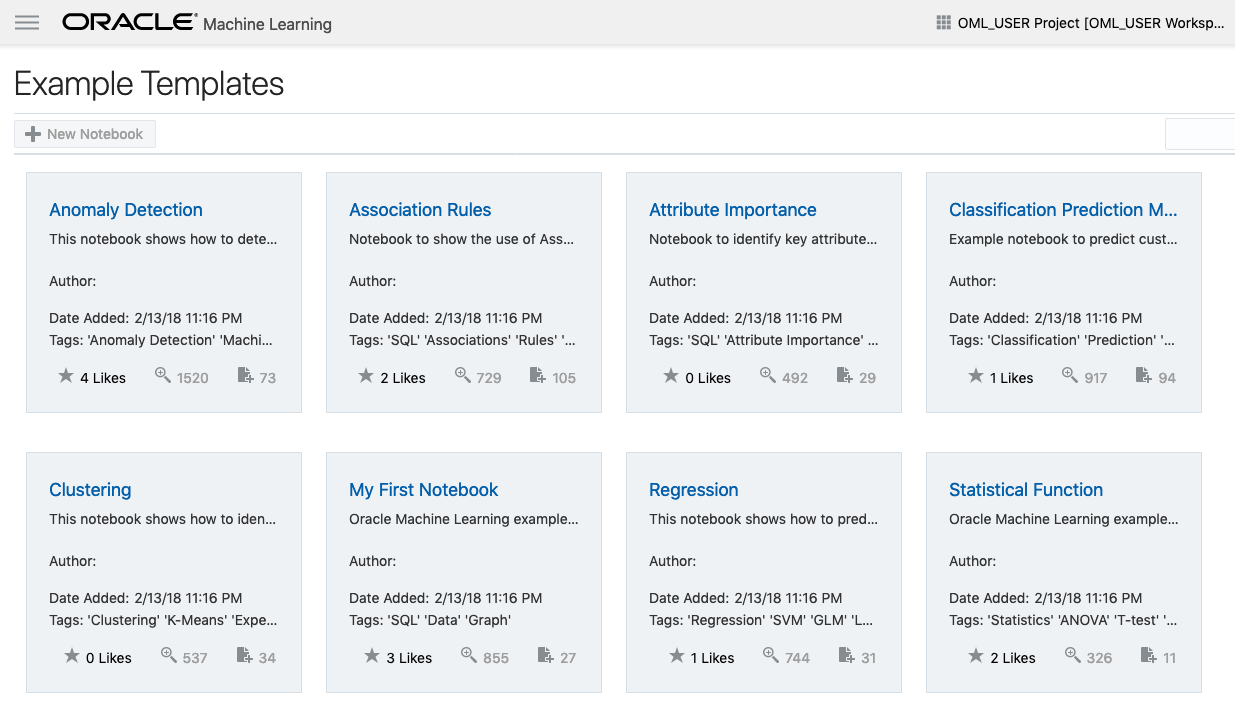
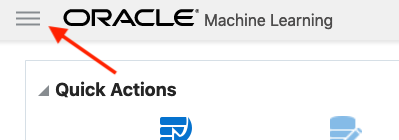
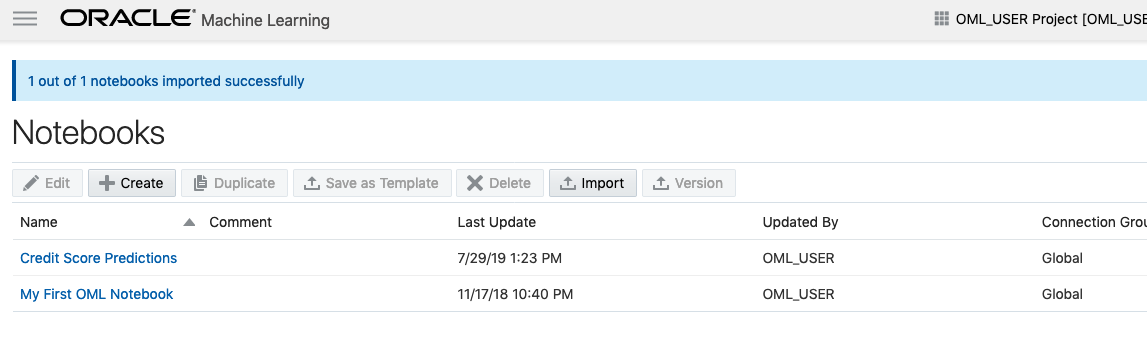
To load a new notebook into OML, select the icon (three horizontal line) on the top left hand corner of the screen. Then select Notebooks from the menu.
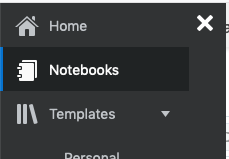

Then select the Import button located at the top of the Notebooks screen. This will open a File window, where you can select the json file from your file system.
A couple of seconds later the notebook will be available and listed along side any other notebooks you may have created.
All done!
You have now imported a new notebook into OML and can now use it to process your data and perform machine learning using the in-database features.
Importance of setting Fetched Rows size for Database Query using Golang
When issuing queries to the database one of the challenges every developer faces is how to get the results quickly. If your queries are only returning a small number of records, eg. < 5, then you don’t really have to worry about execution time. That is unless your query is performing some complex processing, joining lots of tables, etc.
Most of the time developers are working with one or a small number of records, using a simple query. Everything runs quickly.
But what if your query is returning several tens or thousands of records. Assuming we have a simple query and no query optimization is needed, the challenge facing the developer is how can you get all of those records quickly into your environment and process them. Typically the database gets blamed for the query result set being returned slowly. But what if this wasn’t the case? In most cases developers take the default parameter settings of the functions and libraries. For database connection libraries and their functions, you can change some of the parameters and affect how your code, your query, gets executed on the Database server and can affect how quickly the data is shipped from the database to your code.
One very important parameter to consider is the query array size. This is the number of records the database will send to your code in each batch. The database will keep sending batches until you tell it to stop. It makes sense to have the size of this batch set to a small value, as most queries return one or a small number of records. But when we get onto returning a larger number of records it can affect the response time significantly.
I tested the effect of changing the size of the returning buffer/array using Golang and querying data in an Oracle Database, hosted on Oracle Cloud, and using goracle library to connect to the database.
[ I did a similar test using Python. The results can be found here. You will notices that Golang is significantly quicker than Python, as you would expect. ]
The database table being queried contains 55,000 records and I just executed a SELECT * FROM … on this table. The results shown below contain the timing the query took to process this data for different buffer/array sizes by setting the FetchRowCount value.
rows, err := db.Query(dbQuery, goracle.FetchRowCount(arraySize))

As you can see, as the size of the buffer/array size increases the timing it takes to process the data drops. This is because the buffer/array is returning a larger number of records, and this results in a reduced number of round trips to/from the database i.e. fewer packets of records are sent across the network.
The challenge for the developer is to work out the optimal number to set for the buffer/array size. The default for the goracle libary, using Oracle client is 256 row/records.
When that above query is run, without the FetchRowCount setting, it will use this default 256 value. When this is used we get the following timings.
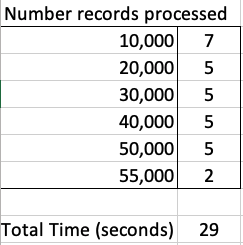
We can see, for the data set being used in this test case the optimal setting needs to be around 1,500.
What if we set the parameter to be very large? That would no necessarily make it quicker. You can see from the first table the timing starts to increase for the last two settings. There is an overhead in gathering and sending the data.
Here is a subset of the Golang code I used to perform the tests.
var currentTime = time.Now()

var i int

var custId int

arrayOne := [11] int{5, 10, 30, 50, 100, 200, 500, 1000, 1500, 2000, 2500}


currentTime = time.Now()


fmt.Println("Array Size = ", arraySize, " : ", currentTime.Format("03:04:05:06 PM"))


for index, arraySize := range arrayOne {

    currentTime = time.Now()

    fmt.Println(index, " Array Size = ", arraySize, " : ", currentTime.Format("03:04:05:06 PM"))


    db, err := sql.Open("goracle", username+"/"+password+"@"+host+"/"+database)

    if err != nil {

        fmt.Println("... DB Setup Failed")

        fmt.Println(err)

        return

    }

    defer db.Close()


    if err = db.Ping(); err != nil {

        fmt.Printf("Error connecting to the database: %s\n", err)

        return

    }


    currentTime = time.Now()

    fmt.Println("...Executing Query", currentTime.Format("03:04:05:06 PM"))

    dbQuery := "select cust_id from sh.customers"

    rows, err := db.Query(dbQuery, goracle.FetchRowCount(arraySize))

    if err != nil {

        fmt.Println(".....Error processing query")

        fmt.Println(err)

        return

    }

    defer rows.Close()


    i = 0

    currentTime = time.Now()

    fmt.Println("... Parsing query results", currentTime.Format("03:04:05:06 PM"))

   for rows.Next() {

        rows.Scan(&custId)

        i++

        if i% 10000 == 0 {

            currentTime = time.Now()

            fmt.Println("...... ",i, " customers processed", currentTime.Format("03:04:05:06 PM"))

        }

    }


    currentTime = time.Now()

    fmt.Println(i, " customers processed", currentTime.Format("03:04:05:06 PM"))


    fmt.Println("... Closing connection")

    finishTime := time.Now()

    fmt.Println("Finished at ", finishTime.Format("03:04:05:06 PM"))


}
OCI – Making DBaaS Accessible using port 1521
When setting up a Database on Oracle Cloud Infrastructure (OCI) for the first time there are a few pre and post steps to complete before you can access the database using a JDBC type of connect, just like what you have in SQL Developer, or using Python or other similar tools and/or languages.
1. Setup Virtual Cloud Network (VCN)
The first step, when starting off with OCI, is to create a Virtual Cloud Network.
Create a VCN and take all the defaults. But change the radio button shown in the following image.
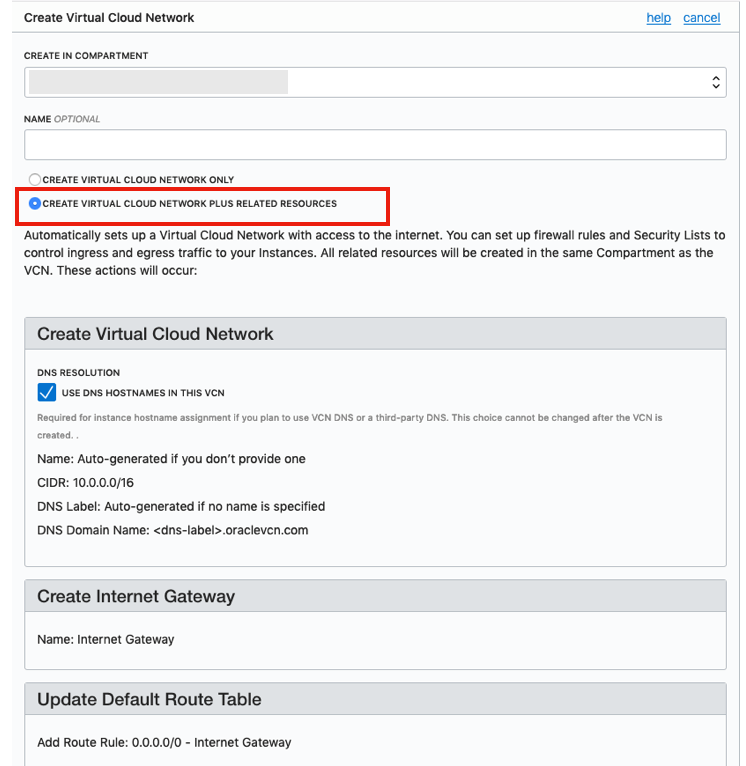
That’s it. We will come back to this later.
2. Create the Oracle Database
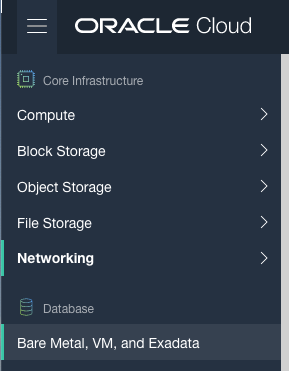
To create the database select ‘Bare Metal, VM and Exadata’ from the menu.
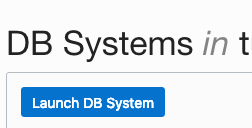
Click on the ‘Launch DB System’ button.
Fill in the details of the Database you want to create and select from the various options from the drop-downs.
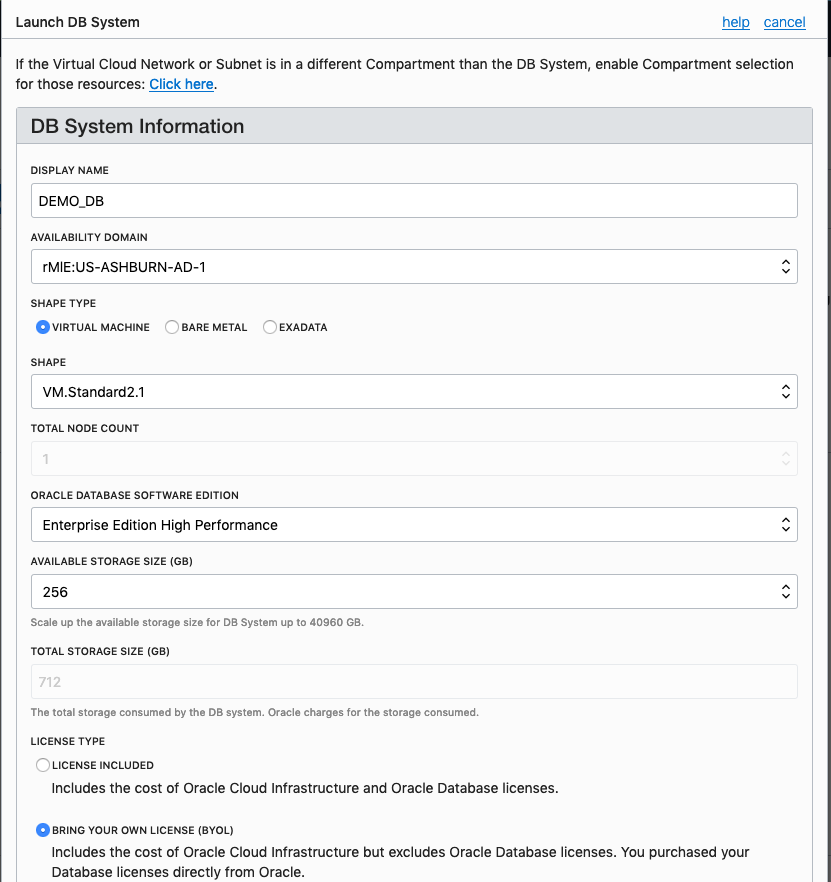
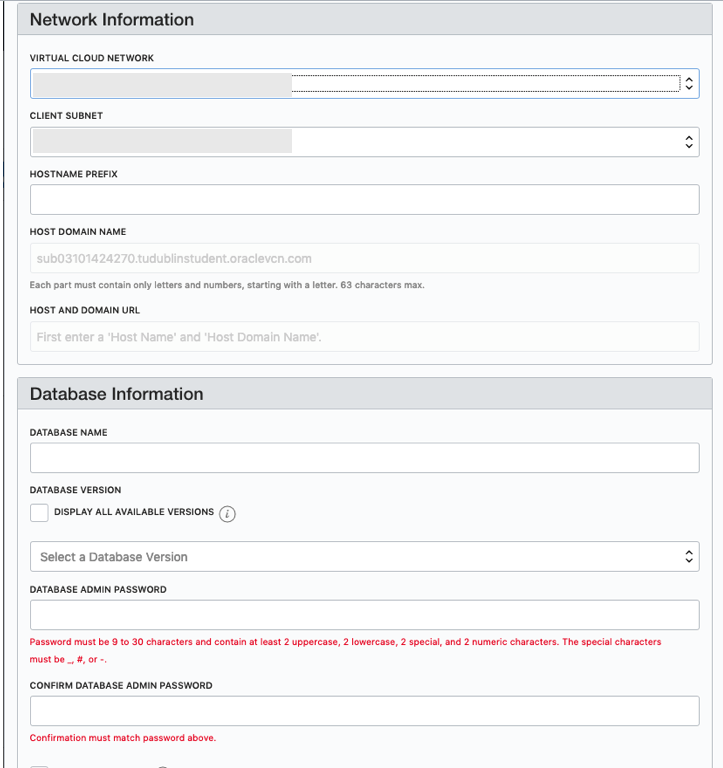
Fill in the details of the VCN you created in the previous set, and give the name of the DB and the Admin password.
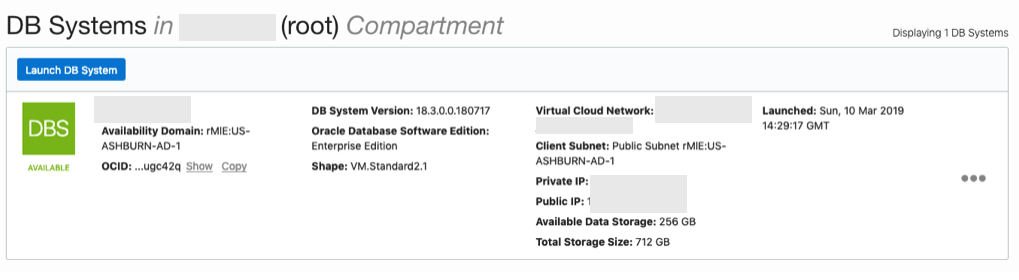
When you are finished everything that is needed, the ‘Launch DB System’ at the bottom of the page will be enabled. After clicking on this botton, the VM will be built and should be ready in a few minutes. When finished you should see something like this.
3. SSH to the Database server
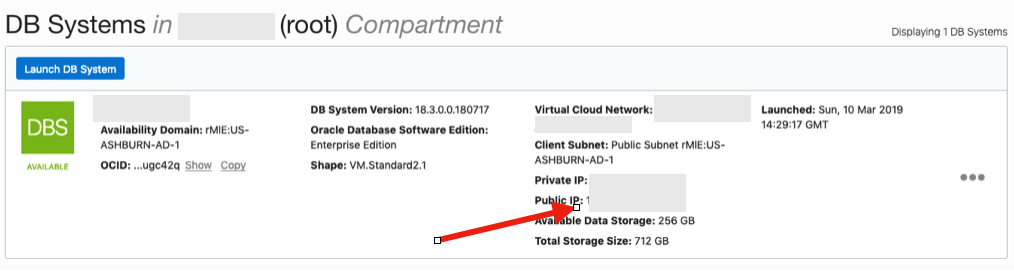
When the DB VM has been created you can now SSH to it. You will need to use the SSH key file used when creating the DB VM. You will need to connect to the opc (operating system user), and from there sudo to the oracle user. For example
ssh -i <ssh file> opc@<public IP address>
The public IP address can be found with the Database VM details
[opc@tudublins1 ~]$ sudo su - oracle
[oracle@tudublins1 ~]$ . oraenv
ORACLE_SID = [cdb1] ?
The Oracle base has been set to /u01/app/oracle
[oracle@tudublins1 ~]$
[oracle@tudublins1 ~]$ sqlplus / as sysdba

SQL*Plus: Release 18.0.0.0.0 - Production on Wed Mar 13 11:28:05 2019
Version 18.3.0.0.0

Copyright (c) 1982, 2018, Oracle. All rights reserved.


Connected to:
Oracle Database 18c Enterprise Edition Release 18.0.0.0.0 - Production
Version 18.3.0.0.0

SQL> alter session set container = pdb1;

Session altered.

SQL> create user demo_user identified by DEMO_user123##;

User created.

SQL> grant create session to demo_user;

Grant succeeded.

SQL>
4. Open port 1521
To be able to access this with a Basic connection in SQL Developer and most programming languages, we will need to open port 1521 to allow these tools and languages to connect to the database.
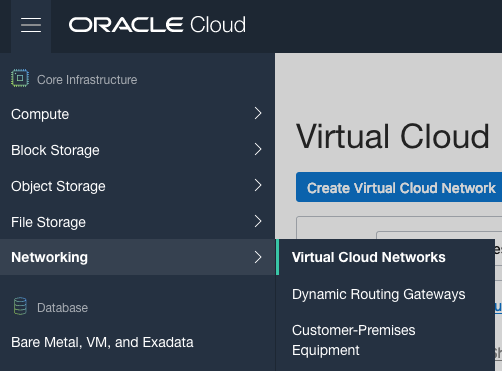
To do this go back to the Virtual Cloud Networks section from the menu.
Click into your VCN, that you created earlier. You should see something like the following.

Click on the Security Lists, menu option on the left hand side.
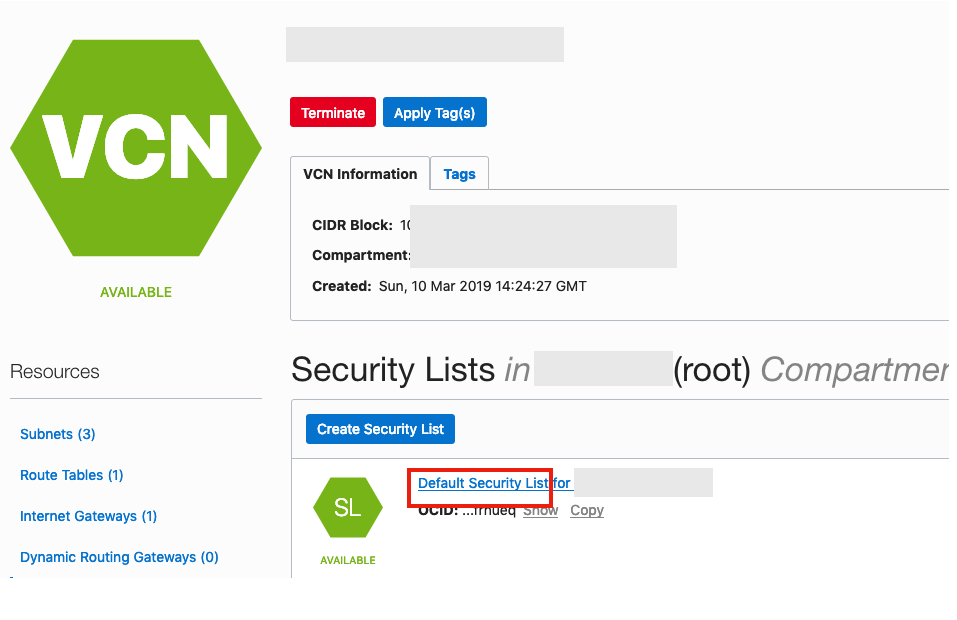 From that screen, click on Default Security List, and then click on the ‘Edit All Rules’ button at the top of the next screen.
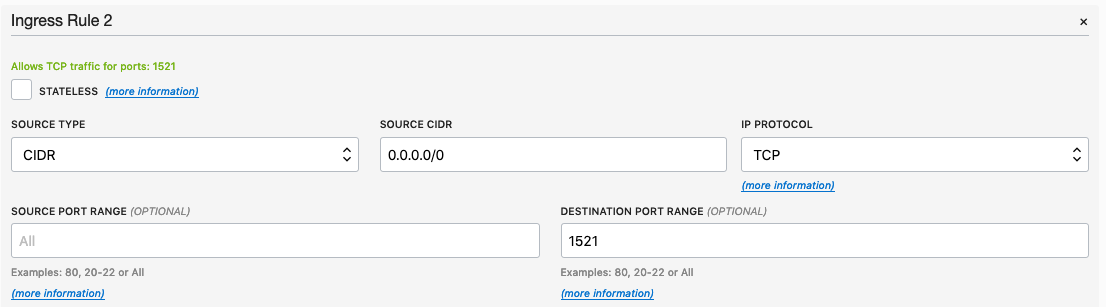
Add a new rule to have a ‘Destination Port Range’ set for 1521
That’s it.
5. Connect to the Database from anywhere
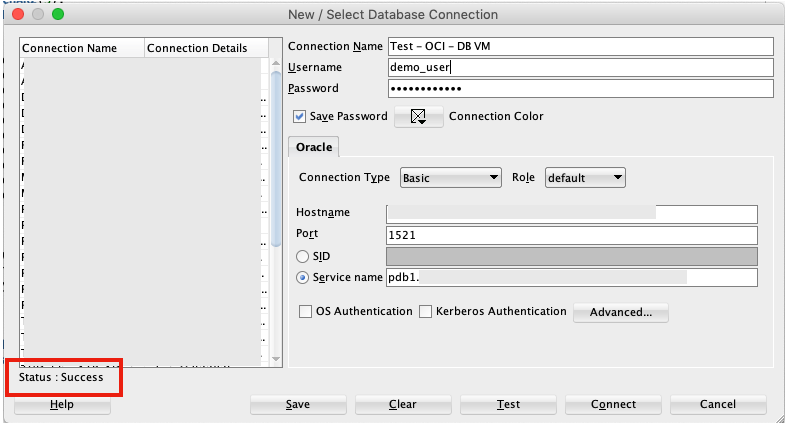
Now you can connect to the OCI Database using a basic SQL Developer Connection.
Oracle Advanced Analytics in the Oracle Cloud
You have heard about the cloud? Right? Even the Oracle Cloud?
If you haven’t, then maybe we need to look at how you can learn more about the Oracle Cloud.
Over the past while, and in the past few weeks in particular, Oracle has been advertising about how you can get a trail Oracle cloud service setup for FREE. Well it is free for one month when you set it up on the Oracle website (cloud.oracle.com).
As I like to talk about and use the Oracle Advanced Analytics (OAA) option (a lot), I thought I’d just give you some pointers on how to use OAA on the Oracle cloud.
To do this you need to set up an account on the Oracle cloud website (your Oracle single sign on should help with making that process a lot quicker). There are lots of websites and blog that will talk/show you through the process. Then you need to select what Database as a Service that you want to setup
OAA is not available on the Database Schema Service just yet (maybe one day they will)
Although Oracle Advanced Analytics comes pre-installed in the Oracle Enterprise Edition database (yes it is a separately priced option) when you install it on your own servers, but for the Enterprise Edition DaaS OAA is not part of it.
DaaS has the following versions
- Standard Edition Service
- Enterprise Edition Service
- High Performance Service
- Extreme Performance Service
OAA is only available for these last two versions of the DaaS.
High Performance DaaS: Multitenant, Partitioning, Real Application Testing, Advanced Compression, Advanced Security, Label Security, Database Vault, OLAP, Advanced Analytics, Spatial and Graph, Diagnostics Pack, Tuning Pack, Database Lifecycle Management Pack, Data Masking & Subsetting Pack and Cloud Management Pack for Oracle Database.
Extreme Performance DaaS: In-Memory Database, RAC (Real Application Clusters), Active Data Guard, Multitenant, Partitioning, Real Application Testing, Advanced Compression, Advanced Security, Label Security, Database Vault, OLAP, Advanced Analytics, Spatial and Graph, Diagnostics Pack, Tuning Pack, Database Lifecycle Management Pack, Data Masking & Subsetting Pack and Cloud Management Pack for Oracle Database.
Oracle Advanced Analytics has two main products or components. The first is the in-database Oracle Data Mining features. This are part of the High Performance and Extreme Performance DaaS offerings. But Oracle R Enterprise is not installed on these DaaS. Well if kind of is if you can get an 11g DaaS, but at time of writing this post ORE is not part of the 12c DaaS images. So you will need to factor in some time to go and install ORE, if you need to use it.
I’ve been lucky to have one of these DaaS with OAA trials and with thanks to Thomas Kurian he has extended these trials to 12 months for all Oracle ACE Directors. Thank you Thomas.
When you get your DaaS setup you just need to configure your connection privileges, ssh, etc and away you go. All you need to do is to move your data across the internet to your own Oracle DaaS, and once it is in the DaaS all your OAA and other analytics is performed on the Database Server. Only the results are returned to you and displayed in your tool. This significantly reduces the processing time for your data and removes the need to constantly extract your data (in whole or in parts) to feed into other advanced analytics tools.
So if you haven’t tried Oracle Advanced Analytics yet, then go ahead and setup your free trial of Oracle DaaS and try it out. You never know what you might discover by using Oracle Advanced Analytics (in the cloud)


You must be logged in to post a comment.