
What does Legacy really mean?
In the IT industry we hear the term “legacy” being using, but that does it mean? It can mean a lot of different things and it really depends on the person who is saying it, their context, what they want to portray and their intended meaning. In a lot of cases people seem to use it without knowing the meaning or the impact it can have. This can result in negative impact and not in the way the person intended.
Before looking at some (and there can be lots) possible meanings, lets have a look at what one person said recently.
“Migrating away from legacy databases like Oracle can seem like a daunting undertaking for businesses. But it doesn’t have to be.”
To give context to this quote, the person works for a company selling products, services, support, etc for PostgreSQL and wants everyone to move to ProtgreSQL (Postgres), which is understandable given their role. There’s nothing wrong with trying to convince people/companies to use software that you sell lots of services and additional software to support it. What is interesting is they used the work “legacy”.
Legacy can mean lots of different things to different people. Here are some examples of how legacy is used within the IT industry.
- The product is old and out of date
- The product has no relevancy in software industry today
- Software or hardware that has been superseded
- Any software that has just been released (yes I’ve come across this use)
- Outdated computing software and/or hardware that is still in use. The system still meets the needs it was originally designed for, but doesn’t allow for growth
- Anything in production
- Software that has come to an end of life with no updates, patching and/or no product roadmap
- …
Going back to the quote given above, let’s look a little closer at their intended use. As we can see from the list above the use of the word “legacy” can be used in derogatory way and can try to make one software appear better then it’s old, out of date, not current, hard to use, etc competitor.
If you were to do a side-by-side comparison of PostgreSQL and Oracle, there would be a lot of the same or very similar features. But there are differences too and this, in PostgreSQL case, we see various vendors offering add-on software you can pay for. This is kind of similar with Oracle where you need to license various add-ons, or if you are using a Cloud offering it may come as part of the package. On a features comparison level when these are similar, saying one is “legacy” doesn’t seem right. Maybe its about how old the software is, as in legacy being old software. The first release of Oracle was 1979 and we now get yearly update releases (previously it could be every 2-4 years). PostgresSQL, or its previous names date back to 1974 with the first release of Ingres, which later evolved to Postgres in early 1980s, and took on the new name of PostgreSQL in 1996. Are both products today still the same as what they had in the 1970s, 1980s, 1990s, etc. The simple answer is No, they have both evolved and matured since then. Based on this can we say PostgreSQL is legacy or is more of a Legacy product than Oracle Database which was released in 1979 (5 years after Ingres)? Yes we can.
I’m still very confused by the quote (given above) as to what “legacy” might mean, in their scenario. Apart from and (trying) to ignore the derogatory aspect of “they” are old and out of date, and look at us we are new and better, it is difficult to see what they are trying to achieve.
In a similar example on a LinkedIn discussion where one person said MongoDB was legacy, was a little surprising. MongoDB is very good at what it does and has a small number of use cases. The problem with MongoDB is it is used in scenarios when it shouldn’t be used and just causes too many data architecture problems. For me, the main problem driving these issues is how software engineering and programming is taught in Universities (and other third level institutions). They are focused on JavaScript which makes using MongoDB so so easy. And its’ Agile, and the data model can constantly change. This is great, up until you need to use that data. Then it becomes a nightmare.
Getting back to saying MongoDB is legacy, again comes back to the person saying it. They work at a company who is selling cloud based data engineering and analytic services. Is using cloud services the only thing people should be using? For me it is No but a hybrid cloud and on-premises approach will work based for most. Some of the industry analysts are now promoting this, saying vendors offering both will succeed into the future, where does only offering cloud based services will have limited growth, unless the adapt now.
What about other types legacy software applications. Here is an example Stew Ashton posted on Twitter. “I once had a colleague who argued, in writing, that changing the dev stack had the advantage of forcing a rewrite of “legacy applications” – which he had coded the previous year! Either he thought he had greatly improved, or he wanted guaranteed job security”
There are lots and lots of more examples out there and perhaps you will encounter some when you are attending presentations or sales pitches from various vendors. If you hear, then saying one product is “legacy” get them to define their meaning of it and to give specific examples to illustrate it. Does their meaning match with one from the list given above, or something else. Are they just using the word to make another product appear inferior without knowing the meaning or the differences in the product? Their intended meaning within their context is what defines their meaning, which may be different to yours.
AI Liability Act
Over the past few weeks we have seem a number of new Artificial Intelligence (AI) Acts or Laws, either being proposed or are at an advanced stage of enactment. One of these is the EU AI Liability Act (also), and is supposed be be enacted and work hand-in-hand with the EU AI Act.
There are different view or focus perspectives between these two EU AI acts. For the EU AI Act, the focus is from the technical perspective and those who develop AI solutions. On the other side of things is the EU AI Liability Act whose perspective is from the end-user/consumer point.
The aim of the EU AI Liability Act is to create a framework for trust in AI technology, and when a person has been harmed by the use of the AI, provides a structure to claim compensation. Just like other EU laws to protect the consumers from defective or harmful products, the AI Liability Act looks to do similar for when a person is harmed in some way by the use or application of AI.
Most of the examples given for how AI might harm a person includes the use of robotics, drones, and when AI is used in the recruitment process, where is automatically selects a candidate based on the AI algorithms. Some other examples include data loss from tech products or caused by tech products, smart-home systems, cyber security, products where people are selected or excluded based on algorithms.
Harm can be difficult to define, and although some attempt has been done to define this in the Act, additional work is needed to by the good people refining the Act, to provide clarifications on this and how its definition can evolve post enactment to ensure additional scenarios can be included without the need for updates to the Act, which can be a lengthy process. A similar task is being performed on the list of high-risk AI in the EU AI Act, where they are proposing to maintain a webpages listing such.
Vice-president for values and transparency, Věra Jourová, said that for AI tech to thrive in the EU, it is important for people to trust digital innovation. She added that the new proposals would give customers “tools for remedies in case of damage caused by AI so that they have the same level of protection as with traditional technologies”

Didier Reynders, the EU’s justice commissioner says, “The new rules apply when a product that functions thanks to AI technology causes damage and that this damage is the result of an error made by manufacturers, developers or users of this technology.
The EU defines “an error” in this case to include not just mistakes in how the A.I. is crafted, trained, deployed, or functions, but also if the “error” is the company failing to comply with a lot of the process and governance requirements stipulated in the bloc’s new A.I. Act. The new liability rules say that if an organization has not complied with their “duty of care” under the new A.I. Act—such as failing to conduct appropriate risk assessments, testing, and monitoring—and a liability claim later arises, there will be a presumption that the A.I. was at fault. This creates an additional way of forcing compliance with the EU AI Act.
The EU Liability Act says that a court can now order a company using a high-risk A.I. system to turn over evidence of how the software works. A balancing test will be applied to ensure that trade secrets and other confidential information is not needlessly disclosed. The EU warns that if a company or organization fails to comply with a court-ordered disclosure, the courts will be free to presume the entity using the A.I. software is liable.
The EU Liability Act will go through some changes and refinement with the aim for it to be enacted at the same time as the EU AI Act. How long will this process that is a little up in the air, considering the EU AI Act should have been adopted by now and we could be in the 2 year process for enactment. But the EU AI Act is still working its way through the different groups in the EU. There has been some indications these might conclude in 2023, but lets wait and see. If the EU Liability Act is only starting the process now, there could be some additional details if the EU wants both Acts to be effective at the same time.
Preparing images for #DeepLearning by removing background
There are a number of methods available for preparing images for input to a variety of purposes. For example, for input to deep learning, other image processing models/applications/systems, etc. But sometimes you just need a quick tool to perform a certain task. An example of this is I regularly have to edit images to extract just a certain part of it, or to filter out all the background colors and/or objects etc. There are a a variety of tools available to help you with this kind of task. For me, I’m a Mac user, so I use the instant alpha feature available in some of the Mac products. But what if you are not a Mac user, what can you use.
I’ve recently come across a very useful Python library that takes all or most of the hard work out of doing such tasks, and has proved to be extremely useful for some demos and projects I’ve been working on. The Python library I’m using is remgb (Remove Background). It isn’t perfect, but it does a pretty good job and only in a small number of modified images, did I need to do some additional processing.
Let’s get started with setting things up to use remgb. I did encounter some minor issues installing it, and I’ve give the workarounds below, just in case you encounter the same.
pip3 install remgbThis will install lots of required libraries and will check for compatibility with what you have installed. The first time I ran the install it generated some errors. It also suggested I update my version of pip, which I did, then uninstalled the remgb library and installed again. No errors this time.
When I ran the code below, I got some errors about accessing a document on google drive or it had reached the maximum number of views/downloads. The file it is trying to access is an onix model. If you click on the link, you can download the file. Create a directory called .u2net (in your home directory) and put the onix file into it. Make sure the directory is readable. After doing that everything runs smoothly for me.
The code I’ve given below is typical of what I’ve been doing on some projects. I have a folder with lots of images where I want to remove the background and only keep the key foreground object. Then save the modified images to another directory. It is these image that can be used in products like Amazon Rekognition, Oracle AI Services, and lots of other similar offerings.
from rembg import remove
from PIL import Image
import os
from colorama import Fore, Back, Style

sourceDir = '/Users/brendan.tierney/Dropbox/4-Datasets/F1-Drivers/'
destDir = '/Users/brendan.tierney/Dropbox/4-Datasets/F1-Drivers-NewImages/'

print('Searching = ', sourceDir)

files = os.listdir(sourceDir)
for file in files:
    try:
        inputFile = sourceDir + file
        outputFile = destDir + file

        with open(inputFile, 'rb') as i:
            print(Fore.BLACK + '..reading file : ', file)
            input = i.read()
            print(Fore.CYAN + '...removing background...')
            output = remove(input)

        try:
            with open(outputFile, 'wb') as o:
                print(Fore.BLUE + '.....writing file : ', outputFile)
                o.write(output)
        except:
            print(Fore.RED + 'Error writing file :', outputFile)

except:
    print(Fore.RED + 'Error processing file :', file)

print(Fore.BLACK + '---')
print(Fore.BLACK + 'Finished processing all files')
print(Fore.BLACK + '---')
For this demonstration I’ve used images of the F1 drivers for 2022. I had collected five images of each driver with different backgrounds including, crowds, pit-lane, giving media interviews, indoor and outdoor images.
Generally the results were very good. Here are some results with the before and after.


As you can see from these image there are some where a shadow remains and the library wasn’t able to remove it. The following images gives some additional examples of this. The first is with Bottas and his car, where the car wasn’t removed. The second driver is Vettel where the library captures his long hair and keeps it in the filtered image.


Number of rows in each Table – Various Databases
A possible common task developers perform is to find out how many records exists in every table in a schema. In the examples below I’ll show examples for the current schema of the developer, but these can be expanded easily to include tables in other schemas or for all schemas across a database.
These example include the different ways of determining this information across the main databases including Oracle, MySQL, Postgres, SQL Server and Snowflake.
A little warning before using these queries. They may or may not give the true accurate number of records in the tables. These examples illustrate extracting the number of records from the data dictionaries of the databases. This is dependent on background processes being run to gather this information. These background processes run from time to time, anything from a few minutes to many tens of minutes. So, these results are good indication of the number of records in each table.
Oracle
SELECT table_name, num_rows
FROM user_tables
ORDER BY num_rows DESC;
or
SELECT table_name,
       to_number(
          extractvalue(xmltype(
             dbms_xmlgen.getxml('select count(*) c from '||table_name))
                ,'/ROWSET/ROW/C')) tab_count
FROM   user_tables
ORDER BY tab_count desc;
Using PL/SQL we can do something like the following.
DECLARE
   val NUMBER;
BEGIN
   FOR i IN (SELECT table_name FROM user_tables ORDER BY table_name desc) LOOP
      EXECUTE IMMEDIATE 'SELECT count(*) FROM '|| i.table_name INTO val;
      DBMS_OUTPUT.PUT_LINE(i.table_name||' -> '|| val );
   END LOOP;
END;
MySQL
SELECT table_name, table_rows
FROM INFORMATION_SCHEMA.TABLES
WHERE table_type = 'BASE TABLE'
AND  TABLE_SCHEMA = current_user();
Using Common Table Expressions (CTE), using WITH clause
WITH table_list AS (
SELECT
    table_name
  FROM information_schema.tables
  WHERE table_schema = current_user()
  AND
        table_type = 'BASE TABLE'
)
SELECT CONCAT(
            GROUP_CONCAT(CONCAT("SELECT '",table_name,"' table_name,COUNT(*) rows FROM ",table_name) SEPARATOR " UNION "),
            ' ORDER BY table_name'
        )
INTO @sql
FROM table_list;
Postgres
select relname as table_name, n_live_tup as num_rows from pg_stat_user_tables;
An alternative is
select n.nspname as table_schema,
       c.relname as table_name,
       c.reltuples as rows
from pg_class c
join pg_namespace n on n.oid = c.relnamespace
where c.relkind = 'r'
      and n.nspname = current_user
order by c.reltuples desc;
SQL Server
SELECT tab.name,
       sum(par.rows)
FROM   sys.tables tab INNER JOIN sys.partitions par
          ON tab.object_id = par.object_id
WHERE  schema_name(tab.schema_id) = current_user
Snowflake
SELECT t.table_schema, t.table_name, t.row_count
FROM   information_schema.tables t
WHERE  t.table_type = 'BASE TABLE'
AND    t.table_schema = current_user
order by t.row_count desc;
The examples give above are some of the ways to obtain this information. As with most things, there can be multiple ways of doing it, and most people will have their preferred one which is based on their background and preferences.
As you can see from the code given above they are all very similar, with similar syntax, etc. The only thing different is the name of the data dictionary table/view containing the information needed. Yes, knowing what data dictionary views to query can be a little challenging as you switch between databases.
AUTO_PARTITION – Inspecting & Implementing Recommendations
In a previous blog post I gave an overview of the DBMS_AUTO_PARTITION package in Oracle Autonomous Database. This looked at how you can get started and to setup Auto Partitioning and to allow it to automatically implement partitioning.
This might not be something the DBAs will want to happen for lots of different reasons. An alternative is to use DBMS_AUTO_PARTITION to make recommendations for tables where partitioning will have a performance improvement. The DBA can inspect these recommendations and decide which of these to implement.
In the previous post we set the CONFIGURE function to be ‘IMPLEMENT’. We need to change that to report the recommendations.
exec dbms_auto_partition.configure('AUTO_PARTITION_MODE','REPORT ONLY');Just remember, tables will only be considered by AUTO_PARTITION as outlined in my previous post.
Next we can ask for recommendations using the RECOMMEND_PARTITION_METHOD function.
exec  dbms_auto_partition.recommend_partition_method(
   table_owner => 'WHISKEY',
   table_name => 'DIRECTIONS',
   report_type => 'TEXT',
   report_section => 'ALL',
   report_level => 'ALL');
The results from this are stored in DBA_AUTO_PARTITION_RECOMMENDATIONS, which you can query to view the recommendations.
select recommendation_id, partition_method, partition_key
from dba_auto_partition_recommendations;
RECOMMENDATION_ID PARTITION_METHOD PARTITION_KEY
-------------------------------- ------------------------------------------------------------------------------------------------------------- --------------
D28FC3CF09DF1E1DE053D010000ABEA6 Method: LIST(SYS_OP_INTERVAL_HIGH_BOUND("D", INTERVAL '2' MONTH, TIMESTAMP '2019-08-10 00:00:00')) AUTOMATIC D
To apply the recommendation pass the RECOMMENDATION_KEY value to the APPLY_RECOMMENDATION function.
exec dbms_auto_partition.apply_recommendation('D28FC3CF09DF1E1DE053D010000ABEA6');It might takes some minutes for the partitioned table to become available. During this time the original table will remain available as the change will be implemented using a ALTER TABLE MODIFY PARTITION ONLINE command.
Two other functions include REPORT_ACTIVITY and REPORT_LAST_ACTIVITY. These can be used to export a detailed report on the recommendations in text or HTML form. It is probably a good idea to create and download these for your change records.
spool autoPartitionFinding.html
select dbms_auto_partition.report_last_activity(type=>'HTML') from dual;
exit;AUTO_PARTITION – Basic setup
Partitioning is an effective way to improve performance of SQL queries on large volumes of data in a database table. But only so, if a bit of care and attention is taken by both the DBA and Developer (or someone with both of these roles). Care is needed on the database side to ensure the correct partitioning method is deployed and the management of these partitions, as some partitioning methods can create a significantly large number of partitions, which in turn can affect the management of these and possibly performance too, which is not what you want. Care is also needed from the developer side to ensure their code is written in a way that utilises the partitioning method deployed. If doesn’t then you may not see much improvement in performance of your queries, and somethings things can run slower. Which not one wants!
With the Oracle Autonomous Database we have the expectation it will ‘manage’ a lot of the performance features behind the scenes without the need for the DBA and Developing getting involved (‘Autonomous’). This is kind of true up to a point, as the serverless approach can work up to a point. Sometimes a little human input is needed to give a guiding hand to the Autonomous engine to help/guide it towards what data needs particular focus.
In this (blog post) case we will have a look at DBMS_AUTO_PARTITION and how you can do a basic setup, config and enablement. I’ll have another post that will look at the recommendation feature of DBMS_AUTO_PARTITION. Just a quick reminder, DBMS_AUTO_PARTITION is for the Oracle Autonomous Database (ADB) (on the Cloud). You’ll need to run the following as ADMIN user.
The first step is to enable auto partitioning on the ADB using the CONFIGURE function. This function can have three parameters:
- IMPLEMENT : generates a report and implements the recommended partitioning method. (Autonomous!)
- REPORT_ONLY : {default} reports recommendations for partitioning on tables
- OFF : Turns off auto partitioning (reporting and implementing)
For example, to enable auto partitioning and to automatically implement the recommended partitioning method.
exec DBMS_AUTO_PARTITION.CONFIGURE('AUTO_PARTITION_MODE', 'IMPLEMENT');The changes can be inspected in the DBA_AUTO_PARTITION_CONFIG view.
SELECT * FROM DBA_AUTO_PARTITION_CONFIG;When you look at the listed from the above select we can see IMPLEMENT is enabled

The next step with using DBMS_AUTO_PARTITION is to tell the ADB what schemas and/or tables to include for auto partitioning. This first example shows how to turn on auto partitioning for a particular schema, and to allow the auto partitioning (engine) to determine what is needed and to just go and implement that it thinks is the best partitioning methods.
exec DBMS_AUTO_PARTITION.CONFIGURE(
   parameter_name => 'AUTO_PARTITION_SCHEMA',
   parameter_value => 'WHISKEY',
   ALLOW => TRUE);
If you query the DBA view again we now get.

We have not enabled a schema (called WHISKEY) to be included as part of the auto partitioning engine.
Auto Partitioning may not do anything for a little while, with some reports suggesting to wait for 15 minutes for the database to pick up any changes and to make suggestions. But there are some conditions for a table needs to meet before it can be considered, this is referred to as being a ‘Candidate’. These conditions include:
- Table passes inclusion and exclusion tests specified by AUTO_PARTITION_SCHEMA and AUTO_PARTITION_TABLE configuration parameters.
- Table exists and has up-to-date statistics.
- Table is at least 64 GB.
- Table has 5 or more queries in the SQL tuning set that scanned the table.
- Table does not contain a LONG data type column.
- Table is not manually partitioned.
- Table is not an external table, an internal/external hybrid table, a temporary table, an index-organized table, or a clustered table.
- Table does not have a domain index or bitmap join index.
- Table is not an advance queuing, materialized view, or flashback archive storage table.
- Table does not have nested tables, or certain other object features.
If you find Auto Partitioning isn’t partitioning your tables (i.e. not a valid Candidate) it could be because the table isn’t meeting the above list of conditions.
This can be verified using the VALIDATE_CANDIDATE_TABLE function.
select DBMS_AUTO_PARTITION.VALIDATE_CANDIDATE_TABLE(
   table_owner => 'WHISKEY',
   table_name => 'DIRECTIONS')
from dual;
If the table has met the above list of conditions, the above query will return ‘VALID’, otherwise one or more of the above conditions have not been met, and the query will return ‘INVALID:’ followed by one or more reasons
Check out my other blog post on using the AUTO_PARTITION to explore it’s recommendations and how to implement.
Postgres on Docker
Prostgres is one of the most popular databases out there, being used in Universities, open source projects and also widely used in the corporate marketplace. I’ve written a previous post on running Oracle Database on Docker. This post is similar, as it will show you the few simple steps to have a persistent Postgres Database running on Docker.
The first step is go to Docker Hub and locate the page for Postgres. You should see something like the following. Click through to the Postgres page.

There are lots and lots of possible Postgres images to download and use. The simplest option is to download the latest image using the following command in a command/terminal window. Make sure Docker is running on your machine before running this command.
docker pull postgresAlthough, if you needed to install a previous release, you can do that.

After the docker image has been downloaded, you can now import into Docker and create a container.
docker run --name postgres -p 5432:5432 -e POSTGRES_USER=postgres -e POSTGRES_PASSWORD=pgPassword -e POSTGRES_DB=postgres -d postgresImportant: I’m using Docker on a Mac. If you are using Windows, the format of the parameter list is slightly different. For example, remove the = symbol after POSTGRES_DB
If you now check with Docker you’ll see Postgres is now running on post 5432.

Next you will need pgAdmin to connect to the Postgres Database and start working with it. You can download and install it, or run another Docker container with pgAdmin running in it.
First, let’s have a look at installing pgAdmin. Download the image and run, accepting the initial requirements. Just let it run and finish installing.


When pgAdmin starts it looks for you to enter a password. This can be anything really, but one that you want to remember. For example, I set mine to pgPassword.
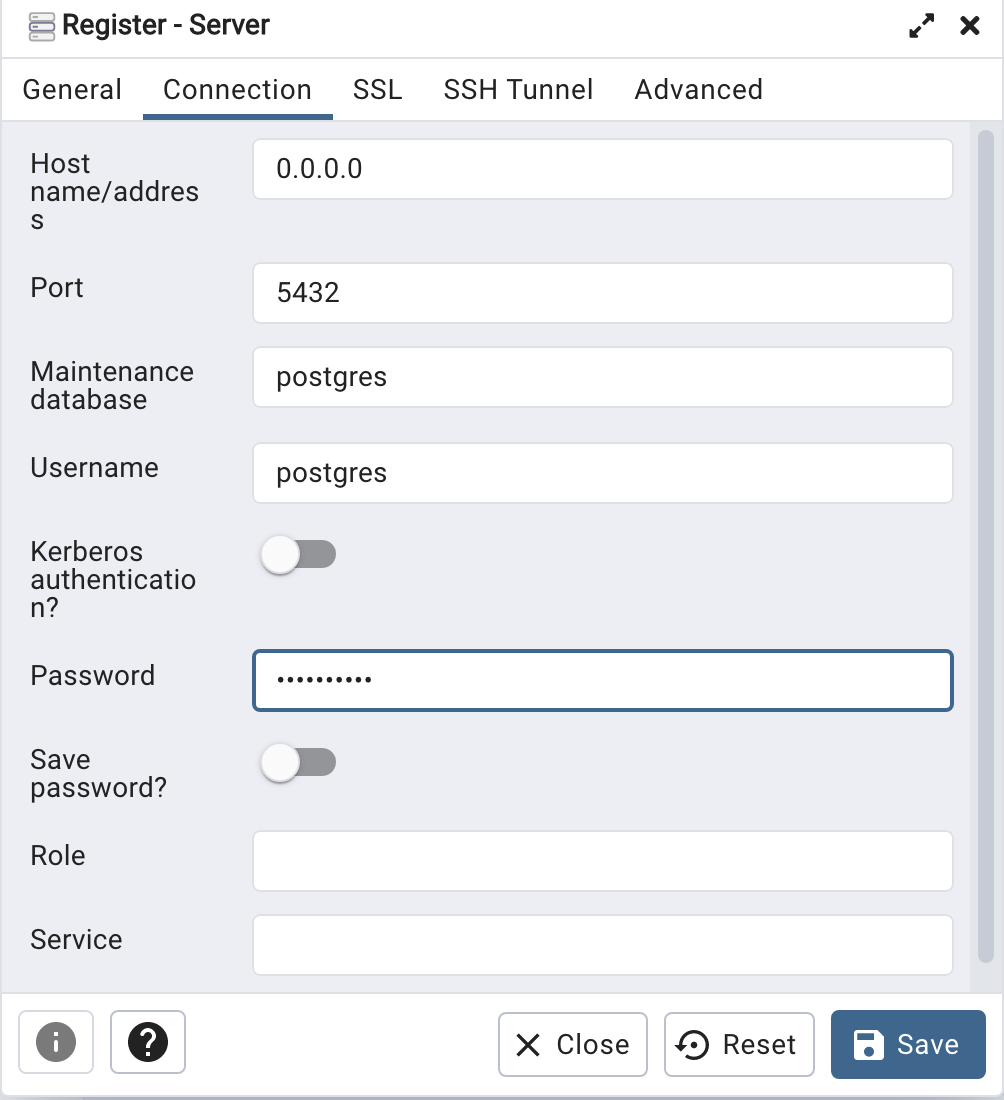
Then create (or Register) a connection to your Postgres Database. Enter the details you used when creating the docker image including username=postgres, password=pgPassword and IP address=0.0.0.0.
The IP address on your machine might be a little different, and to check what it is, run the following
docker ps -a


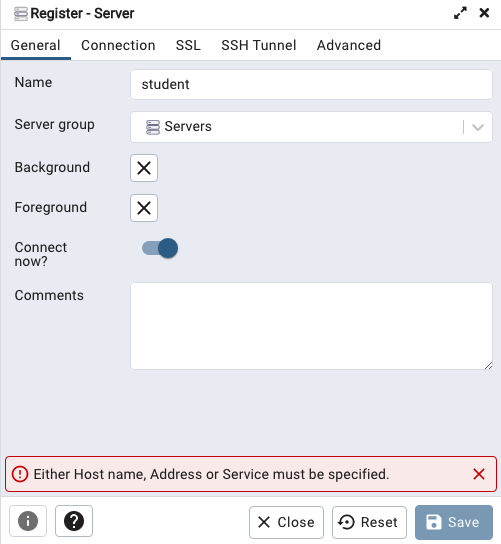
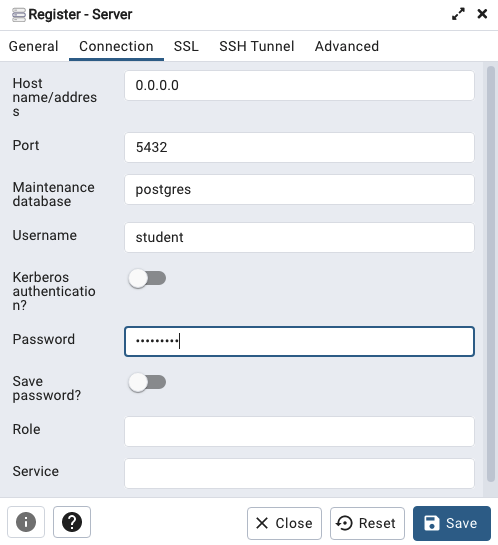
When your (above) connection works, the next step is to create another schema/user in the database. The reason we need to do this is because the user we connected to above (postgres) is an admin user. This user/schema should never be used for database development work.
Let’s setup a user we can use for our development work called ‘student’. To do this, right click on the ‘postgres’ user connection and open the query tool.
Then run the following.

After these two commands have been run successfully we can now create a connection to the postgres database, open the query tool and you’re now all set to write some SQL.

OML4R available on ADB
Oracle Machine Learning for R (OML4R) is available on Oracle Autonomous Database. Finally. After waiting for way, way too long we can now run R code in the Autonomous Database (in the Cloud). It’s based on using Oracle R Distribution 4.0.5 (which is based on R 4.0.5). This product was previously called Oracle R Enterprise, which I was a fan of many few years ago, so much so I wrote a book about it.
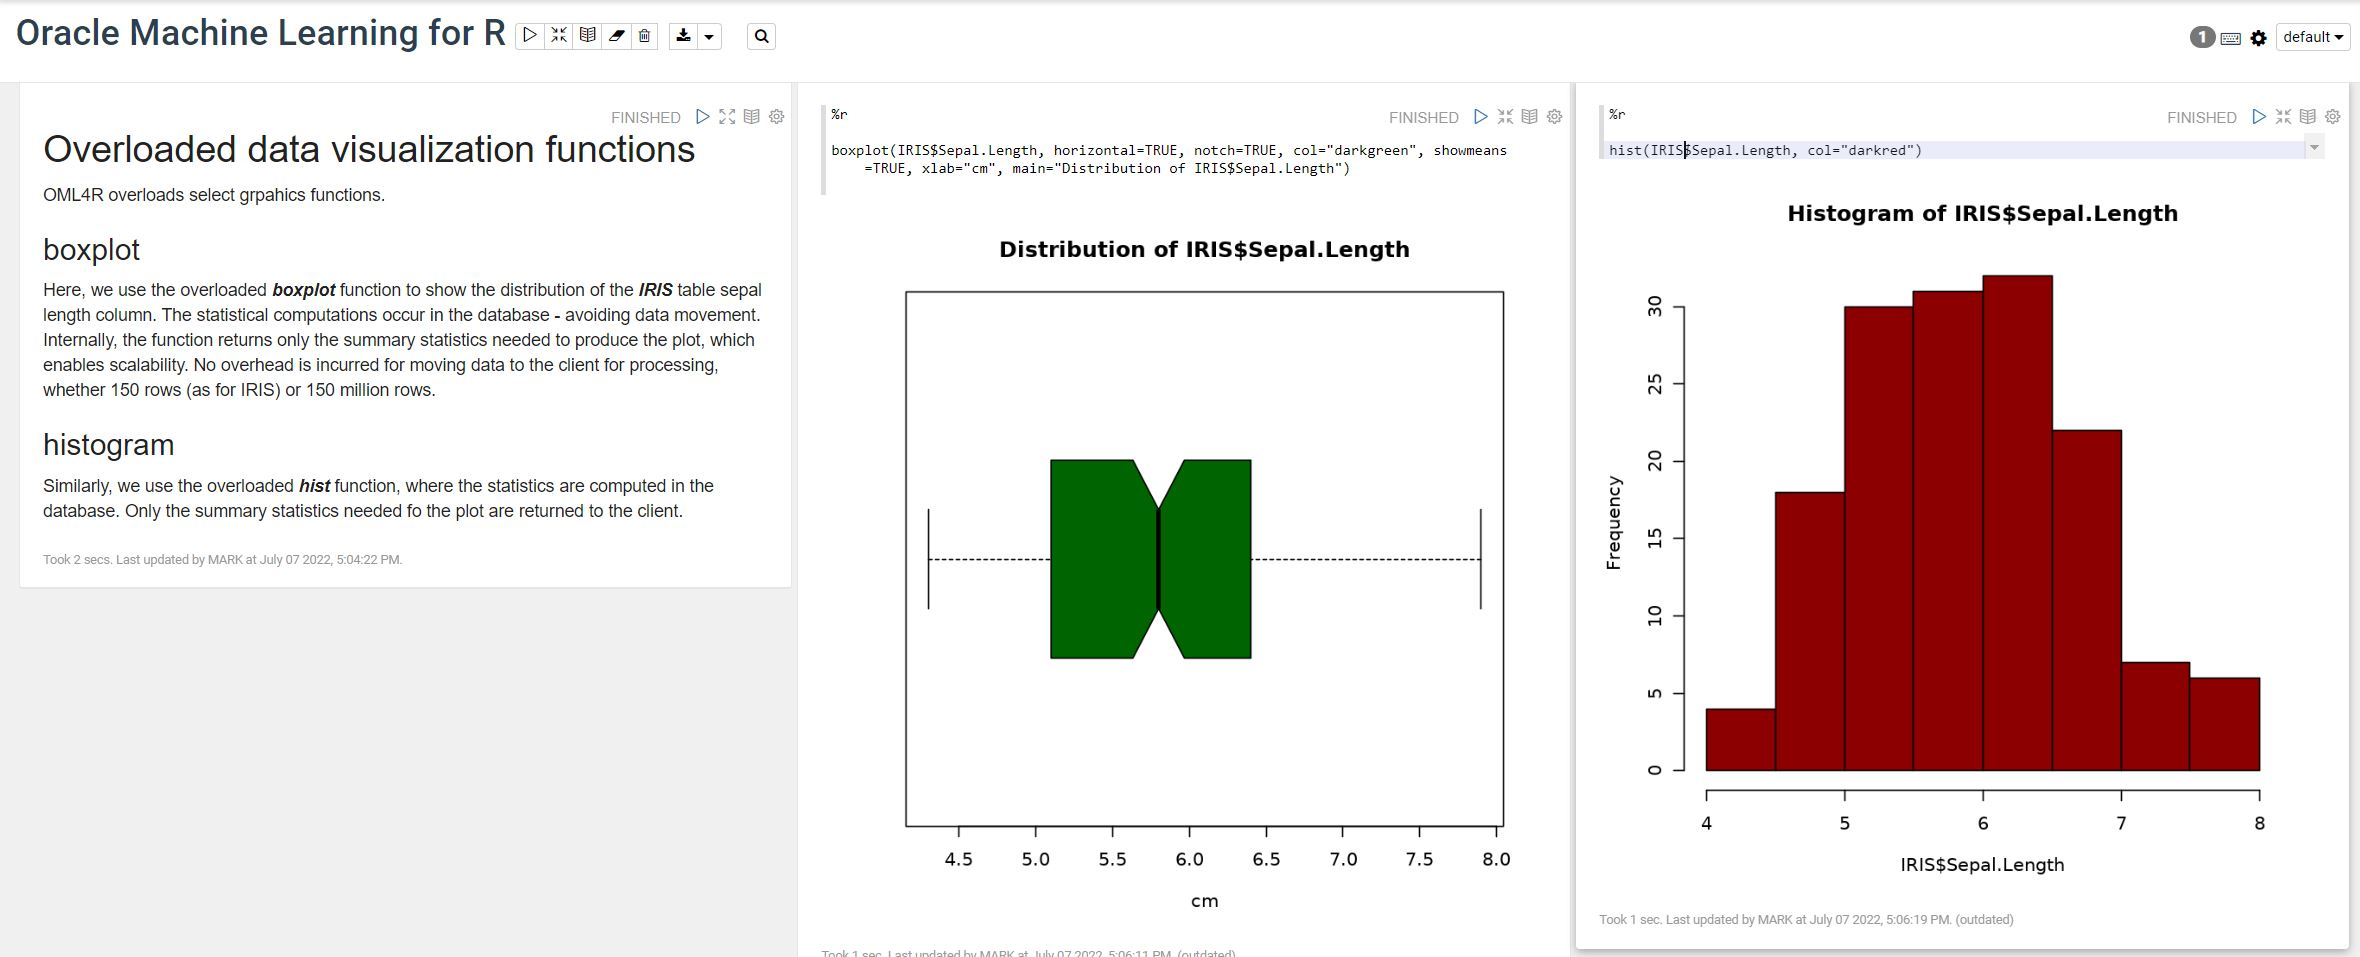
OML4R comes with all (or most) of the benefits of Oracle R Enterprise, whereby you can connect to, in this case an Oracle Autonomous Database (in the Cloud), allowing data scientists work with R code and manipulate data in the database instead of in their local environment. Embed R code in the database and enable other database users (and applications) to call this R code. Although with OML4R on ADB (in the Cloud) does come with some limitations and restrictions, which will put people/customers off from using it.
Waiting for OML4R reminds me of Eurovision Song Contest winning song by Johnny Logan titled,
I’ve been waiting such a long time
Looking out for you
But you’re not here
What’s another year
It has taken Oracle way, way too long to migrate OML4R to ADB. They’ve probably just made it available because one or two customers needed/asked it.
As the lyrics from Johnny Logan says (changing I’ve to We’ve), We’ve been waiting such a long time, most customers have moved to other languages, tools and other cloud data science platforms for their data science work. The market has moved on, many years ago.
Hopefully over the next few months, and with Oracle 23c Database, we might see some innovation, or maybe their data science and AI focus lies elsewhere within Oracle development teams.
Running Oracle Database on Docker on Apple M1 Chip
Click on this link to see the latest way to run Oracle 23ai Database on Docker. The instructions below are a bit obsolete, although they work for M1. To run Oracle 23ai Database on Docker on Apple Scilcon check out the instructions on this link.
This post is for you if you have an Apple M1 laptop and cannot get Oracle Database to run on Docker.
The reason Oracle Database, and lots of other software, doesn’t run on the new Apple Silicon is their new chip uses a different instruction set to what is used by Intel chips. Most of the Database vendors have come out to say they will not be porting their Databases to the M1 chip, as most/all servers out there run on x86 chips, and the cost of porting is just not worth it, as there is zero customers.
Are you using an x86 Chip computer (Windows or Macs with intel chips)? If so, follow these instructions (and ignore this post)
If you have been using Apple for your laptop for some time and have recently upgraded, you are now using the M1 chip, and you have probably found some of your software doesn’t run. In my scenario (and with many other people) you can no longer run an Oracle Database 😦
But there does seem to be a possible solution and this has been highlighted by Tom de Vroomen on his blog. A workaround is to spin up an x86 container using Colima. Tom has given some instructions on his blog, and what I list below is an extended set of instructions to get fully set up and running with Oracle on Docker on M1 chip.
1-Install Homebrew
You might have Homebrew installed, but if not run the following to install.
/bin/bash -c "$(curl -fsSL https://raw.githubusercontent.com/Homebrew/install/HEAD/install.sh)"2-Install colima
You can now install Colima using Homebrew. This might take a minute or two to run.
brew install colima3-Start colima x86 container
With Colima installed, we can now start an x86 container.
colima start --arch x86_64 --memory 4
The container will be based on x86, which is an important part of what we need. The memory is 4GB, but you can probably drop that a little.
The above command should start within a second or two.
4-Install Oracle Database for Docker
The following command will create an Oracle Database docker image using the image created by Gerald Venzi.
docker run -d -p 1521:1521 -e ORACLE_PASSWORD=<your password> -v oracle-volume:/opt/oracle/oradata gvenzl/oracle-xe
23c Database – If you want to use the 23c Database, Check out this post for the command to install
I changed <your password> to SysPassword1.
This will create the docker image and will allow for any changes to the database to be persisted after you shutdown docker. This is what you want to happen.
5-Log-in to Oracle as System
Open the docker client to see if the Oracle Database image is running. If not click on the run button.

When it finishes starting up, open the command line (see icon to the left of the run button), and log in as the SYSTEM user.
sqlplus system/SysPassword1@//localhost/XEPDB1
You are now running Oracle Database on Docker on an M1 chip laptop 🙂
6-Create new user
You shouldn’t use the System user, as that is like using root for everything. You’ll need to create a new user/schema in the database for you to use for your work. Run the following.
create user brendan identified by BTPassword1 default tablespace usersgrant connect, resource to brendan;If these run without any errors you now have your own schema in the Oracle Database on Docker (on M1 chip)
7-Connect using SQL*Plus & SQL Developer
Now let’s connect to the schema using sqlplus.
sqlplus brendan/BTPassword1@//localhost/XEPDB1That should work for you and you can now proceed using the command line tool.
If you refer to use a GUI tool then go install SQL Developer. Jeff Smith has a blog post about installing SQL Developer on M1 chip. Here is the connection screen with all the connection details entered (using the username and password given/used above)

You can now use the command line as well as SQL Developer to connect to your Oracle Database (on docker on M1).
8-Stop Docker and Colima
After you have finished using the Oracle Database on Docker you will want to shut it down until the next time you want to use it. There are two steps to follow. The first is to stop the Docker image. Just go to the Docker Desktop and click on the Stop button. It might take a few seconds for it to shutdown.
The second thing you need to do is to stop Colima.
colima stopThat’s it all done.
9-What you need to run the next time (and every time after that)
For the second and subsequent time you want to use the Oracle Docker image all you need to do is the following
(a) Start Colima
colima start --arch x86_64 --memory 4
(b) Start Oracle on Docker
Open Docker Desktop and click on the Run button [see Docker Desktop image above]
And to stop everything
(a) Stop the Oracle Database on Docker Desktop
(b) Stop Colima by running ‘colima stop’ in a terminal
Oracle Database In-Memory – simple example
In a previous post, I showed how to enable and increase the memory allocation for use by Oracle In-Memory. That example was based on using the Pre-built VM supplied by Oracle.
To use In-Memory on your objects, you have a few options.
Enabling the In-Memory attribute on the EXAMPLE tablespace by specifying the INMEMORY attribute
SQL> ALTER TABLESPACE example INMEMORY;Enabling the In-Memory attribute on the sales table but excluding the “prod_id” column
SQL> ALTER TABLE sales INMEMORY NO INMEMORY(prod_id);Disabling the In-Memory attribute on one partition of the sales table by specifying the NO INMEMORY clause
SQL> ALTER TABLE sales MODIFY PARTITION SALES_Q1_1998 NO INMEMORY;Enabling the In-Memory attribute on the customers table with a priority level of critical
SQL> ALTER TABLE customers INMEMORY PRIORITY CRITICAL;You can also specify the priority level, which helps to prioritise the order the objects are loaded into memory.

A simple example to illustrate the effect of using In-Memory versus not.
Create a table with, say, 11K records. It doesn’t really matter what columns and data are.
Now select all the records and display the explain plan
select count(*) from test_inmemory;
Now, move the table to In-Memory and rerun your query.
alter table test_inmemory inmemory PRIORITY critical;
select count(*) from test_inmemory;  -- again
There you go!
We can check to see what object are In-Memory by
SELECT table_name, inmemory, inmemory_priority, inmemory_distribute,
       inmemory_compression, inmemory_duplicate
FROM user_tables
WHERE inmemory = 'ENABLED’
ORDER BY table_name;
To remove the object from In-Memory
SQL > alter table test_inmemory no inmemory; -- remove the table from in-memory
This is just a simple test and lots of other things can be done to improve performance
But, you do need to be careful about using In-Memory. It does have some limitations and scenarios where it doesn’t work so well. So care is needed
CAO Points 2022 – Grade inflation, deflation or in-line
Last week I wrote a blog post analysing the Leaving Cert results over the past 3-8 years. Part of that post also looked at the claim from the Dept of Education saying the results in 2022 would be “in-line on aggregate” with the results from 2021. The outcome of the analysis was grade deflation was very evident in many subjects, but when analysed and profiled at a very high level, they did look similar.
I didn’t go into how that might impact on the CAO (Central Applications Office) Points. If there was deflation in some of the core and most popular subjects, then you might conclude there could be some changes in the profile of CAO Points being awarded, and that in turn would have a small change on the CAO Points needed for a lot of University courses. But not all of them, as we saw last week, the increased number of students who get grades in the H4-H7 range. This could mean a small decrease in points for courses in the 520+ range, and a small increase in points needed in the 300-500-ish range.
The CAO have published the number of students of each 10 point range. I’ve compared the 2022 data, with each year going back to 2015. The following table is a high level summary of the results in 50 point ranges.
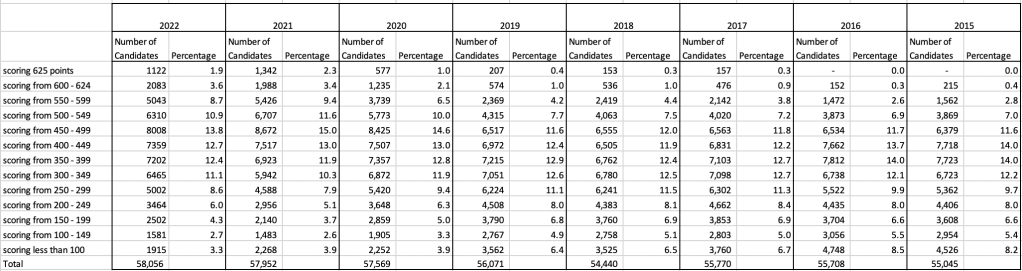
An initial look at these numbers and percentages might look like points are similar to last year and even 2020. But for 2015-2019 the similarity is closer. Again looking back at the previous blog post, we can see the results profiles for 20215-2019 are broadly similar and does indicate some normalisation might have been happening each year. The following chart illustrate the percentage of students who achieved points in each range.
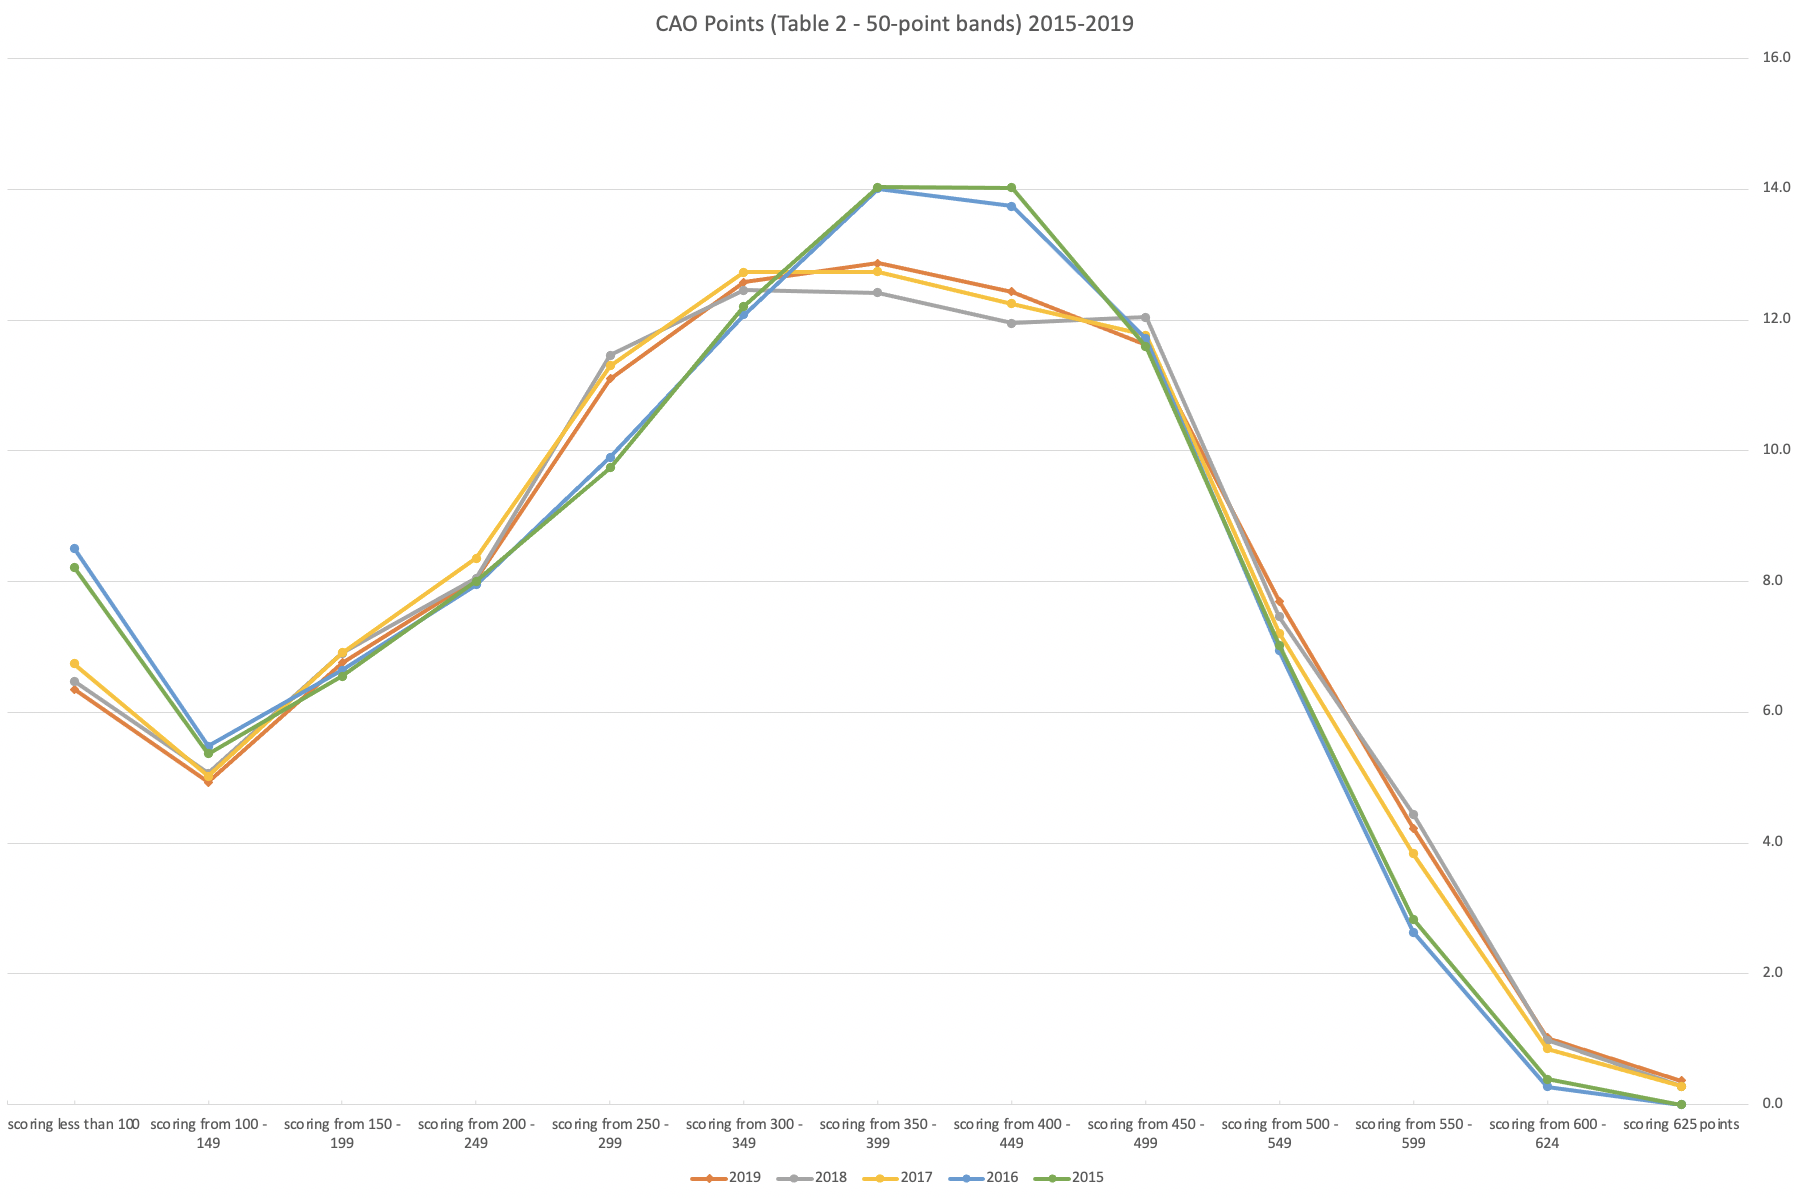
From the above we can see the profile is similar across 2015-2019, although there does seem to be a flattening of the curve between 2015-2016!
Let’s now have a look at 2019 (the last pre-coivd year), 2021 and 2022. This will allow use to compare the “inflated” years to the last “normal” year.
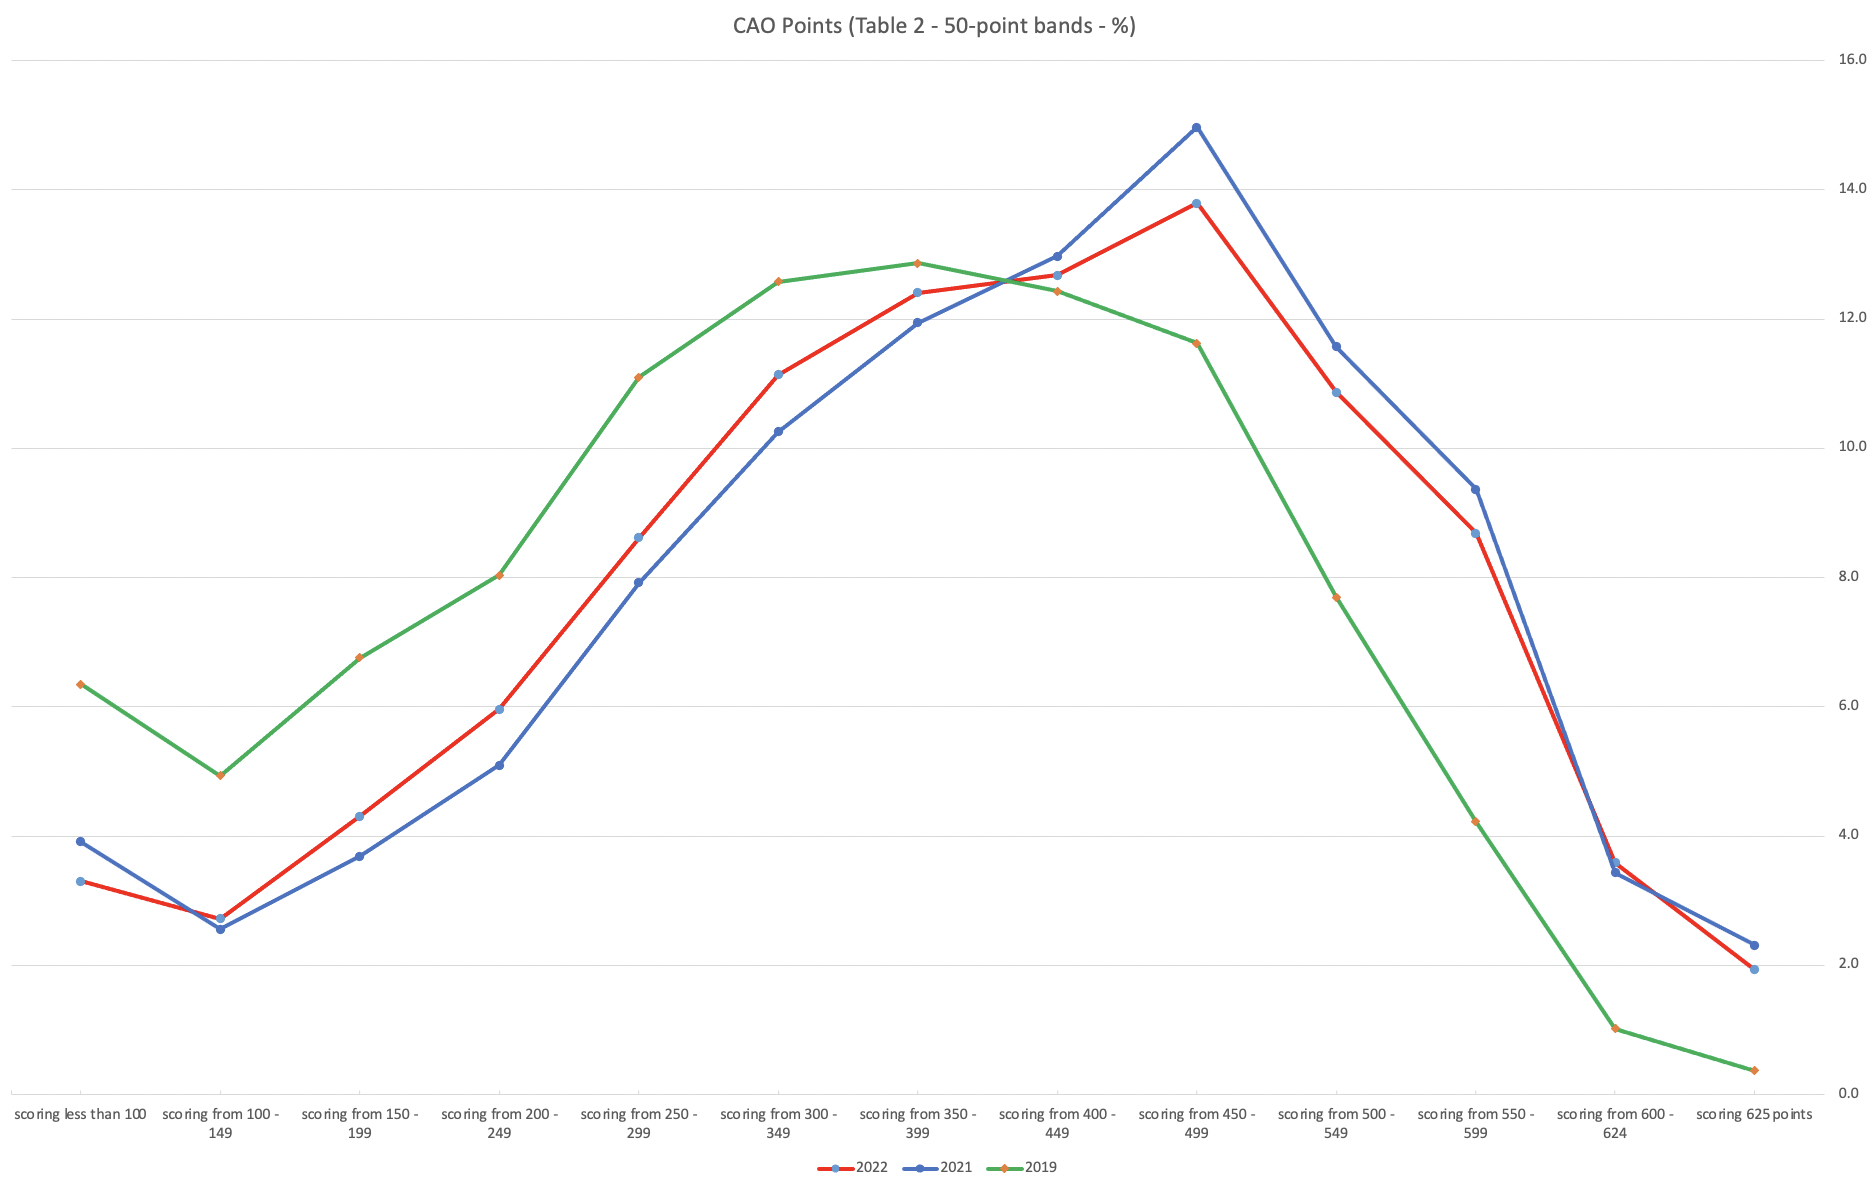
This chart clearly shows a shifting of the profile to the left for the red line which represents 2022. This also supports my blog post last week, and that the Dept of Education has started the process of deflating marks.
Based on this shifting/deflating of marks, we could see the grade/CAO Points profiles reverting back to almost 2019 profile by 2025. For students sitting the Leaving Cert in 2023, there will be another shift to the left, and with another similar shift in 2024. In 2024, the students will be the last group to sit the Leaving Cert who were badly affected during the Covid years. Many of them lost large chunks on school and many didn’t sit the Junior Cert. I’d predict 2025 will see the first time the marks/points profiles will match pre-covid years.
For this analysis I’ve used a variety of tools including Excel, Python and Oracle Analytics.
The Dataset used can be found under Dataset menu, and listed as ‘CAO Points Profiles 2015-2022’. Also, check out the Leaving Certificate 2015-2022 dataset.
Leaving Cert 2022 Results – Inflation, deflation or in-line!
The Leaving Certificate 2022 results are out. Up and down the country there are people who are delighted with their results, while others are disappointed, and lots of other emotions.
The Leaving Certificate is the terminal examination for secondary education in Ireland, with most students being examined in seven subjects, with their best six grades counting towards their “points”, which in turn determines what university course they might get. Check out this link for learn more about the Leaving Certificate.
The Dept of Education has been saying, for several months, this results this year (2022) will be “in-line on aggregate” with the results from 2021. There has been some concerns about grade inflation in 2021 and the impact it will have on the students in 2022 and future years. At some point the Dept of Education needs to address this grade inflation and look to revert back to the normal profile of grades pre-Covid.
Let’s have a look to see if this is true, and if it is true when we look a little deeper. Do the aggregate results hide grade deflation in some subjects.
For the analysis presented in this blog post, I’ve just looked at results at Higher Level across all subjects, and for the deeper dive I’ll look at some of the most popular subjects.
Firstly let’s have a quick look at the distribution of grades by subject for 2022 and 2021.
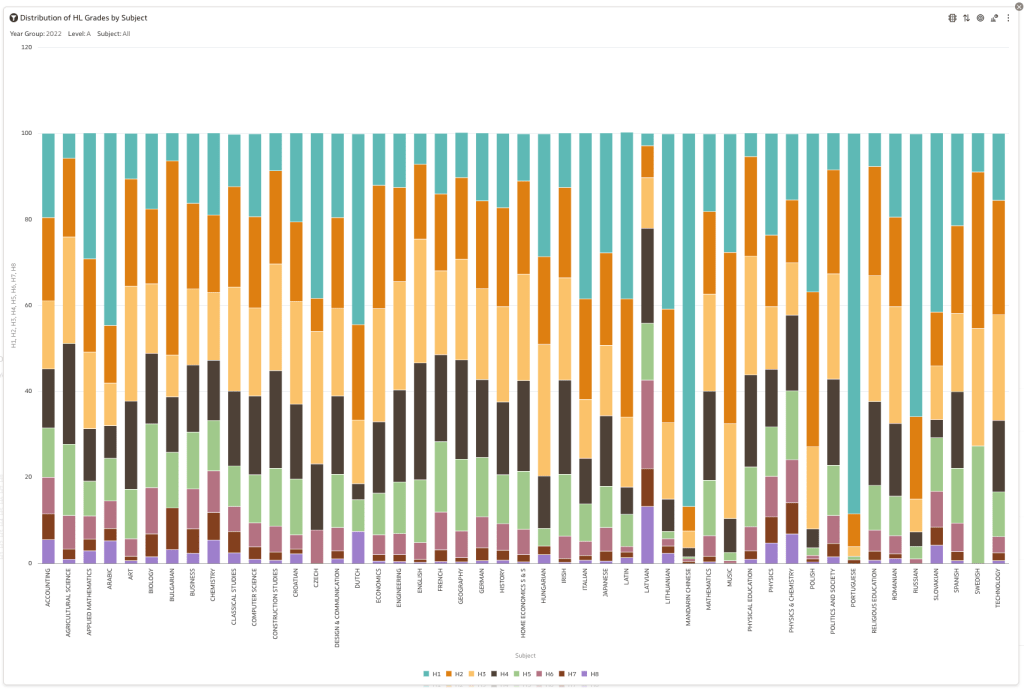
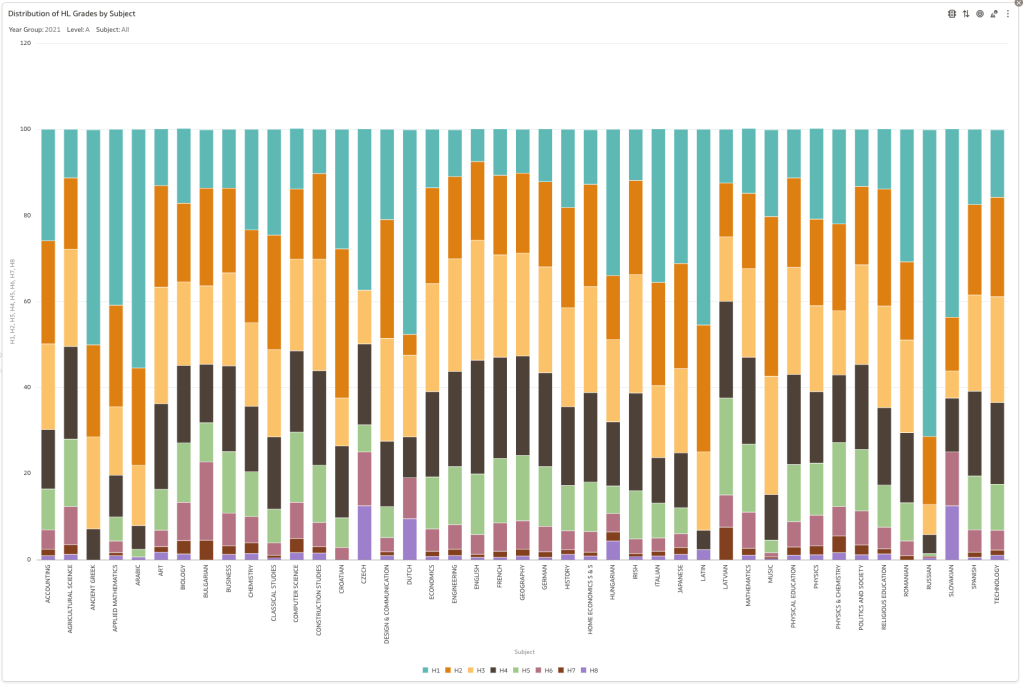
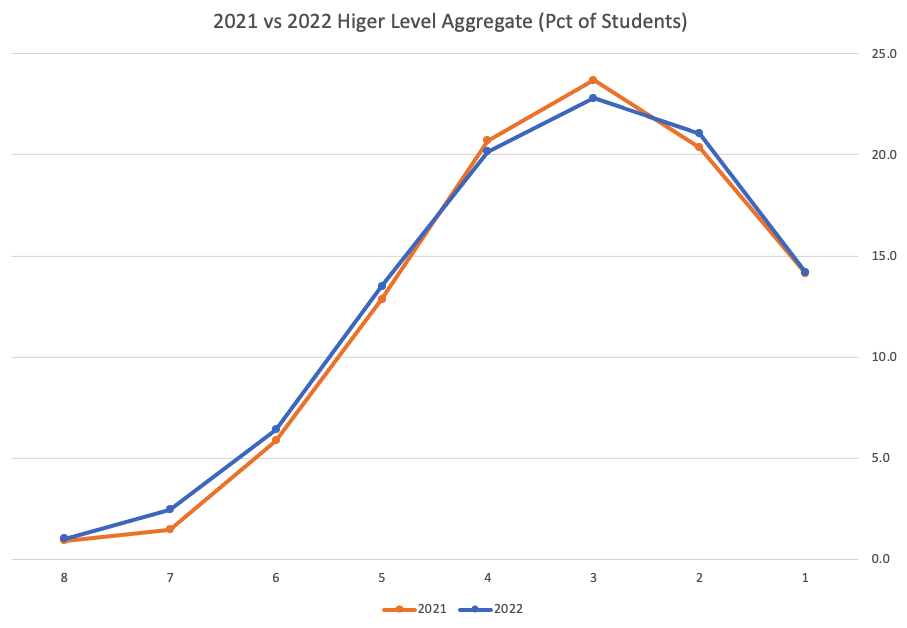
Remember the Dept of Education said the 2022 results should be in-line with the results of 2021. This required them to apply some adjustments, after marking the exam scripts, to give an updated profile. The following chart shows this comparison between the two years. On initial inspection we can see it is broadly similar. This is good, right? It kind of is and at a high level things look broadly in-line and maybe we can believe the Dept of Education. Looking a little closer we can see a small decrease in the H2-H4 range, and a slight increase in the H5-H8.
Let’s dive a little deeper. When we look at the grade profile of students in 2021 and 2022, How many subjects increased the number of students at each grade vs How many subjects decreased grades vs How many approximately stated the same. The table below shows the results and only counts a change if it is greater than 1% (to allow for minor variations between years).

This table in very interesting in that more subjects decreased their H1s, with some variation for the H2-H4s, while for the lower range of H5-H7 we can see there has been an increase in grades. If I increased the margin to 3% we get a slightly different results, but only minor changes.
“in-line on aggregate” might be holding true, although it appears a slight increase on the numbers getting the lower grades. This might indicate either more of an adjustment to weaker students and/or a bit of a down shifting of grades from the H2-H4 range. But at the higher end, more subjects reduced than increase. The overall (aggregate) numbers are potentially masking movements in grade profiles.
Let’s now have a look at some of the core subjects of English, Irish and Mathematics.
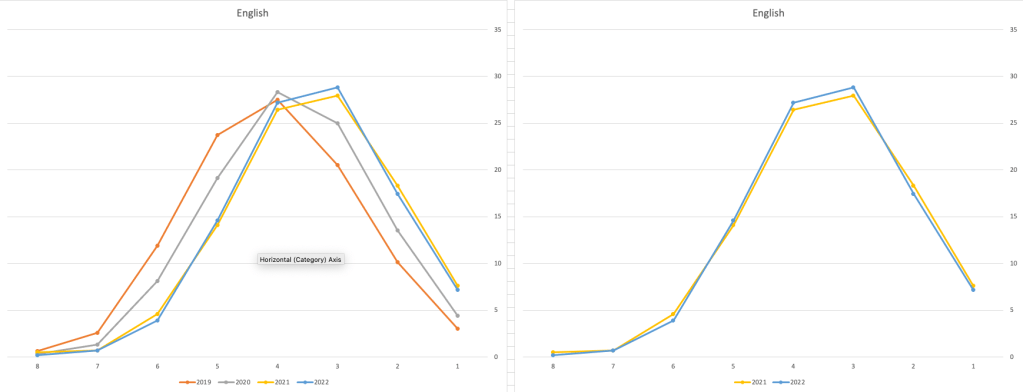
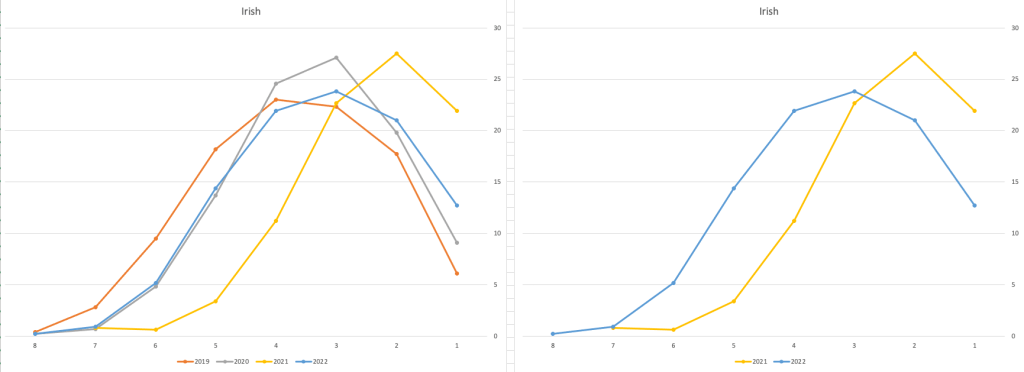
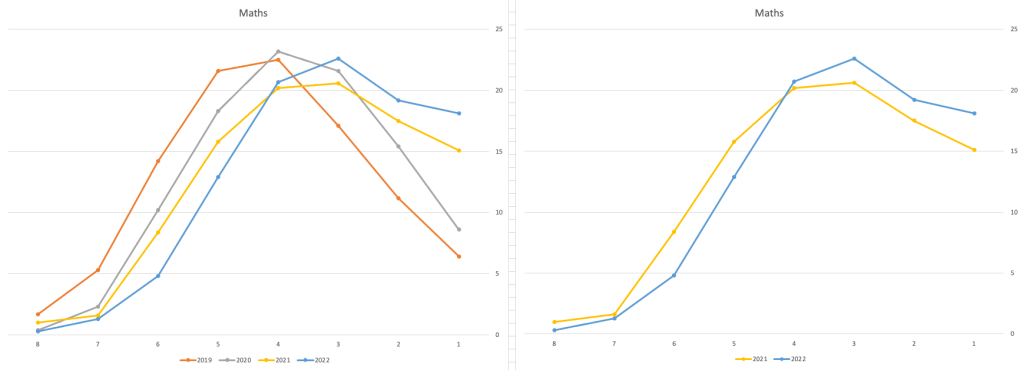
For English, it looks like they fitted to the curve perfectly! keeping grades in-line between the two years. Mathematics is a little different with a slight increase in grades. But when you look at Irish we can see there was definite grade deflation. For each of these subjects, the chart on the left contains four years of data including 2019 when the last “normal” leaving certificate occurred. With Irish the grade profile has been adjusted (deflated) significantly and is closer to 2019 profile than it is to 2021. There was been lots and lots of discussions nationally about how and when grades will revert to normal profile. The 2022 profile for Irish seems to show this has started to happen in this subject, which raises the question if this is occurring in any other subjects, and is hidden/masked by the “in-line on aggregate” figures.
This blog post would become just too long if I was to present the results profile for each of the 42+ subjects.
Let’s have a look as two of the most common foreign languages, French and Spanish.
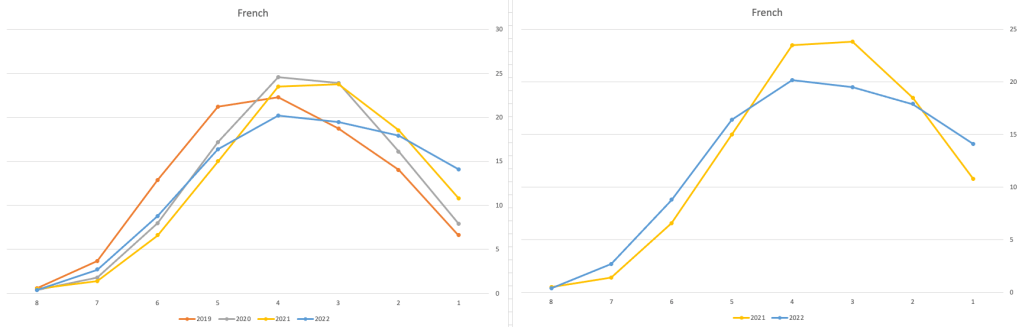
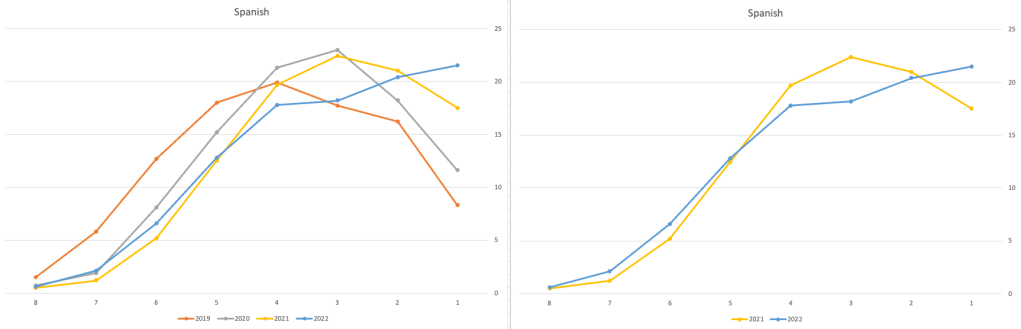
Again we can see some grade deflation, although not to be same extent as Irish. For both French and Spanish, we have reduced numbers for the H2-H4 range and a slight increase for H5-H7, and shift to the left in the profile. A slight exception is for those getting a H1 for both subjects. The adjustment in the results profile is more pronounced for French, and could indicate some deflation adjustments.
Next we’ll look at some of the science subjects of Physics, Chemistry and Biology.
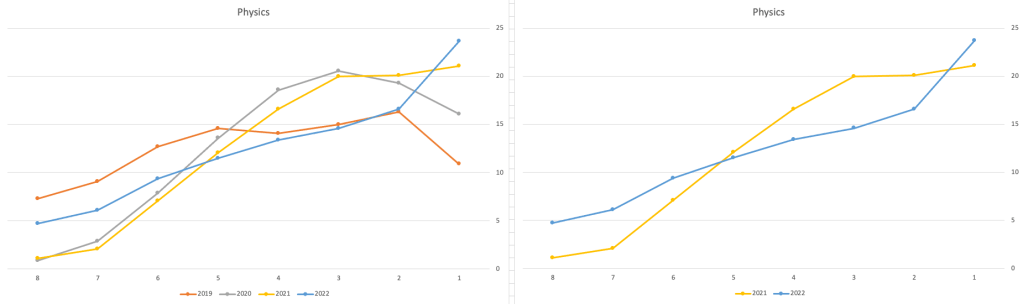
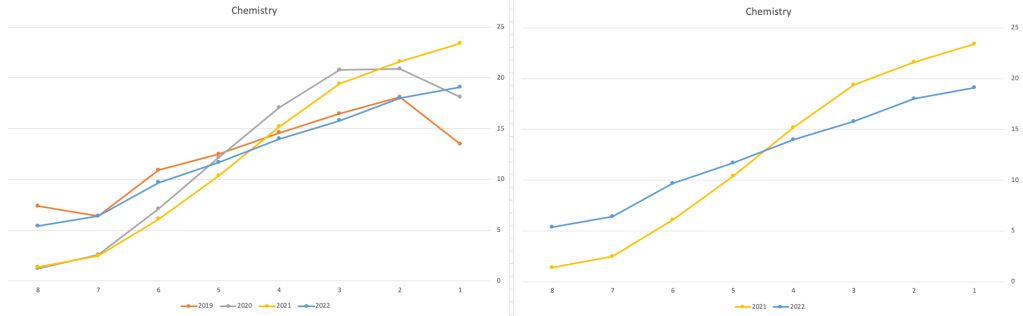
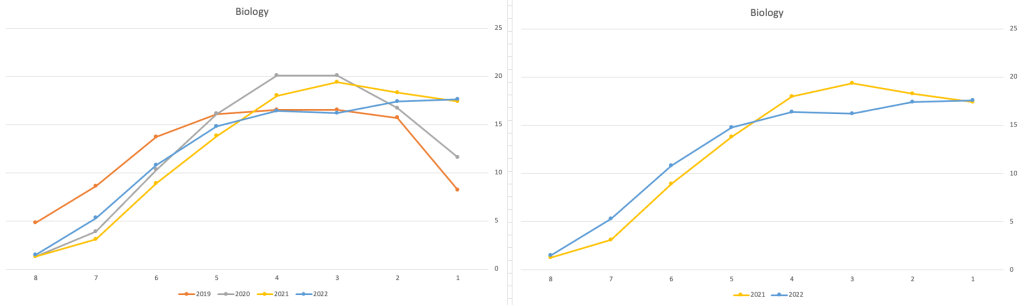
These three subjects also indicate some adjusts back towards the pre-Covid profile, with exception of H1 grades. We can see the 2022 profile almost reflect the 2019 profile (excluding H1s) and for Biology appears to be at a half way point between 2019 and 2022 (excluding H1s)
Just one more example of grade deflation, and this with Design, Communication and Graphics (or DCG)
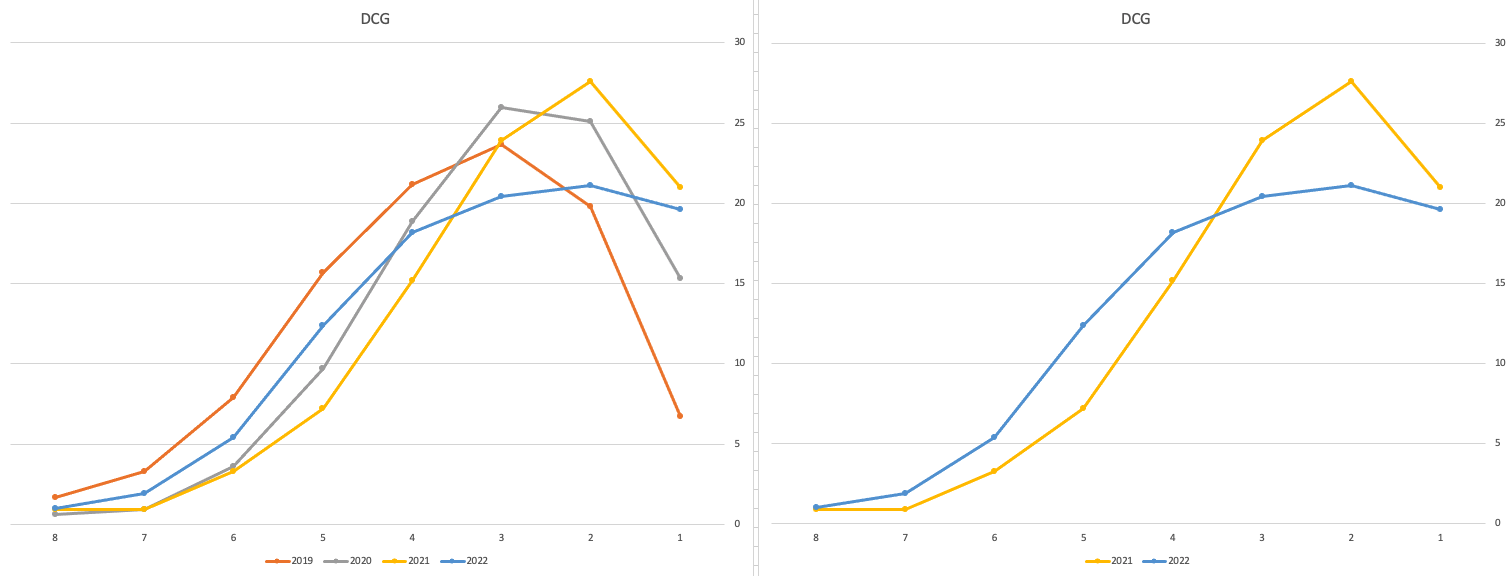
Yes there is obvious grade deflation and almost back to 2019 profile, with the exception of H1s again.
I’ve mentioned some possible grade deflation in various subjects, but there are also subjects where the profile very closely matches the 2021 profile. We have seen above English is one of those. Others include Technology, Art and Computer Science.
I’ve analyzed many more subjects and similar shifting of the profile is evident in those. Has the Dept of Education and State Examinations Commission taken steps to start deflating grades from the highs of 2021? I’d said the answer lies in the data, and the data I’ve looked at shows they have started the deflation process. This might take another couple of years to work out of the system and we will be back to “normal” pre-covid profiles. Which raises another interesting question, Was the grade profile for subjects, pre-covid, fitted to the curve? For the core set of subjects and for many of the more popular subjects, the data seems to indicate this. Maybe the “normal” distribution of marks is down to the “normal” distribution of abilities of the student population each year, or have grades been normalised in some way each year, for years, even decades?
For this analysis I’ve used a variety of tools including Excel, Python and Oracle Analytics.
The Dataset used can be found under Dataset menu, and listed as ‘Leaving Certificate 2015-2022’. An additional Dataset, I’ll be adding soon, will be for CAO Points Profiles 2015-2022.

You must be logged in to post a comment.